In this post we are going to see How to establish docker network between containers,
How to Link Docker Containers,
How to Access one Container from Another,
Docker inter-container communication,
How to Connect to Container, etc.
This post is to answer all that.
So How do we connect a Container from Another Container? How to create communication network between docker containers?
In this post, we are going to see multiple methods on How to Connect two or multiple containers and enable inter container connectivity
Three methods to Create Docker network between containers
These are the methods we are going to be discussing in detail with examples in this post
- Docker Link - Linking One more Docker Containers
- Docker Compose - Using Docker Compose create an Auto Created Shared Network
- Docker Network - Create a Network and Connect the Containers to that network
Pre Requisites:
- Docker CE and Docker CLI installed
- Internet Connectivity
- Basic Knowledge on What is Container, What is Dockerfile and How to Create Container
- Basic Knowledge on Apache HTTPD web server and Tomcat (Optional)
The Requirement / The Objective:
In order to demonstrate the various methods to connect docker containers, I need some easily relatable objective.
Consider the following Design of infrastructure with three different technologies running in the container comes together to make an enterprise like web application.
- HA Proxy - Edge Level Load Balancer and Reverse Proxy like F5 Big IP
- Node JS - Java Script based Application Server Framework where the App is hosted
- Redis DB - A Small Key-Value Database to store data
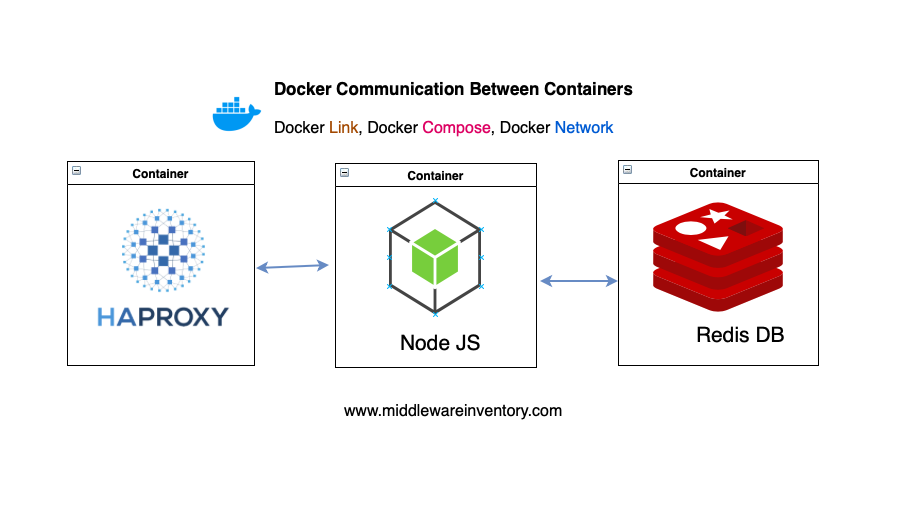
Note*: Though we have different methods to achieve the same docker container intercommunication or connectivity between containers. All these methods do the same thing at the backend which is creating a shared bridged network and attaching these containers to them.
Once the containers are connected on the same network they can communicate to the other container docked to the same network freely by just knowing the name of the other container.
Environment Setup
we are going to use three technologies in this post and we are going to create our own Docker images by writing Dockerfile and we also need to write some configuration files for HAProxy and Javascript program files for NodeJS containers.
Refer to the following Directory Structure tree with all necessary files we need for this post.
You can simply download the resources required for this post as a ZIP file or clone my Github Repository
➜ tree haproxy-nodejs-redis
haproxy-nodejs-redis ## Root Directory
├── docker-compose
│   └── docker-compose.yml
├── haproxy
│   ├── Dockerfile
│   └── haproxy.cfg
└── nodejs
    ├── Dockerfile
    ├── index.js
    └── package.json

3 directories, 6 files
I presume that you have downloaded these files in the same directory structure. [ It would be helpful to follow along]
Let's move on.
Create Docker Images Locally
The first step to create a container is to have the image ready. In our case, we are going to build our images using the Dockerfile
Now let us go and create the Docker Images.
I request you to name these images as same as I do so that you can follow along without getting lost in the middle.
Now go to the root directory of our Directory structure in your terminal [ terminal or iterm2 for mac & Git Bash for Windows ]
What is Root Directory
If you have downloaded the Directory as zip file the root directory name would be haproxy-nodejs-redis-master If you have gone with Git clone your root directory name would be haproxy-nodejs-redis
You can refer the tree diagram given in the Environment setup section if you still have a question.
Here are the commands that you need to execute in the same order as it is given.
cd haproxy-nodejs-redis
cd haproxy
docker build -t my-haproxy .
cd ../nodejs
docker build -t my-nodejs .
For better understanding, I have copied the results along with the commands as it was executed in my terminal.
➜  /tmp cd haproxy-nodejs-redis

➜  haproxy-nodejs-redis git:(master) cd haproxy

➜  haproxy git:(master) docker build -t my-haproxy .
Sending build context to Docker daemon  3.584kB
Step 1/2 : FROM haproxy
 ---> 914693575d71
Step 2/2 : COPY haproxy.cfg /usr/local/etc/haproxy/haproxy.cfg
 ---> bcefbfb501fe
Successfully built bcefbfb501fe
Successfully tagged my-haproxy:latest

➜  haproxy git:(master) cd ../nodejs

➜  nodejs git:(master) docker build -t my-nodejs .
Sending build context to Docker daemon  4.608kB
Step 1/6 : FROM node:alpine
 ---> 5206c0dd451a
Step 2/6 : WORKDIR "/app"
 ---> Using cache
 ---> 7850f098dfd7
Step 3/6 : COPY package.json .
 ---> Using cache
 ---> 724a794795e2
Step 4/6 : RUN npm install
 ---> Using cache
 ---> e75ab380acda
Step 5/6 : COPY . .
 ---> 1842d18166f2
Step 6/6 : CMD ["npm", "start"]
 ---> Running in fb2d11819180
Removing intermediate container fb2d11819180
 ---> 7ba992104be2
Successfully built 7ba992104be2
Successfully tagged my-nodejs:latest
Now we have Successfully created images named my-haproxy and my-nodejs.
Now, these images are created and stored in your local. You can verify the same using docker images command
If you have noticed, we have not created an image for Redis, The reason is that the default redis image is sufficient for us.
Now our Images are ready and they can be containerized anytime. But before creating it as container we need to set somethings clear.
What are we building? what should be the outcome?
The Visitor Tracking NodeJS Application.
In the root directory, If you go into the nodejs directory you can find a Javascript file named index.js If you take a look you can understand it tries to connect to the Redis server and update the value for the key named visit
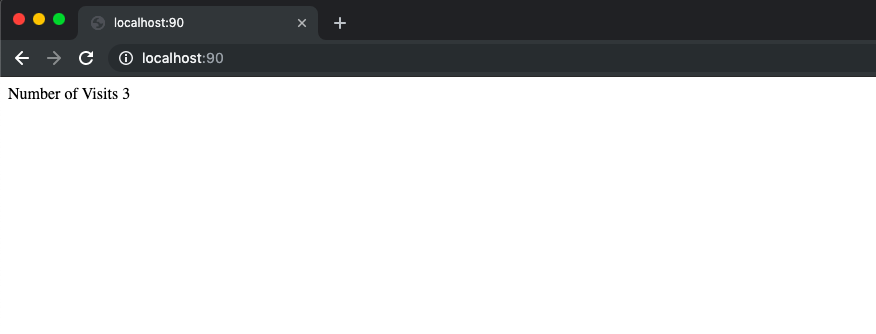
So the Application that we have taken for this post is designed to track the number of visits made to the NodeJS website.
The Data [ number of visits] is saved and retrieved from the Redis database running on the container named redisnode01
Here is our final expected web page. the Visits count would increase as you refresh the page.
I hope everything is clear till here.
Now we are going to create three containers and establish a network between them using different methods and validate the communication.
Besides that, we are also going to create an enterprise like NODEJS application which tracks the number of visits and stores the visitor information in REDIS DB.
Method1: Docker Link Containers
Docker Link container is a legacy method to connect containers together by linking the containers we form a Shared network to enable communication channel so that the containers can talk within themselves and transmit packets on bidirectional channels.
If everything is done right. These three commands would complete and finish our requirement.
# Start the Redis Container
➜  docker container run -it -d --name redisnode01 redis
75126420ab18faaf3bd68e18fb7f6201c29a91c8b96f56e3673e8b81388d5146

# Start the NodeJS Container and link it with Redis Container
➜  docker container run -it -d --name nodejsserver01 – link redisnode01 my-nodejs
3eb4a3bf3e70686259d4e66e607144dc9145f464c599333b36c2f3628634c112

# Start the Haproxy Container and link it with NodeJS Container
➜  docker container run -it -d --name haproxyserver – publish 90:80 – link nodejsserver01 my-haproxy
567c7d3aceb3b900194fd62e157a1bab6b8798aa208f9bd1911c0833ec39c03c
On your host machine where you are executing these Docker CLI commands. you can access the webpage in the following URLhttp://localhost:90/
The commands are already self-explanatory. If you are still having a question, just look at the --name and --link flags of each command.
Let's decrypt what commands are given below
- We have Started the Redis container in the name
redisnode01 - Started the nodejs container in the name
nodejsserver01and linked it withredisnode01container which I created in the previous step - Have also started the haproxy container in the name
haproxyserverand linked it withnodejsserver01container which I created in the previous step
Like a Chain reaction? Is not it.
Clear up your workspace before Switching methods
Before proceeding to the next method, you must stop the containers you have created in the previous method and also you need to remove them to save space and to reclaim the name.
To see what Containers are running/stopped
docker ps -a
Stop the containers
docker stop <container id> [or] <container name>
To Remove the container and reclaim the Name and Space
docker stop <container id> [or] <container name>
Method 2: Docker Network Connect Containers ( Recommended )
This is a recommended and widely accepted method to connect two containers together, this exactly does the same thing as Docker Link which is connecting the containers to the same network.
While Docker Link is doing the task in an abstracted manner Docker Network is doing the same in a Sophisticated manner.
let us do our objective of creating the NodeJS Visitor management Application using this method.
These are the commands that I had to execute to bring the environment up. If you notice the text in the green color you can understand that I have created a network and using the same network all the way down with my containers.
Note*: There is an order to start the containers as they are integrated and have dependencies. so execute the commands in the same order.
# Create a Network
➜ docker network create internal-container-network
ac3f833da3297899d5ef461da39420b39bbe4ca988f481b785d7577c129b1277

# Start the Redis Container and Attach to the Created Network
➜ docker container run -it -d – name redisnode01 --network internal-container-network redis
a915154432d17e02965d7af4aa9277fedea34e5502dab428d05a90c529372411

# Start the NodeJS Container and Attach to the Created Network
➜ docker container run -it -d – name nodejsserver01 --network internal-container-network my-nodejs
4b6159c8e5fc6842ca267d78579316b7a836734004e68ae01da68588bfa3b883

# Start the HaProxy Container and Attach to the Created Network
➜ docker container run -it -d – name haproxyserver – publish 90:80 --network internal-container-network my-haproxy
2486a7589706904392d167148d2585e9268edf398f7dff6a47c5ddf7da9bdd3d
Should I remember you to clear your workspace and stop the remove the containers before going to the next method?
Method 3: Docker Compose Link Containers
Docker-compose is the most predominant method out of these three and a programmatic approach used in enterprises to start an enterprise application like what we are developing
As I said this is a programmatic approach. we are going to use the docker-compose.yml manifest file which was already downloaded as part of the Environment setup step
Go into the docker-compose directory beneath the root directory. You will find the docker-compose.yml which has everything already pre-written.
All you have do is execute the following command
docker-compose up
docker-compose creates a network and connect all the containers together in the same network and make sure they are communicating with each other with no issues.
Here is the snapshot of me executing the same command and the result.
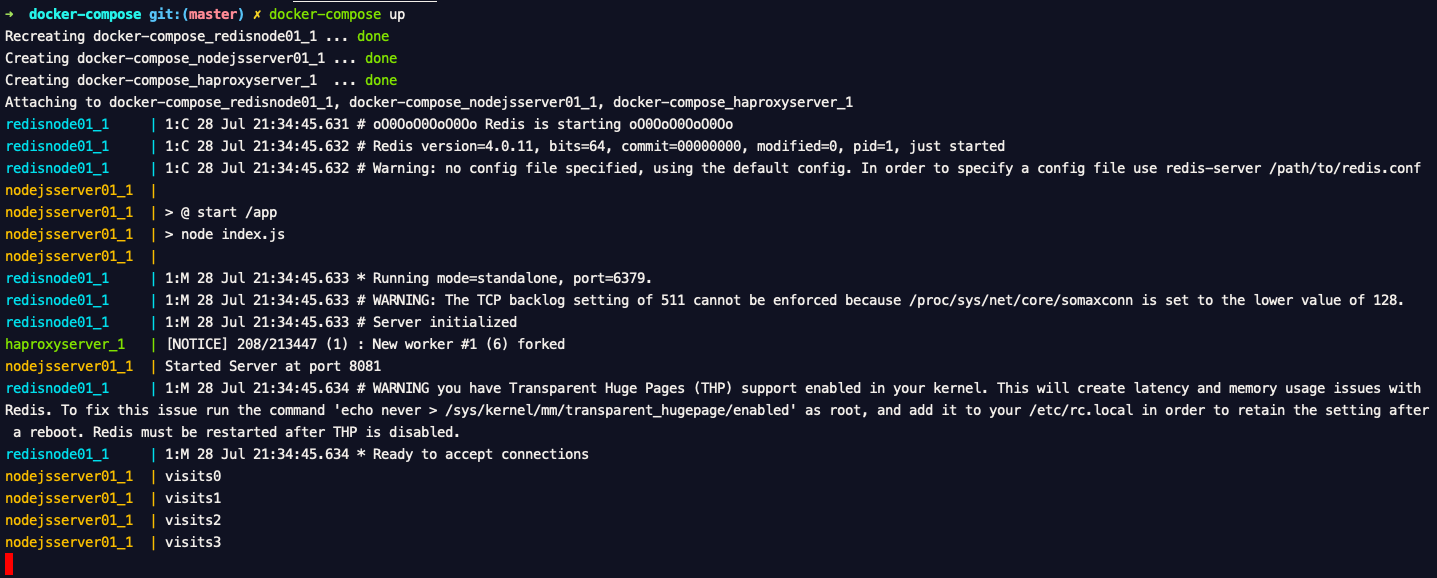
Besides that, Docker compose can help you set up a reliable environment that can auto start the containers in case of failure.
To stop the infrastructure you have brought up with docker-compose all you need to is executing the following command
docker-compose down
Do you have any questions? feel free to ask
If you have questions or need some support or find any bug in here. Please do let me know over the comments.
Hope it Helps. Rate this article [ratings]
Cheers,
Sarav AK

Follow me on Linkedin My Profile Follow DevopsJunction onFacebook orTwitter For more practical videos and tutorials. Subscribe to our channel
Signup for Exclusive "Subscriber-only" Content