We all at some point wanted to know who is accessing our web page.
Our Source of information is the access log file. Sometimes we do not get what we expect to.
In case if we want to know the exact client's IP. Sometimes All you get is some network/firewall endpoint IP address which is none of your concern.
So how to get your exact client IP address in your web server log file.
Before discussing that part. We have to set a stage first, an infrastructure setup which we could relate and understand. The objective of this post will only be met if we are on the same page.
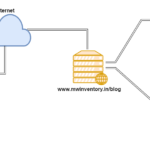
Let's consider a scenario like this.
- A user named "Tony Stark" { I like him :)} is launching the URL www.mwinventory.in from his home in his favorite browser.
- After all the DNS resolution story, It gets the IP of the domain name mwinventory.in as 166.62.30.153
- This must be a Public IP address, Generally denoted or pointing to some internal virtual IP of the company mwinventory VIP [Virtual IP is an IP created/used in Load Balancer (Bigip, F5, Squid) to receive the global request before applying any load balancing (or) IP spraying (or) internal re-routing strategies.]
- These VIPs will forward the requests to the actual web server IP address (or) to a group of web server organized and denoted in the name of pool
- When the HTTP request reaches the Load balancer, it continues the journey through the load balancing rules and find its way to the web server using server_pool or an Irule [Rules, written for routing, A kind of algorithm]
- After reaching the web server based on the technology this site is using it will either go to the application server (or) will be processed at the web server itself. i.e LAMP/WAMP [PHP/CGI] websites
- In case of java based web application, HTTP request will proceed further to application server with the help of application server proxies/plugins like [mod_proxy/mod_jk/WebLogic Proxy Plugin/Websphere Proxy Plugin]
What is X-Forwarded-For
The X-Forwarded-For (XFF) HTTP header field is a common method for identifying the originating IP address of a client connecting to a web server through an HTTP proxy or load balancer.
So let us start with, how to enable X-Forwarding in the Load Balancer
I am taking Big-IP Load balancer for this article.
How to enable XFF in BigIP
To configure the BIG-IP system to insert the original client IP address in an X-Forwarded-For HTTP header, perform the following procedure:
- Log in to the Configuration utility.
- Navigate to Local Traffic > Profiles.
- From the Services menu, click HTTP.
- Click Create.
- Type a name for the HTTP profile.
- Select the Insert X-Forwarded-For check box.
Note: Older versions of BIG-IP software may display the option as Insert XForwarded For instead of Insert X-Forwarded-For.
- From the Insert X-Forwarded-For menu, select Enabled.
- Click Finished.
You must now associate the new HTTP profile with the virtual server/VIP
Using an iRule to insert the original client IP address in an X-Forwarded-For HTTP header
- Log in to the Configuration utility.
- Navigate to Local Traffic > iRules > Create.
- In the Name box, type a name.
- In the Definition box, copy and paste the following iRule:
when HTTP_REQUEST {
HTTP::header insert X-Forwarded-For [IP::remote_addr]
} - Click Finished.
You must now associate the new iRule with the virtual server/VIP
Configuring the web server to extract the IP address from the HTTP header
After you have configured the BIG-IP system to insert the original client IP address in an HTTP header using an X-Forwarded-For HTTP header, you must also configure the web server to extract the IP address from the HTTP header, and then log the IP address to the web server log file.
Apache web server
You can configure an Apache web server to extract the IP address from the X-Forwarded-For HTTP header and log that IP address to the web server log file by adding the appropriate logging directives to the main Apache configuration file (typically named httpd.conf) or to the relevant virtual host configuration files.
For example:
LogFormat "%v %{X-Forwarded-For}i %l %u %t \"%r\" %>s %b" X-Forwarded-For
CustomLog /var/log/apache/www.example.com-xforwarded.log X-Forwarded-For
IIS web server
Unlike Apache Web server, to make IIS web server to extract the IP address from the X-Forwarded-For HTTP Header and log that IP address to the log file, we need to perform list of configuration changes in the site.
For IIS 7
Open IIS manager by the run command inetmgr (or) using control panel.
To enable XFF logging you must have a Advanced Logging feature enabled
In general "Advanced Logging" does not come as built in with IIS 7, you must install as an add-on
From here you can download the same https://www.microsoft.com/en-us/download/confirmation.aspx?id=7211
You will get a installation binary with a name AdvancedLogging.msi double click on the package to install it on the server

After installing the Advanced Logging plugin, close and re-open the iis manager and click on the server node
You will be able to see an Icon named Advanced Logging under the IIS grouping on the center panel
Double click on Advanced Logging Icon

you will get screen like this, you must enable it by clicking "Enable Advanced Logging" option on the right panel
After enabling the Advanced Logging
Expand the Server Node -> Click on Sites -> Click on your corresponding Site name
Here my website name is "WebServices" , click to select it

Double click on Advanced Logging Icon available on the center panel.
on the right panel click on "Edit Logging Fields" link to add a new logging field
You will get screen like below

Now click on Add Field and fill the values as shown in the below Screen snap

Now hit OK
From the Actions pane on the right, click Add Log Definition.

Enter "Client Source IP" in the Base file name field.

Click Select Fields and select the Logging Field we have added in the previous section "Client Source IP"

Click OK on the Select Logging Fields form, then click Apply in the actions pane.
Restart the corresponding website
The advanced log must be viewed rather than the default log. The advanced log is located in %SystemDrive%inetpublogsAdvancedLogs. To view the logs, right-click the Client Source IP log definition and click View Log Files.

For IIS8
In IIS8 this is much simpler to enable XFF and to capture XFF in the log
- Select your website and click on it
- Click the Logging Icon in the center panel
- In the Log File Grouping click on Select Fields

- Click on Add Field and add a new Field as shown in the following snap

- Click OK and return to previous page and restart the corresponding website
That's it, you will be able to see the XFF information in the current log file of your website.
Hope this post is helpful. Please comment and let me know your feedback
For more contents like this, Please follow us in facebook by liking our page http://www.facebook.com/middlewareinventory
Thanks
A K SARAV