
In this article, we are going to see a quick packer aws example setup and provide the steps to create an AWS Image (AMI) using Packer and we are also going to Create Amazon EC2 Instance ( Elastic Bean Stack - EBS) from the same AMI Image we have created, using Terraform,
we are going to use three different products or technologies together such as Packer, aws Terraform.
 Let us see some Quick Overview of Packer and Terraform before we proceed further
What is Packer?
Packer is an OpenSource Image Provisioning tool developed by Hashicorp.
It creates machine images and makes the Configuration Management and Server provisioning an easy Job.
It can create Images for multiple platforms like Docker, AWS, Oracle Virtual Box, Digital Ocean, OpenStack, Linode, Azure etc.
you can write the Instructions to the packer as JSON files they are called as Templates in Packer Parlance.
The technology Packer facilitates is widely known Infrastructure as a Code (IOC)
What is Terraform?
Terraform is an open-source infrastructure as code software tool created by HashiCorp.
It enables users to define and provision a datacenter infrastructure using a high-level configuration language known as Hashicorp Configuration Language (HCL), or optionally JSON.
Terraform supports a number of cloud infrastructure providers such as
- Amazon Web Services
- IBM Cloud (formerly Bluemix)
- Google Cloud Platform
- Linode
- Microsoft Azure
- Oracle Cloud Infrastructure
- VMware vSphere
- OpenStack
Simply put, the Machine Images we create using Packer can be used by Terraform to build the infrastructures.
Since this is going to be the process of Infrastructure as a Code paradigm.
We need a API programmatic access for AWS.
Steps to Create Packer Image and Create EC2 with Terraform
These are the steps we are going to perform to create a packer image which install apache httpd webserver using a shell provisioner and prepare the image.
Once the image is ready we are going to use Terraform create an instance based on the AMI or the image we have created using packer.
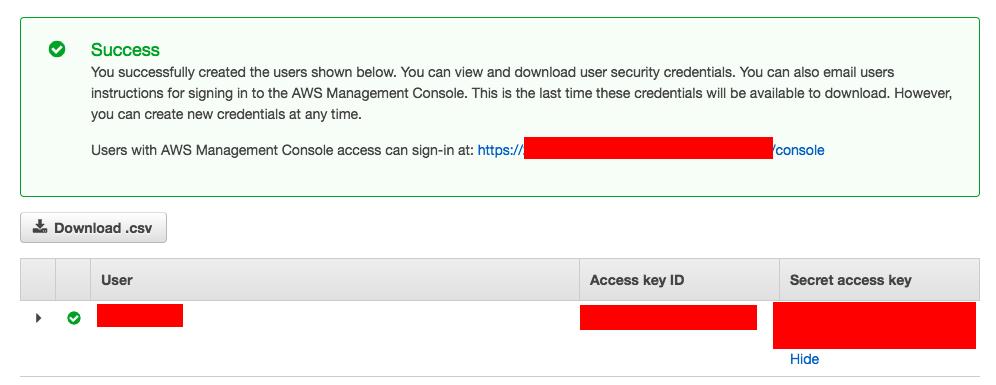
Step0: Get your Programmatic Access / Create Access Key and Secret from AWS
-
Login to AWS Console
-
In the services go to IAM
-
Create a User and Click on map existing Policies
-
Choose UserName and Select the Policy (Administrator Access Policy)
-
Create user
-
Final Stage would present the AccessKEY and Secret Access like given below.
Step1: Install and Setup Packer
-
Download Packer https://www.packer.io/downloads.html
-
Unzip the downloaded file and there will be a Single File named packer
- I have installed the packer in
/apps/packer - Let us add this path into the
$PATHvariable andBASH_PROFILEfile as well for better convenience and to call packer any location without having to refer the full path of the packer. - Add the /apps/packer at the end of the
export PATH=*lineexport PATH=/usr/local/Cellar/openssl/1.0.2p/bin:$PATH:/apps/packer/
- To validate if it is working just type
packer -version
What is a Packer Template file and How to Write a Packer Template?
The Packer template file uses JSON format and it consists of three parts
- Builders
- provisioners
- Post-Processors
Along with this, There is a dedicated section for variables and we will start from there. Variables - This Section would contain the list of variables you need to use or need across other sections on the Packer Template JSON file.
It is always a Good practice to use variables and referring the variable name across the builders and provisioners as using a variable would make your Packer Template easy to understand and to modify/update in future for new requirements.
In our case, we have set our AWS Access ID and Secure Key as the variable and we have defined it to be taken from the Environment variable for additional security.
builders - Here we define what image we are going to create and for which technology/platform we are going to create an image for like AWS, DOCKER, VirtualBox, OpenStack etc.
Based on the Builders the configuration elements we use in this section would vary. Packer support various builders like EC2, Vmware, Virtual box etc.. and it can be expanded to various other new products and technologies.
Provisioners - These are the list of built-in or external configuration on management tools like Shell, Ansible, Chef, PowerShell etc..
Here we define what must the image be build with, like a software product, Certain Usernames, Directories, Patch Version, Kernal Version, Environmental specific configuration etc.
Provisioners let you design your image and make it more meaningful by adding a necessary software/programs to it, Without it, the image we create is a simple OS kernel base image otherwise Some Use Cases of Provisioners
- Installing Packages/Softwares
- Creating a username and Configuration
- Run Some Custom Scripts to make Environment required changes
- Configure File System / NFS / Storage etc
- Security Setup / Configuration
- downloading necessary code files etc.
- patching the kernel
- Configuring the Packages/Softwares the way you want ( Apache/NGINX/Tomcat/mysql) etc
Basically, provisioners are doing the main job here and making the image as ready to use
Post Processors (Optional): Post-processors comes into the picture after the image is Successfully built or created by the builder and provisioned by the provisioner(s).
Post-processors are optional, and they can be used to upload artefacts, re-package, create tags, Publish to clouds like hub.docker.com and vagrant cloud etc Some of the Popular Post processors are
- Docker Push
- Docker Tag
- Vagrant
- Vagrant cloud
- Vsphere Template
- Amazon Import
- DigitalOcean import etc
Step2: Create a WorkSpace to place Scripts and Packer Template
Let us create a new directory and call it as a workspace where our Template and other files required for the Packer must be present, By files, I meant any provisioners script like Shell Script, Ansible playbook etc.
Which you want to execute during the provisioning to configure your image in the way you want. Here are the steps as they are executed.
# Create a Directory or Work Space
aksarav@middlewareinventory:/apps/packer$ pwd
/apps/packer
aksarav@middlewareinventory:/apps/packer$ mkdir awsimages
aksarav@middlewareinventory:/apps/packer$ cd awsimages
aksarav@middlewareinventory:/apps/packer/awsimages$ ls -rlt
aksarav@middlewareinventory:/apps/packer/awsimages$ pwd
/apps/packer/awsimages


# Create a New test file named welcomefile with a Single Line of Welcome Message
aksarav@middlewareinventory:/apps/packer/awsimages$ cat > welcomefile
WELCOME TO PACKER SARAV!..

# Create a Simple Script named setup.sh to install Apache2
aksarav@middlewareinventory:/apps/packer/awsimages$ cat > setup.sh
echo "Hello Sarav, How are you doing"
echo "Installing Apache2"
apt-get update
apt-get -y install apache2


# Validate if they are created
aksarav@middlewareinventory:/apps/packer/awsimages$ ls -rlt
total 16
-rw-r--r –  1 aksarav  wheel    27B Mar  2 12:13 welcomefile
-rw-r--r –  1 aksarav  wheel    38B Mar  2 12:13 setup.sh

# Make the Script Executable
aksarav@middlewareinventory:/apps/packer/awsimages$ chmod a+x setup.sh

# Set your AWS ACCESS KEY and SECRET KEY as an environment variable for additional security [ Some characters are masked for Obvious reasons ]
aksarav@middlewareinventory:/apps/packer/awsimages$ export AWS_ACCESS_KEY_ID=AK************IEVXQ
aksarav@middlewareinventory:/apps/packer/awsimages$ export AWS_SECRET_ACCESS_KEY=gbaIbK*********************iwN0dGfS

# Create a New template file and paste the below content
aksarav@middlewareinventory:/apps/packer/awsimages$ cat > ebs.json
Having learnt the basics of Packer file creation, Now let us see our Sample template JSON file the for packer.
The Sample Template file for packer
{
    "variables": {
        "aws_access_key": "{{env `AWS_ACCESS_KEY_ID`}}",
        "aws_secret_key": "{{env `AWS_SECRET_ACCESS_KEY`}}",
        "region":         "us-east-1"
    },
    "builders": [
        {
            "access_key": "{{user `aws_access_key`}}",
            "ami_name": "packer-linux-aws-demo-{{timestamp}}",
            "instance_type": "t3.micro",
            "region": "ap-south-1",
            "secret_key": "{{user `aws_secret_key`}}",
            "source_ami_filter": {
              "filters": {
              "virtualization-type": "hvm",
              "name": "ubuntu/images/*ubuntu-xenial-16.04-amd64-server-*",
              "root-device-type": "ebs"
              },
              "owners": ["099720109477"],
              "most_recent": true
            },
            "ssh_username": "ubuntu",
            "type": "amazon-ebs"
        }
    ],
    "provisioners": [
        {
            "type": "file",
            "source": "./welcomefile",
            "destination": "/home/ubuntu/"
        },
        {
            "type": "shell",
            "inline":[
                "ls -al /home/ubuntu",
                "cat /home/ubuntu/welcomefile"
            ]
        },
        {
            "type": "shell",
            "script": "./setup.sh"
        }
    ]
}
Once you have saved the preceding Template JSON content in the workspace. [ in my case the file name is ebs.json ] Now it is a time to validate and execute.
How to validate the Packer Image?
To validate the packer image file ( JSON ) we have created, we can use the packer validate command
$ packer validate ebs.json
Template validated successfully.
If you get Template validated Successfully message. Then you are Good.
Step3: Build an Image using Packer from the Template JSON file
Now it is a time to build the Image from the Template we have created already. We should use packer build command followed by the JSON file name to build the image
$ packer build ebs.json
amazon-ebs output will be in this color.
==> amazon-ebs: Prevalidating AMI Name: packer-linux-aws-demo-1551511502
    amazon-ebs: Found Image ID: ami-0a574895390037a62
==> amazon-ebs: Creating temporary keypair: packer_5c7a2fcf-66e5-01d5-b774-fcc0ddcfc2c5
==> amazon-ebs: Creating temporary security group for this instance: packer_5c7a2fd1-2ab9-8f5a-e3c6-d33e5ce49bee
==> amazon-ebs: Authorizing access to port 22 from 0.0.0.0/0 in the temporary security group...
==> amazon-ebs: Launching a source AWS instance...
==> amazon-ebs: Adding tags to source instance
    amazon-ebs: Adding tag: "Name": "Packer Builder"
    amazon-ebs: Instance ID: i-09510a5b2434d64b2
==> amazon-ebs: Waiting for instance (i-09510a5b2434d64b2) to become ready...
==> amazon-ebs: Using ssh communicator to connect: 13.232.19.83
==> amazon-ebs: Waiting for SSH to become available...
==> amazon-ebs: Connected to SSH!
==> amazon-ebs: Uploading ./welcomefile => /home/ubuntu/
1 items:  27 B / 27 B [===================================================================================================================================] 0s
==> amazon-ebs: Provisioning with shell script: /var/folders/gy/_pnf5jtn711fcqn8v2j54tcm0000gn/T/packer-shell531024437
    amazon-ebs: total 32
    amazon-ebs: drwxr-xr-x 4 ubuntu ubuntu 4096 Mar  2 07:25 .
    amazon-ebs: drwxr-xr-x 3 root   root   4096 Mar  2 07:25 ..
    amazon-ebs: -rw-r--r – 1 ubuntu ubuntu  220 Aug 31  2015 .bash_logout
    amazon-ebs: -rw-r--r – 1 ubuntu ubuntu 3771 Aug 31  2015 .bashrc
    amazon-ebs: drwx---- – 2 ubuntu ubuntu 4096 Mar  2 07:25 .cache
    amazon-ebs: -rw-r--r – 1 ubuntu ubuntu  655 May 16  2017 .profile
    amazon-ebs: drwx---- – 2 ubuntu ubuntu 4096 Mar  2 07:25 .ssh
    amazon-ebs: -rw-r--r – 1 ubuntu ubuntu   27 Mar  2 07:25 welcomefile
    amazon-ebs: WELCOME TO PACKER SARAV!..
==> amazon-ebs: Provisioning with shell script: ./setup.sh
    amazon-ebs: Hello Sarav, How are you doing
    amazon-ebs: Installing Apache2
==> amazon-ebs: Stopping the source instance...
    amazon-ebs: Stopping instance, attempt 1
==> amazon-ebs: Waiting for the instance to stop...
==> amazon-ebs: Creating unencrypted AMI packer-linux-aws-demo-1551511502 from instance i-09510a5b2434d64b2
    amazon-ebs: AMI: ami-0ba13714603920d0e
==> amazon-ebs: Waiting for AMI to become ready...
==> amazon-ebs: Terminating the source AWS instance...
==> amazon-ebs: Cleaning up any extra volumes...
==> amazon-ebs: No volumes to clean up, skipping
==> amazon-ebs: Deleting temporary security group...
==> amazon-ebs: Deleting temporary keypair...
Build 'amazon-ebs' finished.
==> Builds finished. The artifacts of successful builds are:
--> amazon-ebs: AMIs were created:
ap-south-1: ami-0ba13714603920d0e
In the preceding Execution Output, If you look at the Texts highlighted in Yellow, You can understand, The Provisioner Scripts we have defined to be executed has Successfully launched during the Image Creation and Succeeded.
It has also installed the Apache2 httpd inside the newly created image and we can expect apache2 httpd server be present whenever we create an instance out of this newly created AMI or Amazon Machine Image.
Here the last line would give you the AMI Image ID ami-0ba13714603920d0e which would vary for everyone.
So you must copy yours and keep it safe as we will need for Terraform
Step4: Building AWS EC2 Instance using Terraform and AMI
Now we have created the AWS Machine Image using Packer. By now, you can actually see your images in the AMI section on the AWS Management console.
Now let us see how to Create an EC2 instance using Terraform To make this precise and Short I have not added the installation instruction of Terraform.
You can find the instructions here Installing Terraform Now Let me proceed further with an assumption that you have installed the Terraform.
In the workspace, Create a new file named BuildEC2.tf with the following content and make sure that your Environment variables are set properly and machine ID is updated
provider "aws" {
  region = "ap-south-1"
}

resource "aws_instance" "web" {
  ami           = "UPDATE YOUR AMI MACHINE ID"
  instance_type = "t2.micro"

  tags = {
    Name = "HelloWorld"
  }
}
These are the commands to build AWS EC2 instance using terraform, in the same order it was executed
# Make Sure the Terraform Template/Instruction file is present
aksarav@middlewareinventory:/apps/terraform$ ls -rlt
total 8
-rw-r--r –  1 aksarav  wheel   189B Mar  2 13:51 BuildEC2.tf

# Init terraform
aksarav@middlewareinventory:/apps/terraform$ terraform init
Initializing provider plugins...
- Checking for available provider plugins on https://releases.hashicorp.com...
- Downloading plugin for provider "aws" (2.0.0)...
The following providers do not have any version constraints in configuration,
so the latest version was installed.
To prevent automatic upgrades to new major versions that may contain breaking
changes, it is recommended to add version = "..." constraints to the
corresponding provider blocks in configuration, with the constraint strings
suggested below.
* provider.aws: version = "~> 2.0"
Terraform has been successfully initialized!
You may now begin working with Terraform. Try running "terraform plan" to see
any changes that are required for your infrastructure. All Terraform commands
should now work.
If you ever set or change modules or backend configuration for Terraform,
rerun this command to reinitialize your working directory. If you forget, other
commands will detect it and remind you to do so if necessary.

# Apply Terraform to build the EC2 instance
aksarav@middlewareinventory:/apps/terraform$ terraform apply
An execution plan has been generated and is shown below.
Resource actions are indicated with the following symbols:
  + create
Terraform will perform the following actions:
  + aws_instance.web
      id:                           <computed>
      ami:                          "ami-0ba13714603920d0e"
      arn:                          <computed>
      associate_public_ip_address:  <computed>
      availability_zone:            <computed>
      cpu_core_count:               <computed>
      cpu_threads_per_core:         <computed>
      ebs_block_device.#:           <computed>
      ephemeral_block_device.#:     <computed>
      get_password_data:            "false"
      host_id:                      <computed>
      instance_state:               <computed>
      instance_type:                "t2.micro"
      ipv6_address_count:           <computed>
      ipv6_addresses.#:             <computed>
      key_name:                     <computed>
      network_interface.#:          <computed>
      network_interface_id:         <computed>
      password_data:                <computed>
      placement_group:              <computed>
      primary_network_interface_id: <computed>
      private_dns:                  <computed>
      private_ip:                   <computed>
      public_dns:                   <computed>
      public_ip:                    <computed>
      root_block_device.#:          <computed>
      security_groups.#:            <computed>
      source_dest_check:            "true"
      subnet_id:                    <computed>
      tags.%:                       "1"
      tags.Name:                    "HelloWorld"
      tenancy:                      <computed>
      volume_tags.%:                <computed>
      vpc_security_group_ids.#:     <computed>
Plan: 1 to add, 0 to change, 0 to destroy.
Do you want to perform these actions?
  Terraform will perform the actions described above.
  Only 'yes' will be accepted to approve.
  Enter a value: yes
aws_instance.web: Creating...
  ami:                          "" => "ami-0ba13714603920d0e"
  arn:                          "" => "<computed>"
  associate_public_ip_address:  "" => "<computed>"
  availability_zone:            "" => "<computed>"
  cpu_core_count:               "" => "<computed>"
  cpu_threads_per_core:         "" => "<computed>"
  ebs_block_device.#:           "" => "<computed>"
  ephemeral_block_device.#:     "" => "<computed>"
  get_password_data:            "" => "false"
  host_id:                      "" => "<computed>"
  instance_state:               "" => "<computed>"
  instance_type:                "" => "t2.micro"
  ipv6_address_count:           "" => "<computed>"
  ipv6_addresses.#:             "" => "<computed>"
  key_name:                     "" => "<computed>"
  network_interface.#:          "" => "<computed>"
  network_interface_id:         "" => "<computed>"
  password_data:                "" => "<computed>"
  placement_group:              "" => "<computed>"
  primary_network_interface_id: "" => "<computed>"
  private_dns:                  "" => "<computed>"
  private_ip:                   "" => "<computed>"
  public_dns:                   "" => "<computed>"
  public_ip:                    "" => "<computed>"
  root_block_device.#:          "" => "<computed>"
  security_groups.#:            "" => "<computed>"
  source_dest_check:            "" => "true"
  subnet_id:                    "" => "<computed>"
  tags.%:                       "" => "1"
  tags.Name:                    "" => "HelloWorld"
  tenancy:                      "" => "<computed>"
  volume_tags.%:                "" => "<computed>"
  vpc_security_group_ids.#:     "" => "<computed>"
aws_instance.web: Still creating... (10s elapsed)
aws_instance.web: Creation complete after 15s (ID: i-06987184944fa33cf)
Apply complete! Resources: 1 added, 0 changed, 0 destroyed.
Now you can see the EC2 instance created successfully on AWS. you can cross verify the same on the console.
Some Quick Caveats
- Make sure the region you select for the Image creation at Packer and the Terraform Region matches.
as AMI ID is region Specific - Make Sure you use the valid AWS Key and Secret
- Last but not least, Make sure you shut down the EC2 instances and Remove the AMI images if you are on Free tier. You would be charged otherwise.
Conclusion
This is a quick introduction for Packer and Terraform and there are numerous and advanced use cases for Terraform and it is widely used on the industry right now for the IAC.
Hope this give some basic Idea on the Terraform and Packer.
You can checkout our other articles in Terraform here and keep learning
Cheers
Sarav AK

Follow me on Linkedin My Profile Follow DevopsJunction onFacebook orTwitter For more practical videos and tutorials. Subscribe to our channel
Signup for Exclusive "Subscriber-only" Content