Postfix is a powerful opensource mail server with a lot of customization options available built-in. I recently had a requirement to set up an Organization-wide mail server to perform SMTP relay to Office365 and allow our Java, JS, Python applications to send emails from different office365 email ids based on the Subject (or) the sender details.
Before we think about the multiple email IDs and sender-based relay in postfix. Let us cover the basic setup and send our test emails.
I am going to split this article into four parts or subtopics
- Configuring Postfix SMTP relay to Office 365 and testing it with Single email ID/Domain
- Configuration Postfix SMTP relay for multiple domains and sender-based relay
- Troubleshooting SMTP relay and Fixing Email Delivery Problems
- Check your email Score (or) Spam test result
Before we proceed with these three steps I would like to take you on a quick tour around the three different connection methodologies you can have with Office365. Knowing which one you are using would help you to fix the problems faster when you run into one.
Three types of Integration supported by Office365.
If you browse through the internet you would find numerous articles with different methods to set up SMTP relay from POSTFIX or to connect your application or device and relay your mails. So I am listing out the three different types of integrations we can do with Office365 to send emails.
1. SMTP client submission
The client should be connected to the Server "smtp.office365.com" on port 587 and in this approach, we can send emails to internal and external recipients

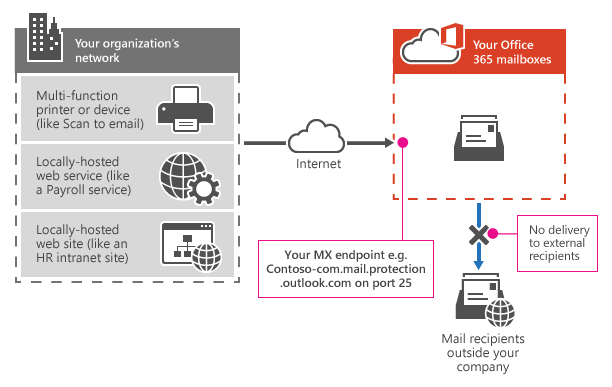
2. Direct send
In this method, we are connected to our Organization Mail Server hostname (MX) whose name ends with "mail.protection.outlook.com"
In my case, gritfy-com.mail.protection.outlook.com is my mail server. to find out your organization's mail server MX record use https://mxtoolbox.com/
With this method, email cannot be sent to recipients outside your organization
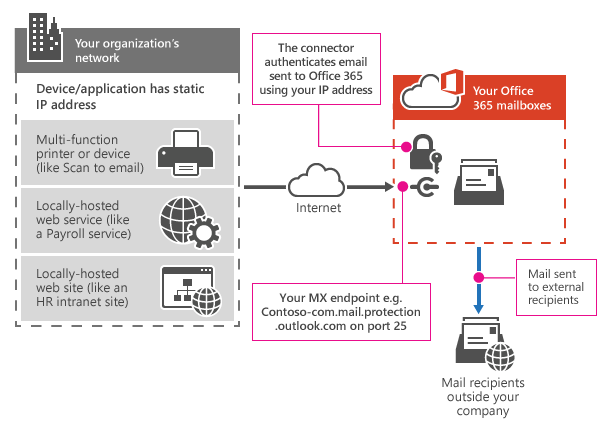
3. Office 365 SMTP relay ( Discussed in this Post )
In this method, we are connected to our Organization Mail Server hostname (MX) whose name ends with "mail.protection.outlook.com"
There is a connector set up in Office 365 for emails sent from your organization's mail server. In our case it is postfix.
In this method, we can send mail to external recipients as well as internal organization.
Simple SMTP relay with Postfix Office365
As shown in the preceding method 3, we are going to set up an SMTP relay with Connectors in Office365 and Postfix to send emails to internal and external recipients.
Let us start from installing the postfix mail server in your Linux host. you have to choose your appropriate package manager like yum or apt-get
Installing postfix mail server
In my case, it is CentOS so I am going with yum
yum install postfix
Update the Postfix configuration
If you goto the /etc/postfix directory and list the files, you would find a set of configuration files already present and we are going to update some of the configurations to make the SMTP relay work through the office365
Updating Relay Host in postfix configuration
the first file we are going to make changes is main.cf file and you have to find and update the parameter named relay_host= if it is commented, Uncomment it
You are going to use your Organization MX Server endpoint in there with the port number 25, In my case it is
relayhost = [gritfy-com.mail.protection.outlook.com]:25
Updating SMTP Outbound Relay configuration
In the same main.cf file add the following lines at the end of the file, The configuration is to enable a Security using sasl_passwd file where we would be defining our email and password. We can also configure the outbound mail to be encrypted with TLS using smtp_tls_security_level option but in this post, we are going without TLS
smtp_sasl_auth_enable = yes
smtp_sasl_password_maps = hash:/etc/postfix/sasl_passwd
smtp_sasl_security_options = noanonymous
smtp_tls_security_level = may
header_size_limit = 409600
So we have defined the password_maps file within the main.cf file but have not created it yet. so our next step is to create one and it should be on the /etc/postfix directory with the name sasl_passwd
Creating sasl_passwd file with Authentication info
Create a new file named sasl_passwd under /etc/postfix and enter your Office365 account details.
It is recommended that this account does not have admin privileges as the sasl_passwd file would contain this password as cleartext.
Here is the content of my sasl_passwd file for your reference.
[gritfy-com.mail.protection.outlook.com]:25 [email protected]:SecurePassword
Postfix reads the login info from the Database file so it is necessary that we should convert this file to a *.db format. In order to do that
you can use the command
postmap /etc/postfix/sasl_passwd
upon the successful execution of this command, you can see a new file would be created in the same name with .db extension
By default, these files would have the global read permissions which let all logged-in user to the server read the files. to prevent it, you can consider setting up some file permissions like shown below. this would enable only owners to read and write the file and restrict all others
sudo chmod 0600 /etc/postfix/sasl_passwd /etc/postfix/sasl_passwd.db
Now we have configured the postfix mail server but since we are using the SMTP relay method of Office365 integration, we need to create our Office365 connector which requires Office365 Admin privileges.
Creating Connector in Office365
To create a connector in Office365 you need to have Global Admin or Exchange Admin role.
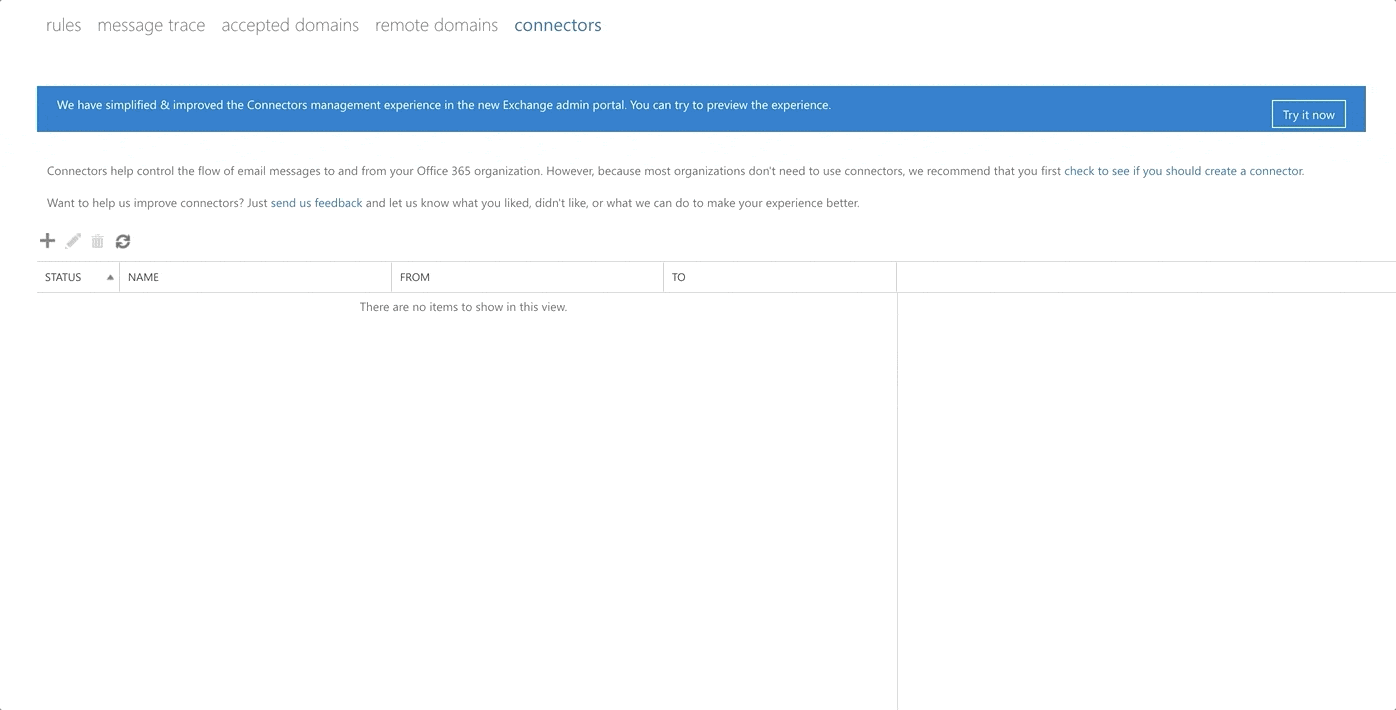
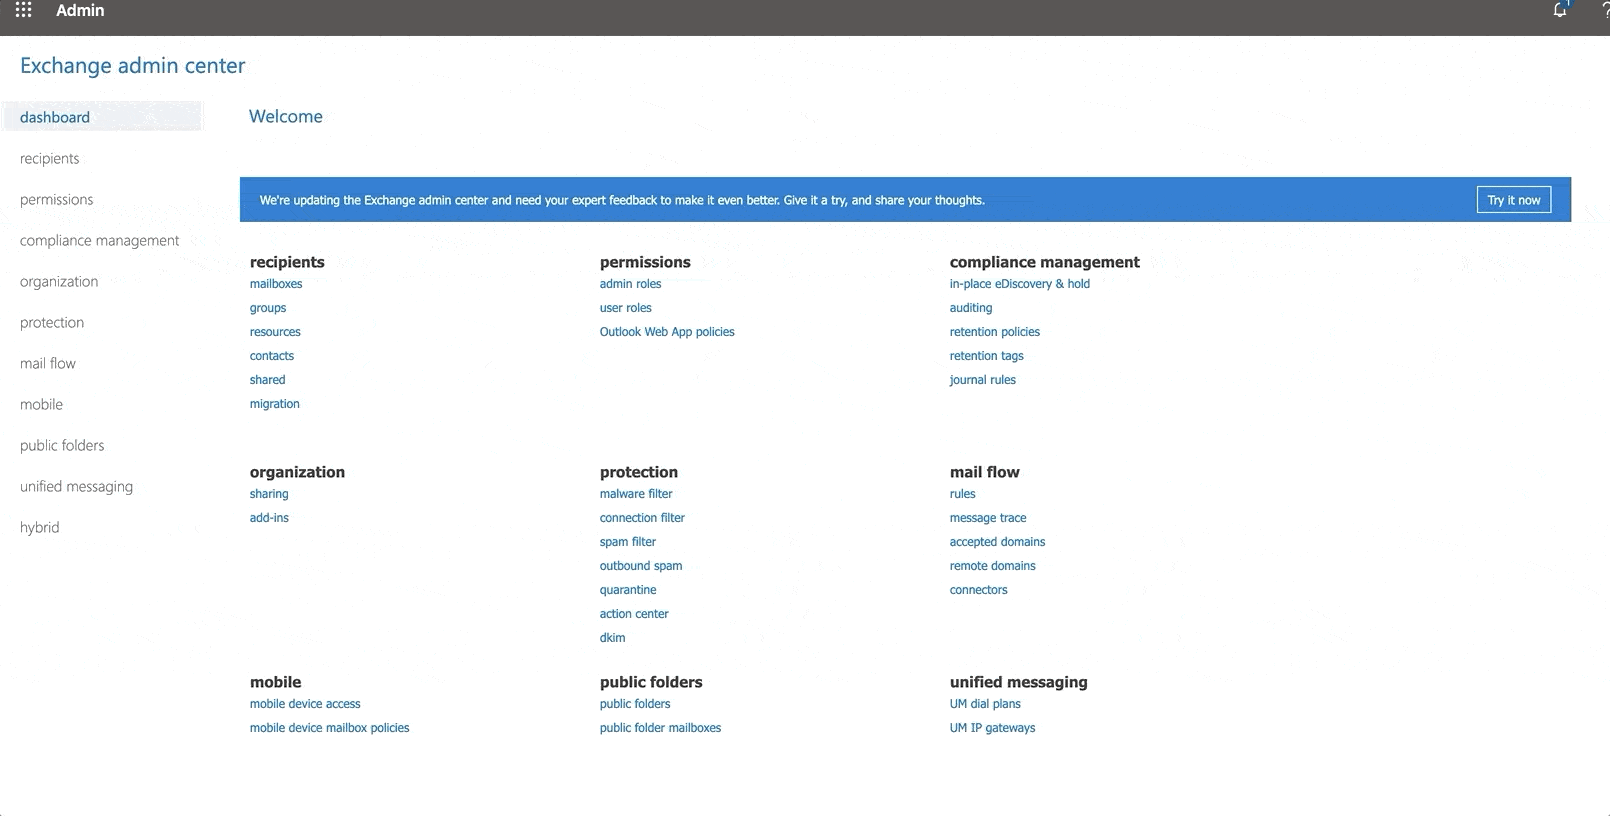
Login to Office365 Exchange Admin page and under mail flow option you would find an option named connectors click on it to create a new connector
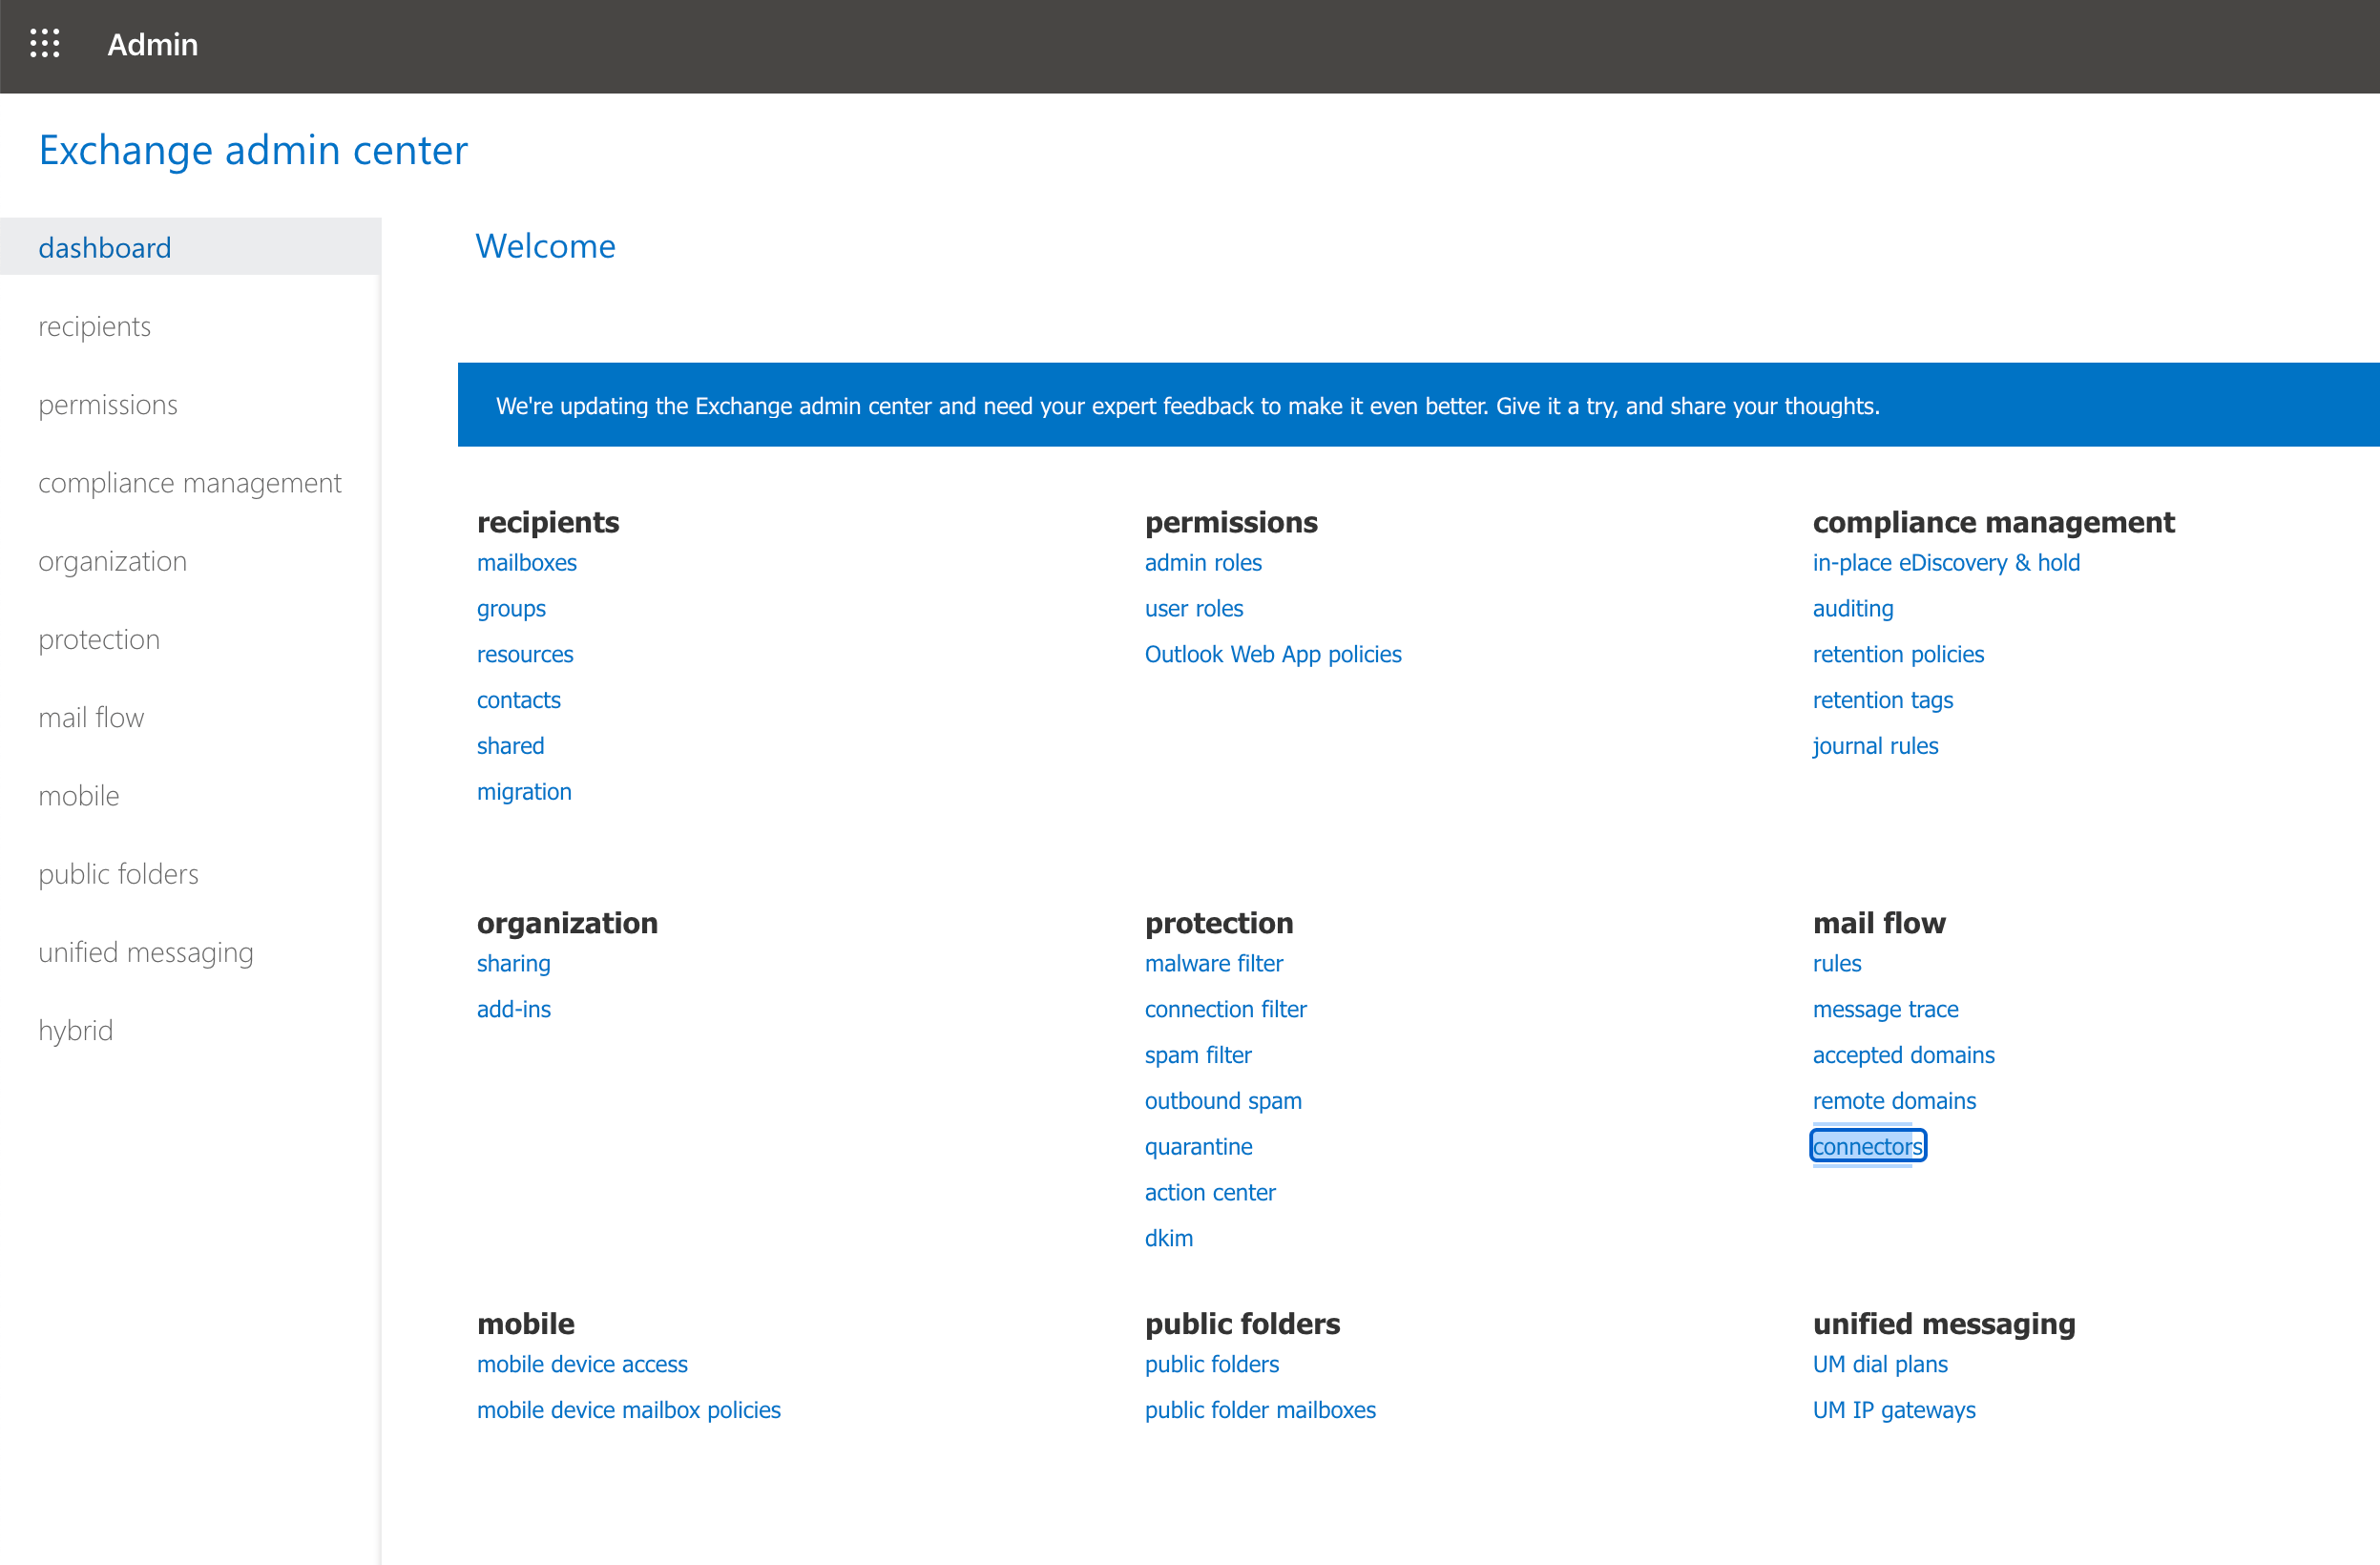
Once you have clicked on the Connectors, you would be prompted few details where you need to either choose the Connector to allow the clients based on the Certificate or by the IP.
In this post, we are going with the IP method where Office365 Connector would allow the client applications like Postfix to send emails when they are from a specific public IP address.
So if you are implementing this in your Organization it is advised that you have a static public IP enabled for your Linux server. for AWS users it is even simple, as you can allocate an Elastic IP for your instance where you are setting this up.
Take a look at this Screen record of me doing the same setup.
Updating SPF record with your public IP ( to avoid your email ending as SPAM )
All the steps we have done till now is enough to get your email going out from Postfix relay.
We should do one more thing to save our emails getting ended up into the SPAM folder.
If you are in the AWS world, you can do it easily in Route53. if you are in public providers like GoDaddy and Bluehost you need to find their own technical documentation on how to add this new SPF record.
Basically our objective here is to add our public ipv4 IP to the SPF record. It would look something like this, you can keep adding many ipv4 records as you add more
v=spf1 ip4:49.205.79.85 include:spf.protection.outlook.com -all
To create SPF records in the right syntax you can use SPF record generator
To validate your SPF record you can use this mxtoolbox supertool
Whitelist your Server URL in the office365
Also, you need to whitelist your Server IP for the Office365 to accept your connection request on port 25 and to honour your mail submission
Exchange Admin Center -> Connection Filter -> Add Allowed IP Address
If your IP is not whitelisted, You might see some errors like given below.
Jul 30 22:35:57 mwiapp01 postfix/smtp[18821]: AC8A74078131:
to=<[email protected]>,
relay=gritfy-com.mail.protection.outlook.com[104.47.100.36]:25,
delay=5.9, delays=0.09/0.05/4.1/1.6, dsn=5.7.750,
status=bounced (host gritfy-com.mail.protection.outlook.com[104.47.100.36]
said: 550 5.7.750 Service unavailable.
Client blocked from sending from unregistered domains.
For more information please go to http://go.microsoft.com/fwlink/?LinkId=526653. AS(800051)
[MA1IND01FT006.eop-IND01.prod.protection.outlook.com] (in reply to end of DATA command))
Restart Postfix and Send some email to test it
Now go back to the server and restart your postfix using your systemctl or service command and after validating the services are started. you can send yourself a test email to validate your setup
echo "Some Email to Test"|mailx -s "Test Email" -r [email protected] [email protected]
If everything went well you should see your mail status=sent in your maillog usually located in /var/log/maillog
Jul 30 22:44:32 mwiapp01 postfix/smtp[19253]: 60DAF4078131:
to=<[email protected]>,
relay=gritfy-com.mail.protection.outlook.com[104.47.100.36]:25,
delay=7.2, delays=0.05/0.03/4/3.1, dsn=2.6.0,
status=sent (250 2.6.0 <5f234d49.DY75T7s4TYaD7ECn%[email protected]>
[InternalId=23136988825661, Hostname=MA1PR01MB3468.INDPRD01.PROD.OUTLOOK.COM] 8682 bytes in 0.311, 27.186 KB/sec Queued mail for delivery)
Jul 30 22:44:32 mwiapp01 postfix/qmgr[3774]: 60DAF4078131: removed
Multiple Domains and Sender Based Relay PostFIX Office365
You can have more than one relays in Postfix and configure postfix to choose the relay configuration and credentials based on the sender email ID
For example, If you want to send emails from two different users on the same domain you can do that
[email protected]
[email protected]
or if you want to send emails from two different domains and email IDs you can do that too with postfix
[email protected]
[email protected]
So How to achieve sender based SMTP relay in postfix
If you are trying to use two different Office365 accounts you need to do all the same steps we did earlier, Since this post is about Office365 and postfix let me presume that the other account hosted by Office365 too.
So you need to redo these steps on the other Email Domain as well. in my case it is middlewareinventory.com as I have already done these steps for grify.com
- Create a Connector in Corresponding Office365 and allow the IP of your Server
- Whitelist your IP in Exchange Connection Filter
- Update your SPF record and add your Server IP where your Postfix is running
I presume that you have done these steps flawlessly Let us skip to the postfix configuration section
Update the main.cf configuration of Postfix to Support Sender based relay
If you are following along from the Single SMTP relay and to this multiple smtp relay you need to update few values, If you are directly setting up sender based relay you can just copy and paste these values in your /etc/postfix/main.cf file at the bottom
smtp_sasl_auth_enable = yes
smtp_sasl_password_maps = hash:/etc/postfix/sasl_passwd_maps
smtp_sasl_security_options = noanonymous
smtp_tls_security_level = may
header_size_limit = 4096000
inet_protocols = all
smtp_sender_dependent_authentication = yes
sender_dependent_relayhost_maps = hash:/etc/postfix/relay_by_sender
If you look at the configuration there are two files (maps) we need to create and place it on the server. First, let us create the /etc/postfix/relay_by_sender file which is needed for the sender dependent relay in Postfix
Create a relay_by_sender file for Postfix and Keep the Mail Server (MX) details
Within the relay_by_sender file we need to paste the following content. Make sure you update these values with your mail server smart host (mail server) details.
[email protected] [gritfy-com.mail.protection.outlook.com]:25
[email protected] [devopsjunction.mail.protection.outlook.com]:25
Once you have saved the file in /etc/postfix/relay_by_sender now you need to create a DB file for postfix to use it. using the postmap command
postmap /etc/postfix/relay_by_sender
Create the Sasl_Passwd_maps file with relays and credentials
Now we need to provide credentials for both of these relays we have created. so create a file under /etc/postfix with the name sasl_passwd_maps
[gritfy-com.mail.protection.outlook.com]:25 [email protected]:MysecretPassword
[devopsjunction.mail.protection.outlook.com]:25 [email protected]:Password
and just like you did earlier you have to create the db file using postmap
postmap /etc/postfix/sasl_passwd_maps
Reload or the Restart the Postfix server and test the relays
Now you have made necessary changes for your sender based relays to work. So go ahead and restart/reload your postfix server
service postfix reload(or)
service postfix restart
Send some test emails to validate if the mails are passing through the right relays
To test the first sender with gritfy.com. Mention the sender address with -r while sending your email.
echo "Some Email to Test"|mailx -s "Test Email" -r [email protected] [email protected]
To test the second sender with devopsjunction.com, update the sender address after -r and hit it
echo "Some Email to Test"|mailx -s "Test Email" -r [email protected] [email protected]
to know which relay the email is going through and to see if it has been sent to the recipient or not. use the maillog usually located at /var/log/maillog
Jul 31 00:58:35 mwiapp01 postfix/smtp[26151]: 28D5A4078131:
to=<[email protected]>,
relay=gritfy-com.mail.protection.outlook.com[104.47.100.36]:25,
delay=7.8, delays=0.06/0.05/4.2/3.5, dsn=2.6.0,
status=sent (250 2.6.0 <5f236cb4.kaTYiINfdbNN2Gyr%[email protected]> [InternalId=22905060593379, Hostname=MAXPR01MB4031.INDPRD01.PROD.OUTLOOK.COM] 8684 bytes in 0.610, 13.883 KB/sec Queued mail for delivery)
Jul 31 00:58:35 mwiapp01 postfix/qmgr[25474]: 28D5A4078131: removed
So we have successfully testing Single and Multiple Sender Relay with Office365 and Postfix
Now I want to give a few links for you to help you with your SMTP relay troubleshooting and to fix your setup issues.
Troubleshooting SMTP relay issues
There are few errors I have faced during the implementation of this setup and I found some articles on the internet to help me. I am listing them here for your reference.
This type of SMTP relay is little complex but highly customizable and programmable and since you are connecting directly to MX server or Smart Host of Office365. There are lot of restrictions to identify and to ensure that you are not a Spammer.
Like IP restrictions and blocks etc and the other issue could be SPF and IP whitelisting. So make sure you do everything discussed in this post without missing still if you are having issues, here are few links I can refer to you
- Microsoft article on Troubleshooting the SMTP relay
- Five possible root causes for Relay access denied and how to fix it
- IP blacklist checker and Email Delivery Problem finder
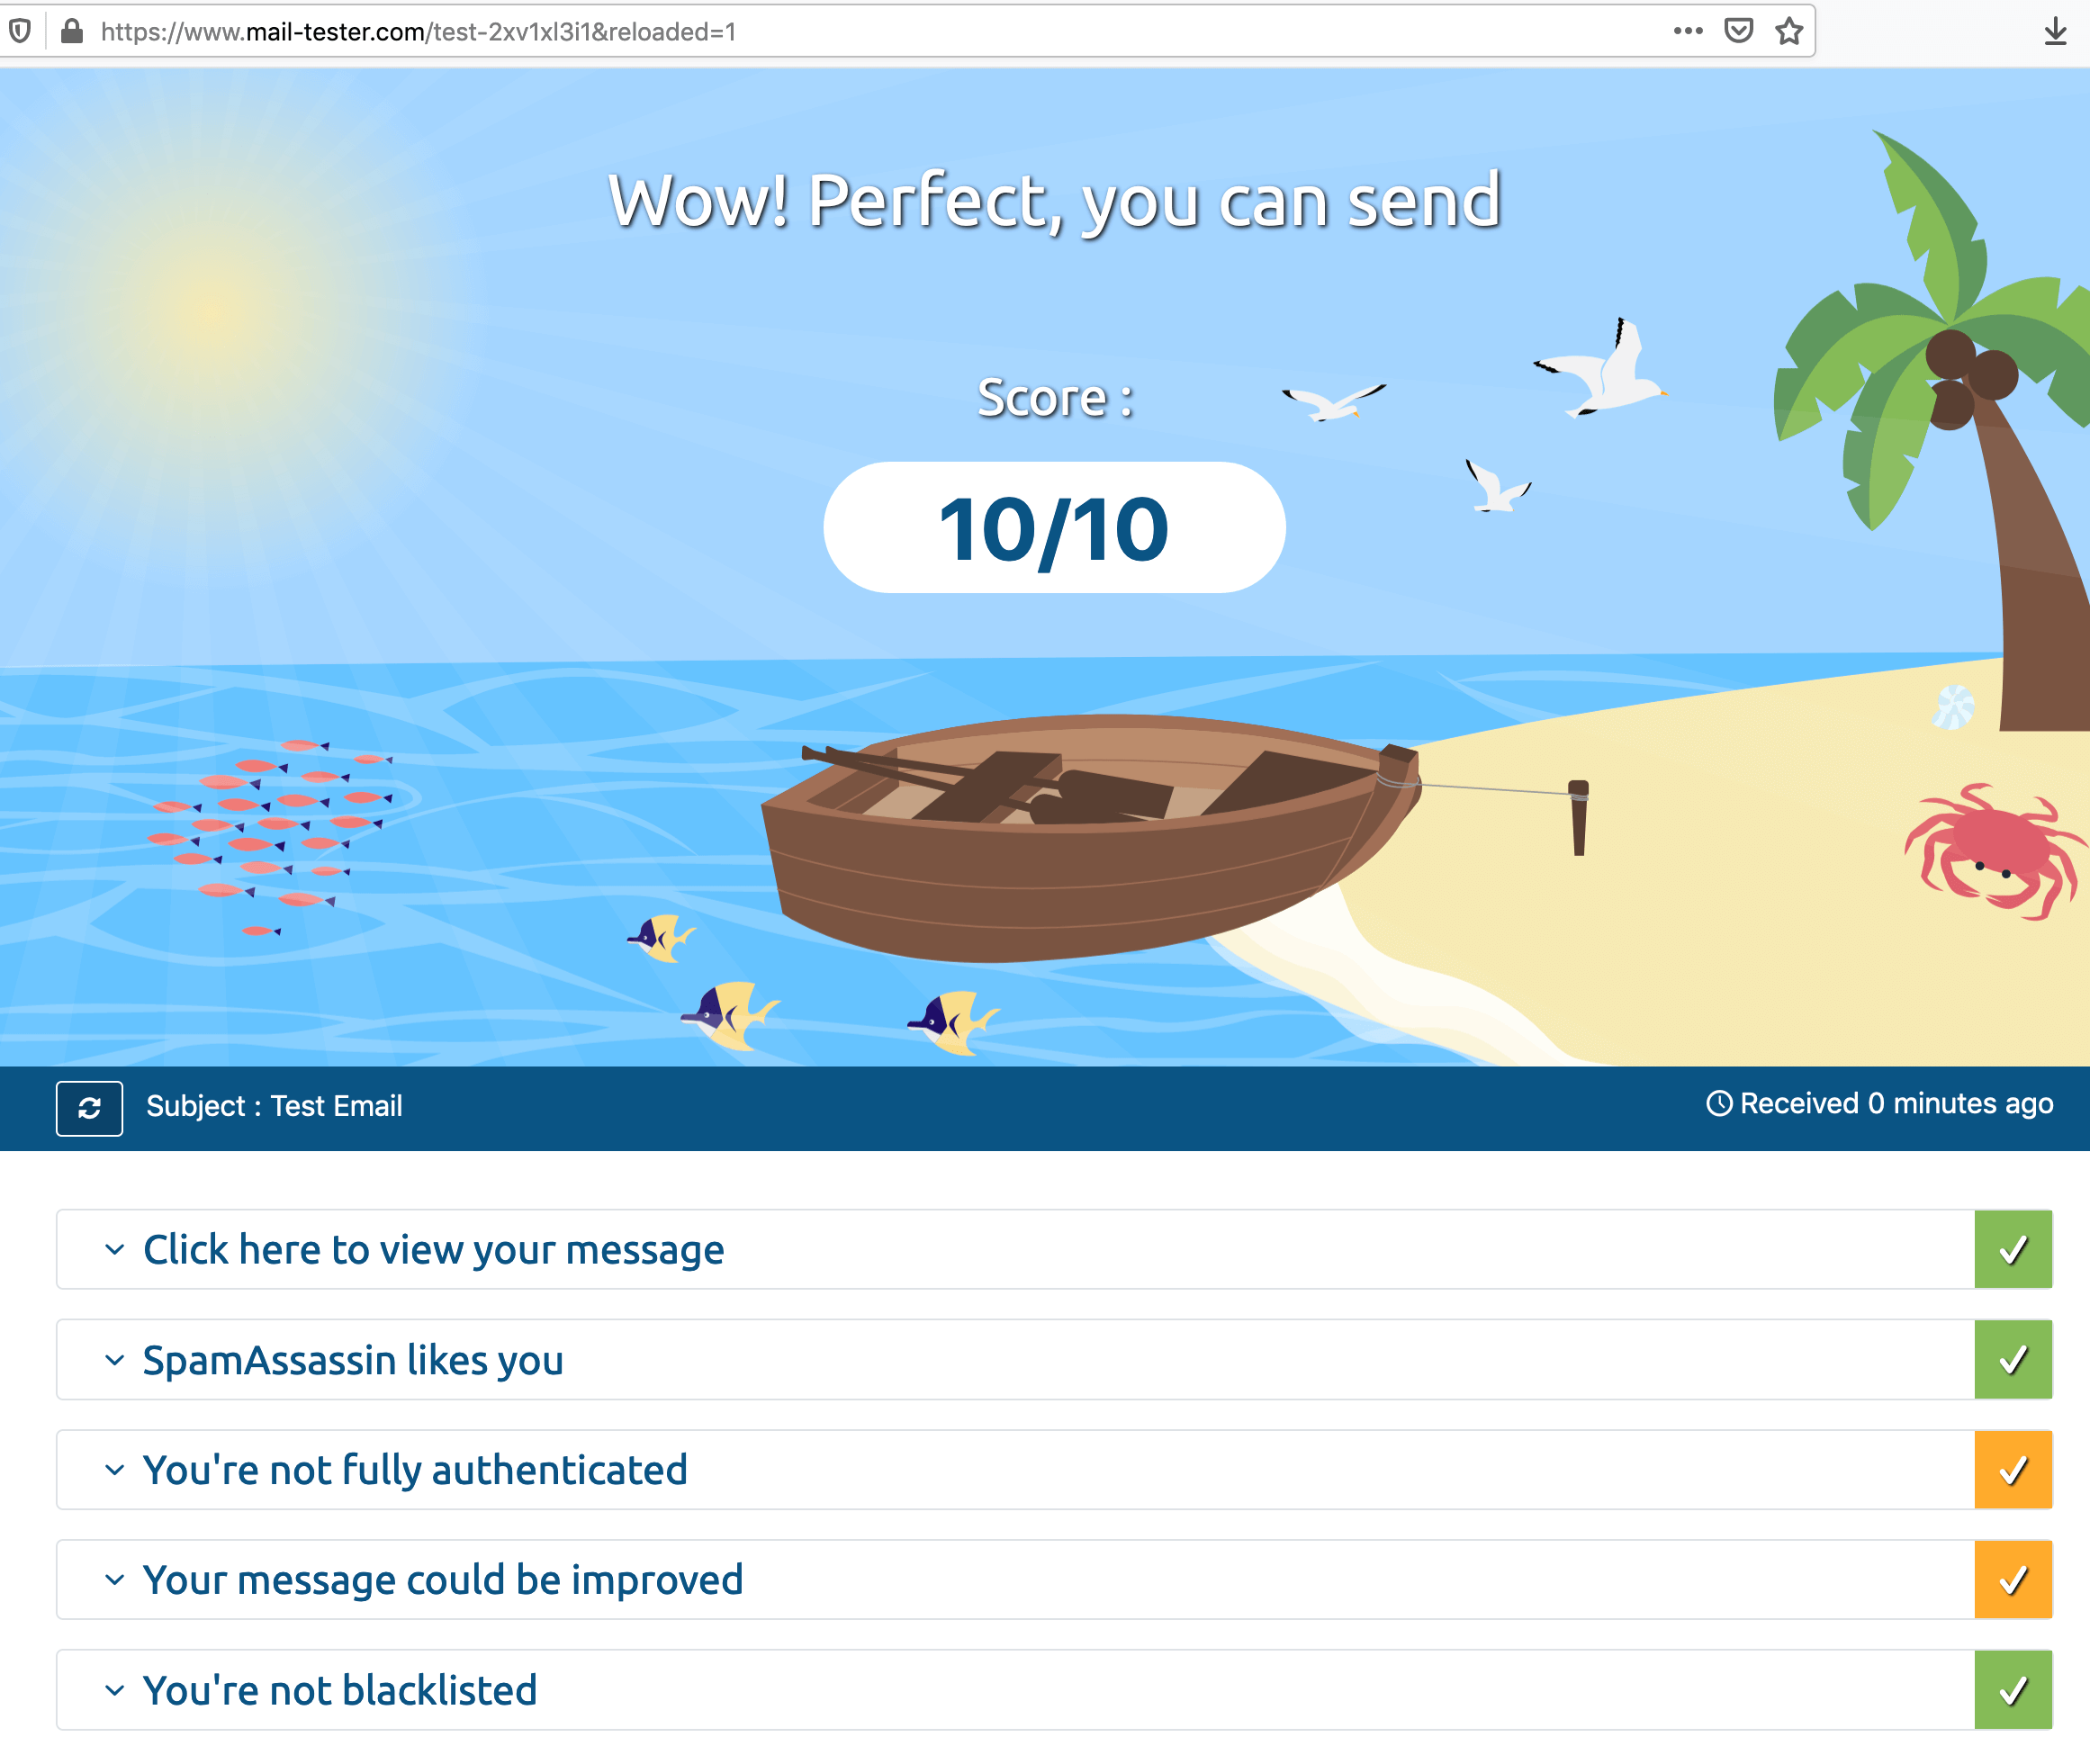
Testing the Score of your SMTP setup or Spam Test Result
I highly recommend testing your SMTP setup by sending email to the dynamic email ID generated by https://www.mail-tester.com/
Visit the web page and copy the dynamic email ID shown on the screen and once the email is sent. Check your score. It would list out your configuration issues and Spammyness of your email with possible fixes
I have prepared this article in a hope that it serves as a Single page of reference when you want to set up Postfix Office365 SMTP relay and troubleshoot it. Hope it helps.
Ask me questions using comments
Cheers
Sarav AK (சரவணன் அ க)

Follow me on Linkedin My Profile Follow DevopsJunction onFacebook orTwitter For more practical videos and tutorials. Subscribe to our channel
Signup for Exclusive "Subscriber-only" Content