In this article, we are going to see how to connect to AWS ActiveMQ using Python.
STOMP ( Simple Text Oriented Messaging Protcol) is a protocol supported by Message Oriented Middleware products like ActiveMQ, RabbitMQ for faster and reliable message streaming.
We are going to use STOMP with Python to connect to ActiveMQ in this article.
Python provides a library called stomp.py which we will be using to connect to our message broker using the STOMP protocol.

Creating Certificate to present to SSL Stomp connector
Before you can execute the python code from the EC2 instance, there is a requirement we need to address
Remember that AWS ActiveMQ Supports STOMP with SSL
you can see it in the endpoint itself that it would have ssl+stomp
In order to connect to this SSL enabled stomp we must produce a certificate. So we are now going to create one dummy certificate using OpenSSL
Run the following code on your EC2 instance to generate the privateKey.key and cert.pem required for the SSL connection to ActiveMQ.
openssl req -newkey rsa:2048 -nodes -keyout privateKey.key -x509 -days 365 -out cert.pem
This would create a private key and a certificate that we can produce to the STOMP + SSL enabled AWS ActiveMQ.
Now we have the certificate file and the private key ready. Let us move on to copying the Python code and executing it
Creating AWS ActiveMQ
As we have mentioned already, we are going to use AWS ActiveMQ and our code is going to be deployed on EC2.
So we have given a quick Video how to create a AWS ActiveMQ with Simple Authentication.
Now we have created the AWS ActiveMQ with some user and password and now we can create the python program and can use the STOMP host and Port to connect
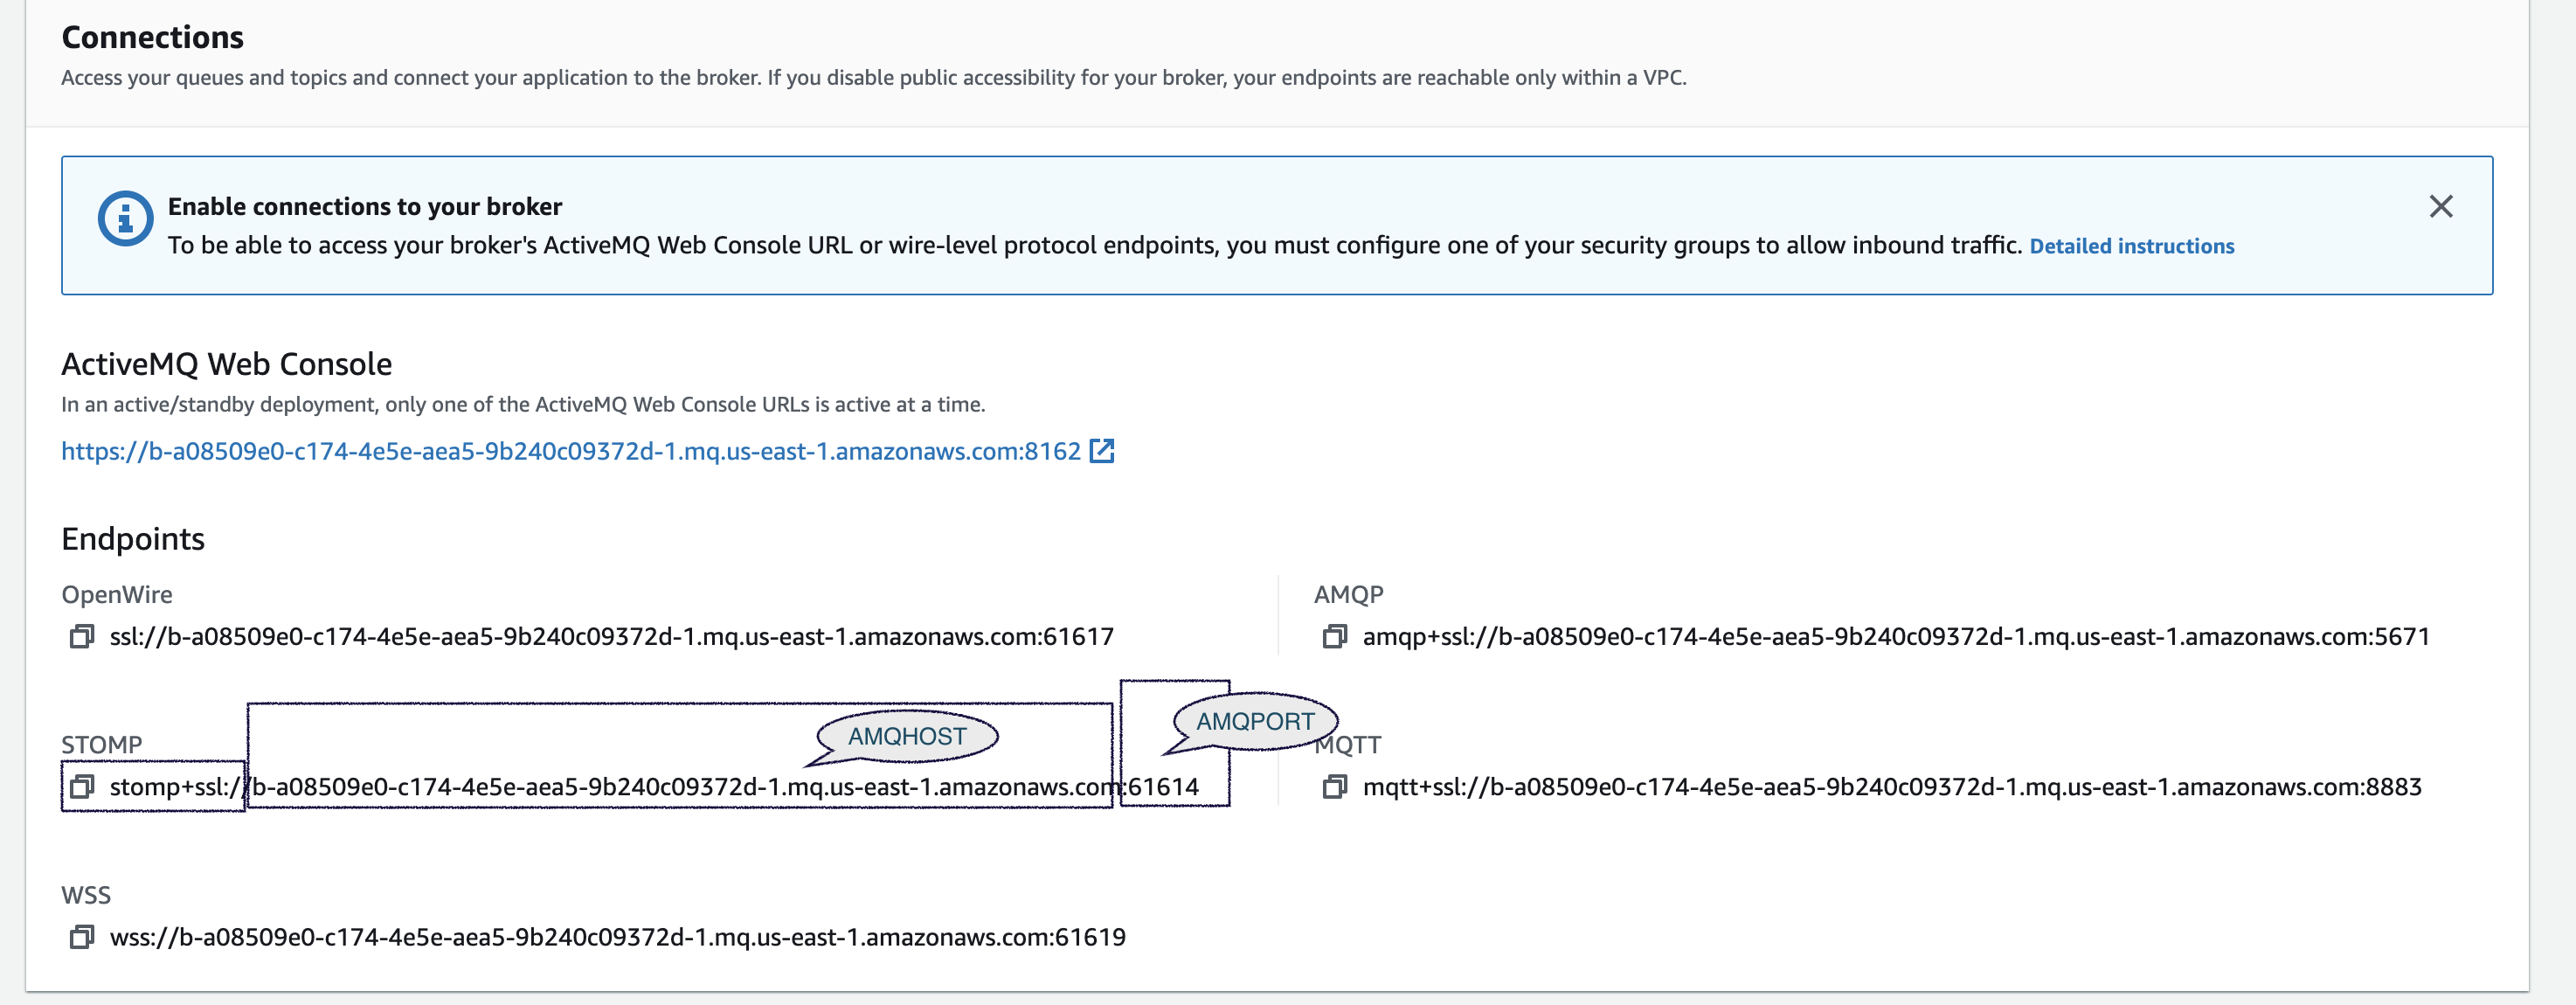
As you can see There are five different type of endpoints available with different protocol support
but we are going with STOMP
Python program to connect AWS ActiveMQ
This program is designed to connect to the AWS ActiveMQ using the STOMP protocol.
Before you can use this program, you need to replace the following variables in the python source code given below.
- AMQHOST - ActiveMQ Stomp Hostname ( stomp+ssl:// removed)
- AMQPORT - ActiveMQ Stomp port ( usually 61614 or 61613)
- AMQUSER - ActiveMQ userName that we created
- AMQPASS - ActiveMQ Password
- TOPICNAME - ActiveMQ Topic name ( if not exist, it would be created)
During the creation of the broker, we created the username and password which we would use as AMQUSER and AMQPASS.
Copy the following code and create a new file named amq-client.py
Note*: Make sure this python file is created/present on the same directory where we have created the privatekey and certificate pem file
Here is the source code
import time
import sys
import stomp
import ssl


class MsgListener(stomp.ConnectionListener):

    def on_error(self, message):
        print('received an error "%s"' % message.body)
    def on_message(self, frame):
        print('received a message "%s"' % frame.body)


AMQHOST=<YOUR STOMP HOST, WITH NO PROTOCOL SPECIFIED>
AMQPORT=<AMQ STOM PORT - 61614 usually >
AMQUSER=<USERNAME YOU CREATE IN AWS ACTIVEMQ>
AMQPASS=<PASSWORD OF THE USER NAME MENTIONED ABOVE>
TOPICNAME=topic/testtopic

hosts = [(AMQHOST, AMQPORT)]

conn = stomp.Connection(host_and_ports=hosts)
conn.set_listener('stomp_listener', MsgListener())
conn.set_ssl(for_hosts=[(AMQHOST, AMQPORT)], cert_file='cert.pem', key_file='privateKey.key',ssl_version=ssl.PROTOCOL_TLSv1_2)
conn.connect(AMQUSER, AMQPORT, wait=True,headers = {'client-id': 'clientname'})

conn.send(body=' '.join(sys.argv[1:]), destination=TOPICNAME)
time.sleep(320)
conn.subscribe(destination=TOPICNAME, id=1, ack='auto')


conn.disconnect()
Install PIP and Stomp
Now we need to install the Stomp Package on the EC2 instance where we are going to execute the python code.
if you do not have PIP, refer to this page and get it installed
Once the pip is installed and ready. execute the following command to install the stomp
pip install stomp.py
Make sure your EC2 instance has external internet connectivity otherwise you would not be able to install any PyPI packages.
Run the Program
Now run the Python program by issuing the following command
python amq-client.py "hello world"
If all goes well you will see your message being published into the topic name you have given and read back by the subscriber/listener we have configured.
Secure Alternative with AWS Parameter Store
In the preceding program, you might have seen that we are hardcoding the password and other configuration info
It is not a good practice to keep these secrets hardcoded in the production environment.
So the better alternative is to store these in some Secret Manager like
- Hashicorp Vault
- AWS Secret Manager
- AWS parameter Store
Since we are using the EC2 instance and an AWS ActiveMQ. Let us choose the AWS Vault mechanism
People usually prefer AWS Secret Manager over AWS Parameter Store but we are taking up AWS Parameter Store in this article.
AWS Parameter Store can be a viable solution to store secrets.
In order to use AWS Parameter Store in our program, we need to use boto3 the powerful python SDK to connect to AWS
Now here is the modified python code that uses boto3 to connect and fetch secrets/parameters from the AWS parameter store.
import time
import sys
import stomp
import ssl
import boto3

def read_param(paramname):
    ssm= boto3.client('ssm','us-east-1')
    parameter = ssm.get_parameter(Name=paramname,WithDecryption=True)
    print(parameter['Parameter']['Value'])
    return parameter['Parameter']['Value']

class MsgListener(stomp.ConnectionListener):

    def on_error(self, message):
        print('received an error "%s"' % message.body)
    def on_message(self, frame):
        print('received a message "%s"' % frame.body)


AMQHOST=read_param("AMQ_STOMP_URL")
AMQPORT=read_param("AMQ_STOMP_PORT")
AMQUSER=read_param("AMQ_USERNAME")
AMQPASS=read_param("AMQ_PASSWORD")
TOPICNAME=read_param("AMQ_TOPIC")

hosts = [(AMQHOST, AMQPORT)]

conn = stomp.Connection(host_and_ports=hosts)
conn.set_listener('stomp_listener', MsgListener())
conn.set_ssl(for_hosts=[(AMQHOST, AMQPORT)], cert_file='cert.pem', key_file='privateKey.key',ssl_version=ssl.PROTOCOL_TLSv1_2)
conn.connect(AMQUSER, AMQPORT, wait=True,headers = {'client-id': 'clientname'})

conn.send(body=' '.join(sys.argv[1:]), destination=TOPICNAME)
time.sleep(320)
conn.subscribe(destination=TOPICNAME, id=1, ack='auto')


conn.disconnect()
AWS Parameter Store.
Create Parameters using SecureString as the Parameter type. You can also choose other Parameter types but we recommend using SecureString for added security concerns
- Go to Parameter Store in AWS.
- Create a Parameter and enter the name.
- Choose Tier as Standard, Type as SecureString and enter the Value of the Parameter.
Your parameters would look like this: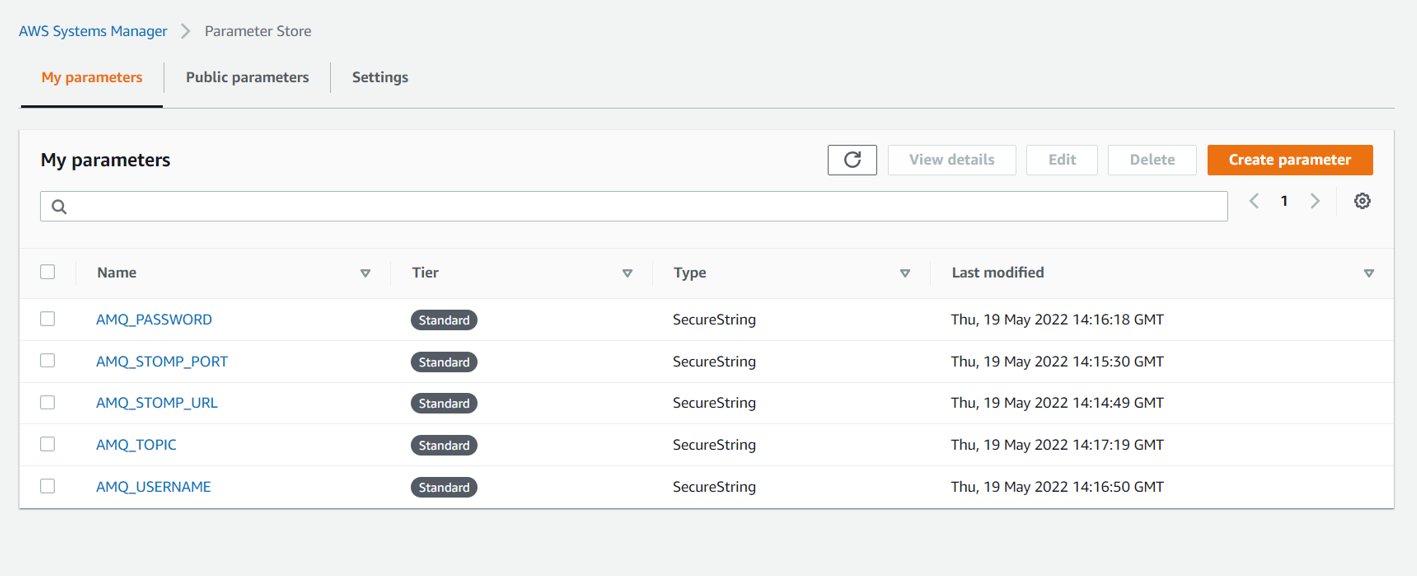
Creating IAM Role and mapping to EC2
As we are going to read the configuration and secrets from the AWS parameter store. We need to make sure that our EC2 instance has the right IAM role/permission to be able to do that.
To create IAM Role which is necessary for this objective, follow the steps:
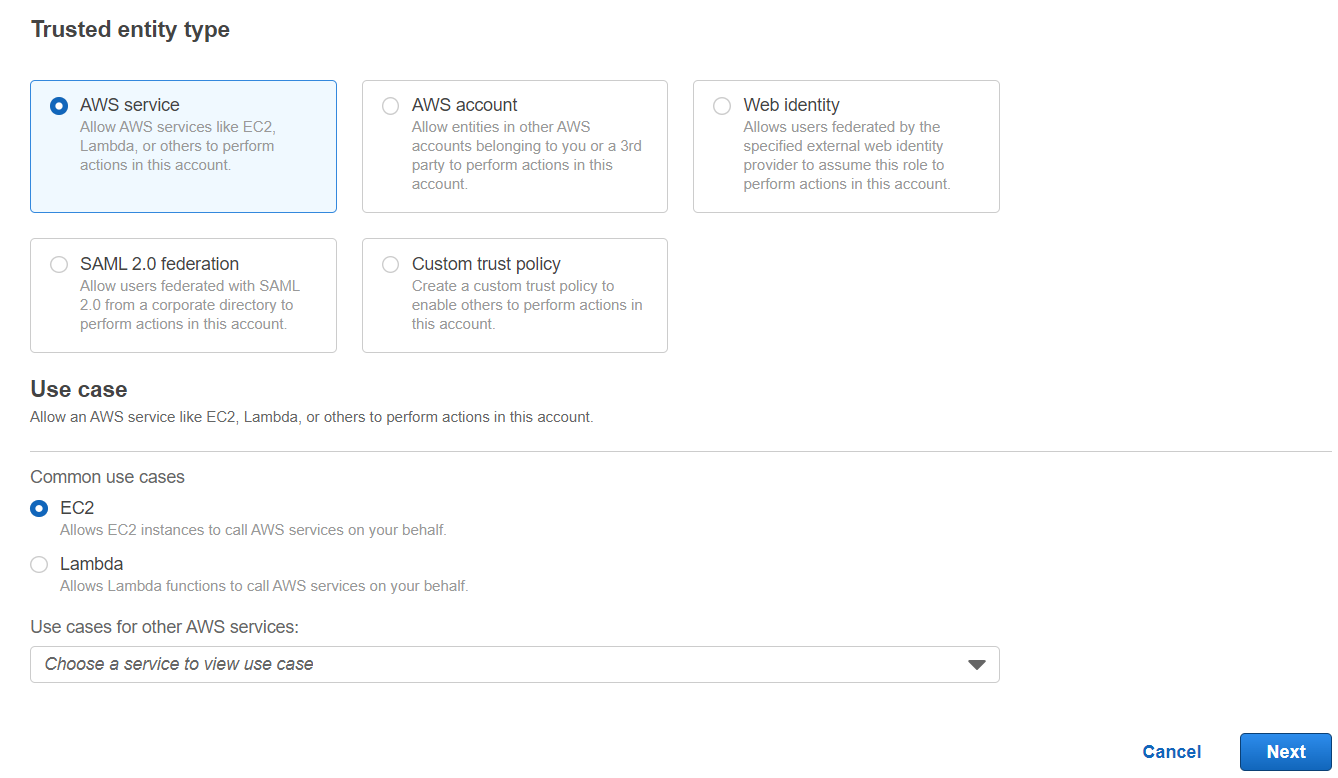
- Go to IAM > Roles > Create Role.
- Select AWS Service as Trusted entity type and EC2 as Use case.
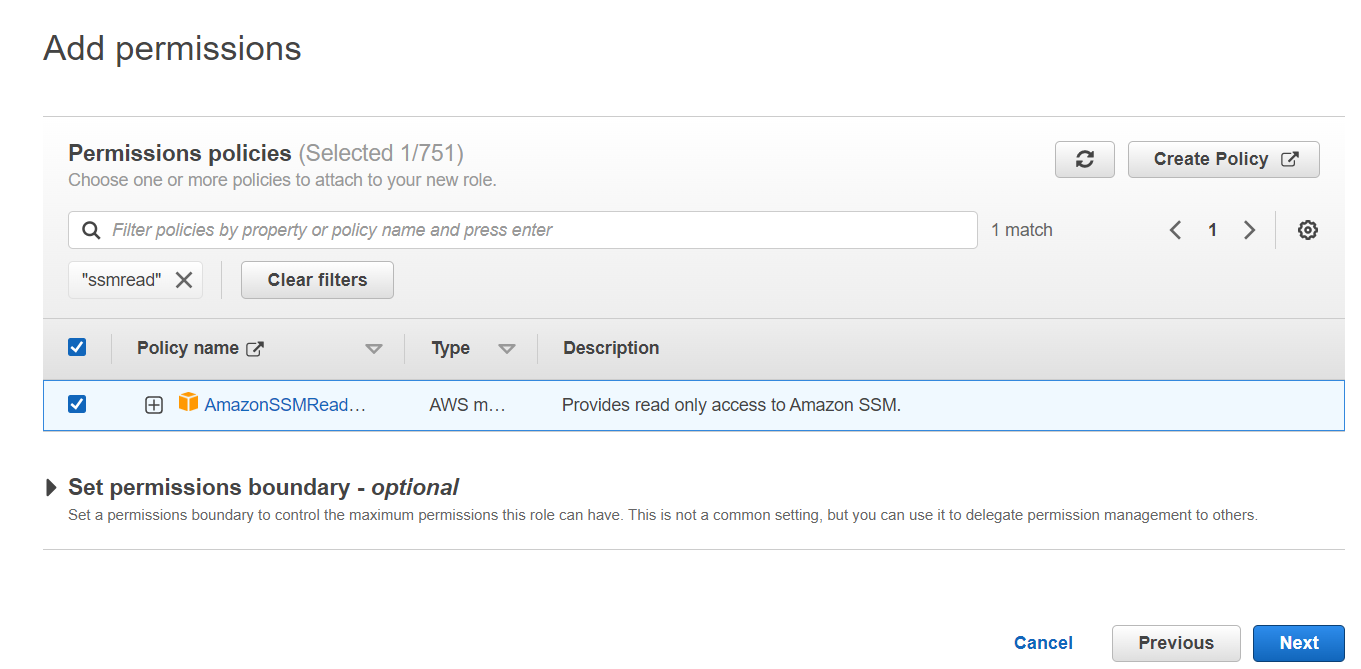
- Click Next and Add AmazonSSMReadOnlyAccess permission from Permission policies.
- Provide the Role name and create the role.
Now we have given permission for the Ec2 instance to read Parameters so we are good to test our code now.
Run the Program
Run your Python Client to establish the connection to your ActiveMQ Broker using the command:
python <name_of_your_python_client_file.py> "message"
Execution output
here is the execution output of the program when tried from our end

Conclusion
With this article hope you were able to learn how to use ActiveMQ with Python using STOMP protocol
we also covered how securely store and fetch the configuration and credential info from AWS Secret Manager/ Parameter Store using Boto3
If you have any requirement in DevOps where you need our professional help, please do reach out to us at [email protected]
Co Authored By
Vishnu & Sarav AK

Follow me on Linkedin My Profile Follow DevopsJunction onFacebook orTwitter For more practical videos and tutorials. Subscribe to our channel
Signup for Exclusive "Subscriber-only" Content