AWS CLI (Command Line Interface) is a powerful tool that allows users to interact with various AWS services through the command line. One of the essential features of AWS CLI is the ability to assume an IAM role, which allows users to access AWS resources and perform actions on behalf of another account or entity. In this article, we will explore the concept of assuming an IAM role using AWS CLI and provide examples to help you get started.

What is an IAM Role?
IAM (Identity and Access Management) is a service offered by AWS that enables users to manage access to AWS services and resources securely. IAM roles are a key feature of IAM, allowing users to define a set of permissions and policies that determine what actions an entity can perform on AWS resources. These roles can be assumed by other entities, such as AWS users or AWS services, to access resources and perform actions.
What is Assume Role?
Assuming an IAM role means temporarily taking on the permissions and policies assigned to that role to perform actions on AWS resources. When an entity assumes a role, it receives temporary security credentials that it can use to access resources for a specified period. AWS CLI allows users to assume an IAM role programmatically, making it easier to automate various tasks and operations.
How to Assume an IAM Role using AWS CLI?
Assuming an IAM role using AWS CLI involves a few steps, which we will outline below:
Step 1: Configure the AWS CLI
Before assuming an IAM role, you need to configure the AWS CLI with your access keys and region. You can do this by running the following command:
We presume that you have aws cli installed in your local.
aws configure
This command will prompt you to enter your AWS access key ID, secret access key, default region, and default output format. Once you have provided this information, the AWS CLI is ready to use.
Step 2: Create an IAM Role and attach policies
If you haven't already created an IAM role, you will need to do so before you can assume it. You can create a role using the AWS Management Console or the AWS CLI.
You can refer to this article from AWS on how to create a policy using the AWS Management Console
the document also covers trust policy and permissions
Here's an example of how to create an IAM role using AWS CLI:
aws iam create-role --role-name my-iam-role --assume-role-policy-document file://trust-policy.json
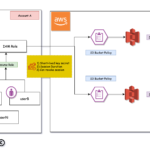
This command creates an IAM role named "my-iam-role" and attaches a trust policy to it. The trust policy defines which entities can assume the role.
Here is the sample trust policy JSON file
{
    "Version": "2012-10-17",
    "Statement": [
        {
            "Effect": "Allow",
            "Principal": {
                "Service": "ec2.amazonaws.com",
                "AWS": [
                    "arn:aws:iam::ACCOUNTID:user/sarav",
                    "arn:aws:iam::ACCOUNTID:user/smith",
                    "arn:aws:iam::ACCOUNTID:user/david",
                    "arn:aws:iam::ACCOUNTID:user/john"
                ]
            },
            "Action": "sts:AssumeRole"
        }
    ]
}
Remember, We are not defining any permission for this role to do that you can use the following command
aws iam put-role-policy --role-name my-iam-role --policy-name ExamplePolicy --policy-document file://AdminPolicy.json
Here is some sample Permission Policy JSON, that gives all s3 related permissions
{
    "Version": "2012-10-17",
    "Statement": [
        {
            "Effect": "Allow",
            "Action": [
                "s3:*",
                "s3-object-lambda:*"
            ],
            "Resource": "*"
        }
    ]
}
You can optionally attach the existing and AWS-managed policies using the attach-role-policy command
aws iam attach-role-policy \
--policy-arn arn:aws:iam::aws:policy/ReadOnlyAccess \
--role-name my-iam-role
Note: Hope you do not confuse yourself with two different policies
1. Trust policy - define who can assume the role, also known as assume role policy
2. Permission Policy - defines what permissions are entitled to this role
To know more about the IAM policy and it fields refer to this documentation from AWS
Some more links are given below to learn more about the AWS CLI IAM commands aforementioned.
- Read more about AWS CLI attach role policy
- Read more about AWS CLI Create-role
- Read more about put role policy
Step 3: Assume an IAM Role - with AWS CLI
Once you have configured the AWS CLI and created an IAM role, you can assume the role using the following command:
aws sts assume-role --duration-seconds 28800 \
--role-arn "arn:aws:iam::ACCOUNT-ID:role/my-iam-role" \
--role-session-name my-role-session
In this command, replace "ACCOUNT-ID" with the AWS account ID that owns the IAM role you want to assume. You must also replace "my-iam-role" with the name of the IAM role you want to assume. Finally, "my-role-session" is a name for your temporary session that will use the assumed role.
You can set the --duration-seconds from 900 seconds to 43200 seconds ( 12 hours).
Remember, the duration seconds cannot exceed the max session duration setting of the role itself.
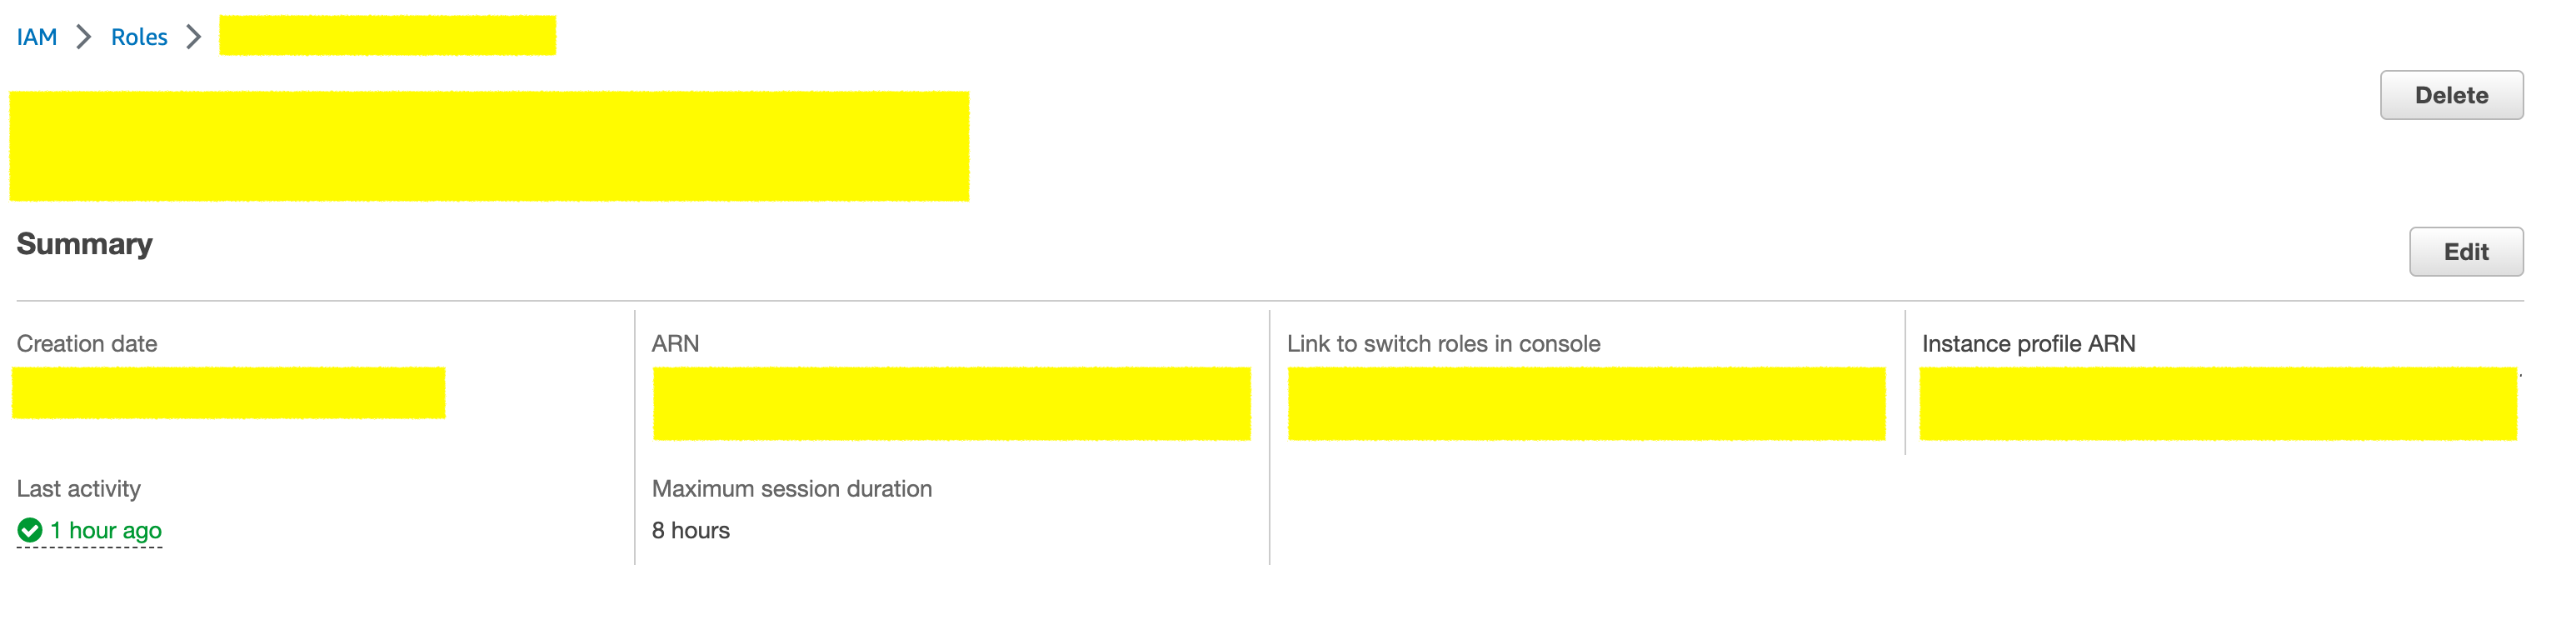
In the preceding screenshot you can see the maximum session duration set on the role is 8 hours and your --duration-seconds cannot exceed this 8 hours limit
The command returns a set of temporary security credentials that you can use to access AWS resources with the assumed role.
The output of this command would look like this
{
    "Credentials": {
        "AccessKeyId": "ASIAXXXXXXXXXXXXY",
        "SecretAccessKey": "v0riZaXXXXXXXXXdCCCXXXXXXm/tf1Zx",
        "SessionToken": "IQoJb3JpZ2luX2VjEND//////////wEaCXVzLWVhc3QtMSJGMEQCIEMPgxxxxxxxxxxxxxxxxxxxxxxxxxxxxxxxxxxxxxxxxxxxxxxxxxxxxxxxxxxxxxxxxxxxxxxxxxxxxxxxxxxxxxxxxxxxxxxxxxxxxxxxxxxxxxxxxxxxxxxxxxxxxxxxxxxxxxxxxxxxxxxxxxxxxxxxxxxxxxxxxxxxxxxxxxxxxxxxxxxxxxxxxxxxxxxxxxxxxxxxxxxxxxxxxxxxxxxxxxxxxxxxxxxxxxxxxxxxxxxxxxxxxxxxxxxxxxxxxxxxxxxxxxxvxxxxxxxxxxxxxxxxxxxxxxxxxxxxxxxxxxxxxxvJJLFOppIQa7aF8NM8ej2VHAvGNsAYZA0fSxFDviqQH/jX7P/YkwlaaIaYC1moaAgqHriKRxanLR4nK8U8z5QvRQSpCOKf7TF4+vRKvhXgUMLAYx8Evz3IC2A==",
        "Expiration": "2023-03-11T16:04:11+00:00"
    },
    "AssumedRoleUser": {
        "AssumedRoleId": "xxxxxxxxxx:my-role-session",
        "Arn": "arn:aws:sts::xxxxxxxxxx:assumed-role/my-iam-role/my-role-session"
    }
}
It would contain the following information
- AccessKeyID
- SecretAccessKey
- SessionToken
We need this information to be able to connect to the AWS account. Let us put these credentials into use
Step 4: Export the credentials and use it
To be able to use these credentials you need to export them or add them as a profile in your .aws credentials and config files
The easy way is to export these values one by one like this
export AWS_ACCESS_KEY_ID=<Value of the AccessKeyID>

export AWS_SECRET_ACCESS_KEY=<Value of the SecretAccessKey>

export AWS_SESSION_TOKEN=<Value SessionToken>
Once you have done exporting these values, Execute the following command to validate if your credentials are being accepted by aws
aws sts get-caller-identity
If all goes well you would see an output similar to this. If you look at the output closely you can see that the ARN would contain the assumed-role and the session-name you have set while running the assume-role command
{
"UserId": "ASIAXXXXXXSDXX:my-role-session",
"Account": "ACCOUNTID",
"Arn": "arn:aws:sts::ACCOUNTID:assumed-role/my-iam-role/my-role-session"
}
Now go ahead and run some other AWS CLI command and it would be using these credentials
The success of the subsequent AWS CLI commands is subject to the permissions granted for the role. In other words, you can only do the tasks which the role is allowed to do
In simple terms, Let's say you are an interim CEO of Microsoft or google you would have all the permissions and power that the CEO (role) usually entitles. On the other side, if you are taking the role of Junior software engineer you would have defined roles which you can do but not what the CEO can.
You basically assume the role which has its boundaries and permissions and what you can do with it is totally up to the Access policy of the role itself.
Step 5: Use assumed Credentials
With the temporary security credentials, you can now use AWS CLI commands to interact with AWS resources as the assumed role. For example, to list all Amazon S3 buckets in the account, you can run the following command:
aws s3 lsThis command lists all S3 buckets in the account that the temporary security credentials have access to.
There you go, you have successfully assumed the AWS role with AWS CLI
Assume role as Named Profile ( Best Practice)
As you have noticed in Step 4, you have to export the credentials as environment variables every time you run aws iam assume-role
It can get complex when you have multiple terminals open and a lot of copy and paste. In the process, you also compromise the security of the AWS Key and session token.
I have a solution for this, How about assuming the role an easy way using AWS Named profile
If you are new to AWS CLI named profile concept read this link before continuing
AWS CLI can take credentials from the Environment variable or from the ~/.aws/config and ~/.aws/credentials file. When you are using the Environment variable it is always risky as anyone can see your keys with simple echo $AWS_ACCESS_KEY or an env command
Using it as a named profile means that you store these credentials safely in the aws config and credential files with different names ( profiles)
It also lets you switch profiles whenever you want. using a single command as follows
# to switch to default role
export AWS_DEFAULT_PROFILE=default

# to switch to assumed role
export AWS_DEFAULT_PROFILE=assumed-role
here default and assumed-role are the names of the aws profiles
Now here is the script that basically does everything for you. It creates a profile and adds/append the temporary assumed credentials with a profile named assumed-role
which you can use any time you want with the preceding AWS_DEFAULT_PROFILE export method
#/bin/bash

tmpfile=/tmp/aws-session-file

aws sts assume-role --duration-seconds 28800 --role-arn "arn:aws:iam::ACCOUNTID:role/my-iam-role" --role-session-name `whoami`-`date +%d%m%y`-session > $tmpfile

AWS_ACCESS_KEY_ID=`cat $tmpfile|jq -c '.Credentials.AccessKeyId'|tr -d '"'`
AWS_SECRET_ACCESS_KEY=`cat $tmpfile |jq -c '.Credentials.SecretAccessKey'|tr -d '"'`
AWS_SESSION_TOKEN=`cat $tmpfile|jq -c '.Credentials.SessionToken'|tr -d '"'`

rm -rf $tmpfile

aws configure set aws_access_key_id $AWS_ACCESS_KEY_ID --profile assumed-role
aws configure set aws_secret_access_key $AWS_SECRET_ACCESS_KEY --profile assumed-role
aws configure set aws_session_token $AWS_SESSION_TOKEN --profile assumed-role
aws configure set region us-east-1 --profile assumed-role

export AWS_DEFAULT_PROFILE=assumed-role
export AWS_PROFILE=assumed-role

echo "Role Assumption has completed successfully"

export AWS_PAGER=""

aws sts get-caller-identity
Before running the script make sure, you update the following details on the script
- Account ID
- Duration seconds
- Role name
If everything goes well, the script would return a message Role Assumption has been completed Successfully and also display the new assumed role details
Good luck and Well done.
Conclusion
Hope this article helped you learn about Assume role and how to assume a role with AWS CLI and use them.
We also have learnt how environment variables and named profiles play a key role in IAM assume-role and created a script to assume the role and create a named profile with ease
Let me know in the comments if you have any questions for me.
Cheers
Sarav AK

Follow me on Linkedin My Profile Follow DevopsJunction onFacebook orTwitter For more practical videos and tutorials. Subscribe to our channel
Signup for Exclusive "Subscriber-only" Content