Most of the organizations using AWS as their cloud platform have multiple AWS accounts to isolate NonProd and PROD to the minimum.
In some cases, there could be dedicated AWS accounts for each environment like Dev, QA, Stage etc.
In such cases, when you want to access a resource (let's say S3 bucket) from another AWS account need a well-designed system architecture.
When you think of connecting two AWS accounts together we mostly think about VPC peering but that ends at the network level.
When you want to allow a user from one AWS account to access a resource from another AWS account.
You need a proper IAM permission design.
In this article, We are going to see two methods to achieve this cross-account permission grant.
In our case, the resource we are giving access to is an S3 bucket
Refer to the following diagram to understand our requirement

As you can see in the preceding diagram we have two AWS accounts, named as Account A and Account B respectively.
We have two IAM users ( user A and B ) in Account A who want to access S3 buckets (SampleBucketA and B) from Account B
Simply put, the s3 buckets are on one AWS account the users are on another.
To enable the users from Account A to access S3 buckets on Account B. we need to cross two permission sets which are
- User's IAM Permissions - defines what action the user can do on
Account A - S3 bucket ACL policy - defines who can access the S3 bucket on
Account B
Two approaches to grant cross-account access to the user
As we have mentioned earlier, there are two methods to grant cross-account S3 access to the user
- Direct cross-account access permission to every individual user
- Controlling the permissions with an IAM role and enabling users to assume role.
Both have their advantages and disadvantages.
I have explained both these strategies in a detail below. Please read through and choose the best suits you.
Adding the user directly to the S3 bucket policy.
While this is easy to implement and simple. It gets complex when you want to add multiple users to multiple buckets.
As the permutations increase it would be harder to manage and keep track
Remember the S3 bucket policy has a limit of 20kb in size so we cannot keep adding users as it would increase the Policy file size.
here is the pictorial representation of this method

as you can see we have to add each user to the bucket policy
Let's suppose Account B is managed by someone else. you need to reach out to them every time you add a new user to update the S3 policy.
Another security disadvantage of this approach is that de-provisioning or removing the user requires change at two accounts.
Like our other approach, there is no way to control the access and session duration etc.
So let us move on to the next and better approach with these listed disadvantages addressed
Letting the user assume the role ( recommended)
Now the other way is to add all the users and the necessary permissions to a single role let's call it assume-access-role
With this method, you do not have to give any access to the user directly. All the necessary access would be given to a single specially designed role.
You can add N number of users to this role and all can assume the role and use it.
Another major advantage is that. the AWS KEY and Secret and session tokens given to the user are ephemeral and you can control how many minutes or hours the user can assume this role.
In case you want to revoke the access all of a sudden you can do that too and the user would lose access immediately.
Also, you do not have to depend on the Account B administrator when you provision or de-provision a user
Here is what it looks like as a System design
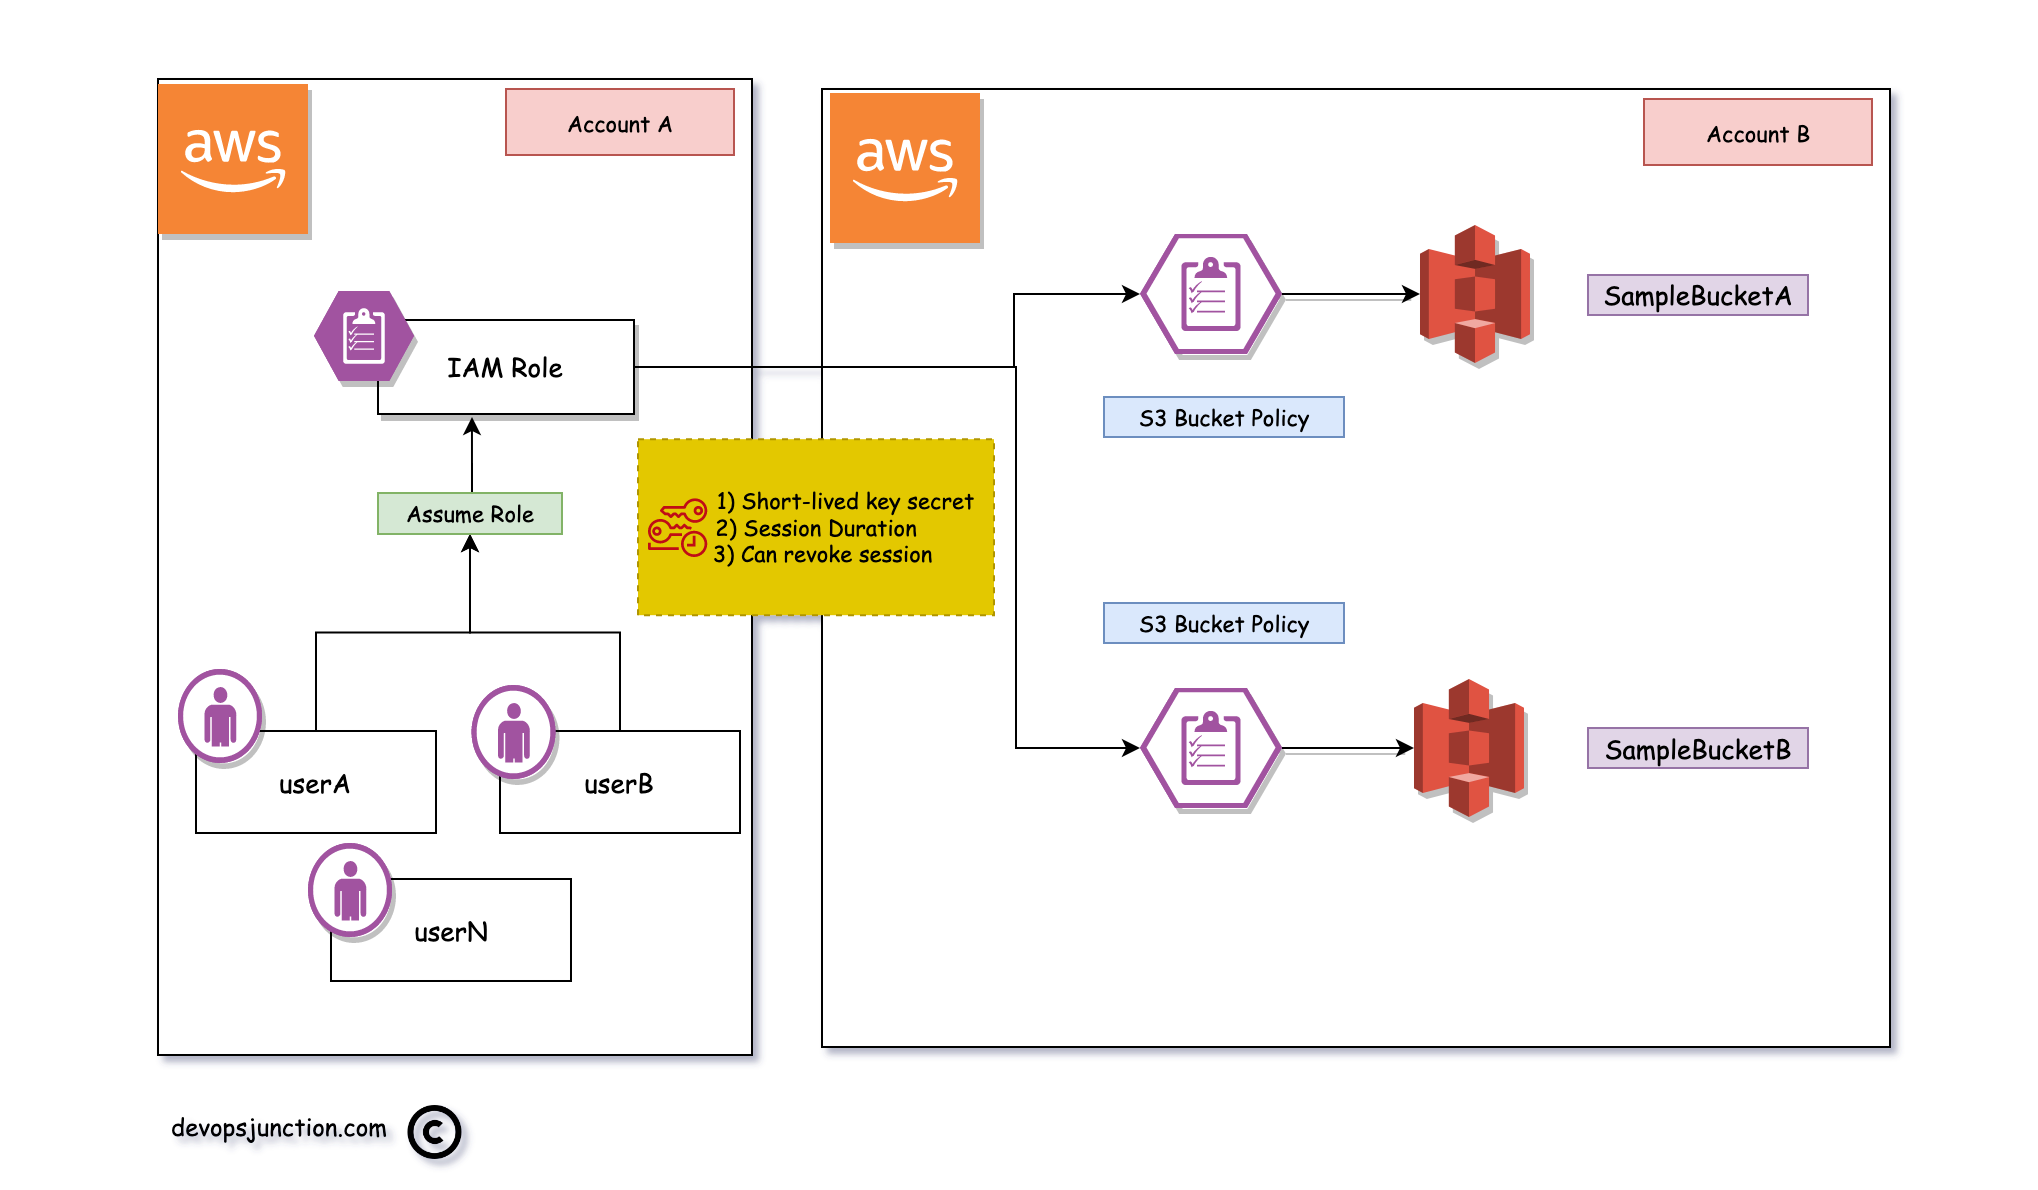
You can see that we have multiple users they all have an assume role access to a single IAM role.
that Single IAM role is added to the remote account's (Account B) bucket policies only one time.
You can keep adding and removing the user to a single role at Account A with no changes required to be done at the Account B
As I have said it has the following advantages
- Time restriction
- Ephemeral Access KEY and Secret
- The session can be tracked and revoked at any time by the administrate
- Centralized access management. So less dependency on the Account B
- No direct access is given to the user
Based on what method you want to implement the configuration would vary. I have given steps for both approaches
Direct User Access - Adding user directly to the S3 policy
This approach consists of two steps
- Updating the user's IAM permission to reach the bucket
- Adding the User to the S3 Bucket policy
let us start with the user IAM permission
User IAM Configuration
As the user is created on the AWS. he must be given permission and it can be done by adding a policy directly to the user or by adding the user to a group which has pre-defined policies
In either case, the user must have permission to access the s3 buckets ( either inherited from the group or from the direct policy)
the policy should be allowing the following Actions on the bucket SampleBucketA and Bwhich is on the other AWS account
- GetObject
- PutObject
- PutObjectACL
You might think how can we define access control for the bucket which is not even in our AWS account?
If you look at the policy given below, you can see there are no account identifiers. but why?
S3 Bucket ARNs do not require an account number or region since bucket names are unique across all accounts/regions. just like your email ID
{
    "Version": "2012-10-17",
    "Statement": [
        {
            "Effect": "Allow",
            "Action": [
                "s3:GetObject",
                "s3:PutObject",
                "s3:PutObjectAcl"
            ],
            "Resource": "arn:aws:s3:::SampleBucketA/*"

        }
    ]
}
Now we have defined the permissions for our user on Account-A. let us move on to Account-B and configure the S3 Bucket permissions.
Configuring S3 bucket permissions on Account B
we have completed the IAM user permissions on Account-A to allow the S3 bucket on Account B. Now it's time to configure our S3 bucket to allow the user to call.
I presume you are aware that every S3 bucket has a permission set known as the S3 bucket policy. if you go to permissions tab on your S3 bucket you can see it
The following S3 policy for the bucket allows the user directly to perform the Actions defined.
You can see we are defining the user information on the Principal section directly
Since each bucket has its own policy you have to update the policy in both buckets
For SampleBucketA
{
    "Version": "2012-10-17",
    "Statement": [
        {
            "Effect": "Allow",
            "Principal": {
                "AWS": [
                    "arn:aws:iam::AccountA-ID:user/userA",
                    "arn:aws:iam::AccountA-ID:user/userB"
                ]
            },
            "Action": [
                "s3:GetObject",
                "s3:PutObject",
                "s3:PutObjectAcl"
            ],
            "Resource": [
                "arn:aws:s3:::SampleBucketA/*"
            ]
        }
    ]
}
For SampleBucketB
{
    "Version": "2012-10-17",
    "Statement": [
        {
            "Effect": "Allow",
            "Principal": {
                "AWS": [
                    "arn:aws:iam::AccountA-ID:user/userA",
                    "arn:aws:iam::AccountA-ID:user/userB"
                ]
            },
            "Action": [
                "s3:GetObject",
                "s3:PutObject",
                "s3:PutObjectAcl"
            ],
            "Resource": [
                "arn:aws:s3:::SampleBucketB/*"
            ]
        }
    ]
}
Now userA and B from Account A can connect to the S3 buckets on Account B.
We already have seen the disadvantages of this method earlier.
Now, let us move on to another method of IAM role with assume role
IAM role based Access - enabling users to assume the role
In this approach instead of adding each user to the remote S3 bucket policy, we are going to add them to a Single Role.
This Single role from Account A would be added to Account B only once. That's all
You do not have to depend on the Account B administrator anymore for any user provisioning or offboarding
You can add N number of users to the Account A IAM role. also, define how much time the users can assume this role ( duration)
Now let us get to the steps to be performed
- Create a role with necessary S3 bucket permissions ( inline policy or policy attachment )
- Add the users to the Trusted Entities of the role
- Add the role to the S3 bucket policy principal
Creating an IAM role with S3 permissions
Let us create a role and am naming it assumed-accountb-role to be explicit and add an inline policy as given below
{
    "Version": "2012-10-17",
    "Statement": [
        {
            "Effect": "Allow",
            "Action": [
                "s3:GetObject",
                "s3:PutObject",
                "s3:PutObjectAcl"
            ],
            "Resource": [
               "arn:aws:s3:::SampleBucketA/*",
               "arn:aws:s3:::SampleBucketB/*"
            ]
        }
    ]
}
in the policy, I just define the list of Actions and the resources ( s3 bucket names)
You can either add this as inline policy or create a policy and attach it to the role, In production, it's better to avoid inline policies
Now I assume the policy is ready. Its time to add the users to Trusted Entities
Add the users to the role Trusted Entities to enable Assume role
To add trusted entities you can click on the created role and go to Trusted Entities tab, you might see something like this
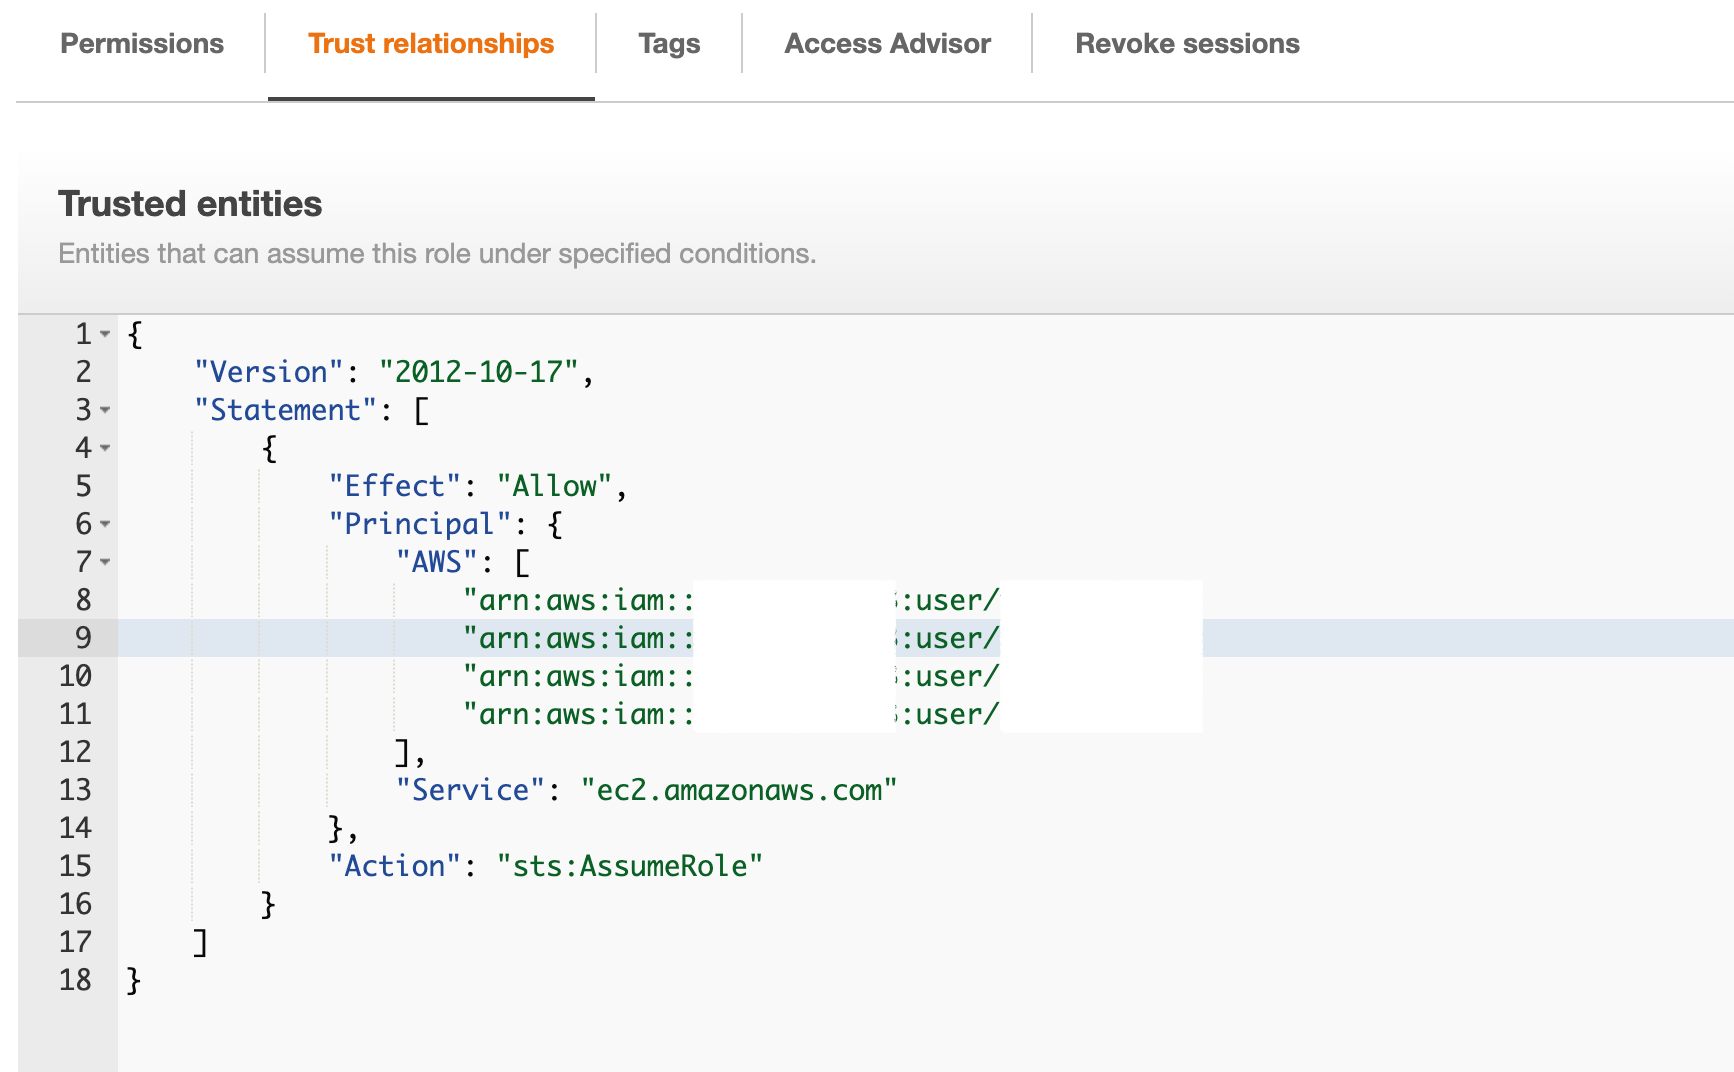
the username and account ID are masked in the preceding screenshot for security reasons
Here is the template you can copy and edit
{
    "Version": "2012-10-17",
    "Statement": [
        {
            "Effect": "Allow",
            "Principal": {
                "AWS": [
                    "arn:aws:iam::accountA:user/userA",
                    "arn:aws:iam::accountA:user/userB",
                    "arn:aws:iam::accountA:user/Sarav"
                ],
                "Service": "ec2.amazonaws.com"
            },
            "Action": "sts:AssumeRole"
        }
    ]
}
as you can see we have the users from Account A and we have given them an sts:AssumeRole permission
With the changes completed at the Account A
Adding the role to the S3 bucket policy
Now let us move on the Account B and add the role to the S3 bucket policy allowed principles
As we have mentioned earlier, you have to add the role to each bucket policy as every bucket has its own policy
Sample Bucket A - Bucket Policy
{
    "Version": "2012-10-17",
    "Statement": [
        {
            "Sid": "allow-access-samplebucketA",
            "Effect": "Allow",
            "Principal": {
                "AWS": [
                    "arn:aws:iam::accountA:role/assumed-accountb-role"
                ]
            },
            "Action": "s3:*",
            "Resource": [
                "arn:aws:s3:::SampleBucketA/*",
                "arn:aws:s3:::SampleBucketA"
            ]
        }
    ]
}
Sample Bucket B - Bucket Policy
{
    "Version": "2012-10-17",
    "Statement": [
        {
            "Sid": "allow-access-samplebucketB",
            "Effect": "Allow",
            "Principal": {
                "AWS": [
                    "arn:aws:iam::accountA:role/assumed-accountb-role"
                ]
            },
            "Action": "s3:*",
            "Resource": [
                "arn:aws:s3:::SampleBucketB/*",
                "arn:aws:s3:::SampleBucketB"
            ]
        }
    ]
}
That's it the user can now assume the role using aws sts assume-role
You can optionally configure the maximum session duration by editing the role
In the following snapshot, you can see the Maximum session duration I have set for this role is 8 hours.
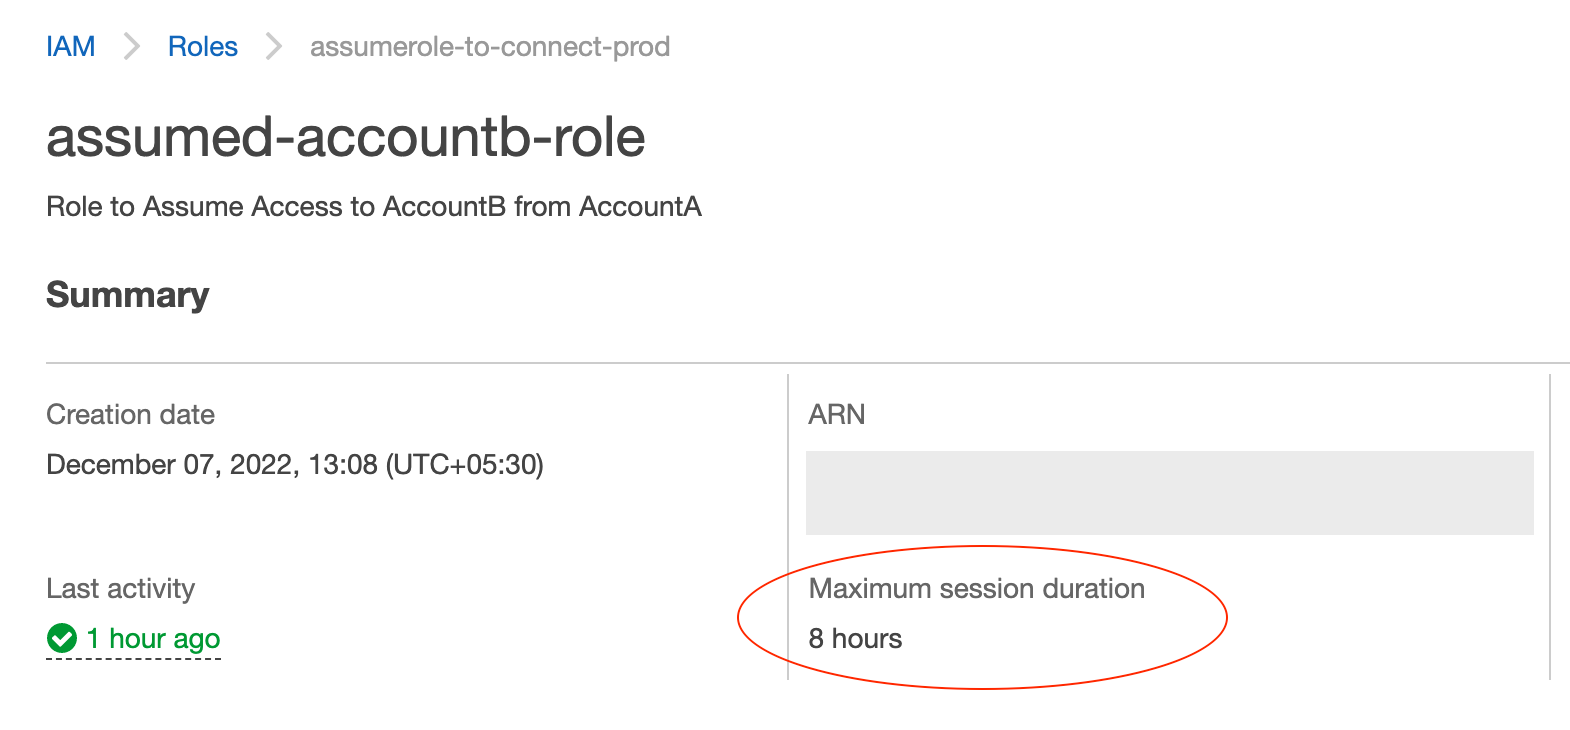
It means that the users can assume this role for a max period of 8 hours.
Assuming the role with aws sts
With that said, the users can use the following command to assume the role
$ aws sts assume-role – duration-seconds 28800 – role-arn "arn:aws:iam::accountA:role/assumed-accountb-role" – role-session-name Sarav-Session
in the preceding command, you can see that we are calling the assume role with a role arn and the duration is set for 8 hours ( 28800 seconds) that's the maximum allowed per the role
Despite the maximum value being set at the role level, the actual duration would depend on the --duration-seconds argument set during the assumed role invocation
Upon executing the assume-role command you would receive the following details.
The Session name is what we have defined with --role-session-name
{
    "Credentials": {
        "AccessKeyId": "ASIAXXXXXX3GB4DFP",
        "SecretAccessKey": "GtJCHXxxxxxxxxxxxxxxxxxxxxxxxrq93o",
        "SessionToken": "xxxxxxxxxxxxxxxxxxxxxxxxxxxxxxxxxxxxxxxxxxxxxxxxxxxxxxxxxxxxxxxxxxxxxxxxxxxxxxxxxxxxxxxxxxxxxxxxxxxxxxxxxxxxxxxxxxxxxxxx",
        "Expiration": "2022-12-11T17:12:04+00:00"
    },
    "AssumedRoleUser": {
        "AssumedRoleId": "AROAxxxxxxxxxWR72T:Sarav-Session",
        "Arn": "arn:aws:sts::751115992403:assumed-role/assumed-accountb-role/Sarav-Session"
    }
}
You need to use these credentials and set it as an environment variable to be able use in your subsequent calls
export AWS_ACCESS_KEY_ID = Credentials.AccessKeyId

export AWS_SECRET_ACCESS_KEY = Credentials.SecretAccessKey

export AWS_SESSION_TOKEN = Credentials.SessionToken
You need to replace the placeholder with the right values from the response you have got.
I have created a script which will make it easy for you
AWS Assume Role the easy way - shell script
The following script helps you assume the AWS role the easy way.
you do not have to manually copy and paste the keys and set the environment variables every time.
Whenever you need to assume the role, just execute the following script and it would create a profile named assumed-role using aws configure
It also updates the Access Key, Secret and Session token into the aws profile config and credentials file
so that once you run the script, every time you need to assume the role. you can simply set the profile as the default profile
export AWS_DEFAULT_PROFILE=assumed-role
you can re-run the script only when you need to refresh your session token and the maximum duration is reached
how can you know that the duration is reached you would receive the following error message if the session is expired
An error occurred (ExpiredToken)
Source code of the assume role script
Here is the source code of the script. you can copy it and save it in your local
#/bin/bash

tmpfile=/tmp/aws-session-file

aws sts assume-role – duration-seconds <duration> – role-arn <the-assumerole-arn> – role-session-name `whoami`-`date +%d%m%y`-session > $tmpfile

AWS_ACCESS_KEY_ID=`cat $tmpfile|jq -c '.Credentials.AccessKeyId'|tr -d '"'`
AWS_SECRET_ACCESS_KEY=`cat $tmpfile |jq -c '.Credentials.SecretAccessKey'|tr -d '"'`
AWS_SESSION_TOKEN=`cat $tmpfile|jq -c '.Credentials.SessionToken'|tr -d '"'`

aws configure set aws_access_key_id $AWS_ACCESS_KEY_ID – profile assumed-role
aws configure set aws_secret_access_key $AWS_SECRET_ACCESS_KEY – profile assumed-role
aws configure set aws_session_token $AWS_SESSION_TOKEN – profile assumed-role
aws configure set region us-east-1 – profile assumed-role

export AWS_DEFAULT_PROFILE=assumed-role
How to run this aws assume role script
Since this script sets the environment variable the script must be executed with a dot operator like this
. ./assume-role.sh
the dot operator makes sure the export we do at the end of the script is persisted in the terminal environment
If you simply run the script without a dot operator. you might have to explicitly run the export command every time you need to set the default profile
export AWS_DEFAULT_PROFILE=assumed-role
A Quick recap
In this article, we have seen how to give cross-account S3 access and enable users from one account to reach the S3 bucket on another account.
We have seen two methods/approaches to achieve the same
- Giving the user permission to access S3 bucket directly and adding them to the S3 bucket policy
- Adding the user to an IAM role and adding the role one time to S3 bucket policies. user can therefore assume the role and reach the S3 bucket
- We also have seen how to assume the role manually and use the script we have created.
that's a quick summary of this article. Before we wrap this up. A Quick reminder.
All the policies given above including the shell script contain placeholder values. you must replace them with your right ARN, Account ID, Username etc.
If you have any questions or feedback. please reach out in the comments section
Hope this helps
Cheers
Sarav AK

Follow me on Linkedin My Profile Follow DevopsJunction onFacebook orTwitter For more practical videos and tutorials. Subscribe to our channel
Signup for Exclusive "Subscriber-only" Content