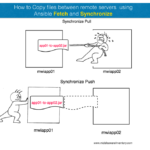
Kubectl cp command is most widely used to copy files between pods and local file system.
It is more like SCP in Linux world to copy files between local to remote machines using ssh protocol.
With kubectl cp you can perform the following tasks
- upload a file to the pod from the local file system
- download a file from the pod to the local
- update/replace the files on the pod with a local copy
In this article, we will go through all the details you would require to copy files from and to the container in Kubernetes using kubectl.
We will see examples of
- how to copy files from your local machine to a container (pod)
- how to copy files from a container(pod) to a local machine
If you are getting that question just like me. Can we use kubectl cp to copy files between two PODs the answer is NO.
You cannot copy files between pods using kubectl cp, you can use Volumes to share files between pods
The syntax of Kubectl cp
Kubectl CP is as simple as a typical Linux CP command.
kubectl cp <source-file-path> <destination-file-path>
Here is the syntax to copy a file from local to pod
kubectl cp /<path-to-your-file>/<file-name> <pod-name>:<fully-qualified-file-name> -c <container-name>
Here is the syntax to copy a file from the pod to local
kubectl cp <pod-name>:<fully-qualified-file-name> /<path-to-your-file>/<file-name> -c <container-name>
Points to remember
- While referring to the file path on the POD. It is always relative to the WORKDIR you have defined on your image.
- unlike Linux, the base directory does not always start from the
/workdir is the base directory - When you have multiple containers on the POD you need to specify the container to use with the copy operation using
-cparameter
Quick Example of kubectl cp
Here is the command to copy the index.html file from the POD's /var/www/html to the local /tmp directory
No need to mention the full path, when the doc root is the workdir or the default directory of the image.
kubectl cp apache-pod:index.html /tmp
To make it less confusing, you can always write the full path like this
kubectl cp apache-pod:/var/www/html/index.html /tmp
Our Objective
Consider that we have deployed an Apache Tomcat web server as a Microservice on our Kubernetes cluster ( find out how to install Tomcat on your Kubernetes cluster here).
We can list the files on our pod's working directory using the command :
kubectl exec -t <pod-name> – ls -lrta
The output of this command would look like this:
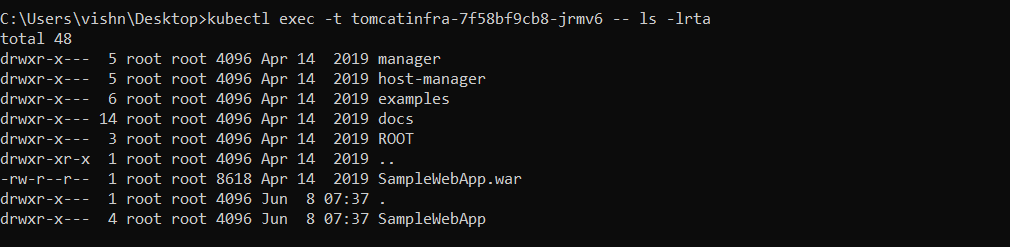
Replace <pod-name> with the output of the command kubectl get pods.
To view the contents of a folder, use the command :
kubectl exec -t <pod-name> – ls -lrta <folder-name>
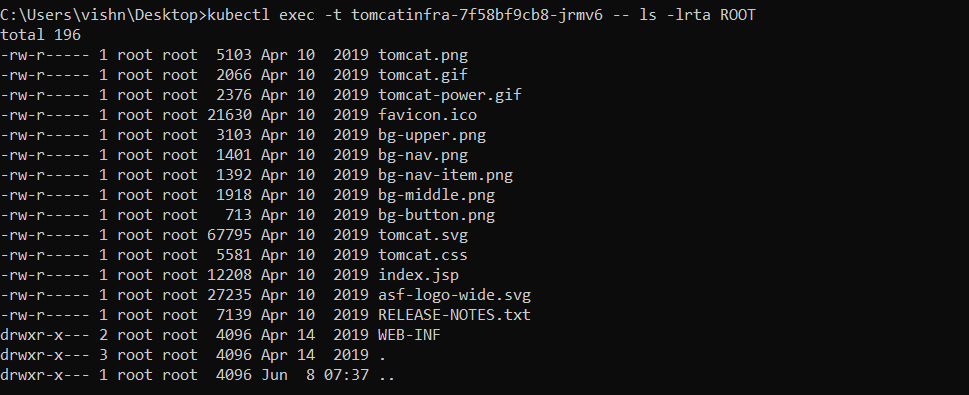
In this preceding image, we are trying to list down the ROOT deployment directory of the tomcat. ( note this is Linux root )
Here we are not defining the full path of the ROOT directory as it would always be a relative path of the WORKDIR of your container
The image we are using in this article is from our dedicated Dockerfile Tomcat example article.
If you check that article you can find our WORKDIR is set to /opt/tomcat/webapps deployment root of the tomcat server.
Now back to our objective
So, in our requirement, we are going to change the default landing page of tomcat by adding a customized index.html file into the ROOT application directory under web apps.
By default, Tomcat will give precedence to this index.html over the built-in index.jsp file.
We will use the kubectl cp command to upload/copy this file to the Pod.
kubectl cp command examples
Now that we got an idea about the file structure in the pod using kubectl exec
We can move ahead and learn how to use the kubectl cp command.
Copying files from a local machine to a container (Pod)
To copy a file from your local machine to a container, use the following command :
kubectl cp /<path-to-your-file>/<file-name> <pod-name>:<folder>/<file-name> -c <container-name>
Since a pod can have multiple containers, when you are copying files using the kubectl cp command, you should always specify the container from/to which you will be copying the files.
To list all the containers inside a pod, use the command:
➜ kubectl get pods <pod-name> -o jsonpath='{.spec.containers[*].name}'
Let us look at some examples to get a better understanding.
➜ kubectl cp /Users/vishn/Desktop/index.html tomcatinfra-7f58bf9cb8-wvmhl:ROOT/index.html -c tomcat8

➜ kubectl cp /Users/vishn/Desktop/gritfygif.gif tomcatinfra-7f58bf9cb8-wvmhl:ROOT/gritfygif.gif -c tomcat8
In this example, I specified the container in which my web server is installed, then I replaced the default landing page of the web server with an index.html page I created and also added a GIF file that my index.html page contains.
Note: Remember, you have to specify the file name in both the source and destination. The command won't work if you just specify a directory.
Container (Pod) to a local machine
To copy a file from the container to your local machine, use the following command :
kubectl cp <pod-name>:directory/<file-name> /<path-to-your-file>/<file-name> -c <container-name>
Now let's look at our example for this command.
➜ kubectl cp tomcatinfra-7f58bf9cb8-wvmhl:ROOT/index.jsp /Users/vishn/Desktop/index.jsp -c tomcat8
This will create a file named index.jsp on my machine and copy the contents of the same file from the tomcat container inside the pod to the file on my local machine.
See kubectl copy in action - video
Here is the terminal record of how to perform kubectl cp in real time.
In this terminal record, I am creating a namespace, a deployment and updating ( Downloading/Uploading) the index.jsp file using kubectl cp.
See the record to get more understanding on kubectl cp and how it works.
How to copy directories recursively with kubectl cp
We have seen how to copy a single file from or to pods and containers using kubectl cp
But sometimes our requirement would not just end in the files. we might want to copy directories or directories of directories
How to do that
It is simple, to copy a directory from the POD to the local. all you have to do is to mention the directory name just like the file name
Here is the syntax to copy a directory from POD to local ( download)
kubectl cp <pod-name>:directory-name <path-on-local-file-system>/directory-name -c <container-name>
Here is the syntax to kubectl copy a directory from local to POD (upload)
kubectl cp <path-on-local-file-system>/directory-name <pod-name>:directory-name -c <container-name>
See it in action here
In this video we have explained how to copy a directory between POD and the local file system using kubectl cp command
Conclusion
In this article, we learned a few important things. Let's take a quick recap of them.
- View the files on the pod's active directory using the command:
kubectl exec -t <pod-name> – ls -lrta
- Copy files from your local machine to the container(pod) using the command:
kubectl cp /<path-to-your-file>/<file-name> <pod-name>:<folder>/<file-name> -c <container-name>
- Copy files from the container(pod) to your local machine using the command:
kubectl cp <pod-name>:folder/<file-name> /<path-to-your-file>/<file-name> -c <container-name>
If you have any product and Cloud / DevOps requirements, Please do contact us for free consulting at [email protected]
Co Authored by
Vishnu & Sarav

Follow me on Linkedin My Profile Follow DevopsJunction onFacebook orTwitter For more practical videos and tutorials. Subscribe to our channel
Signup for Exclusive "Subscriber-only" Content