In this post, we are going to learn how to install a Tomcat Application Server or Web Container on Docker and Deploy web applications into the Tomcat running inside Docker. This post is all about Docker Tomcat and deploying war web application into tomcat docker, Sample Docker Tomcat image, Dockerfile for tomcat
In this Docker tomcat example, We will start with Creating a Tomcat Docker Image and Create a Docker Container from that image and Learn how to Manage the Container and Deploy our Web Application to the Tomcat running on Docker.
Steps to Build Docker Tomcat Image
- Step1: Creating Tomcat Docker Image ( Dockerfile)
- Step2: Build the Image
- Step3: Publishing to Docker ( So that you can reuse the image globally)
- Additional: How can you download and reuse this image
- Step4: Starting the Container from the Tomcat Docker Image
- Step5: Access the Sample Web Application Deployed already
- Commands to Manage your Docker Tomcat Container
- Way forward to Deploy this container to Kubernetes
Prerequisites
We are presuming that you have all these items checked from the following CheckList
- Prior Knowledge of Tomcat
- Basic Knowledge of Docker and Container ( Refer this articles, If you want to refresh)
- Working Environment with Docker CE and Internet Connectivity
Step1: Creating Docker Tomcat Image - Example
First Let us start with Creating a New Directory (workspace) in which we are going to create our Dockerfile and Copy the Web Applications and other configuration files which needs to be shared with the Container.
You can also use the Existing directory but creating a new and Separate directory for your all your container projects are recommended for Clean infrastructure
Creating a Work Space Directory (or) Use the Existing one.
I have created a new directory named "/apps/docker/DockerTomcat" Along the way till the end of this article, I would refer this directory as WORKSPACE directory
Creating a DockerFile - Docker Tomcat Image
Inside the workspace, we are going to create a Dockerfile with the following content
Note*: Dockerfile must start with 'D' as upper case.
In the Dockerfile, I have used the tomcat download URL of my region. you can replace it with the functioning tomcat download url for your region. You can get your download link here
FROM centos

MAINTAINER [email protected]

RUN mkdir /opt/tomcat/

WORKDIR /opt/tomcat
RUN curl -O https://www-eu.apache.org/dist/tomcat/tomcat-8/v8.5.40/bin/apache-tomcat-8.5.40.tar.gz
RUN tar xvfz apache*.tar.gz
RUN mv apache-tomcat-8.5.40/* /opt/tomcat/.
RUN yum -y install java
RUN java -version

WORKDIR /opt/tomcat/webapps
RUN curl -O -L https://github.com/AKSarav/SampleWebApp/raw/master/dist/SampleWebApp.war

EXPOSE 8080

CMD ["/opt/tomcat/bin/catalina.sh", "run"]
Here
MAINTAINER – Who Crate and manage this container image
FROM – What is the base image, we are going to use to host our container. you can either use a minimal OS image like CentOS, Alpine or you can create your own from the scratch by mentioning SCRATCH as a value to this.
RUN – Commands to Run to make the image( the future container) in the way you want
EXPOSE Do you want your image or application in the image to expose any port to the external world or at least to the host. For example if you are building Apache HTTP server image you can EXPOSE port 80, In our case it is 8080
CMD The Default Command of the container which gets created using this image. Every Container must have a Default Command. the Container would run as long as the Default Command is running.
ADD or COPY The files you want to copy into the container from your host.
WORKDIR Define a workspace where the upcoming (or) following set of commands/instructions should be executed in
Here you can see we have used WORKDIR twice, One is to execute set of commands on the TOMCAT_HOME/CATALINA_HOME another WORKDIR is to download the Sample Application WAR file and deploy the war into Docker Tomcat Container.
Note*: Built-In step for an Application Deployment
The Docker Container Image we are creating has an instruction to Deploy an application directly from one of our github page (download the war file) and the version of tomcat we are going to build is 8.5.40
Make necassary Changes if you opt for a different version.
Make you get the Downloadable Link of Tomcat right so that your image gets created with no issues.
Step2: Build the Docker Tomcat Image
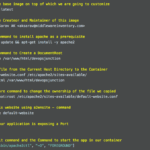
On the same WorkSpace Directory where our Dockerfile is residing. Run the following command to build the image.
The Syntax of the Docker Image command is
docker build -t [Name Of the Image] .
Here the PERIOD . (DOT) represents the Current working directory which is also part of the syntax
$ docker build -t saravak/tomcat8 .

Sending build context to Docker daemon   38.4kB
Step 1/13 : FROM centos
 – -> 1e1148e4cc2c
Step 2/13 : MAINTAINER [email protected]
 – -> Using cache
 – -> af1217ce46de
Step 3/13 : RUN mkdir /opt/tomcat/
 – -> Using cache
 – -> 4c38afae9d54
Step 4/13 : WORKDIR /opt/tomcat
 – -> Using cache
 – -> a725d7431b50
Step 5/13 : RUN curl -O https://www-eu.apache.org/dist/tomcat/tomcat-8/v8.5.40/bin/apache-tomcat-8.5.40.tar.gz
 – -> Using cache
 – -> 91e7bc7726ff
Step 6/13 : RUN tar xvfz apache*.tar.gz
 – -> Using cache
 – -> 629328c4f4d2
Step 7/13 : RUN mv apache-tomcat-8.5.40/* /opt/tomcat/.
 – -> Using cache
 – -> f501f3c72f61
Step 8/13 : RUN yum -y install java
 – -> Using cache
 – -> 345972c4e662
Step 9/13 : RUN java -version
 – -> Using cache
 – -> ccb7b9f52541
Step 10/13 : WORKDIR /opt/tomcat/webapps
 – -> Running in 83e328f92c1a
Removing intermediate container 83e328f92c1a
 – -> 8e8d29c51fd8
Step 11/13 : RUN curl -O https://github.com/AKSarav/SampleWebApp/raw/master/dist/SampleWebApp.war
 – -> Running in cdc45a9204a9
  % Total    % Received % Xferd  Average Speed   Time    Time     Time  Current
                                 Dload  Upload   Total   Spent    Left  Speed
100   149  100   149    0     0     66      0  0:00:02  0:00:02 – :--: –    66
FROM centos
Removing intermediate container cdc45a9204a9
 – -> b064cd141999
Step 12/13 : EXPOSE 8080
 – -> Running in dd17c8c97189
Removing intermediate container dd17c8c97189
 – -> cc5acb3cb1f8
Step 13/13 : CMD ["/opt/tomcat/bin/catalina.sh", "runt"]
 – -> Running in f8bf12a4e567
Removing intermediate container f8bf12a4e567
 – -> 2b61f132794e
Successfully built 2b61f132794e
Successfully tagged saravak/tomcat8:latest
But why did I name my image as "saravak/tomcat8" instead of just Tomcat8
Here saravak is my Docker Login Name / Docker User Name.
It is always recommended to Name the image you are creating with your Docker User Name, So that when you are publishing the Image to Docker hub. ( A Central Shared Repository) it would be easy and People across the world can just download your image by specifying the same name that you have set.
For Example, If you want to download this image, you can simply use docker pull saravak/tomcat8 That's all.
So when you create your images, Please make sure you use your Docker Login Name.
Step3: Publish or Push the image to DockerHub
Before you start publishing the images to DockerHub. It is necessary that you have to create your Docker Hub (or) Docker Account. Visit hub.docker.com
Once you have set up your username in Docker Hub.
Log in to Docker Hub from the Docker CLI
$ docker login
Login with your Docker ID to push and pull images from Docker Hub. If you don't have a Docker ID, head over to https://hub.docker.com to create one.
Username: saravak
Password:
Login Succeeded
Once the Login succeeded.
Publish/Push the image you have created to Docker Hub. Based on your Internet speed you can see the Upload gets completed in a couple of minutes.
$ docker push saravak/tomcat8

The push refers to repository [docker.io/saravak/tomcat8]
bfc9fd0939b7: Pushed
f6b1f20ff3ed: Pushed
6d21360e64a0: Pushed
4a62c00a3c78: Pushed
0bc97febfdbb: Pushed
0f861fa8dd99: Pushed
c1117571ffb4: Pushed
071d8bd76517: Mounted from library/centos
latest: digest: sha256:8ede588ad0bb944e62765fdb40b21f7ebdc6587afa00efc7570ede4c7f0786fa size: 1996
Once the image is uploaded (or) Pushed, The entire world can reuse your image as we have mentioned earlier using docker pull
Additional: How to download this Docker Tomcat Image?
You can use docker CLI to download the image directly and create a container.
To Download this image Just use the following DOCKER CLI command
docker pull saravak/tomcat8
Once you have downloaded this image, This image would be available in your local image repository.
use either of following commands to make sure the image is present
to list all the images in your local repository use the following command
docker images
to list only the subjected tomcat image use the following command
docker image ls saravak/tomcat8
Do I have to do Docker Pull If I want to download this image before Running it as a container?
The Answer is NO, Docker By default, would download the image from Docker Hub if the image is not available in the local image repository. So it is not necessary that you have to explicitly do the docker pull
Step4: Run Docker Tomcat image as a container.
Now the Image is ready and available in Docker Hub. Irrespective of, If the image is available locally or not. You can start the image as a container.
As mentioned earlier, Docker would search for the image in DockerHub if it is not available in local.
So the command given below can even be run at your Host from anywhere in the world. as long as you are connected to the internet. Docker would do the rest.
$ docker container run -it -d – name tomcatcontainer1 -p 8081:8080 saravak/tomcat8
d6f0859b69d216885e8671d9d024f7bdfb82e7a2af1b40fbc8016e36c51313a7
Here
-it: to enable Interactive Session/SSH to get into the container at a later point in time
-d: Run the container in the background (always recommended)
--name: name your container
saravak/tomcat8: the Image used to create this container. the Image instantiated as a container
-p 8081:8080: Forwarding the Container port 8080 to Host 8081
Congratz. we started a Docker Tomcat Container
To quickly verify, if your container use docker ps command. Then at the end of this post, we will share more commands to manage your container
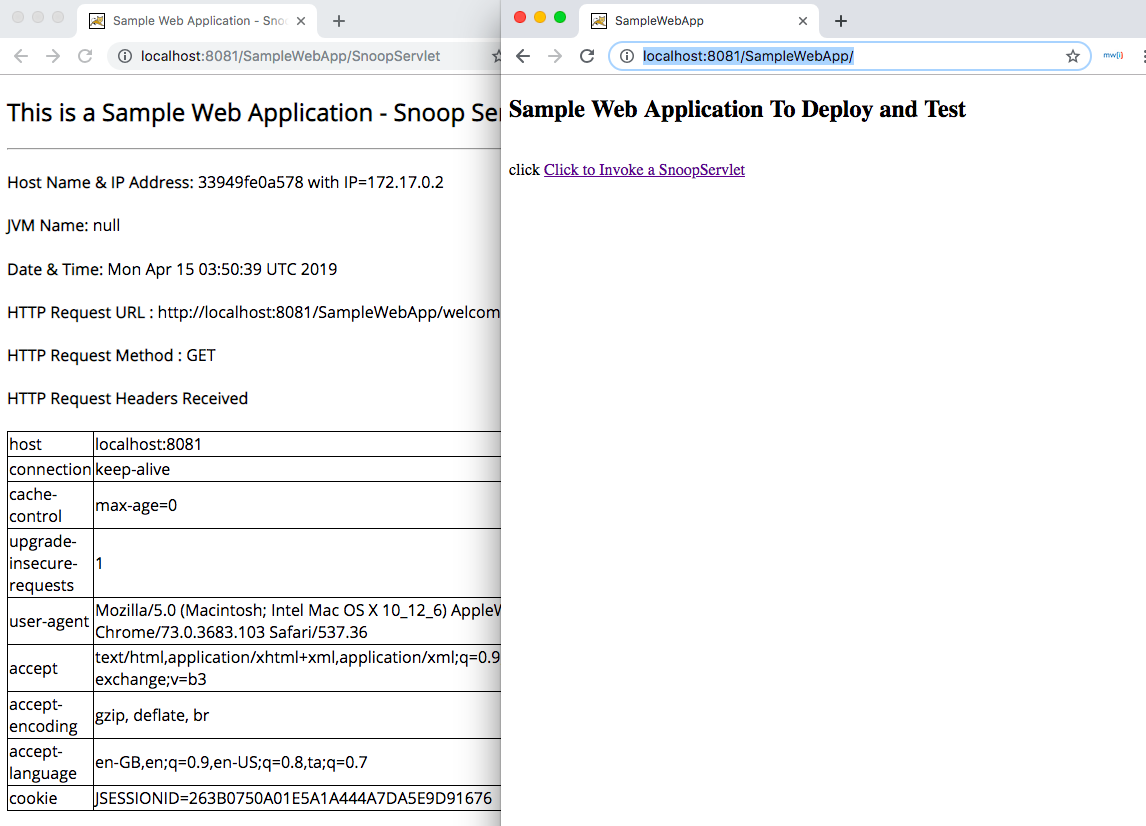
Step5: Access the Deployed/Built-In SampleWebApp
Since we have port forwarding and redirecting the container 8080 to the Host (mac/windows/Linux) 8081. We can access the Sample Web Application installed inside the tomcat container at the following URL
http://localhost:8081/SampleWebApp
In my case, my Host machine is MAC OS so I can directly hit the URL in the browser.
Docker Commands Cheat Sheet
# How to start and stop the container

docker stop <containername/id>  # to stop the container which is running in background mode
docker container start <containername/id> # to start the already stopped container

# monitoring the Container

docker container list # list the containers created
docker container ls -a  #to list the containers including not running containers
docker ps    #to list the running container
docker info #docker engine status including container running/paused/stopped containers list
docker container stats <containername/id> #prints the CPU and MEM usage data of the container name
docker container stats #prints the CPU and MEM usage of all running containers
docker container top <containername/id> #executes the top command in the container specified, fails if the specified container is not running

# How to remove/delete the container

docker container rm <containername/id> # Remove the Container

# How to remove/delete the image

docker container rmi <imagename/imageid> # Remove the image
# How to view the logs of the running container

docker container logs <containername/id> # to view the logs of the container
Deploy this Tomcat container to Kubernetes Cluster
I have written a detailed and exclusive article on how to use this image in your Kubernetes cluster and deploy this tomcat image into Kubernetes cluster as a pod/deployment.
Refer this article.
Further References:
- Tomcat - http://tomcat.apache.org/
- Docker - https://www.docker.com/
Hope this article helps
Let me know how is this article by leaving a comment
For any help or questions contact me on comments or write me an email
Cheers,
Sarav AK

Follow me on Linkedin My Profile Follow DevopsJunction onFacebook orTwitter For more practical videos and tutorials. Subscribe to our channel
Signup for Exclusive "Subscriber-only" Content