In this article, let us explore Kubernetes configmap and how to create, edit, update, and use them with examples.
Configmap as the name suggests holds some configuration information, It can be a fine-grained string or an entire file.
It eliminates the need to hardcode the configuration information into the container or the deployment definition.
Configmap allows the reuse of images and deployment descriptors across environments like dev, QA, and prod.
As we are isolating the configuration away from the application and managing it as a separate object (configmap), we can update the config without having to restart the application
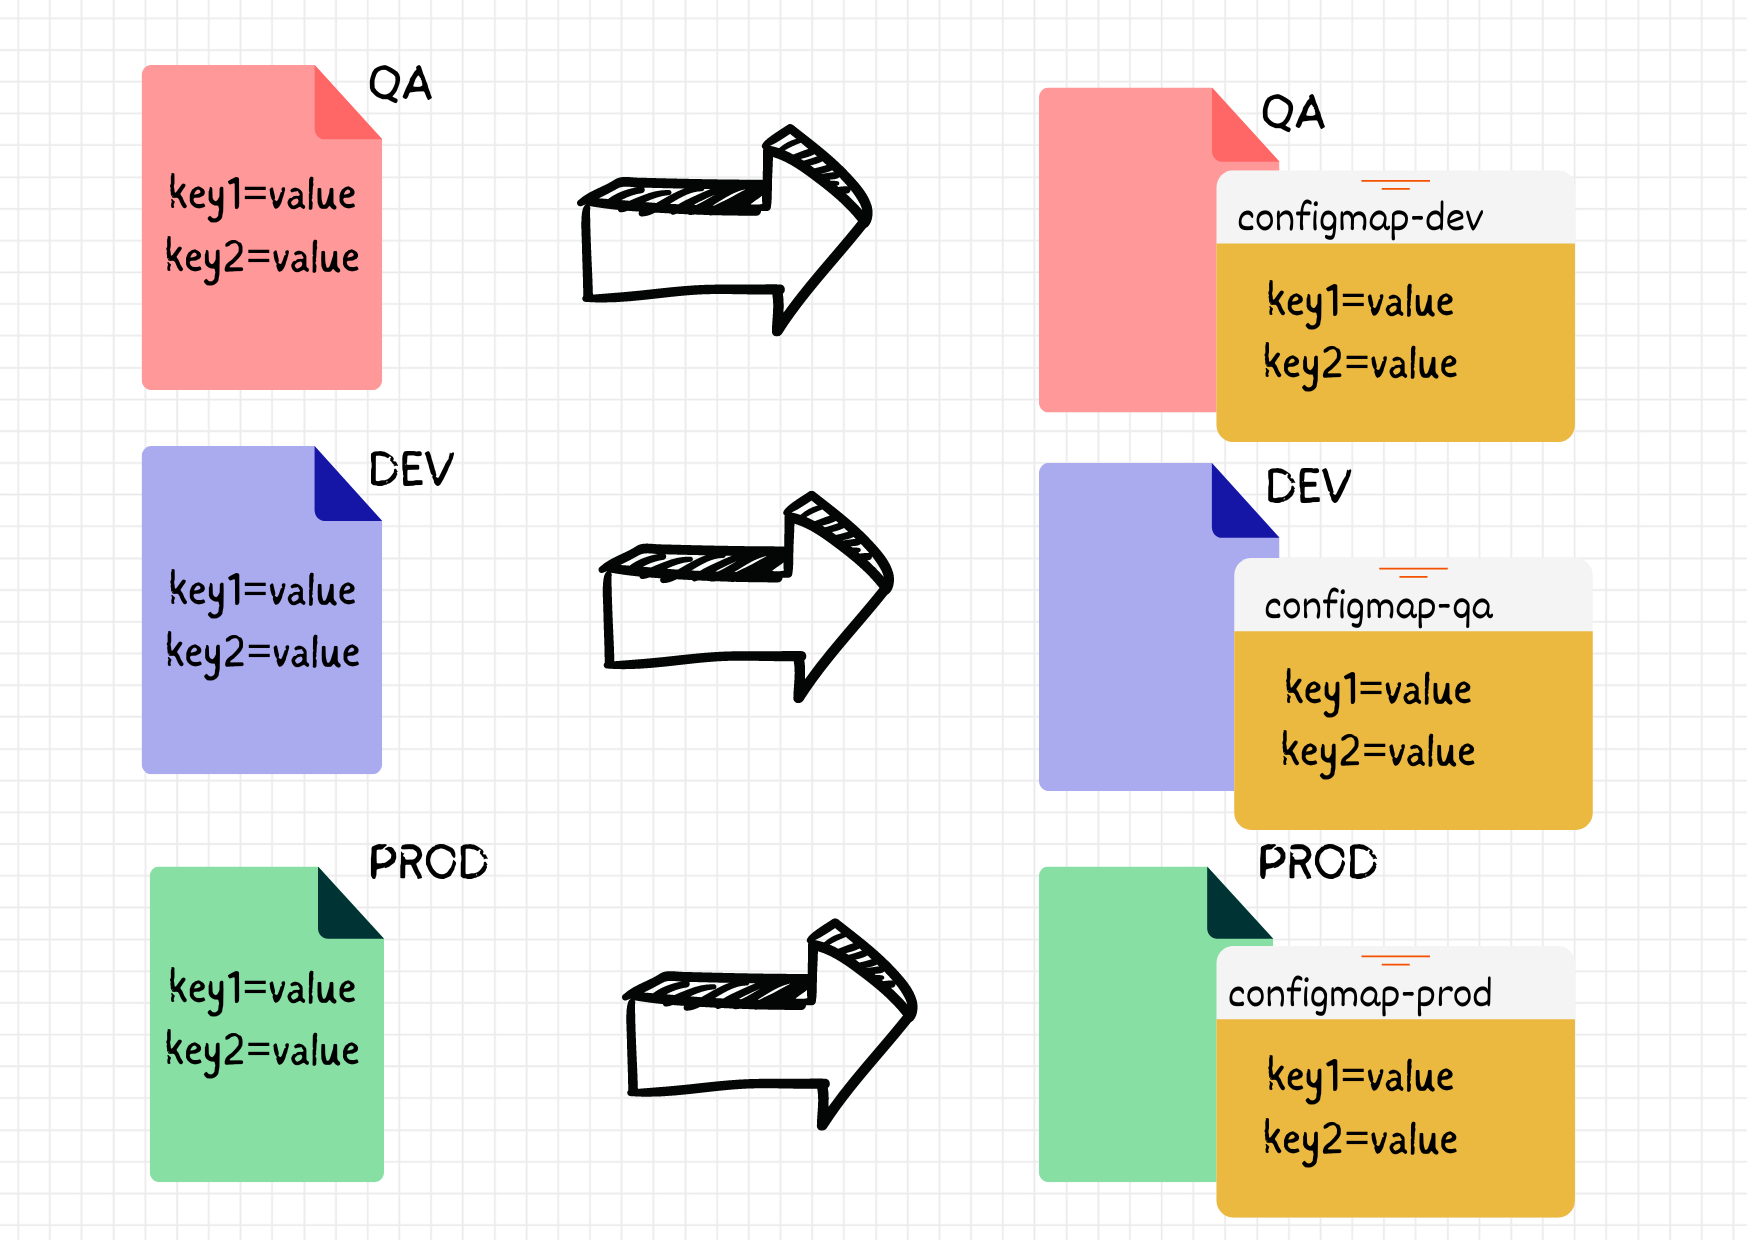
In the preceding diagram you can see, on the left side, we have environments and workloads with config values hardcoded
To the right, you can see they are moved/isolated into a configmap and have a name configmap-<env which would be referred to later in the definition
Types of Kubernetes Configmap
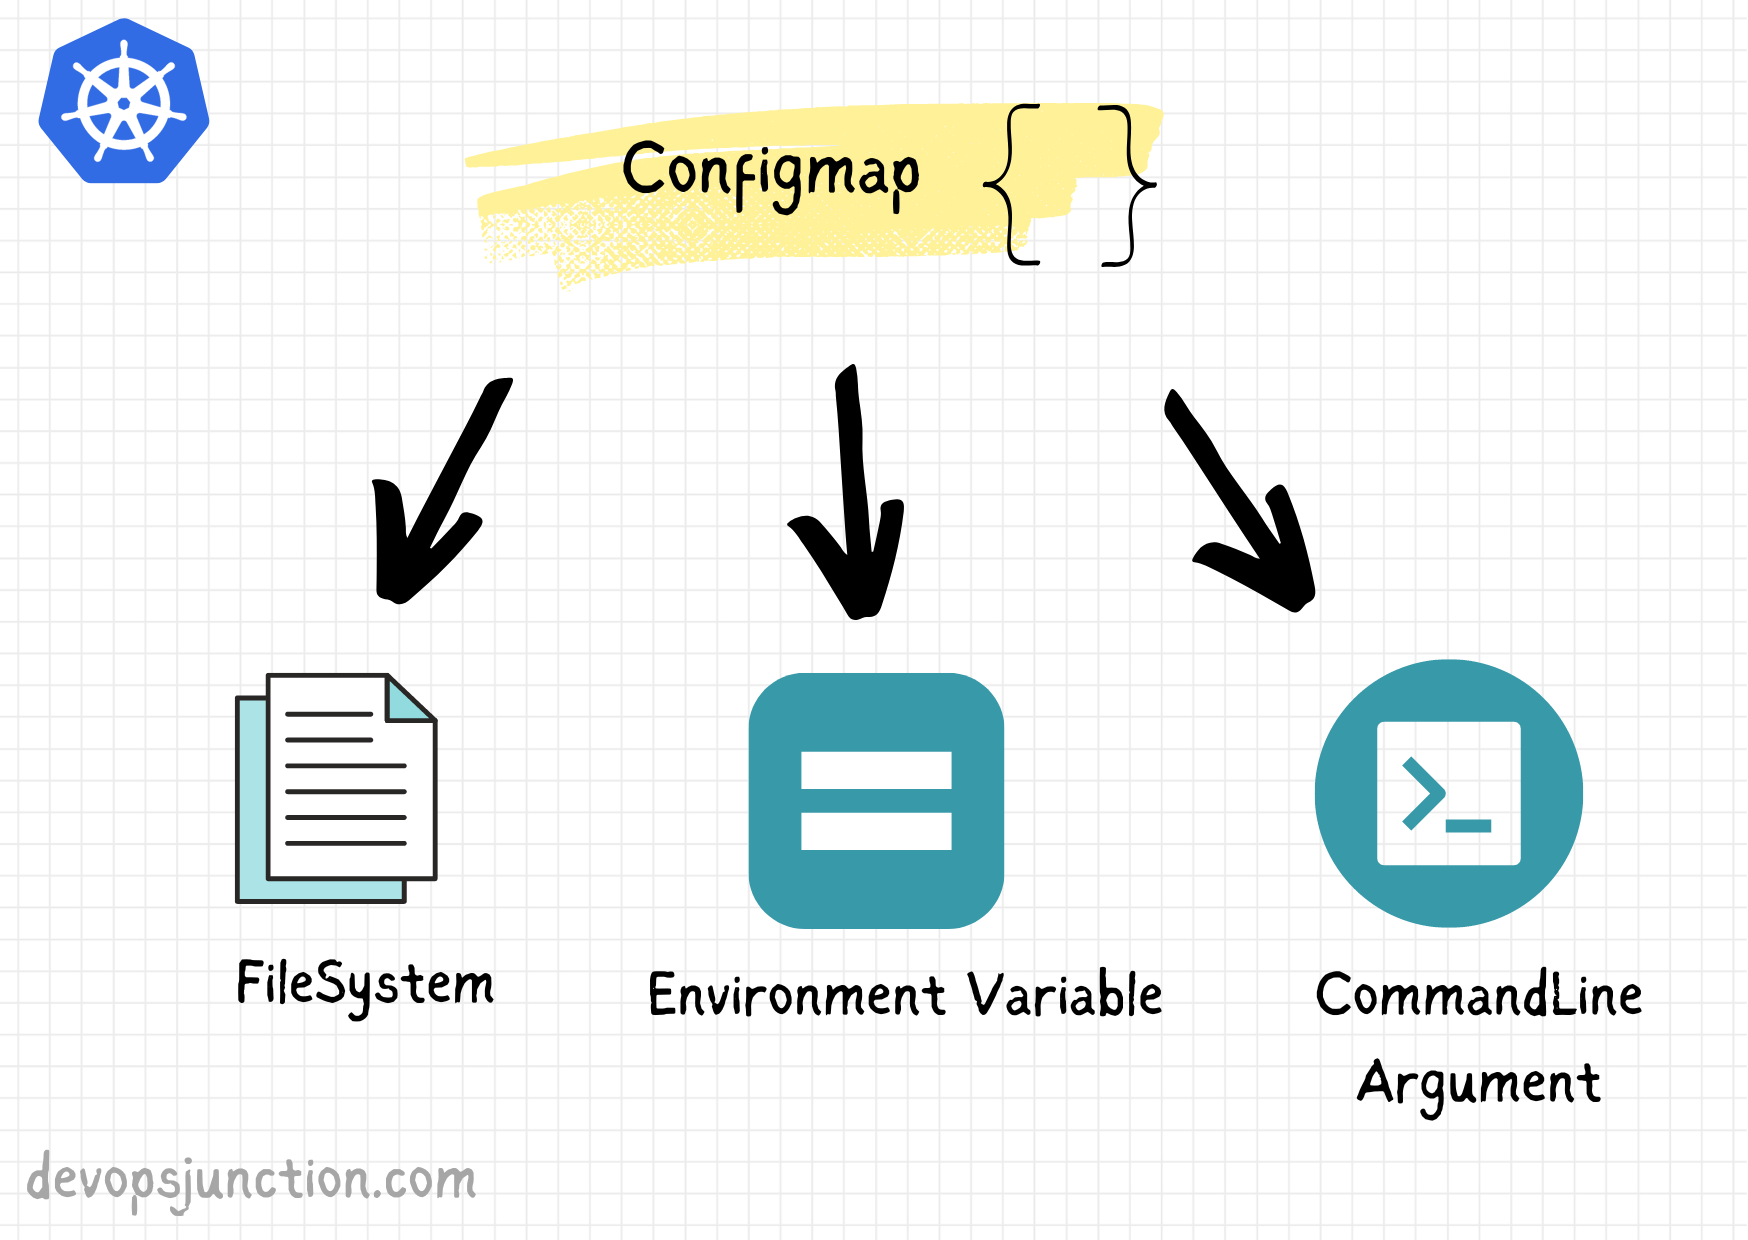
Kubernetes Configmap can be considered and used as one of these
- FileSystem object - You can mount configmap and each key would be created as a file with the corresponding value as a content
- Environment variable - A key and value pair that you want to pass to the container dynamically
- Commandline Argument - You can change the default
CMDof the container using the Commandline argument
So far we have seen what are the types of configmap. Now let us see different ways to create configmap
How to Create Kubernetes Configmap - Introduction
Like many objects in Kubernetes, you can create Configmap in two ways
- Imperative way - from the command line
- Manifest - from a file on the disk
Unless you are completely new to programming, you might already know that the map/dictionary is a collection of key: value pairs ( more like JSON)
Here is a simple javascript code that explains what is map datatype.
const wrongMap = new Map();
wrongMap['bla'] = 'blaa';
wrongMap['bla2'] = 'blaaa2';

console.log(wrongMap); // Map { bla: 'blaa', bla2: 'blaaa2' }
During the Configmap creation, There are a few ways to read the data that goes into the configmap
You can read data directly from the file or from the command line or recursively read all the files from a directory
You can use the special command line options with kubectl create configmap command to define how to read the data
--from-file=filename- Read data directly from the file and the filename is the key
--from-file=key=filename- Read data from the file but we define the key
--from-file=directory- Read all the files in a directory and the filenames are the keys
--from-literal=key=value- Create a single key=value as a string literal
We have seen the types of configmap and methods of creating configmap.
Let us put them into practice and see how to create each type with different methods
Creating Kubernetes Configmap with Kubectl
In this section, we will see how to create a configmap imperatively using the Kubectl command
--from-file=filename
Now we are going to create a configmap of filesystem type using --from-file=filename option. with no explicit keys defined for the configmap.
When no keys are defined, the file name would be taken as the key name.
Here is a glimpse of my terminal, where I am creating configmap
If you look at the preceding video, you can see that I have created a file named samplefile.txt and tried to create a configmap from a file using --from-file
Since I have not defined any key explicitly the filename was taken as a key.
Here are the commands I have used to create the configmap
devopsjunction|⇒ cat > samplefile.txt
this is configmap sample file,
content in this file would be used as a value
to a configmap key

devopsjunction|⇒ kubectl create configmap test-config – from-file=samplefile.txt -n sre01
configmap/test-config created
Let us validate how it is created using the kubectl get configmap command
devopsjunction|⇒ kubectl get configmap test-config -n sre01 -o yaml
apiVersion: v1
data:
  samplefile.txt: |
    this is configmap sample file,
    content in this file would be used as a value
    to a configmap key
kind: ConfigMap
metadata:
  creationTimestamp: "2022-10-02T13:47:14Z"
  name: test-config
  namespace: sre01
  resourceVersion: "340219653"
  uid: 2ad318a8-ff75-481a-987e-2299f69c92af
--from-file=key=filename
Now we are going to create a configmap of filesystem type using --from-file=key=filename option
As you can see, this time we are going to define a key for the configmap
Let us see it in action
As you have seen in the preceding video, we have used the following kubectl command to create a configmap of filesystem type with --from-file=key=filename option
$ kubectl create configmap test-configmap-02 – from-file=configdata=samplefile.txt -n sre01
Like last time we have not let the filename be the key name, we have explicitly set the key name rather.
Once created, the output looked like this.

If you look at the highlighted portion of the image, you can notice that the configmap is not created with the filename as the key. but the custom key we have set configdata
--from-file=directory
With this option, we can create a configmap in bulk.
This reads all the files in the given directory and creates a configmap for each file. The filename would be the corresponding key name and the content of the file would become the value
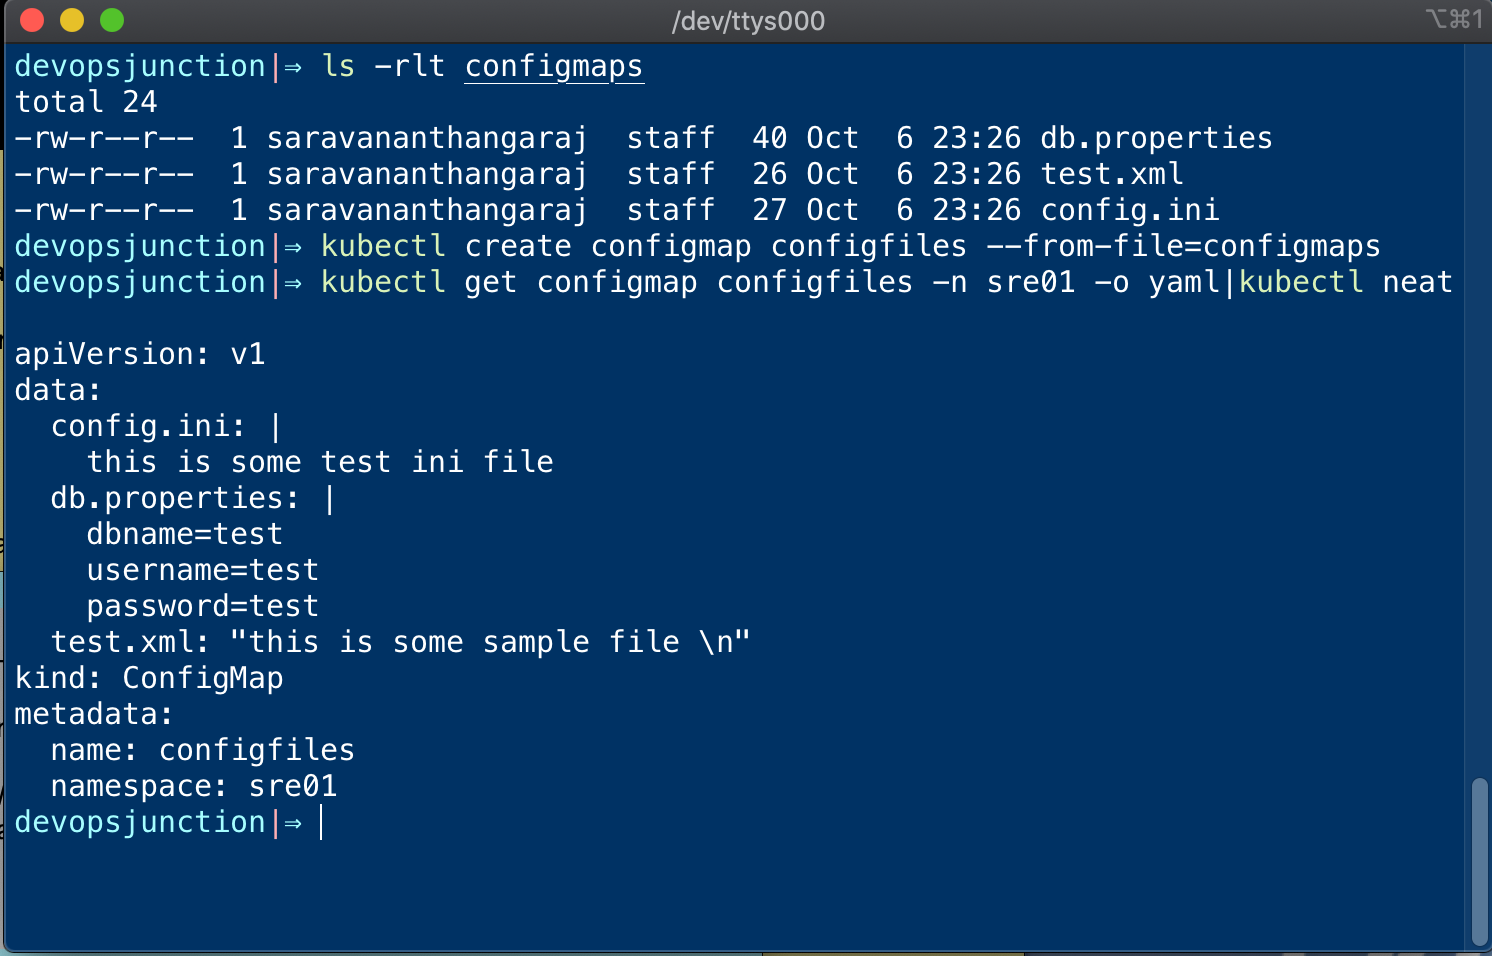
Let us see how this works in real-time
As shown in the preceding video, we have different types of files under a directory and we are importing all of them into our configmap during the creation using --from-file=directory option
filename becomes the key and the content inside becomes the value
Here is the command we have used
$ kubectl create configmap configfiles – from-file=configmaps/
In this command configmaps/ is the directory name.
Refer to the following image which shows the files in the configmaps directory and and the configmap creation and how it looks after the creation.
--from-literal=key=value
The final option to use with kubectl configmap creation is --from-literal=key=value
So far we have seen how to read the file and create a configmap key: value pair
It was helpful to store long file objects inside a configmap and later be used when we want to filesystem type configmap and to mount it as a filesystem
but how to create a simple key: value based configmap
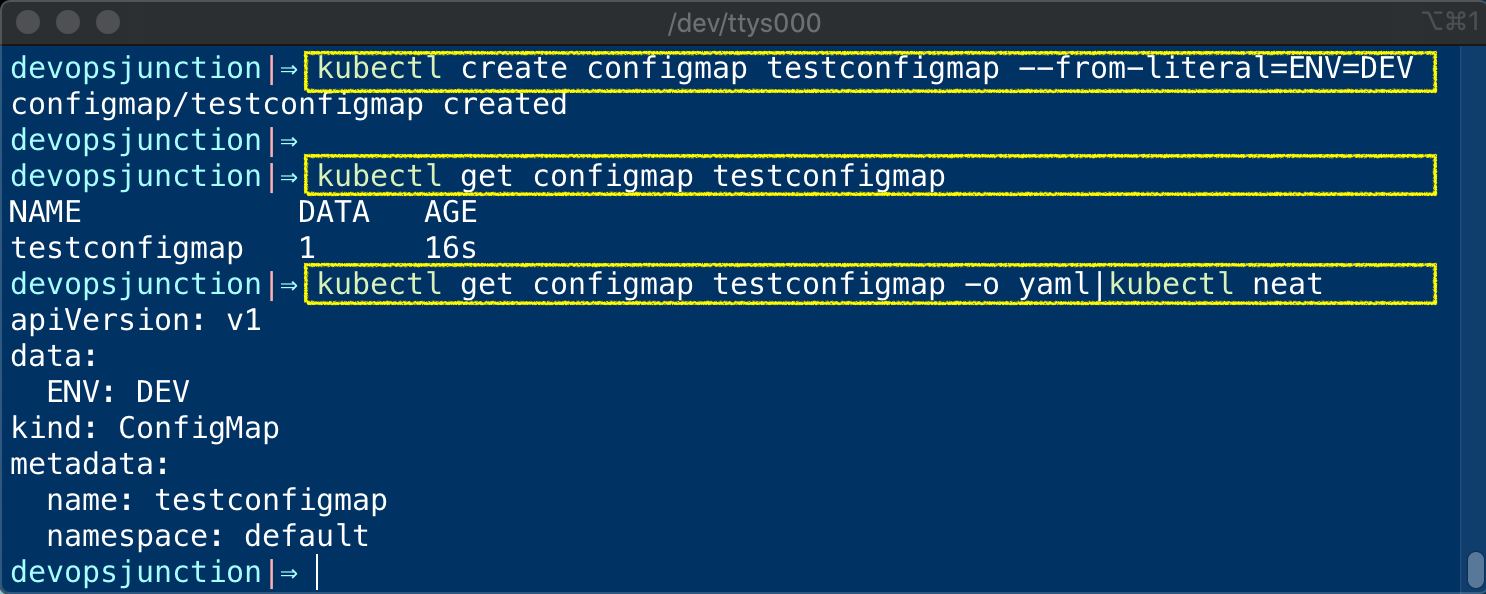
we are going to do the same, using --from-literal=key=value option of kubectl create configmap command
$ kubectl create configmap testconfigmap – from-literal=ENV=DEV
the preceding command creates a new configmap named testconfigmap and just add a single key: value entry inside it
Creating Kubernetes Configmap using Manifest
We have seen how to create configmap using kubectl, Now let us see how to create configmap using Kubernest Manifest
You don't have to memorize or write the manifest from scratch. you can let kubectl create the config file for you
Execute the same Imperative command but with two additional options
- --dry-run - to instruct kubectl to not create the resource
- -o yaml - to display the manifest in the YAML format
See it in action
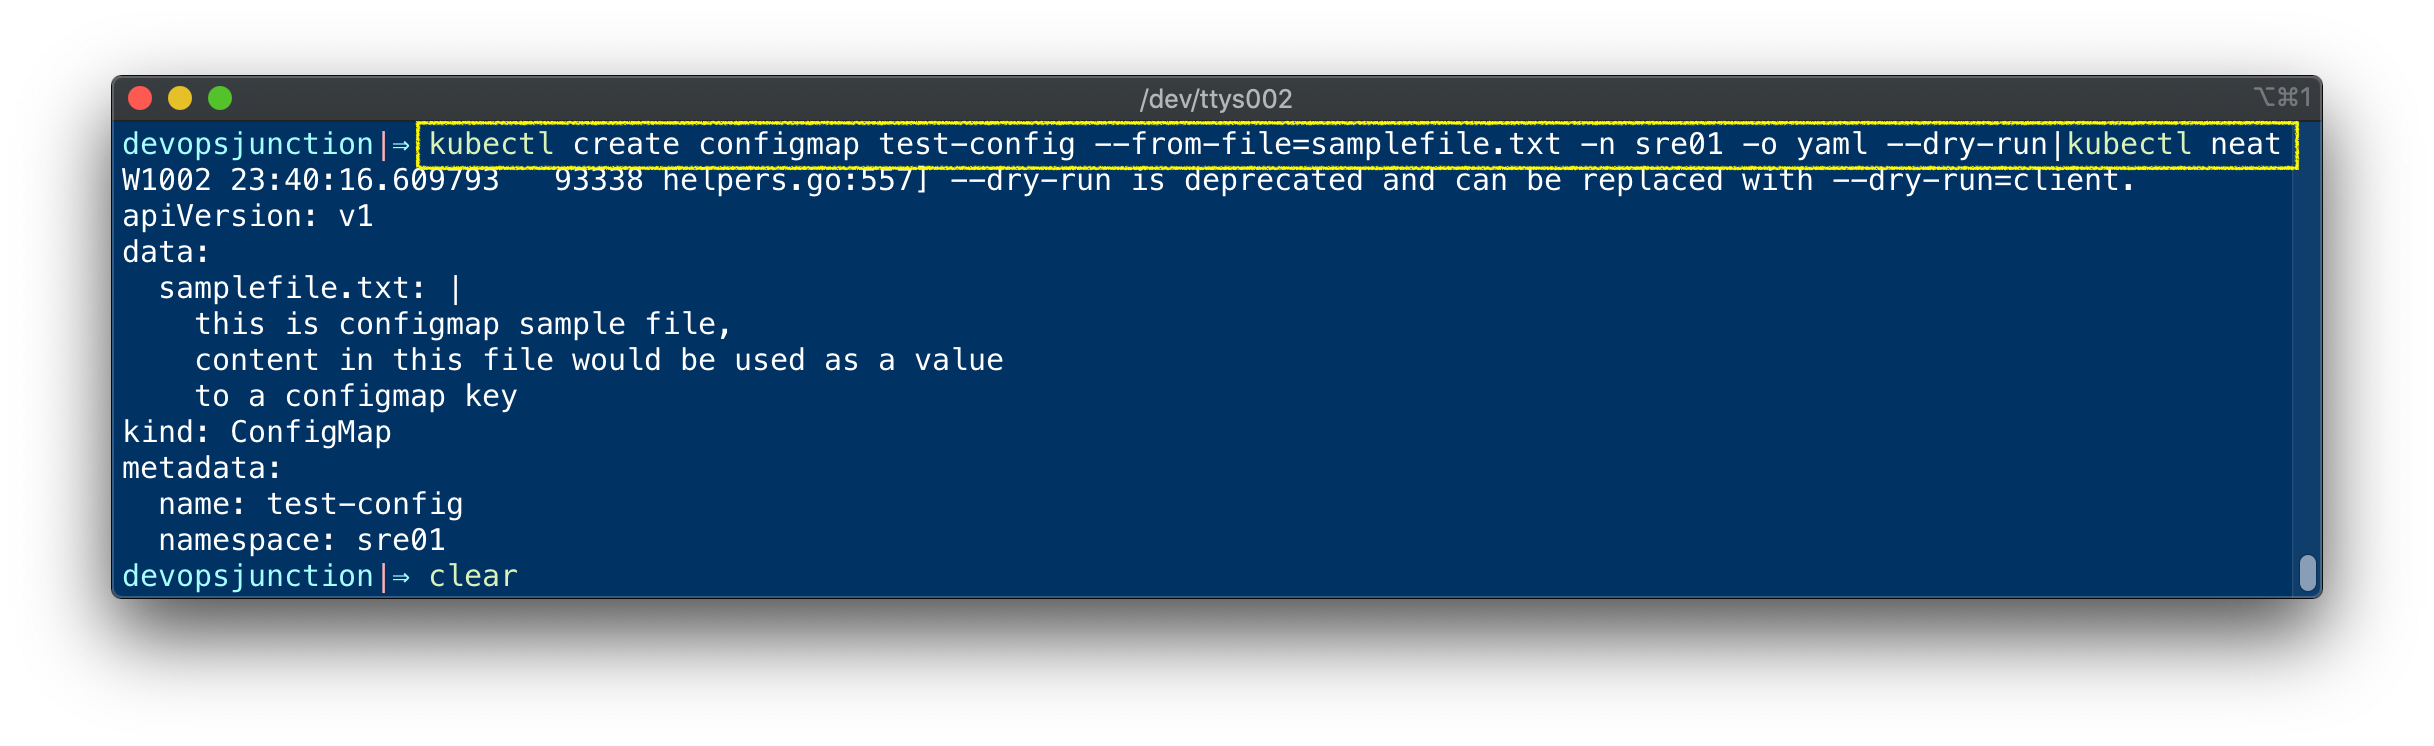
You can see with a dry run you can actually generate the manifest. but you might need some cleanup.
To remove the unwanted lines and make the output usable as it is. You can use a kubectl neat command
It comes from a special package manager called krew refer to our another article on Krew and krew plugins here
For those who want to copy the source code of this Configmap. here you go
apiVersion: v1
data:
  samplefile.txt: |
    this is configmap sample file,
    content in this file would be used as a value
    to a configmap key
kind: ConfigMap
metadata:
  name: test-config
  namespace: sre01
This is a simple configmap YAML with one key: value pair.
We can add more key: value pairs to this configmap like the sample given below.
apiVersion: v1
data:
  samplefile.txt: |
    this is configmap sample file,
    content in this file would be used as a value
    to a configmap key
  config.ini: |
    [analytics]
    check_for_updates = true
    [grafana_net]
    url = https://grafana.net
    [log]
    mode = console
    [paths]
    data = /var/lib/grafana/data
    logs = /var/log/grafana
    plugins = /var/lib/grafana/plugins
    provisioning = /etc/grafana/provisioning
  google_token: xxxxxxxxxxxxxxxxxxxx
  salesforce_token: xxxxxxxxxxxxxxxxx
  LOG_LEVEL: DEBUG
  ENVIRONMENT: DEV
  run.sh: |
    @test "Test Health" {
    url="http://prometheus-grafana/api/health"

    code=$(wget – server-response – spider – timeout 10 – tries 1 ${url} 2>&1 | awk '/^  HTTP/{print $2}')
    [ "$code" == "200" ]
    }
kind: ConfigMap
metadata:
  name: test-config
  namespace: sre01
In the preceding sample configmap manifest, you can see we have various keys and values.
Creating Configmap vs Using Configmap
As the title of this chapter convey Creating Configmap is different from Using Configmap
So far we have seen how to Create a configmap with different command line options like
- --from-file=key=value
- --from-file=filename
- --from-file=directory/
- --from-literal
Also, we have seen how to create a configmap from a manifest/YAML file.
Now that's all to it and the configmap is ready its like a Database of your configuration how you are going to use/consume the data stored in this configmap makes all the difference
Now let us see, how we can consume/use the config data from the configmap
- you can use it as
file object - you can use it as
command line argument - or simply an
environment variableto support your container
Hope you have understood the difference between the creation options and how to use configmap in your workloads.
Kubesample - SourceCode and Docker Image
Let us see how to use the configmap in our deployments and workloads.
To demonstrate this, I have created some sample Applications and named it kubesample
You can find the source code of that kubesample in this GitHub repository (Optional)
$ git clone https://github.com/AKSarav/kubesample.git
Downloading the source code is optional as I have already published the kubesample application image into Dockerhub
You can simply pull the image from Dockerhub using the following image name
saravak/kubesample
How the Kubesample Application is designed and works
The Application is designed on express node js
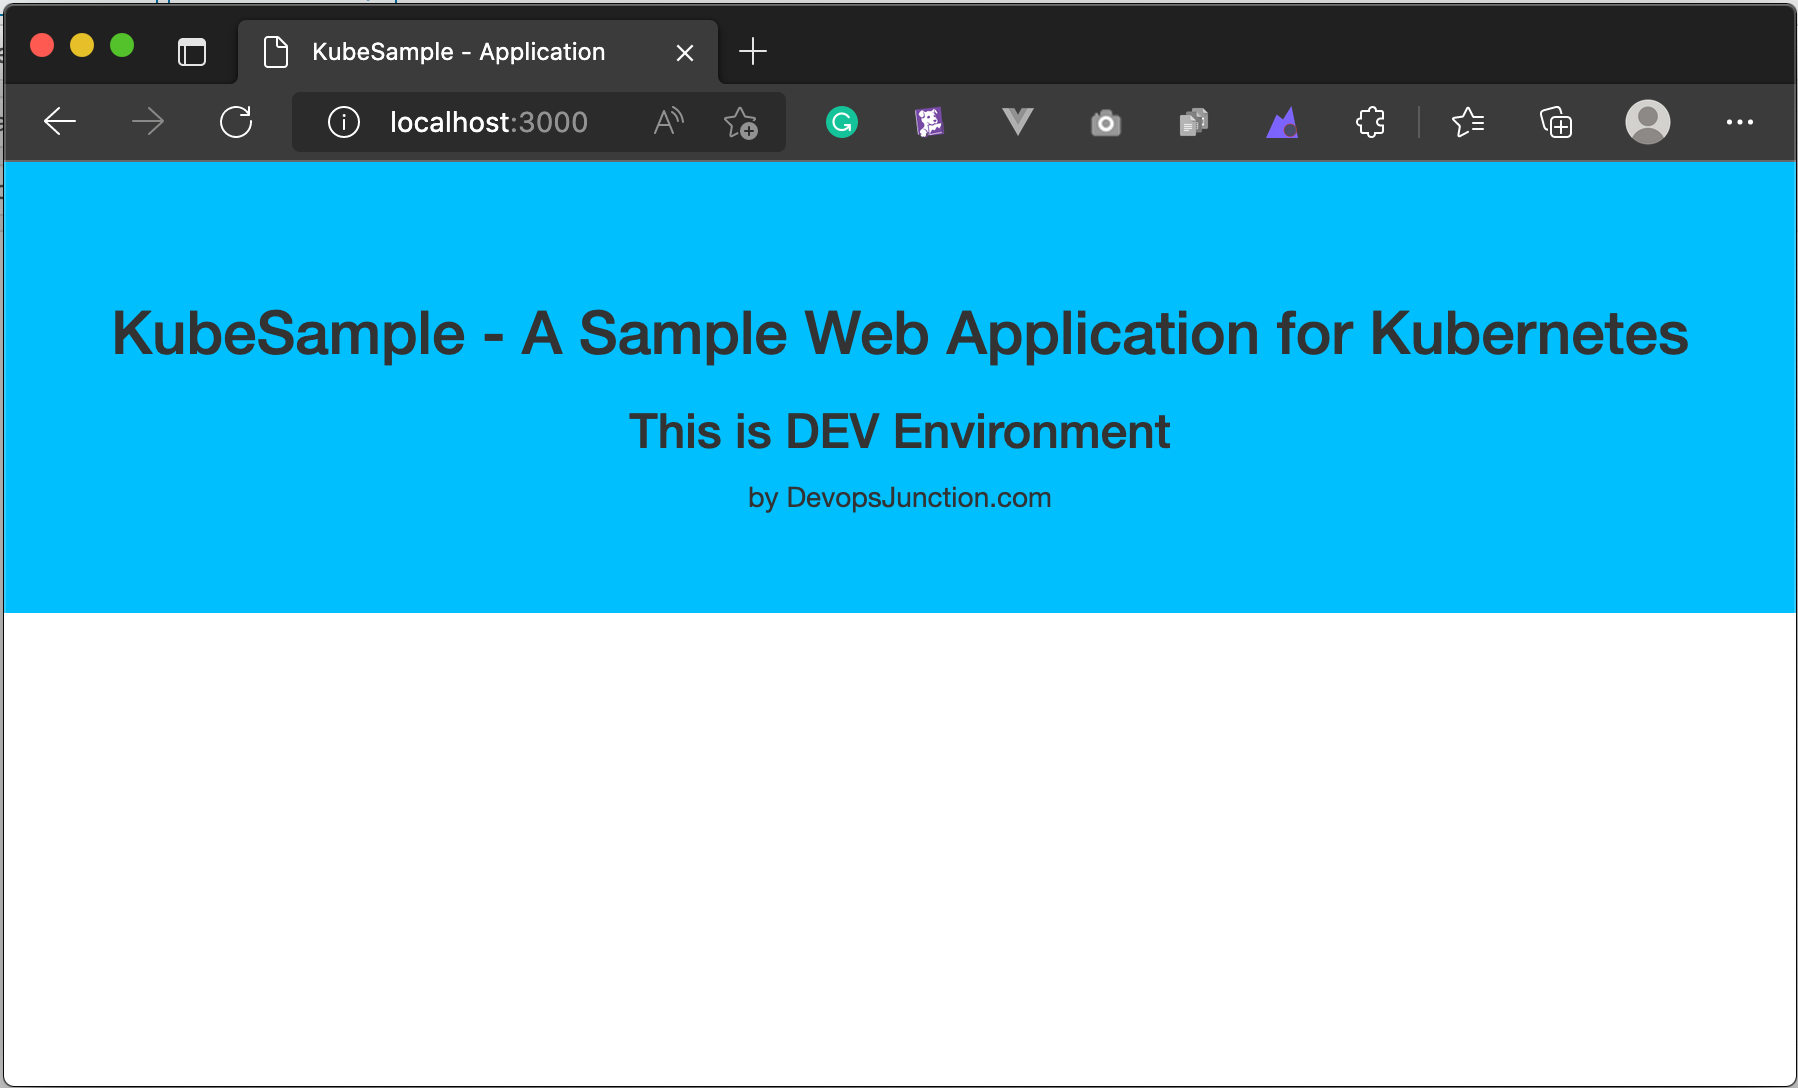
It simply loads the static and default index.html file under the corresponding environment(dev/qa/prod) directory
This Environment is not going to be hardcoded on the deployment manifest, rather would come from the Configmap - This is an example of Configmap as an Environment variable
During the deployment of this application to Kubernetes, we add extra options like cpu-profiling or increased node heap etc. This also comes from Configmap - This is an example of Configmap as a Commandline Argument
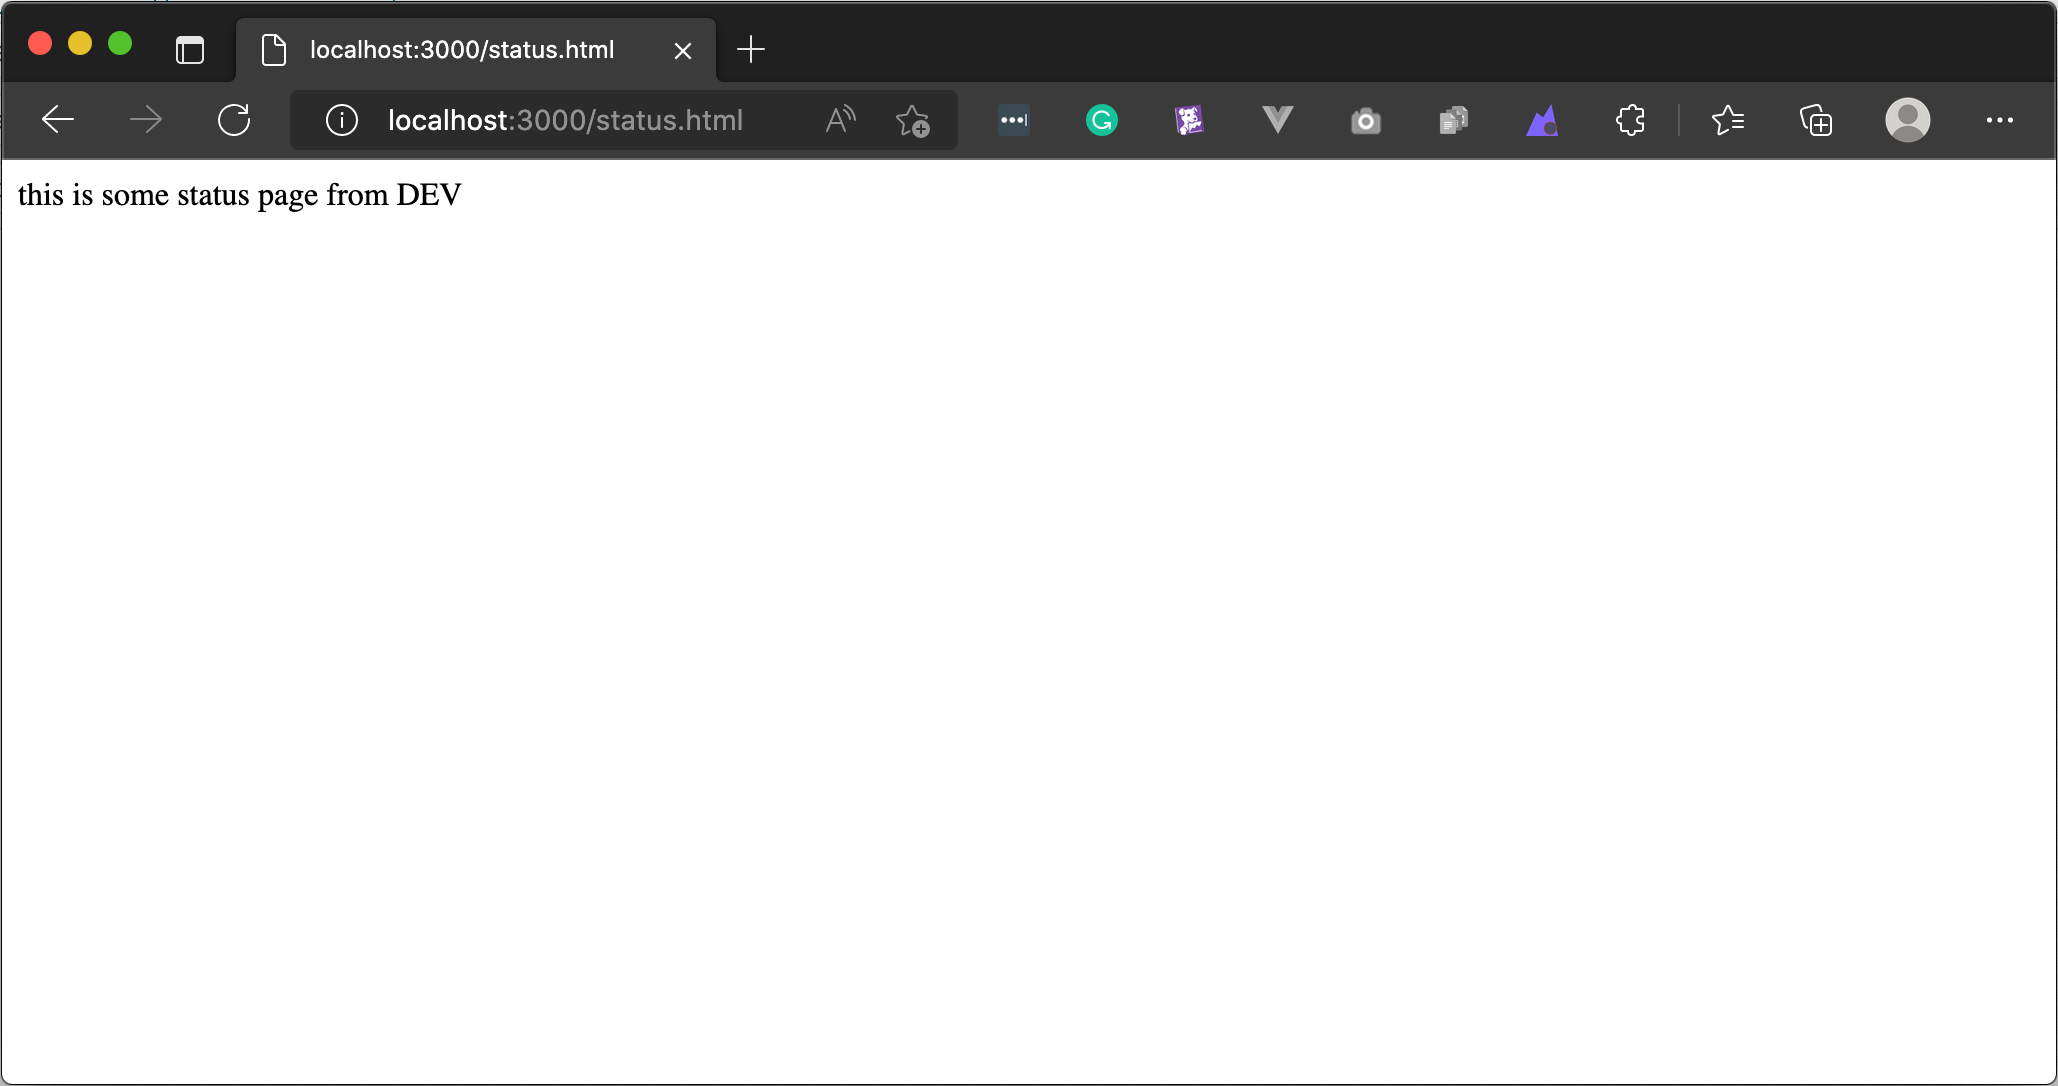
We also add an extra HTML file status.html into the corresponding environment directory at runtime using Configmap as a FileSystem
Before we go further and look at the Yaml files for Configmap and Deployment.
Take a look at the following image, where I have depicted How we are using the configmap in our workload/deployment

Deploying the KubeSample Application and Configmap
Here are the source code or the manifest files for the Kubesample Application Deployment and Configmap
The files are also available on the Github repository, If you have cloned them already you can find them here
create-configmap.yml
Here is the manifest for configmap
apiVersion: v1
data:
  environment: dev
  node_options: – prof
  port: "3000"
  status.html: |
    <html>
    <body>this is some status page from DEV</body>
    </html>
kind: ConfigMap
metadata:
  name: kubesample
  namespace: default
create-deployment.yml
Here is the manifest for Deployment
apiVersion: apps/v1
kind: Deployment
metadata:
  labels:
    app: kubesample
  name: kubesample
spec:
  replicas: 1
  selector:
    matchLabels:
      app: kubesample
  template:
    metadata:
      labels:
        app: kubesample
    spec:
      containers:
      - image: saravak/kubesample
        name: kubesample
        imagePullPolicy: Always
        resources:
          limits:
            cpu: '0.5'
            memory: 100Mi
        command:
          - "node"
          - "$(OPTIONS)"
          - "index.js"
        env:
          - name: appport
            valueFrom:
              configMapKeyRef:
                name: kubesample
                key: port
          - name: ENVIRONMENT
            valueFrom:
              configMapKeyRef:
                name: kubesample
                key: environment
          - name: OPTIONS
            valueFrom:
              configMapKeyRef:
                name: kubesample
                key: node_options
        volumeMounts:
          - mountPath: /app/dev/status.html
            name: staticfile
            subPath: status.html
      volumes:
        - name: staticfile
          configMap:
            name: kubesample
You can use copy this sourcecode and save them on your local disk and apply
$ kubectl apply -f create-configmap.yml

$ kubectl apply -f create-deployment.yml
This will create the deployment and configmap.
These are the initial values we have set for the configmap, you can change these values and observe the behaviour
Note*: While you can change the node_options, port and status.html values as you choose/desire to.
But the value for the environment should be one of prod, dev, qa as this property controlls what directory/files to be loaded at runtime.
As you can see in our Sourcecode, we have only these three directories ( environments ) defined.
- environment:
dev - node_options:
--prof - port:
3000 - status.html:
<html>
<body>this is some status page from DEV</body>
</html>
Validating the Application Setup
As we have created the necessary configmap and deployments Now let us validate our setup and test
Let us first validate the deployment and configmap are intact using the following commands
## Validate configmap and Deployments

$ kubectl get configmap kubesample -o yaml
$ kubectl get deployments kubesample -o yaml

## Validate the pod

$ kubectl get pods
Once you know the pod name, you can do the port-forward
$ kubectl port-forward kubesample-c7bc8ddd5-d966q 3000:3000
Here is a video of me doing the above validation steps on my end.

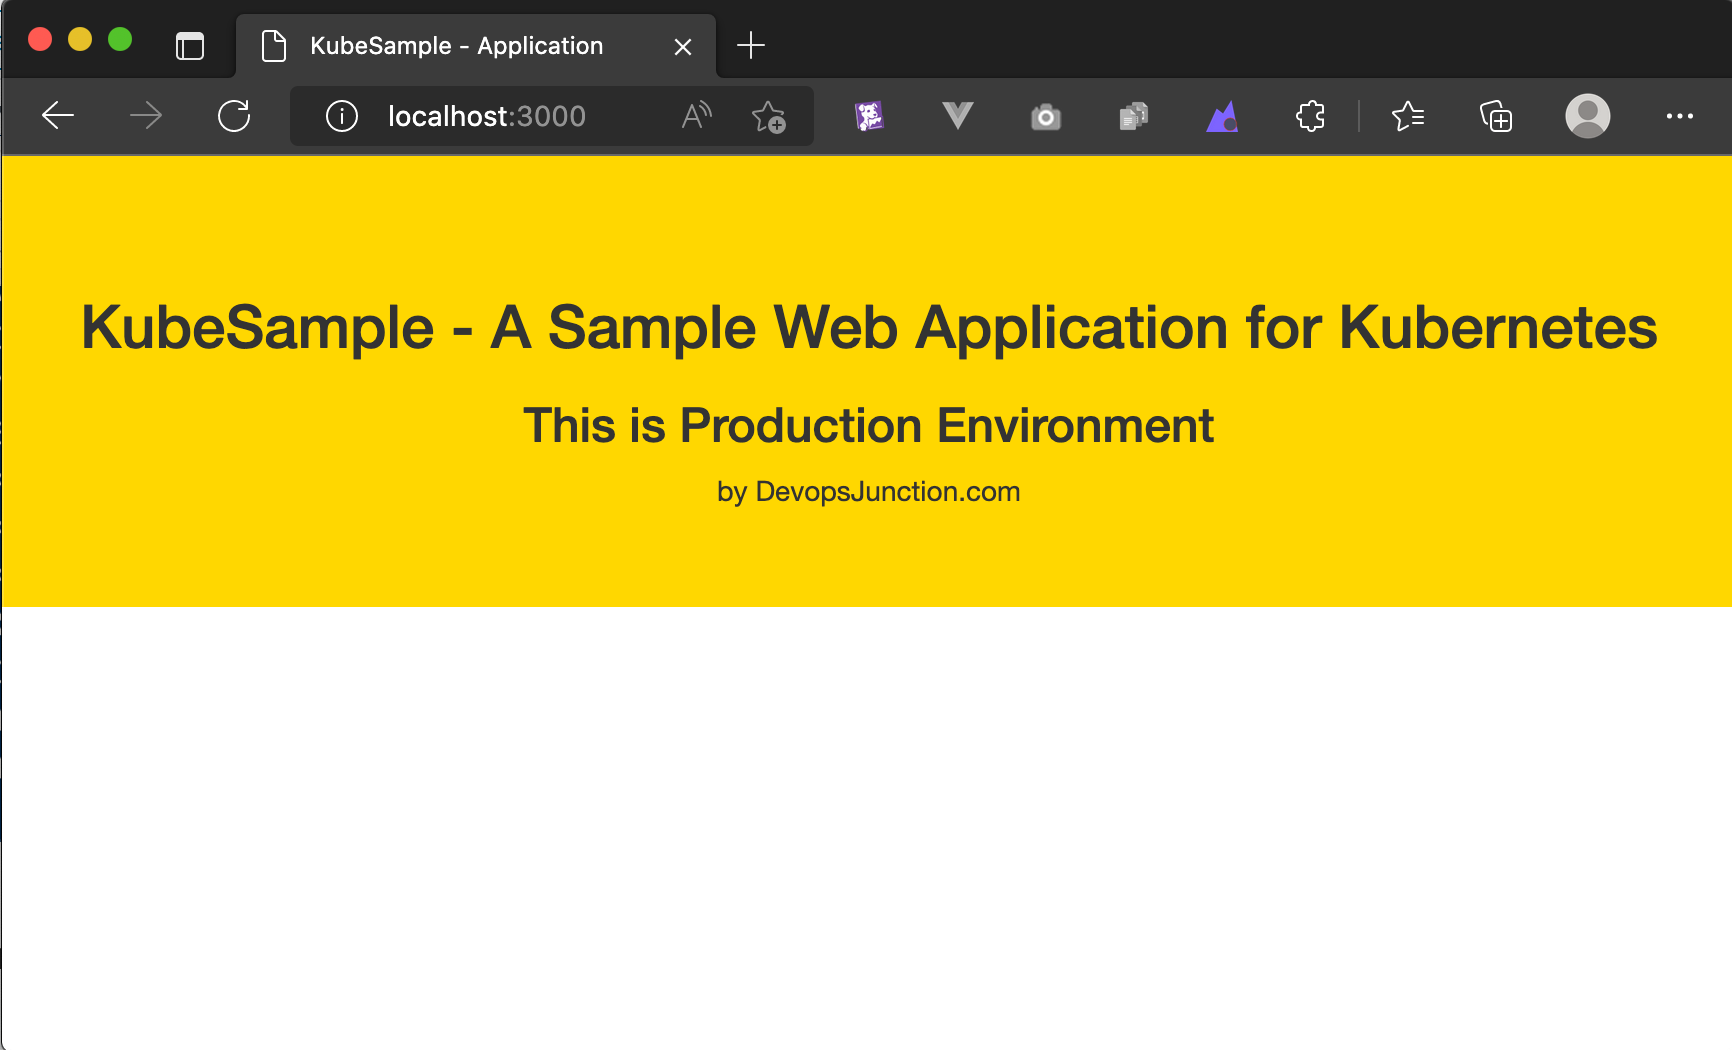
Once the port forward is done, you can access the kubesample Application on http://localhost:3000
Here are the screenshots of kubesample application taken at my end.
Now you can change the values in our Configmap and retry.
$ kubectl edit configmap kubesample
After updating the values. here is the snapshot of my current configmap
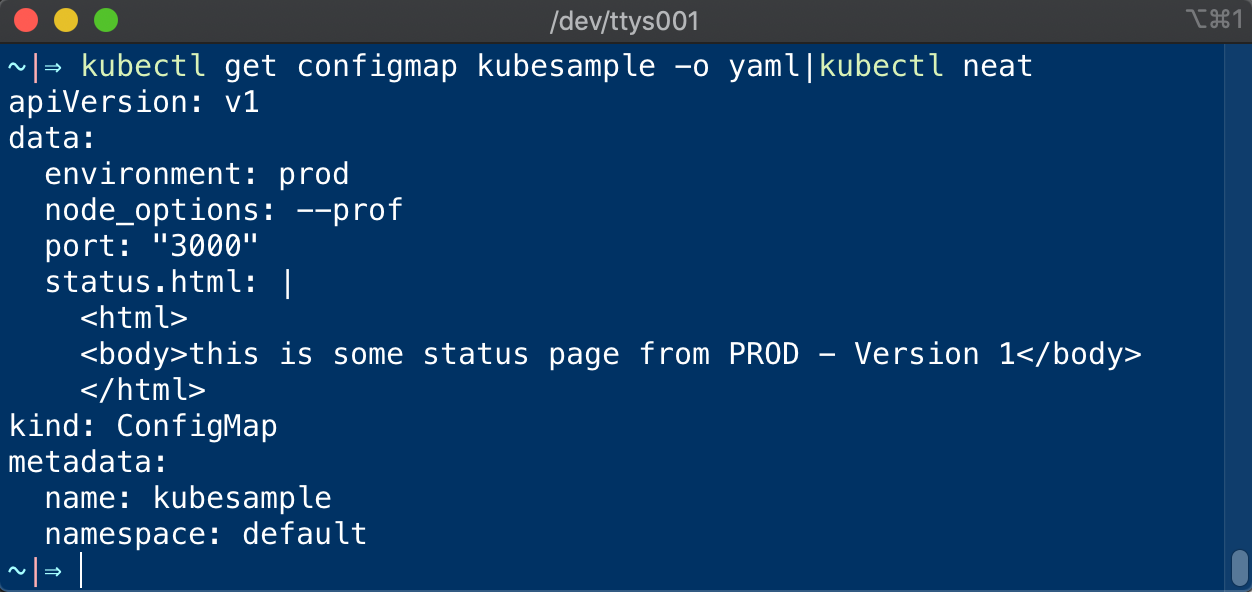
As you can see I have updated the Environment from dev to prod and made changes on the status.html too.
Now let us restart the pods for the application to take the new configmap changes and retry
Conclusion
In summary, we have learnt different ways to create configmap and to use it in your workload
We have also tested the configmap in real time by creating a sample application kubesample
Hope this helps. In case you have any feedback or queries. please do let us know in the comments
Cheers
Sarav AK

Follow me on Linkedin My Profile Follow DevopsJunction onFacebook orTwitter For more practical videos and tutorials. Subscribe to our channel
Signup for Exclusive "Subscriber-only" Content