Overview
CVE-2007-2897
Microsoft Internet Information Services (IIS) 6.0 allows remote attackers to cause a denial of service (server instability or device hang), and possibly obtain sensitive information (device communication traffic); and might allow attackers with physical access to execute arbitrary code after connecting a data stream to a device COM port; via requests for a URI containing a ‘/’ immediately before and after the name of a DOS device, as demonstrated by the /AUX/.aspx URI, which bypasses a blacklist for DOS device requests.
This kind of sensitive attack can be avoided by installing URLScan in Windows machine.
UrlScan 3.1 can be configured to filter HTTP querystring values and other HTTP headers to mitigate SQL injection attacks while the root cause is being fixed in the application.
UrlScan 3.1 actively works with the following IIS versions:
IIS 5.1 on Windows XP
IIS 6.0 on Windows Server 2003
IIS 7.0 and above on Windows Server 2008 and Windows Vista
Administrators may configure UrlScan to reject HTTP requests based on the following criteria:
The HTTP request method or verb
The file name extension of the requested resource
Suspicious URL encoding
Presence of non-ASCII characters in the URL
Presence of specified character sequences in the URL
Presence of specified headers in the request
Lets get into the work !!
Prerequisites
• Windows XP, Windows Server 2003, Windows Vista or Windows Server 2008.
• IIS version 5.1, 6.0 or 7.0 or above (depending on the platform).
Installation Steps
• Run UrlScan v3.1 MSI installer for either x86 or x64 version depending on your platform.
• On successful installation you should have a "UrlScan" folder with UrlScan.dll under %windir%\system32\inetsrv and additionally under %windir%\syswow64\inetsrv as well for x64 installations.
• Folder above will also contain the configuration file, UrlScan.ini. In the x64 case, only the system32 directory will have the UrlScan.ini file since the filter will turn off redirection when attempting to access UrlScan.ini, so both versions of the filter will access the same configuration under system32 directory
• Upgrading from UrlScan v2.5 or UrlScan v3.0 will leave your old UrlScan.ini file intact.
• The default installation will install UrlScan as a global filter only. Please refer to the Setting Up UrlScan v3.1 section for details.
• UrlScan is required to be the highest priority filter for it to function properly. The MSI installer will do so for the global filter case, but if you are installing UrlScan as a site filter you will need to set UrlScan as the highest order filter.
Global Filter
The default installation of UrlScan v3.1 installs the filter as a global filter. See the Site Filter section on how to setup your filter as a site filter
If you are upgrading from UrlScan v2.5 or from UrlScan v3.0 your old UrlScan.ini file will be persisted and all your old settings will apply. If you want to check out the new defaults for the UrlScan.ini file, download the new UrlScan.ini file here.
x86 – > https://www.iis.net/downloads/microsoft/urlscan
x64 – > https://www.iis.net/downloads/microsoft/urlscan
The default logging directory is the "logs" directory underneath the "UrlScan" directory where your global filter is installed. Change this to point to wherever you want your log files to be located. Make sure that IIS worker processes have write permissions to this folder. For IIS 6.0 make sure you give IIS_WPG write permissions to this folder, and for IIS 7.0 and above make sure you give IIS_IUSRS write permission to this folder.
The default UrlScan.ini file has detailed descriptions of what all the configuration options do. Read through it and update the values for them according to your needs. Check out the "Common Scenarios" section for some common configurations.
Site Filter
Upon installation of UrlScan v3.1 as a site filter requests for that particular site will run through both the site and the global filter if the global filter is not un-mapped. There would be two instances of the filter running in this case.
If you have a site called "Site1" setup on the server under c:\site1 folder and you want to use UrlScan v3.1 as a site filter for this site, here is how you would set it up.
1. Copy UrlScan.dll and UrlScan.ini from the default installation location to c:\site1.
2. Modify c:\site1\UrlScan.ini with all the options that you want for your site filter. The default UrlScan.ini file that you can download here has the options listed with comments on what they do.
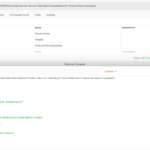
3. Register c:\site1\UrlScan.dll as a site filter. Run "inetmgr" and drill down to "Site1" in your left hand pane. For IIS 5.1 and 6.0, right-click on "Site1" and select "Properties" then go to the "ISAPI Filters" tab and add a new filter and point the executable to c:\site1\UrlScan.dll. For IIS 7.0 and above, you should see an ISAPI Filters icon under the IIS category and double-clicking this will bring up an "Add…" action which you can then point the executable to c:\site1\UrlScan.dll
4. Using the up arrow key, move the UrlScan filter to the top to make it the highest priority filter. This step is essential for the filter to function correctly.
5. if your site has multiple dots (.) in its address, change the value "AllowDotInPath=0" to "AllowDotInPath=1" in Urlscan.ini file and reset IIS to reflect changes.
Now hit the site and voila !!!