In this article, we are going to see how to use Vagrant to create a development of Virtual machines and start practising Ansible.
This is A Beginner article for both Ansible and Vagrant.
I remember the days where I used to struggle with Vmware workstation (or) virtual box to setup network configuration for my Virtual machines and banging my head to take the putty session to the Guest VM.
Then I was introduced to Vagrant and am never going back!.
On the other hand. Ansible is an innovative tool for automation and infrastructure and application management.
A promise for the present and future. In the DevOps sector (or) platform services sector or in any IT infrastructure sector you take, Ansible is an uprising and rapidly being adopted product.
This post is going to be all about Vagrant and Ansible and How Ansible vagrant works together in Server Provisioning
What is Vagrant
According to Hashicorp. A company who developed vagrant. Vagrant is
Vagrant is a tool for building and managing virtual machine environments in a single workflow. With an easy-to-use workflow and focus on automation
In simple words.
- Vagrant is a server provisioning tool
- It uses virtualisation providers like Oracle Virtual box to create VMs
- It just provides an efficient way to demonstrate the VMs created in Oracle Virtual box (or) other virtualisation providers.
- Vagrant has its commands.
- Vagrant works as a layer on top of the Virtualization provider.
- It can also be considered as a Virtual machine management System
- You can create Virtual machines and provision them by typing few lines of code in a configuration file named "Vagrantfile."
- Vagrant is a minimal form of Infrastructure as Code concept and intended for development infrastructure building/provisioning where Terraform is a full-fledged IaC product from the same company (Hashicorp) is a leader in the IaC market.
What is Ansible
Ansible is an agentless Simple IT Automation software/tool which helps to automate any Application Management, Configuration Management, Infrastructure management tasks.
What makes Ansible a leader in IT Automation.
- Clear - Ansible uses a simple syntax (YAML) and is easy for anyone (developers, sysadmins, managers) to understand. APIs are simple and sensible.
- Fast - Fast to learn, fast to setup —especially considering you don’t need to install extra agents or daemons on all your servers!
- Complete - Ansible does three things in one and does them very well. Ansible’s ‘batteries included’ approach means you have everything you need in one complete package.
- Efficient - No extra software on your servers means more resources for your applications. Also, since Ansible modules work via JSON, Ansible is extensible with modules written in a programming language you already know.
-
Secure-AnsibleusesSSH, and requires no extra open ports or potentially - vulnerable daemons on your servers.
Let's go ahead and see how to install and configure Ansible and Vagrant.
Install Oracle Virtual Box
As said earlier, Vagrant works as a layer on top of virtualisation software aka hypervisor like Oracle Virtual box (or) Vmware workstation. Oracle Virtual box and Vagrant are widely used pair of choice.
https://www.virtualbox.org/wiki/Downloads
Note*: In this post, we have used Oracle Virtual box as a hypervisor (or) provider
Install Vagrant
Vagrant can be downloaded and install in your Windows (or) Mac machines; you can also have it installed in Linux based operating systems.
https://www.vagrantup.com/downloads.html
Considering that you have installed the Oracle Virtual box and Vagrant. Let us walk into the magic of Vagrant, by creating our first VM.
Validate the Version of your Vagrant
Once you have installed Vagrant go to your command-line tool.
cmd for windows, terminal for Mac. and enter the following command to make sure that the vagrant is installed properly
vagrant version
Choose your Box ( Operating System )
In Vagrant operating system image is called as Box. Like any traditional VM creation strategy, for any VM creation, we must have an ISO package of the Operating system
Unlike the traditional way of downloading the ISO images directly by your self from the vendor websites.
Vagrant gives you an easy way or a platform to search and download the operating systems of your choice.
Vagrant Cloud is a repository of these Boxes (images), where you can discover various fresh operating systems (or) a complete ready to load an image with infrastructure like LAMP stack.
Everything you might ever need is right there in the Vagrant cloud. If not, you do it on your own and upload it for other pioneers who gonna come in future.
Note*: For this post, I am taking a normal cent os 7 box named as "geerlingguy/centos7"
How to download a new box in Vagrant
There are two methods to download a box to your local vagrant
Auto Download
You can note down the name of the box from the cloud like "geerlingguy/centos7" and mention it as your box name in your Vagrantfile
When you are provisioning (or) bring up your VM for the first time with vagrant upcommand. Vagrant will check the availability of the box in local,
If the box mentioned in Vagrantfile is not available in local. It will try to download it from the Vagrant Cloud
Vagrant.configure("2") do |config|
 config.vm.box = "geerlingguy/centos7"
end
Manual
You can also download the boxes and manage it using with vagrant command line. In order to download and add the box manually to your vagrant. just execute the following command.
vagrant box add geerlingguy/centos7
To get a list of boxes downloaded and available in vagrant (local), use the following command
vagrant box list
Note*: There are various other commands in vagrant for box management and VM management etc. You can find the Vagrant command cheat sheet here
Create your First Virtual Machine with Vagrant
As said earlier, Vagrant works based on a configuration file named "Vagrantfile" . This is written in ruby.
To create a new VM, you must have the Vagrantfile ready with the proper configuration. To get a Vagrantfile, you could use the following command
vagrant init
This will result in creating a new file named "Vagrantfile" in the present working directory.
If you open the Vagrantfile you could see tons of commented lines with only three uncommented lines.
if you want to cut down that comments. you have to initialize the vagrant with --minimal parameter like shown below.
vagrant init – minimal
it would create a Vagrantfile with very minimal content as follows
Vagrant.configure("2") do |config|
    config.vm.box = "base"
end
but this is for default basic VM provisioning where the Virtual machine will be created with the basic minimal OS being provided by hashicorp.
To initialize vagrant with a specific box (image) instead of the base. you have to execute the vagrant init along with the box name at the end.
vagrant init geerlingguy/centos7
Though you mentioned the box name here. There would be no more changes in the content except in the line config.vm.box = "base" base would be replaced with the box name you had mentioned.
So its time to write the Vagrantfile of our own with further cutomizations.
The configuration of our VM
Our requirement is to create a Virtual machine with the following configuration
- 1 GB of Physical Memory
- Cent OS 7 Operating System
- Apache webserver installed
- port forwarding Guest 80 -> Host 8080
- Shared directory between host and guest (vm)
- Ansible Provisioning
Let us create a Vagrantfile defining all of these requirement inside
The Vagrantfile for our VM
This is the Vagrantfile we need to accomplish all those requirements, I have defined all our requirement including ansible provisioning
# -*- mode: ruby -*-
# vi: set ft=ruby :

Vagrant.configure("2") do |config|
 config.vm.box_check_update = "false"
 config.vm.provider "virtualbox" do |vb|
   vb.memory = "1024"
 end

 config.vm.define "webserver" do |web|
   web.vm.hostname = "mwiws01"
   web.vm.box = "geerlingguy/centos7"
   web.vm.network :private_network, ip: "192.168.10.10"
   web.vm.network "forwarded_port", guest: "80", host: "8080"
   web.vm.synced_folder "/apps/shared", "/shared"
   #Provision the webserver with Ansible
   web.vm.provision "ansible" do |ansible|
     ansible.playbook="apache-playbook.yaml"
   end
  end
end
Let me explain what every line in the file does briefly
As you could see, the Vagrantfile uses Ruby Syntax so if you are good at ruby you can easily understand the syntax of this file.
However, knowledge of ruby is not mandatory to write and understand the Vagrantfile
The following line loads the Vagrant API version 2 and assigns it to a variable named config
Vagrant.configure("2") do |config|
config is the widely used variable name at this stage. So let's go with the standards what vagrant follow so that we would be able to understand things much better
config.vm.box_check_update = "false"
the next line in the file is to disable the auto-update feature of the vagrant to read more about this feature go here
config.vm is the major namespace in Vagrant API
There are other namespaces available as follows
- config.vm
- config.ssh
- config.winrm
- config.winssh
- config.vagrant
Note*: To know what each namespace is designated to do and what are the settings available in each namespace. Refer this vagrant documentation
config.vm.provider "virtualbox" do |vb|
   vb.memory = "1024"
end
The preceding lines from Vagrantfile are there to define the provider we are going use for provisioning our VM. In our case it's virtualbox.
vb.memory tells vagrant that, whichever VM we are going to define and create from this Vagrantfile will be having 1024mb of memory by default until it is overwritten by the VM specific configuration.
Now we are going to define our Virtual machine-specific configuration, I have added a comment for each line to explain what they are doing.
# Defining a New VM named webserver and assign to a variable named web
config.vm.define "webserver" do |web|

    # Set the hostname of the VM
    web.vm.hostname = "mwiws01"

    # Set the box (OS) for the Virtual machine, we use centos7
    web.vm.box = "geerlingguy/centos7"


    # Define the network for your VM I chose private_network, you can use public_network as well.
    web.vm.network :private_network, ip: "192.168.10.10"

    # Port forwarding configuration as per our requirement
    web.vm.network "forwarded_port", guest: "80", host: "8080"

    # Creating a Shared Directory between host and guest VM
    web.vm.synced_folder "/apps/shared", "/shared"

    # Provision the webserver with Ansible, Execute the playbook
    web.vm.provision "ansible" do |ansible|

    # Mention the fully qualified path and name of playbook.
    # If no path mentioned, vagrant will take the base directory where Vagrantfile resides
    ansible.playbook="apache-playbook.yaml"
    end
end
Ansible playbook and its artifacts
The Ansible playbook is written to perform various steps like Installing the Repository, Installing the Apache, Creating a Symlink, Creating a document root etc.
The Major task our ansible playbook is going to do is that to download the home page of www.middlewareinventory.com and keep it as a default HTML (index.html) page in our apache server
Note*:
- you can find the playbook and all the artifacts including the Vagrantfile in this GITHUB repository
- More detailed information on how this entire setup is working. See the video I have posted on our youtube channel
Here is a one-line explanation of the files being used in this project
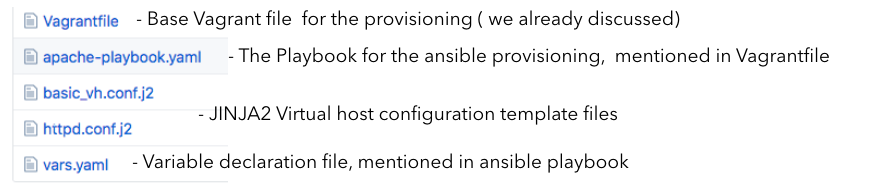
In a summary, this is what our ansible playbook does.
- Load the variables file vars.yaml
- Download and Install the EPEL release RPM ( from internet)
- Install Apache HTTPD Webserver
- Copy the template *.j2 (Jinja2) files to the destination after replacing the variables in J2 file with the corresponding values taken from our variables declaration file vars.yaml
- Create a Document root directory
- Connect to the www.middlewareinventory.com and download the home page and save it as index.html under document root ( Default page for our site)
- Restart the Apache HTTPD process
The preceding tasks would be executed in the order it was given, with this understanding. If you go and refer our playbook given below. You would be able to understand what each task is intended to do.
File Content is hidden by default. Click the Sign to enlarge/shrink
The Ansible Playbook
The Variables file
The Base HTTPD.conf template
The Custom Virtualhost template
The templating process and J2 files make it possible to replace the domain name/ server name at runtime. Having said that. If you want to build a virtualhost with a different server name all you have to do is to update the vars.yaml file.
Create the VM and Start the Server Provisioning - Vagrant ansible
To create the VM and start the server provisioning all you have to do is to enter the following command once you have all the files downloaded from the GITHUB repository.
vagrant up
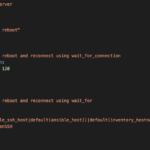
vagrant up command should be used to start the VM as we are starting the VM for the first time it will automatically provision it.
you can manually re-provision the VM at any time ( even after creating the VM) by executing the following command
vagrant provision
If you opt to just the start the VM and provision it later. you can explicitly mention Vagrant to skip provisioning with the following command.
It will bring up the VM but not provision it, in other words, it will not execute our ansible playbook defined in Vagrantfile
vagrant up – no-provision
In our case, we are going to create the VM with provisioning so we are using vagrant up command
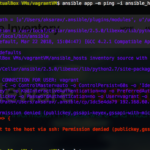
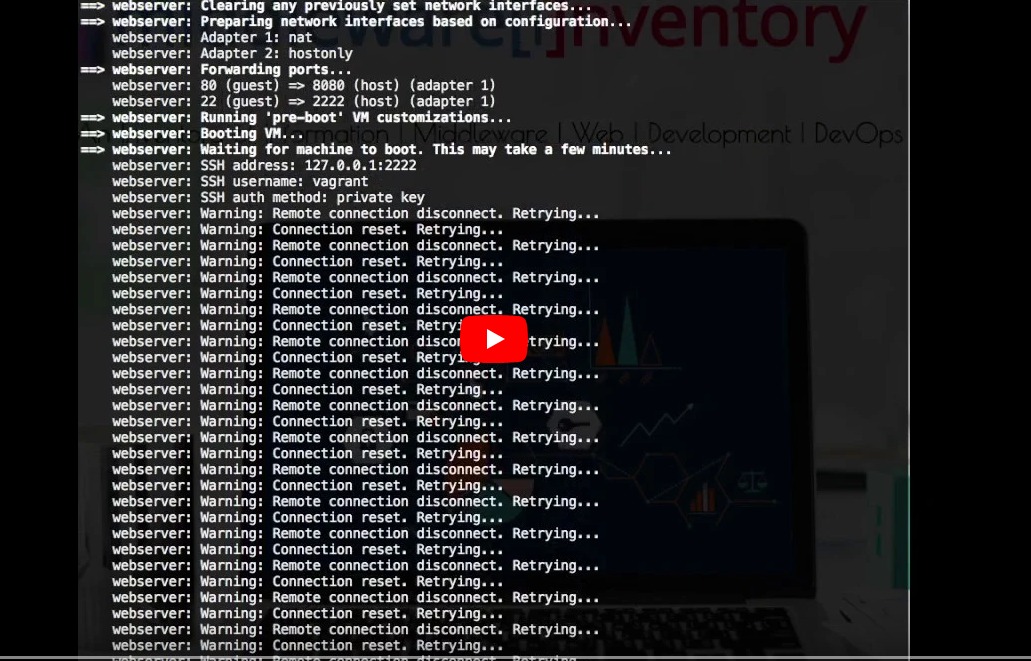
The Execution Output of Vagrant ansible example ( 26 seconds )
you can click on this link to see the execution output
Vagrant Ansible In Action - VLOG
Click on this link to check out the VLOG/Screen recording of this playbook execution and explanation
Vagrantfile example with Multiple Virtual machines
Now, as you have gained some expertise on the ansible provisioning with vagrant.
Now look at the following Vagrantfile which helps you create an entire Infrastructure like Application Server, Web Server, Database Server etc and all of them are going to be having the same Configuration and Base Image (OS)
# -*- mode: ruby -*-
# vi: set ft=ruby :

VAGRANTFILE_API_VERSION = "2"

Vagrant.configure(VAGRANTFILE_API_VERSION) do|config|
    config.ssh.insert_key = false
    config.vm.provider :virtualbox do|vb|
        vb.customize ["modifyvm", :id, "--memory", "2048"]
    end

    #Web Server
    config.vm.define "web1" do|web|
        web.vm.hostname = "mwiweb02"
        web.vm.box = "geerlingguy/centos7"
        web.vm.network "public_network", ip: "192.168.43.14"
    end

    #Application Server1
    config.vm.define "app1" do|app|
        app.vm.hostname = "mwivmapp01"
        app.vm.box = "geerlingguy/centos7"
        app.vm.network "public_network", ip: "192.168.43.11"
    end

    #Application Server2
    config.vm.define "app2" do|app|
        app.vm.hostname = "mwivmapp02"
        app.vm.box = "geerlingguy/centos7"
        app.vm.network "public_network", ip: "192.168.43.12"
    end

    #Database Server
    config.vm.define "db" do|db|
        db.vm.hostname = "mwisqldb01"
        db.vm.box = "geerlingguy/centos7"
        db.vm.network "public_network", ip: "192.168.43.13"
    end

    config.vm.box_check_update = false
    config.vbguest.auto_update = false
end
The last two options are set to disable the auto-update feature of vagrant. You can remove it if you want your images to be updated automatically.
Note*: image update would prevent you while booting up the virtual machine. In a development environment, I recommend disabling this feature so that you don't get stuck in your fast adventure.
That's all of it.
Please let me know your feedback in the comments field and ask me if there are any questions or clarifications.
Rate this article [ratings]
Cheers
Sarav AK

Follow me on Linkedin My Profile Follow DevopsJunction onFacebook orTwitter For more practical videos and tutorials. Subscribe to our channel
Signup for Exclusive "Subscriber-only" Content