Ansible ad hoc commands are one-liners designed to achieve a very specific task they are like quick snippets and your compact swiss army knife when you want to do a quick task across multiple machines.
To put simply, Ansible ad hoc commands are one-liner Linux shell commands and playbooks are like a shell script, a collective of many commands with logic.
Ansible ad hoc commands come handy when you want to perform a quick task.
We have collected 20+ examples which will help you to get started with Ansible AD HOC commands. It is your Ansible AD HOC command Cheat Sheet or Ansible Cheat Sheet.
Come on Pal, Let's Ansible.
Prerequisites
- Ansible must be installed ( only in control machine, remember this is agentless)
- some remote Virtual machines to test, you can use vagrant to build them ( this article would help you get started)
- Make sure that the control machine and VM has SSH connectivity
- I recommend you enable SSH key-based authentication for efficiency ( refer this article to enable SSH key based auth)
What is Ansible ad hoc commands
ad hoc in Latin means something done for a very precise and particular purpose. As the word suggests, ansible ad hoc commands are written for a very particular task. Some of the ad hoc scenarios are given below
- Just validate the uptime of 1 to 200 remote servers
- Just get the disk space of remote hosts
- Ping and validate if the server is alive and responds
- shutdown multiple remote hosts at a single command
I have given 22 real-time examples of ansible ad hoc commands and I know that is just a little but it will help you start your journey towards ansible automation.
Ansible ad_hoc commands Syntax
Refer the following diagram to understand how the ansible ad hoc commands are framed.
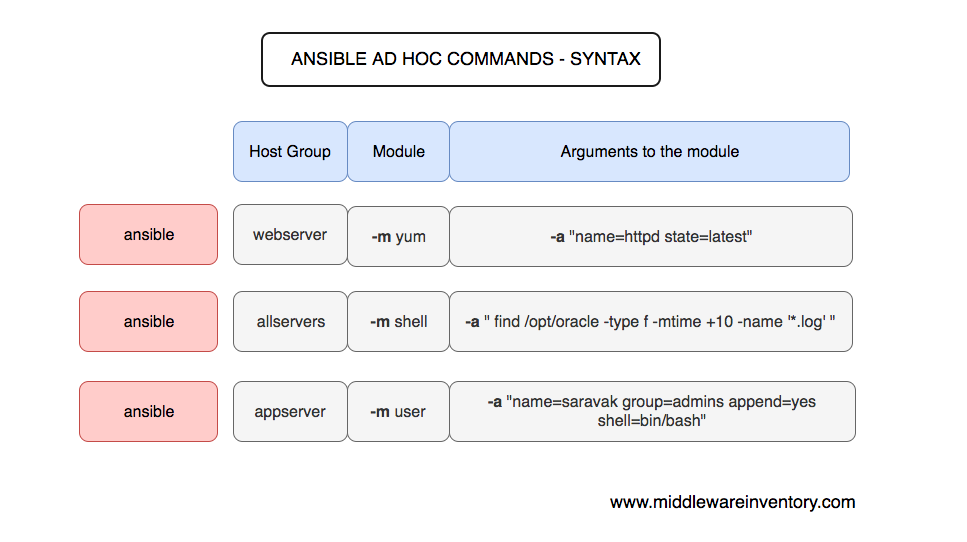
To run an ad hoc command, the command must be framed or have the following syntax.
ansible <host-pattern> [options]
for example. the command should be written as follows.
ansible appserverhostgroup -m <modulename> -a <arguments to the module>
A single ansible ad hoc command can have multiple options. -m and -a are one amongst them and widely used.
Ansible Ad Hoc Command Examples
Here are the 17 selected examples of ansible ad hoc commands and you can directly go to your desired example or scroll through to see them all.
- ansible ad hoc ping command example
- ansible ad hoc command to check uptime
- ansible ad hoc command to check memory usage
- ansible ad hoc command to get physical memory allocated to the host
- Execute a command as root user (sudo) on host with ansible ad hoc command
- ansible ad hoc command to Execute a command as a different user (sudo su)
- ad hoc command to Create a unix user group
- ad hoc command to Create a unix user
- ansible ad hoc command to Create a Directory with 755 permission - ansible mkdir
- ansible ad hoc command to Create a file with 755 permission
- ad hoc command to Change ownership of a file
- ansible ad hoc command to check free disk space of hosts
- ansible ad hoc command to Install a package using yum command
- ansible ad hoc command to Start or stop the service
- Install and configure python Django application server with ansible ad hoc
- Managing Cron Job and Scheduling with Ansible ad hoc
- Running operations in the background asynchronous with Polling ansible
- ansible ad hoc command to reboot remote system
- ansible ad hoc command to check service status
- ansible ad hoc command to copy file local to remote
- ansible ad hoc command to copy directory local to remote
- ansible ad hoc command to list NFS mounts
- adhoc command to collect memory, cpu and OS distribution of a host
- ansible ad hoc command to stop, start, restart, reload service
- ad hoc command to download file from URL
- ad hoc command to check listening ports
Example1: ansible ad hoc ping example
In this example, we are going to test the remote nodes or hosts and make sure they respond back using Ansible's default SSH channel
What is Ansible Module? Quick summary
Ansible modules are more like unix commands they have built to
help you accomplish a single and a specific task.
ping
: to check the connectivity
shell
: to run shell scripts
command
: to run commands in remote
raw
: Execute some very basic SSH commands
We presume that you have set up SSH key based auth between the control machine and the hosts. If yes then there is no need to enter the credentials and command would be simple.
$ ansible multi -m ping -i ansible_hosts – user=vagrant

SSH password:
mwivmapp02 | SUCCESS => {
"changed": false,
"ping": "pong"
}
mwisqldb01 | SUCCESS => {
"changed": false,
"ping": "pong"
}
mwivmapp01 | SUCCESS => {
"changed": false,
"ping": "pong"
}
mwiweb02 | SUCCESS => {
"changed": false,
"
What if you do not have SSH key-based authentication, then enter the user name and password while invoking the command as shown below.
$ ansible multi -m ping -i ansible_hosts – user=vagrant – ask-pass

SSH password:
mwivmapp02 | SUCCESS => {
"changed": false,
"ping": "pong"
}
mwisqldb01 | SUCCESS => {
"changed": false,
"ping": "pong"
}
mwivmapp01 | SUCCESS => {
"changed": false,
"ping": "pong"
}
mwiweb02 | SUCCESS => {
"changed": false,
"
you can read how to transfer SSH key using ansible in this article
FAQ: Why the servers are not in order?
Thanks to ansible parallel nature, Ansible runs commands in remote hosts using multiple forks or simply put executing the task by parallel across all the servers. this would save lot of your time.
The Setting of how many forks (or) parallel process that ansible can run can be configured by using -f (fork) flag.
Try running the same command with the following command
ansible multi -m ping -i ansible_hosts – user=vagrant -f 1
The command restricts ansible to use only one fork (or) limit the parallel process to only one. Now you can see the servers are in order but takes longer time than earlier.
Example 2: ansible ad hoc command to check uptime
In this example, we are going to know the uptime of the hosts. Ansible provides two major modules to run the command over the host group or on the remote server.
Which one to pick is not a big confusion if you know what are they and their capabilities
FAQ: Ansible command vs shell module
Both ansible shell and command modules can be used to run SHELL commands on the nodes. but one difference is that command module does not support piping the output to another command, In other words, it will support the only command whereas shell module support complicated pipes and every shell command you use day to day
| The UNIX Command | Supported in command module | Supported in Shell module |
| cat /etc/passwd | YES | YES |
| cat /etc/passwd|grep "^saravak" | NO ( Since it has Pipe) | YES |
Here are the commands you can use to get the uptime. All three commands would yield you the same results.
ansible multi -m command -a uptime

ansible multi -m shell -a uptime

ansible multi -a uptime
as you could have already figured out -m is the module and -a should contain the command it should run which goes as an argument to command and shell.
Example 3: How to check the free memory or memory usage of hosts using ansible ad hoc command
The following ansible ad hoc command would help you get the free memory of all the hosts in the host group named multi
As you could see we are running the free -m command on the remote hosts and collecting the information
$ ansible multi -a "free -m" -i ansible_hosts

mwivmapp01 | SUCCESS | rc=0 >>
              total        used        free      shared  buff/cache   available
Mem:           1839         108        1570           8         160        1563
Swap:          1023           0        1023

mwisqldb01 | SUCCESS | rc=0 >>
              total        used        free      shared  buff/cache   available
Mem:           1839         100        1578           8         160        1571
Swap:          1023           0        1023

mwiweb02 | SUCCESS | rc=0 >>
              total        used        free      shared  buff/cache   available
Mem:           1839         100        1581           8         157        1573
Swap:          1023           0        1023

mwivmapp02 | SUCCESS | rc=0 >>
              total        used        free      shared  buff/cache   available
Mem:           1839         109        1569           8         160        1562
Swap:          1023           0        1023
Example 4: ansible ad hoc command to get physical memory allocated to the host
To accomplish this example we are going to use two commands together so we must opt to shell module.
$ ansible multi -m shell -a "cat /proc/meminfo|head -2"

mwisqldb01 | SUCCESS | rc=0 >>
MemTotal:        1883428 kB
MemFree:         1616460 kB

mwivmapp02 | SUCCESS | rc=0 >>
MemTotal:        1883428 kB
MemFree:         1607372 kB

mwiweb02 | SUCCESS | rc=0 >>
MemTotal:        1883428 kB
MemFree:         1619612 kB

mwivmapp01 | SUCCESS | rc=0 >>
MemTotal:        1883428 kB
MemFree:         1607908 kB
Example 5: ansible ad hoc become - Execute a command as root user (sudo) host
In the earlier versions of ansible there is an option named as sudo (deprecated), Since ansible 2.0 there are two new options named as become and become_user
In this example, we are going to access one of the privileged configuration files. We are going to check if the user exists by searching the /etc/passwd file
Using SUDO module ( deprecated and will be removed in ansible 2.6 ) use ansible become instead
$ ansible multi -m shell -a "cat /etc/passwd|grep -i vagrant" -s – ask-sudo-pass

SUDO password:

mwivmapp02 | SUCCESS | rc=0 >>
vagrant:x:1000:1000:vagrant:/home/vagrant:/bin/bash

mwivmapp01 | SUCCESS | rc=0 >>
vagrant:x:1000:1000:vagrant:/home/vagrant:/bin/bash

mwisqldb01 | SUCCESS | rc=0 >>
vagrant:x:1000:1000:vagrant:/home/vagrant:/bin/bash

mwiweb02 | SUCCESS | rc=0 >>
vagrant:x:1000:1000:vagrant:/home/vagrant:/bin/bash
$ ansible multi -m shell -a "cat /etc/passwd|grep -i vagrant" -b -K

[DEPRECATION WARNING]: The sudo command line option has been deprecated in favor of the "become" command line arguments. This feature will be removed in version 2.6.
 Deprecation warnings can be disabled by setting deprecation_warnings=False in ansible.cfg.

SUDO password:
mwivmapp02 | SUCCESS | rc=0 >>
vagrant:x:1000:1000:vagrant:/home/vagrant:/bin/bash

mwivmapp01 | SUCCESS | rc=0 >>
vagrant:x:1000:1000:vagrant:/home/vagrant:/bin/bash

mwisqldb01 | SUCCESS | rc=0 >>
vagrant:x:1000:1000:vagrant:/home/vagrant:/bin/bash

mwiweb02 | SUCCESS | rc=0 >>
vagrant:x:1000:1000:vagrant:/home/vagrant:/bin/bash
here
-b is the option for become and by default it will become root user
-K is to tell ansible to ask for SUDO password
Example 6: ansible ad hoc become - Execute a command as a different user (sudo su)
In this example, we are going to create a new file inside a directory /opt/oracle which is owned by weblogic user
In the following ad-hoc command snapshot you can see we have given the username we want to switch to using --become-user=weblogic option
$ ansible app -m file -a "path=/opt/oracle/binaries state=directory mode=0755" -i ansible_hosts -b – become-user=weblogic

mwivmapp01 | SUCCESS => {
    "changed": true,
    "gid": 1001,
    "group": "weblogic",
    "mode": "0755",
    "owner": "weblogic",
    "path": "/opt/oracle/binaries",
    "secontext": "unconfined_u:object_r:usr_t:s0",
    "size": 6,
    "state": "directory",
    "uid": 1001
}
mwivmapp02 | SUCCESS => {
    "changed": true,
    "gid": 1001,
    "group": "weblogic",
    "mode": "0755",
    "owner": "weblogic",
    "path": "/opt/oracle/binaries",
    "secontext": "unconfined_u:object_r:usr_t:s0",
    "size": 6,
    "state": "directory",
    "uid": 1001
}
Example 7: Create a user group with ansible ad hoc command
Here we are creating a user name group named weblogic using the ansible group module, the same task can be reversed to delete the group if you change the state to absent
$ ansible app -s -m group -a "name=weblogic state=present"

mwivmapp02 | SUCCESS => {
    "changed": true,
    "gid": 1001,
    "name": "weblogic",
    "state": "present",
    "system": false
}
mwivmapp01 | SUCCESS => {
    "changed": true,
    "gid": 1001,
    "name": "weblogic",
    "state": "present",
    "system": false
}
Example 8: Create a unix user with ansible ad hoc command
In this example, we are going to create a UNIX user using the ansible user module
$ ansible app -m user -a "name=weblogic group=weblogic createhome=yes" -b

mwivmapp01 | SUCCESS => {
    "changed": true,
    "comment": "",
    "create_home": true,
    "group": 1001,
    "home": "/home/weblogic",
    "name": "weblogic",
    "shell": "/bin/bash",
    "state": "present",
    "system": false,
    "uid": 1001
}
mwivmapp02 | SUCCESS => {
    "changed": true,
    "comment": "",
    "create_home": true,
    "group": 1001,
    "home": "/home/weblogic",
    "name": "weblogic",
    "shell": "/bin/bash",
    "state": "present",
    "system": false,
    "uid": 1001
}
Example 9: Create a Directory with 755 permission using ansible ad hoc command
In this example, we are going to create a new directory with 755 permisssion this is done using the ansible file module
$ ansible app -m file -a "path=/opt/oracle state=directory mode=0755" -b

mwivmapp01 | SUCCESS => {
    "changed": true,
    "gid": 0,
    "group": "root",
    "mode": "0755",
    "owner": "root",
    "path": "/opt/oracle",
    "secontext": "unconfined_u:object_r:usr_t:s0",
    "size": 6,
    "state": "directory",
    "uid": 0
}
mwivmapp02 | SUCCESS => {
    "changed": true,
    "gid": 0,
    "group": "root",
    "mode": "0755",
    "owner": "root",
    "path": "/opt/oracle",
    "secontext": "unconfined_u:object_r:usr_t:s0",
    "size": 6,
    "state": "directory",
    "uid": 0
}
Example 10: Create a file with 755 permission using ansible ad hoc commands
Like the previous example, we are going to create a file this time with 755 permission
$ ansible app -m file -a "path=/tmp/testfile state=touch mode=0755"

mwivmapp02 | SUCCESS => {
    "changed": true,
    "dest": "/tmp/testfile",
    "gid": 1000,
    "group": "vagrant",
    "mode": "0755",
    "owner": "vagrant",
    "secontext": "unconfined_u:object_r:user_tmp_t:s0",
    "size": 0,
    "state": "file",
    "uid": 1000
}
mwivmapp01 | SUCCESS => {
    "changed": true,
    "dest": "/tmp/testfile",
    "gid": 1000,
    "group": "vagrant",
    "mode": "0755",
    "owner": "vagrant",
    "secontext": "unconfined_u:object_r:user_tmp_t:s0",
    "size": 0,
    "state": "file",
    "uid": 1000
}
Example 11: Change ownership of a file using ansible ad hoc command
In this example, we are going to change the ownership of the file using ansible ad hoc command with ansible file module
$ ansible app -m file -a "path=/opt/oracle group=weblogic owner=weblogic" -i ansible_hosts -b

mwivmapp01 | SUCCESS => {
    "changed": true,
    "gid": 1001,
    "group": "weblogic",
    "mode": "0755",
    "owner": "weblogic",
    "path": "/opt/oracle",
    "secontext": "unconfined_u:object_r:usr_t:s0",
    "size": 6,
    "state": "directory",
    "uid": 1001
}
mwivmapp02 | SUCCESS => {
    "changed": true,
    "gid": 1001,
    "group": "weblogic",
    "mode": "0755",
    "owner": "weblogic",
    "path": "/opt/oracle",
    "secontext": "unconfined_u:object_r:usr_t:s0",
    "size": 6,
    "state": "directory",
    "uid": 1001
}
Example 12: how to check free disk space of hosts using ansible ad hoc commands
Most of us would like to quickly check the disk space of many machines with a single command. this is that command
ansible multi -a "df -h"
Example 13: ad hoc command to Install a package using yum module
How to install a package or software in linux using yum module of ansible
ansible multi -s -m yum -a "name=httpd state=installed"
Example 14: ad hoc command to Start or stop the service
You really do not have to log in to start or stop the service running in your Linux system. you can simply use this ansible service module ad hoc command
# To Start
ansible multi -s -m service -a "name=httod state=started enabled=yes"

# To Stop
ansible multi -s -m service -a "name=httpd state=stop enabled=yes"
Example 15: Install and configure python Django application server with ansible ad hoc commands
These are set of commands you have to execute to install the Django application server and Mysql libraries. Here we are using easy_install which is an ansible module it helps to find the easy installation option from ansible galaxy
$ ansible app -s -m yum -a "name=MySQL-python state=present"

$ ansible app -s -m yum -a "name=python-setuptools state=present"

$ ansible app -s -m easy_install -a "name=django"
Example 16: Managing Cron Job and Scheduling with Ansible ad hoc
We can easily manage the Cron jobs with Ansible cron module. Here are the list commands you can keep handy
#  Run the job every 15 minutes
$ ansible multi -s -m cron -a "name='daily-cron-all-servers' minute=*/15
job='/path/to/minute-script.sh'"

# Run the job every four hours
$ ansible multi -s -m cron -a "name='daily-cron-all-servers' hour=4
job='/path/to/hour-script.sh'"

# Enabling a Job to run at system reboot
$ ansible multi -s -m cron -a "name='daily-cron-all-servers' special_time=reboot
job='/path/to/startup-script.sh'"

# Scheduling a Daily job
$ ansible multi -s -m cron -a "name='daily-cron-all-servers' special_time=daily
job='/path/to/daily-script.sh'"

# Scheduling a Weekly job
$ ansible multi -s -m cron -a "name='daily-cron-all-servers' special_time=weekly
job='/path/to/daily-script.sh'"
Example 17: Running operations in the background asynchronous with Polling ansible
You can use AD-HOC commands to run the operations background using -B and poll the job in the frequent interval -P
ansible ad-hoc command to perform yum update and frequently poll and check the status of the job
$ ansible multi -s -B 3600 -a "yum -y update"

$ ansible multi -m async_status -a "jid=763350539037"
By Default the polling interval is 10 seconds, but can modify it using -P option
If you set -P as 0 it called as fire and forget, The job id would not be given and you cannot track the job using async_status as shown above.
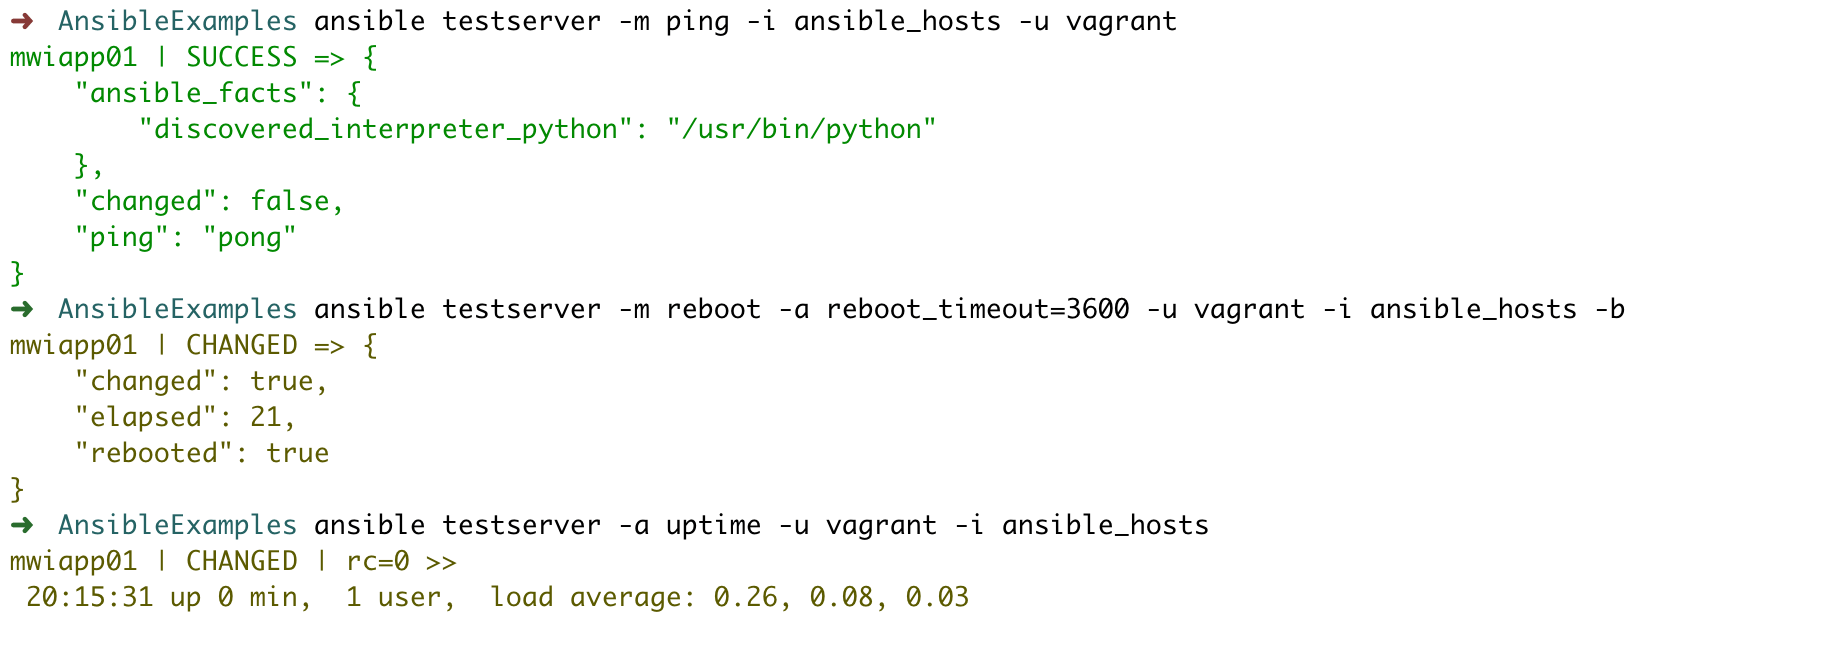
Example 18: ansible ad hoc command to reboot the system
In this example we are going to reboot the remote system using the shell module and Poll 0, it represents fire and forget
To know more about Ansible async and poll refer this article
Rebooting the host in the background is the best example for fire and forget or async and poll.
ansible all -i inventory -b -B 1 -P 0 -m shell -a "sleep 5 && reboot"
there is another ad hoc command available with reboot module to reboot the remote system
ansible all -m reboot -a reboot_timeout=3600 -u vagrant -i ansible_hosts -b
Here
-m - represents the module
-a - additional parameter to the reboot module to set the timeout to 3600 seconds
-u - remote SSH user
-i - inventory file
-b - to instruct ansible to become root user before executing the task
Here is the execution output of this ad hoc command. we have three commands in this screenshot, First is to check the status and second to reboot and third one is to check the uptime
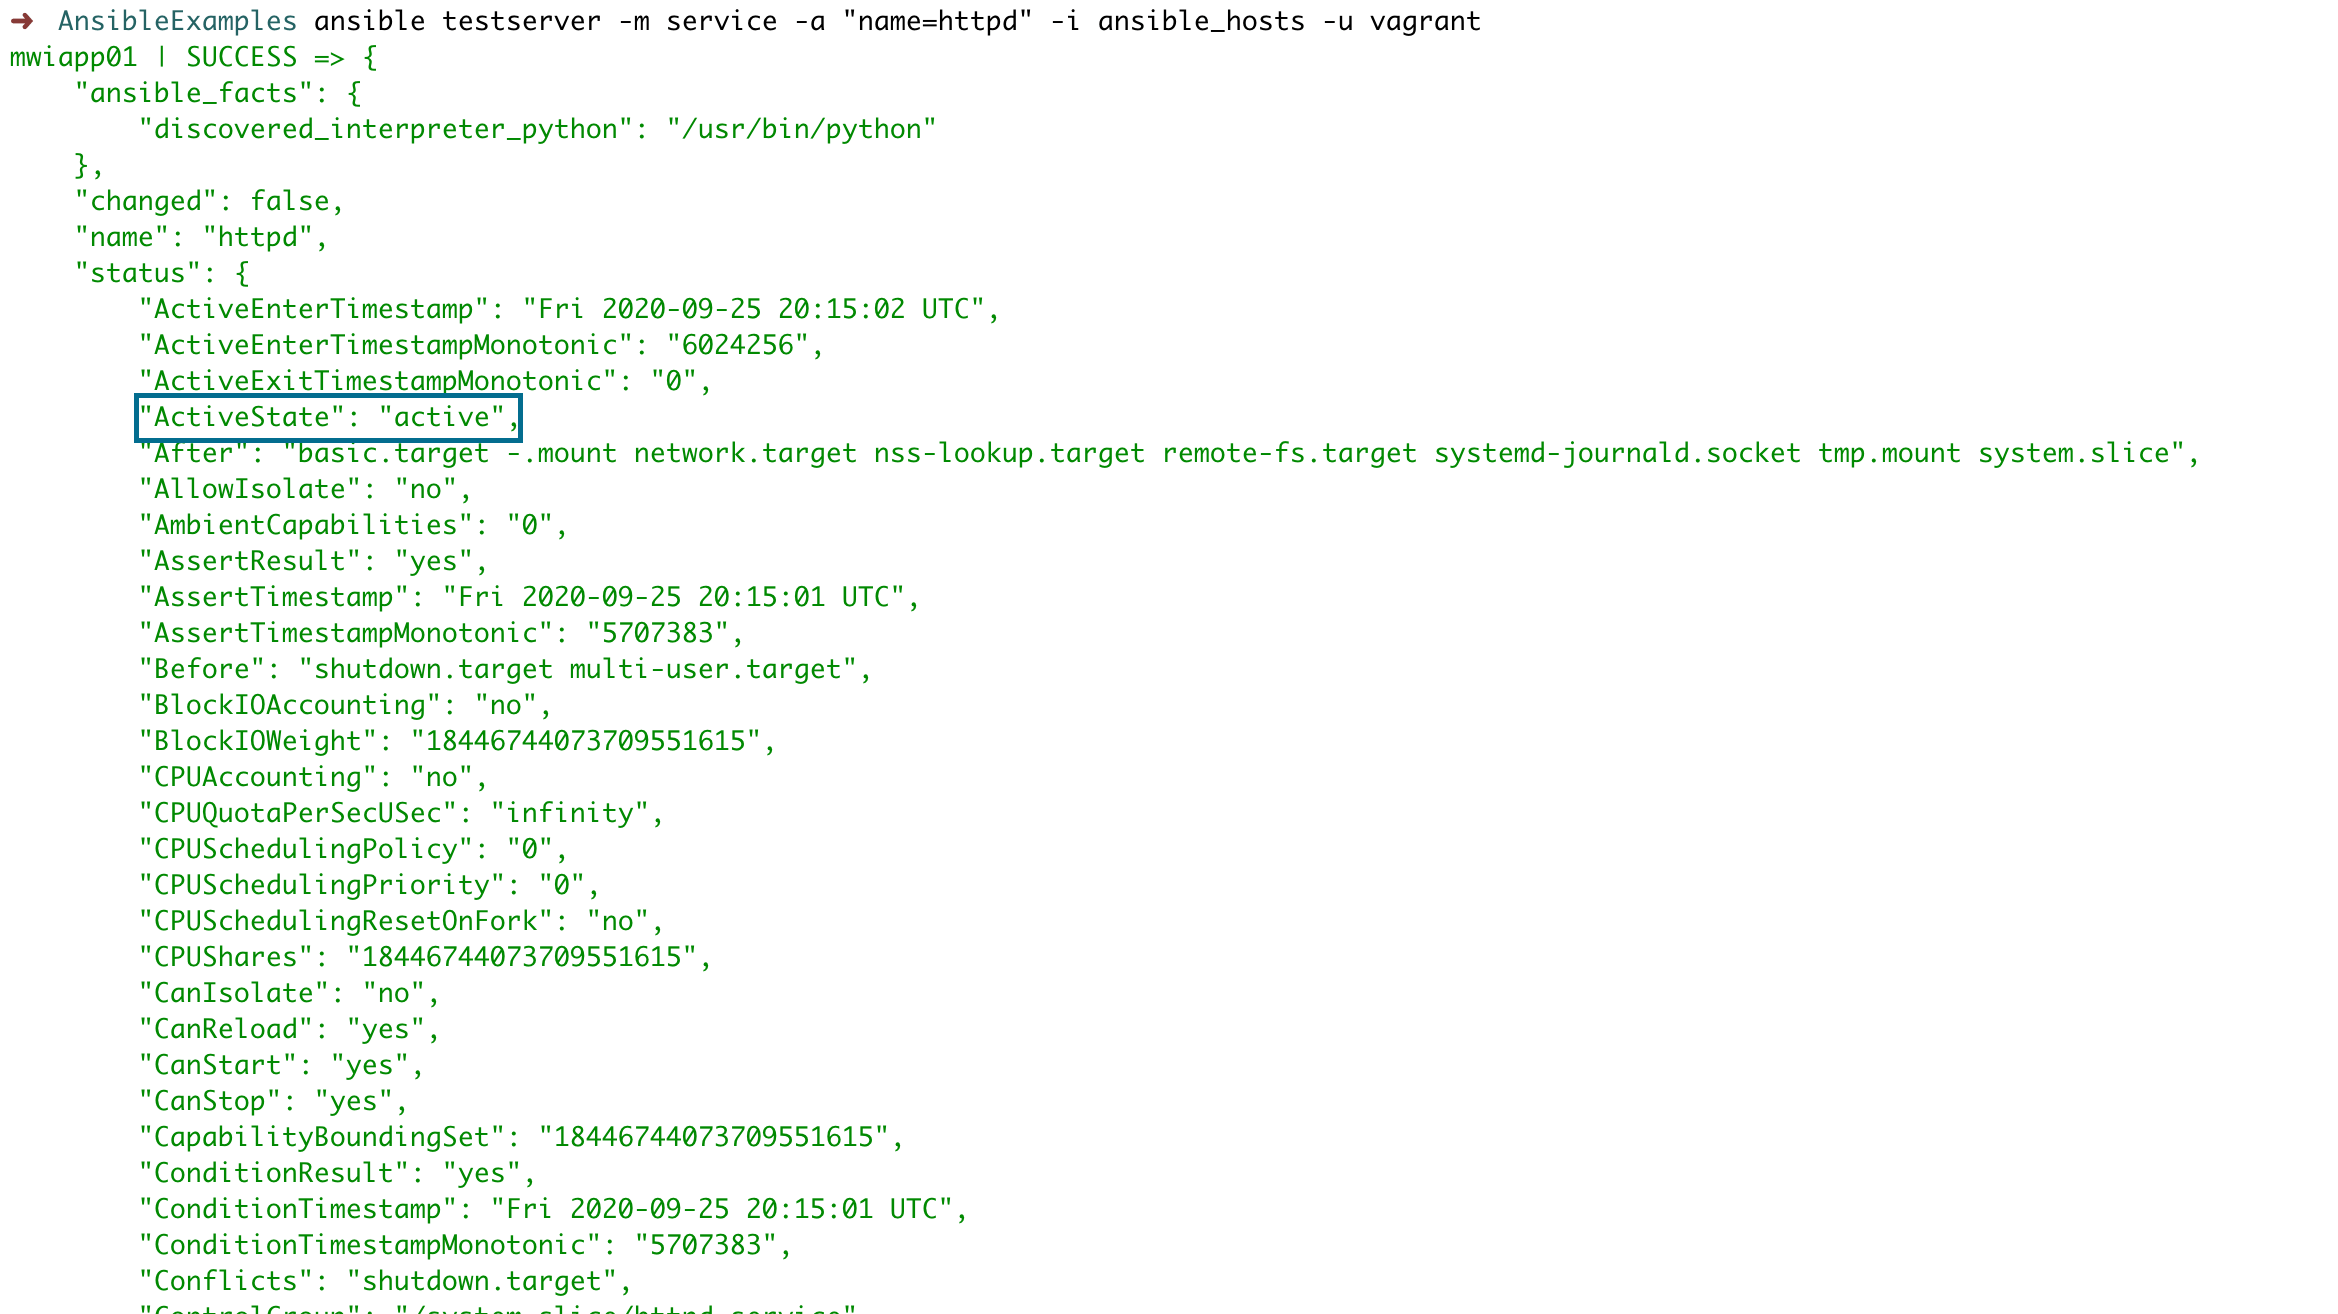
Example 19: ansible ad hoc command to check the service status
In this example, we are going to see how to check the status of service using ansible ad hoc command
For example, let's suppose we want to check the status and more information about the httpd service the following ad hoc command with ansible service module would help
ansible testserver -m service -a "name=httpd" -i ansible_hosts -u vagrant
The following screenshot shows the realtime output showing the status and more information about the httpd service.
Example 20: ansible ad hoc command to copy file - Local to remote
The following ad hoc command with copy module copies the file from Src location on the local control machine to the specified location on the remote server
ansible testserver -m copy -a "src=~/Downloads/index.html dest=/var/www/html owner=apache group=apache mode=0644"
to know more about this in detail refer to this article
Example 21: ansible ad hoc command to copy directory - Local to remote
This is an ansible AD HOC command to copy a directory to the remote server
ansible testserver -m copy -a "src=~/Downloads/logos dest=/var/www/html/ owner=apache group=apache mode=0644 " -i ansible_hosts -b
You need to notice that there is no / at the end of src path. It is just ~/Downloads/logos
If you put a slash at the end. It would copy only the contents of the directory alone but not the directory.
read more about this in detail in here
Example 22: ad hoc command to list nfs mounts
ansible testservers -m shell -a 'df -h -T|grep -i nfs' -i ansible_hosts
we are using the shell module and executing df -h -T to display the type of mount and filtering only nfs type mounts with the help of grep command.
There is a more efficient way to do it with ansible setup module. which is discussed here in detail
Example 23: ad hoc command to display memory, cpu and OS distribution and version
Here we have given a Ansible Ad hoc command to display system information like memory, cpu etc.
we have used Ansible setup module with filter to select necassary attributes of a system.
to know more about what other ansible_facts or variables you can possibly use in this filter. read our detail article on ansible facts
But this ad hoc command would help you solve things up.
$ ansible appservers -m setup -i ansible_hosts -a 'filter=ansible_distribution,ansible_distribution_version,ansible_memfree_mb,ansible_memtotal_mb,ansible_processor_cores*,ansible_architecture' 2>/dev/null
10.0.4.26 | SUCCESS => {
    "ansible_facts": {
        "ansible_architecture": "x86_64",
        "ansible_distribution": "Ubuntu",
        "ansible_distribution_version": "20.04",
        "ansible_memfree_mb": 127,
        "ansible_memtotal_mb": 3933,
        "ansible_processor_cores": 2,
        "discovered_interpreter_python": "/usr/bin/python"
    },
    "changed": false
}
10.0.1.120 | SUCCESS => {
    "ansible_facts": {
        "ansible_architecture": "x86_64",
        "ansible_distribution": "Ubuntu",
        "ansible_distribution_version": "18.04",
        "ansible_memfree_mb": 134,
        "ansible_memtotal_mb": 3943,
        "ansible_processor_cores": 2,
        "discovered_interpreter_python": "/usr/bin/python"
    },
    "changed": false
}
Example 24: ad hoc command to stop, start, restart service - Ansible SystemD
Simple way to restart any service with Ansible ad hoc command is to use Shell module with the actual service or systemctl command
$ ansible webservers -m shell -a "service nginx restart" -b

$ ansible webservers -m shell -a "systemctl restart nginx" -b
You can also use Ansible's built in systemd module otherwise like this.
$ ansible webservers  -m systemd -a "name=nginx state=reloaded" -i prod-ansible-hosts

$ ansible webservers -m systemd -a "name=nginx state=restarted" -i prod-ansible-hosts

$ ansible webservers -m systemd -a "name=nginx state=started" -i prod-ansible-hosts

$ ansible webservers -m systemd -a "name=nginx state=stopped" -i prod-ansible-hosts
So this is how you can manage to start, stop , restart services using ansible ad hoc
Example 25: ansible ad hoc command to download a file from URL
To download a file from URL in ansible ad hoc. You can either invoke linux commands like CURL or WGET but the preferred way is to use the get_url module of Ansible.
This is how you can use get_url module in Ansible ad hoc to download a file in remote system
$ ansible testserver -m get_url -a "url=https://nodejs.org/dist/v14.17.4/node-v14.17.4-linux-x64.tar.xz dest=/tmp mode=0755" -i prod-ansible-hosts
testserver | CHANGED => {
    "ansible_facts": {
        "discovered_interpreter_python": "/usr/bin/python"
    },
    "changed": true,
    "checksum_dest": null,
    "checksum_src": "8ea8ea5e5b34da3e3d81e557d373ab3ffdae91cd",
    "dest": "/tmp/node-v14.17.4-linux-x64.tar.xz",
    "elapsed": 0,
    "gid": 1000,
    "group": "ubuntu",
    "md5sum": "9613888c2a5ad0cbe83f03e0b8ed8707",
    "mode": "0755",
    "msg": "OK (21754020 bytes)",
    "owner": "ubuntu",
    "size": 21754020,
    "src": "/home/ubuntu/.ansible/tmp/ansible-tmp-1627824782.251616-27135-120094112712777/tmpa148e1",
    "state": "file",
    "status_code": 200,
    "uid": 1000,
    "url": "https://nodejs.org/dist/v14.17.4/node-v14.17.4-linux-x64.tar.xz"
}
You just have to pass the necassary parameters to the get_url
dest : Destination directory where the file should be downloaded
url: From where the file should be obtained
mode: The file permission mode of the file once downloaded. we are setting 755
read more about get_url module in our dedicated article
Example 26: ansible ad hoc command to check listening ports
To check the list of open ports you can use netstat or ss commands over the Ansible shell module but the preferred way is to use the ansible community plugin listen_ports_facts module
This is how you can use ansible listen_ports_facts to get a list of TCP and UDP ports listening on the servers (or) hostgroup
$ ansible testserver -m listen_ports_facts -i prod-ansible-hosts

testserver | SUCCESS => {
    "ansible_facts": {
        "discovered_interpreter_python": "/usr/bin/python",
        "tcp_listen": [
            {
                "address": "127.0.0.1",
                "name": "",
                "pid": 0,
                "port": 5000,
                "protocol": "tcp",
                "stime": "",
                "user": ""
            },
            {
                "address": "127.0.0.1",
                "name": "",
                "pid": 0,
                "port": 5001,
                "protocol": "tcp",
                "stime": "",
                "user": ""
            },
            {
                "address": "127.0.0.1",
                "name": "",
                "pid": 0,
                "port": 587,
                "protocol": "tcp",
                "stime": "",
                "user": ""
            },
            {
                "address": "127.0.0.1",
                "name": "",
                "pid": 0,
                "port": 6062,
                "protocol": "tcp",
                "stime": "",
                "user": ""
            },
The output can be further filtered or optimized, If the module is used on the ansible playbook.
Thanks
Sarav AK

Follow me on Linkedin My Profile Follow DevopsJunction onFacebook orTwitter For more practical videos and tutorials. Subscribe to our channel
Signup for Exclusive "Subscriber-only" Content