Introduction
Ansible works seamlessly with Git and you might have had a requirement to download your source code or software directly from the Github, Bitbucket, Gitlab etc.
In this post, we are going to explore various tits and bits of Ansible Git module and how to use it in real-time with an example.
Ansible Git Module
Ansible Git module can be used only to check out a Source code from the Git repository and deploy it on the server.
Consider that you have your Node JS web application hosted on the Git hub Repository and you would like to get it deployed during the server provisioning.
Ansible can do everything here, right from installing the necessary tools and software and installing the package dependencies and starting the NodeJS server etc.
As a summary, the Ansible GIT module can be used for the following purposes
- To Checkout or to download the code from the Git repository
- Create a Git archive from Git repo
- Fetch all pull requests
- Clone a Git repository
Once you have downloaded or checked out the code with the ansible git command, you can use the regular git commands for all other requirements like Push and pull
Our Requirement and Prerequisites
Our requirement is to download a NodeJS code from the Github private repository and install the necessary packages using npm install and start the NodeJS Development server using the node command
Since we are going to download the code from the private repository. we need to find a way to login to the Github repository from the Git CLI.
Note*: Though, we are taking only GITHUB here. you can use this article as a reference for other SCM's like Gitlab, Bitbucket, BeanStalkApp etc. As all these repositories are having the similar authentication features.
Step1: Configuring Git login
To login to GITHUB or to any SCM tools [ bit bucket, gitlab] they usually provide different methods and some popular methods are given below.
- Using the SSH key
- Using the username and password on the URL
https://@github.com/path
- Using the username and security token on the URL
https://@github.com/path
While the SSH Key-based authentication is the most secure and recommended one. Just to explore. I am going to use the third method here which is simple and easy.
I chose this method as I also want to use the Ansible vault feature to securely store and retrieve the username and security token.
Here I presume that you are ready with your Username and Security token (or) username. ( if you want to follow along and use the Ansible vault)
Let's walk further.
Step2: Creating Ansible vault to Store the Git username and token
Look at the following Screen recording to know how to create and encrypt the secrets with Ansible vault
I presume that you have taken a look at the screen recording and noticed that we have created a new ansible-vault named secrets.yaml and saved the GitHub username and token in a key value format.
this can be used inside the ansible-playbook as a variables file and the username and token can be used as a variable using Jinja2 templates syntax {{ gituser}}:{{gitpass}}
The username and password used in this video would be deleted for security purposes but you can use this same methodology to store your username and password before proceeding further
Step3: The Ansible Git Example Playbook
Here is the playbook I have written to download the NODE JS code available in my private repository to install the necessary tools start the Node server finally and launch the application.
Make sure you replace the repository URL in the following playbook to your own private repository before trying it out.
---
- name: Install and Launch the Simple NodeJS Application
hosts: nodeserver
vars_files:
- secrets.yml
vars:
- destdir: /apps/SampleNodeApp
tasks:
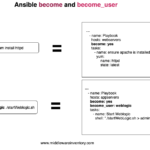
- name : install Node and NPM
become: yes
register: ymrepo
yum:
name: nodejs
state: latest
- name : validate the nodejs installation
debug: msg="Installation of node is Successfull"
when: ymrepo is changed
- name: Version of Node and NPM
shell:
"npm -v && node -v"
register: versioninfo
- name: Version Info
debug:
msg: "Version info {{ versioninfo.stdout_lines }}"
when: versioninfo is changed
- name: Download the NodeJS code from the GitRepo
become: yes
git:
repo: 'https://{{gituser}}:{{gitpass}}@github.com/AKSarav/SampleNodeApp.git'
dest: "{{ destdir }}"
- name: Change the ownership of the directory
become: yes
file:
path: "{{destdir}}"
owner: "vagrant"
register: chgrpout
- name: Install Dependencies with NPM install command
shell:
"npm install"
args:
chdir: "{{ destdir }}"
register: npminstlout
- name: Debug npm install command
debug: msg='{{npminstlout.stdout_lines}}'
- name: Start the App
async: 10
poll: 0
shell:
"(node index.js > nodesrv.log 2>&1 &)"
args:
chdir: "{{ destdir }}"
register: appstart
- name: Validating the port is open
tags: nodevalidate
wait_for:
host: "localhost"
port: 5000
delay: 10
timeout: 30
state: started
msg: "NodeJS server is not running"
In the preceding playbook, you need to re-look a few things to understand it better.
First is the URL, You can see we have used the Jinja2 templates {{gituser}} and {{gitpass}} in the URL. During the runtime, these would be replaced with actual values.
'https://{{gituser}}:{{gitpass}}@github.com/AKSarav/SampleNodeApp.git'
and the second one you need to check is the variable file we have mentioned at the top with vars_files directive.
vars_files: - secrets.yml
You can see that we used secrets.yml file as our variable file. Rest all are usual syntaxes only
At the last, we have also use wait_for module to make sure that the NODEJS server is started and running by monitoring the port 5000
Now, you might think. the secrets.yml file is encrypted by ansible vault and how can we use it as a variable file in the playbook. We will discuss this next
Step4: Launch the Playbook with Ansible Git
Now you can launch the playbook with ansible-playbook command but there is a little chance that you have to add one more argument/flag while starting the playbook.
ansible-playbook gitexample.yml --ask-vault-pass
As you have guessed, the additional parameter we have added is to make ansible-playbook get the password of the ansible-vault from the user as it needs the password to decrypt the secrets.yml file used inside the playbook.
Refer to the following screen recording clip to see how the playbook is running on real-time and to see the output
If you want more info on the Git hash information. you can use -vv while you are invoking the playbook
ansible-playbook gitexample.yml --ask-vault-pass – vv
It would show the Git commit hash details along with before and after GIT information

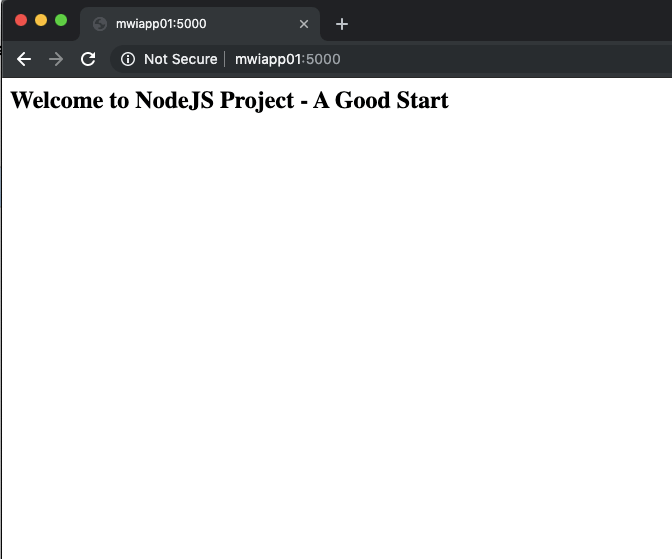
Step5: Validate the Deployment
Hope your Ansible Playbook has run successfully and now it is the time for validation. You might have figured out that my remote server name is mwiapp01 as it is displayed on the preceding snapshot.
Now let us access the URL http://mwiapp01:5000 and test it
Using Git token instead of username and Password
In the previous playbook, you can see that we have used the username and the password which is not a secure solution.
Github now supports user access tokens in place of username and password for authentication
Refer to this article to know how to create personal access token in GitHub
Once you have the token with you can simply replace the GIT URL from
'https://{{gituser}}:{{gitpass}}@github.com/AKSarav/SampleNodeApp.git'
to this
'https://{{gittoken}}@github.com/AKSarav/SampleNodeApp.git'
Here is the complete example playbook you can refer to, in this upgraded playbook we have used additional modules and features like
- Ansible Assert
- pre_task
- post_task
- slack notification etc
---
  - name: Install and Launch the Simple NodeJS Application
    hosts: testserver
    vars_files:
       - gitsecrets.yml
    vars:
       - destdir: /apps/sampleapp
    pre_tasks:
      - name : install dependencies before starting
        become: yes
        register: aptinstall
        apt:
           name:
            - nodejs
            - npm
            - git
           state: latest
           update_cache: yes

      - name : validate the nodejs installation
        debug: msg="Installation of node is Successfull"
        when: aptinstall is changed

    tasks:
       - name: Version of Node and NPM
         shell:
            "npm -v && nodejs -v"
         register: versioninfo
       - name: Validate if the installation is intact
         assert:
          that: "versioninfo is changed"

       - name: Create Dest Directory if not exists
         become: yes
         file:
          path: "{{ destdir }}"
          state: directory
          owner: vagrant
          group: vagrant
          mode: 0755
       - name: Download the NodeJS code from the GitRepo
         become: yes
         git:
            repo: 'https://{{gittoken}}@github.com/AKSarav/SampleNodeApp.git'
            dest: "{{ destdir }}"
       - name: Change the ownership of the directory
         become: yes
         file:
           path: "{{destdir}}"
           owner: "vagrant"
         register: chgrpout
       - name: Install Dependencies with NPM install command
         shell:
            "npm install"
         args:
            chdir: "{{ destdir }}"
         register: npminstlout
       - name: Debug npm install command
         debug: msg='{{npminstlout.stdout_lines}}'
       - name: Start the App
         async: 10
         poll: 0
         shell:
            "(node index.js > nodesrv.log 2>&1 &)"
         args:
           chdir: "{{ destdir }}"
         register: appstart
       - name: Validating the port is open
         tags: nodevalidate
         wait_for:
           host: "localhost"
           port: 5000
           delay: 10
           timeout: 30
           state: started
           msg: "NodeJS server is not running"
    post_tasks:
        - name: notify Slack that the servers have been updated
          tags: slack
          community.general.slack:
            token: T026******PF/B02U*****N/WOa7r**********Ao0jnWn
            msg: |
                ### StatusUpdate ###
                – ------------------------------------
                ``
                `Server`: {{ansible_host}}
                `Status`: NodeJS Sample Application installed successfully
                – ------------------------------------
            channel: '#ansible'
            color: good
            username: 'Ansible on {{ inventory_hostname }}'
            link_names: 0
            parse: 'none'
          delegate_to: localhost
If you are using this playbook, make sure you are updating your secrets file too, with new variable gittoken with your token value.
This playbook is covered in detail in the following article.
Conclusion
Hope you find this article helping. this article was primarily designed to give an overview of how the Ansible Git module can be used to deploy the code from the remote.
There are other few things you can do with the Ansible git module which I find it not interesting. Though I like the Ansible Git module, It would have been great if they would have given the other necessary features of Git such as Pull, Push, Fetch, Merge etc.
I hope it would be added in the future, I will update this article as and when I am finding more options available with this module.
I will also write an article for Ansible and Git CLI in near future with all Git core comands. Till then Cheers.
Rate this article [ratings]
Thanks
Sarav AK

Follow me on Linkedin My Profile Follow DevopsJunction onFacebook orTwitter For more practical videos and tutorials. Subscribe to our channel
Signup for Exclusive "Subscriber-only" Content