The Objective
We are going to create an Ansible role (or) playbook to quickly build a distributed, multi-node, Fully featured Weblogic Domain with two managed servers and a horizontal cluster and machines
In a single line, Ansible role to build, Weblogic Infrastructure with Managed Server, Admin Server and a Cluster on Vagrant (CentOS)
The playbook is going to cover and automate all the tasks of weblogic installation and domain creation including managed server creation, Node manager set up along with the pack and unpack.
By the end of this post. you would have a beautiful and fully functional weblogic 12c domain with two managed servers and a cluster mapped with machines and node manager. You can start the managed servers the moment you log in to the console (or) Deploy an application to the cluster.
Starting the managed server and Performing Application deployment is not covered in this post to cut down the information overloading. I will cover those in my next post.
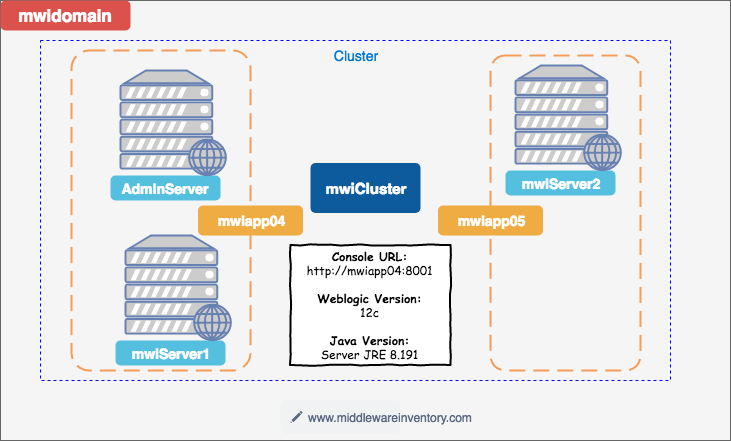
The Domain Architecture what we are trying to build is presented in the following diagram
Let us proceed.
Prerequisites
- Basic knowledge of Ansible and weblogic
- Little hands-on experience in the installation of weblogic 12c would not harm
- A computer with ansible and vagrant ( if you have your own VMs that's fine too)
- Internet connectivity to download necessary files
- An interest to read this further and a little grit to get this done.
The Vagrant file
Obviously, I am not going to teach you the basics of vagrant and Ansible and the how each of them works and definitely not gonna bore you with the syntax explanation of Vagrantfile. In case you need to read more about Vagrantfile and a little bit about server provisioning with vagrant. I recommend you to refer this article and come back here
With no further ado. Here comes the vagrant file of my setup
# vi: set ft=ruby :

VAGRANTFILE_API_VERSION = "2"

Vagrant.configure(VAGRANTFILE_API_VERSION) do|config|
	config.ssh.insert_key = false
	config.vm.provider :virtualbox do|vb|
		vb.customize ["modifyvm", :id, "--memory", "2048"]
	end


	#Application Server1
	config.vm.define "app1" do|app|
		app.vm.hostname = "mwiapp04"
		app.vm.box = "geerlingguy/centos7"
		app.vm.network "public_network", ip: "192.168.43.15"
	end


	#Application Server2
	config.vm.define "app2" do|app|
		app.vm.hostname = "mwiapp05"
		app.vm.box = "geerlingguy/centos7"
		app.vm.network "public_network", ip: "192.168.43.16"
	end


	config.vm.box_check_update = false
	config.vbguest.auto_update = false

end
Hoping the file is simple and intelligible. So the key take away here is that I have two application servers named mwiapp04 and mwiapp05
I do not want to give the playbook here as I think it would be too early and unfounded. so let us proceed with the steps. Hoping that you would follow along.
I am just presuming that you have vagrant and ansible installed with a network connectivity
The Execution
These are the steps we are going to perform
Step1: Create a workspace and download the vagrant, ansible, weblogic and java related files and binaries and build the project structure (Refer to the tree structure given below.)
Step2: Start the Application Server CentOS virtual machines (mwiapp04 & mwiapp05) using vagrant up command
Step3: Execute the main playbook which will invoke the weblogic role.
Step4: Login to the console and celebrate your small private victory or a Milestone in your learning
We will see all the preceding steps in brief in the following sections along with Screen cast
How to download this playbook and the required binaries
Create a workspace directory or choose an existing directory where you want to copy the Vagrant file and other ansible related files along with weblogic and java binaries.
You can download the files directly from the Github. or by cloning my repository
Note: We have removed the server-jre-8u191-linux-x64.tar.gz and fmw_12_2.1.3.0_wls.jar considering the size of the files and the Legal constraints.
You can download these files from here
1) fmw_12.2.1.3.0_wls_Disk1_1of1.zip
# Download the Generic installer from here(2) server-jre-8uXX-linux-x64.tar.gz
# Download Server JRE from hereThe fmw_12.2.1.3.0_wls_Disk1_1of1.zip should be uncompressed to get fmw_12_2.1.3.0_wls.jar file
The Expected Project Tree Structure
The JDK and Weblogic JAR file has to be placed in the files directory of the setup-weblogic role The Ultimate resulting tree structure of your workspace should finally look like this
<Workspace Directory Name>/
├── Vagrantfile
├── ansible_hosts
├── buffer
├── playbook.yaml
└── roles
    └── setup-weblogic
        ├── files
        │   ├── DemoIdentity.jks
        │   ├── fmw_12.2.1.3.0_wls.jar
        │   ├── install.file
        │   ├── oraInst.loc
        │   └── server-jre-8u191-linux-x64.tar.gz
        ├── meta
        ├── tasks
        │   ├── main.yml
        │   └── sshkey-exchange-t2.yaml
        ├── templates
        │   ├── CreateDomain.sh.j2
        │   ├── Map-Resources.j2
        │   └── create-wls-domain.py.j2
        └── vars
            └── main.yml
Start the Application Server Virtual Machines.
If you are following along this entire time. I presume you have not started your vagrant boxes yet, So just enter vagrant up command to start the centos application server instances. (mwiapp04 and mwiapp05)
Enter the following command in side the workspace ( where the Vagrantfile is available)
vagrant up
To get started on Vagrant, Refer my another article where I have covered the Vagrant and Ansible basics.
Server Provisioning with Vagrant and Ansible – Apache server setup Example
Execute the main playbook
Start the playbook named playbook.yml available in your workspace with ansible-playbook command. Use the following command
ansible-playbook playbook.yaml -i ansible_hosts
In case you want to see what is happening inside and for debugging use -v or -vv or -vvv while starting the playbook
It is a time to Sit back and Relax!. Let ansible do all the work.
If everything is done right, The weblogic setup will be completed as flat as a pancake. Once the playbook is completed its course. You would have your AdminServer and the console up and running in Node1 (mwiapp04)
As the application servers will be having their Nodemanager up and running you can go ahead and start the Managed Servers right from the console with no further configuration.
The Screencast
Some References
If you are having questions on How did I enable SSH Key authentication between newly built servers and done the pack and unpack on the fly.
Refer my another post where I have covered the topic in detail
If your question is about the Ansible Variables I have used in this post and how to use them and to know the other ansible variables. Refer this post
Ansible Facts and Variables – How to use them the Right way in playbook
There are more in here. Go to Ansible Category to continue reading.
The Conclusion
Hope this article is helpful. If you like this, Leave a rating for this article [ratings]
For any questions, Feel free to write it up in the comments section. I will respond as early as possible.Share this article with your friends if you think its worth.
Cheers,
Sarav AK

Follow me on Linkedin My Profile Follow DevopsJunction onFacebook orTwitter For more practical videos and tutorials. Subscribe to our channel
Signup for Exclusive "Subscriber-only" Content


