Ansible archive module is an ansible way of compressing the file and creating an archive. Just like the tar and gz command working together. If you are a Linux guy you would easily get this analogy. For windows, Just think of this as a normal winzip or WinRAR programs
Facts of Ansible archive module
- This command is the opposite of
unarchivecommand of ansible - By default, it assumes the source file you are trying to compress does exist.
- It will not copy the source file from the local system to the target before archiving.
- Source files can be deleted after archival by specifying remove=True
- Requires tarfile, zipfile, gzip and bzip2 packages on target host.
- Requires lzma or backports.lzma if using xz format.
- Can produce gzip, bzip2, lzma and zip compressed files or archives.
Ansible Archive module Examples
- Compressing the Directory with
tar - Compressing the Directory with
tarandgz - Compress the file with default type
gz - Remove the Source files after adding to the archive and compressed
- How to Create a
ziparchive with Ansible archive module - How to Create a
bz2archive with Ansible archive module - Archive Multiple files from multiple Directories with few exclusions
- Ansible archive multiples files with loop - multiple single files
Example1: Compressing the Directory with TAR
As mentioned above, Ansible creates various types of archives and the most famous and widely used is tar archive. In this example we show how to compress a directory using tar with Ansible Archive module.
The Playbook is simple and ansible archive module takes only three arguments
path - Source path on the target machine
dest - Destination Path on the target machine, the resulting file name
format - tar file
---
 - name: Ansible archive Examples
   user: vagrant
   hosts: testserver
   tasks:
    - name: Compress Directory contents
      become: yes
      archive:
        path: /apps/tomcat
        dest: /apps/tomcat.tar
        format: tar
What if the source file is not present on the target ?
The Task would fail with path does not exist, Ansible archive just presumes that the source file is present
Example 2:Compressing the Directory with tar and gz
If you are familiar with the Linux commands, you might agree with me, we tend to use the tar cvfz command more than tar -cvf
because the tar just archive the files and not compress them, rather doing this at two steps, we mostly use tar cvfz to create the compressed archive file.
In this example, we are going to do the same thing
There are two ways to create the tar.gz or .tgz file ( both are same don't get confused )
Method1: Mention it Explicitly with the format attribute
---
 - name: Ansible archive Examples
   user: vagrant
   hosts: testserver
   tasks:
    - name: Compress Directory contents
      become: yes
      archive:
        path: /apps/tomcat
        dest: /apps/tomcat.tar.gz
        format: gz
Method2: Do not mention any format attribute. As tar.gz is the default when the format is not mentioned and the file type is a directory
---
 - name: Ansible archive Examples
   user: vagrant
   hosts: testserver
   tasks:
    - name: Compress Directory contents
      become: yes
      archive:
        path: /apps/tomcat
        dest: /apps/tomcat.tar.gz
Example 3: Compress the file - Default File Compress format
As we have mentioned previously on the Example2, the default compression type for the directory when the format is not mentioned is tar.gz
Likewise, for the file the default compression and archive type is .gz when no format is explicitly mentioned
---
 - name: Ansible archive Examples
   user: vagrant
   hosts: testserver
   tasks:
    - name: Compress the file using Default format
      become: yes
      archive:
        path: /apps/tomcat/conf/server.xml
        dest: /apps/tomcat/server.xml.gz
Example 4: Remove the Source files after archiving
Most of the time the purpose of doing the archival process is to save some disk space and storage. So once the source file is archived & compressed the source file is no longer needed.
Especially when we are handling the logs and system housekeeping tasks, we would want to remove the old file once the compression is done.
There is a parameter you can use to enable that by default it is disabled.
---
 - name: Ansible archive Examples
   user: vagrant
   hosts: testserver
   tasks:
    - name: Compress the file and remove
      become: yes
      archive:
        path: /apps/tomcat/logs/localhost-access.log
        dest: /apps/tomcat/localhost-access.log.gz
        remove: yes
Note* When you are compressing the directory with
bz2orgzAnsible archive module first archive the directory withtarand then apply the compressing technique on the resulting file. So its not necassary that you have to create a tar ball first before trying to compress.It does not apply to the
zipformat. Zip does not create the tarball before compressing it. so if youunzipthe archive file you will directly get the files not the tarball while the farmer two would give you the tarball which you have to further extract
Example 5: Create a ZIP file archive - File and Directory
Note*: for this command to work you should have the zipfile package installed on the target machine
Here is the ansible-playbook with ansible archive module to zip a Single file we have also used the remove parameter to delete the original file once the compress is done
---
 - name: Ansible archive Examples
   user: vagrant
   hosts: testserver
   tasks:
    - name: Compress Directory contents
      become: yes
      archive:
        path: /apps/tomcat/logs/catalina.2019-07-24.log
        dest: /apps/tomcat/catalina.2019-07-24.log.zip
        format: zip
        remove: yes
Here is the ansible-playbook to zip a directory using ansible unarchive module in the zip format
---
 - name: Ansible archive Examples
   user: vagrant
   hosts: testserver
   tasks:
    - name: Compress Directory contents using ZIP
      become: yes
      archive:
        path: /apps/tomcat
        dest: /apps/tomcat-bkp.tar.zip
        format: zip
Example 6: Create a BZIP archive - File and Directory
In this example, we are going to use the much powerful and reliable Bzip2 to archive the files, bzip2 is by far the best product amongst others and the resulting archive file size would be small than the other ones so you could save some more disk space.
Refer my comparison of all archive formats like bz2 zip gz at the end of this post
Back to the subject, Here is the playbook we are going to use to bzip the file and directory I combined both of the tasks into a Single playbook to save some space
All we have to change here is the format from the previous example. As usual the directory compression would be a compressed tarball.
---
 - name: Ansible archive Examples
   user: vagrant
   hosts: testserver
   tasks:
    - name: Compress the file using BZ2
      become: yes
      archive:
        path: /apps/tomcat/logs/catalina.2019-07-24.log
        dest: /apps/tomcat/catalina.2019-07-24.log.bz2
        format: bz2

    - name: Compress the Directory using BZ2
      become: yes
      archive:
        path: /apps/tomcat/
        dest: /apps/tomcat-bkp.tar.bz2
        format: bz2
Example 7: Compressing and Archiving multiple files Ansible archive
We saved the little complex and the best for the last and here we have collected few interesting examples as follows
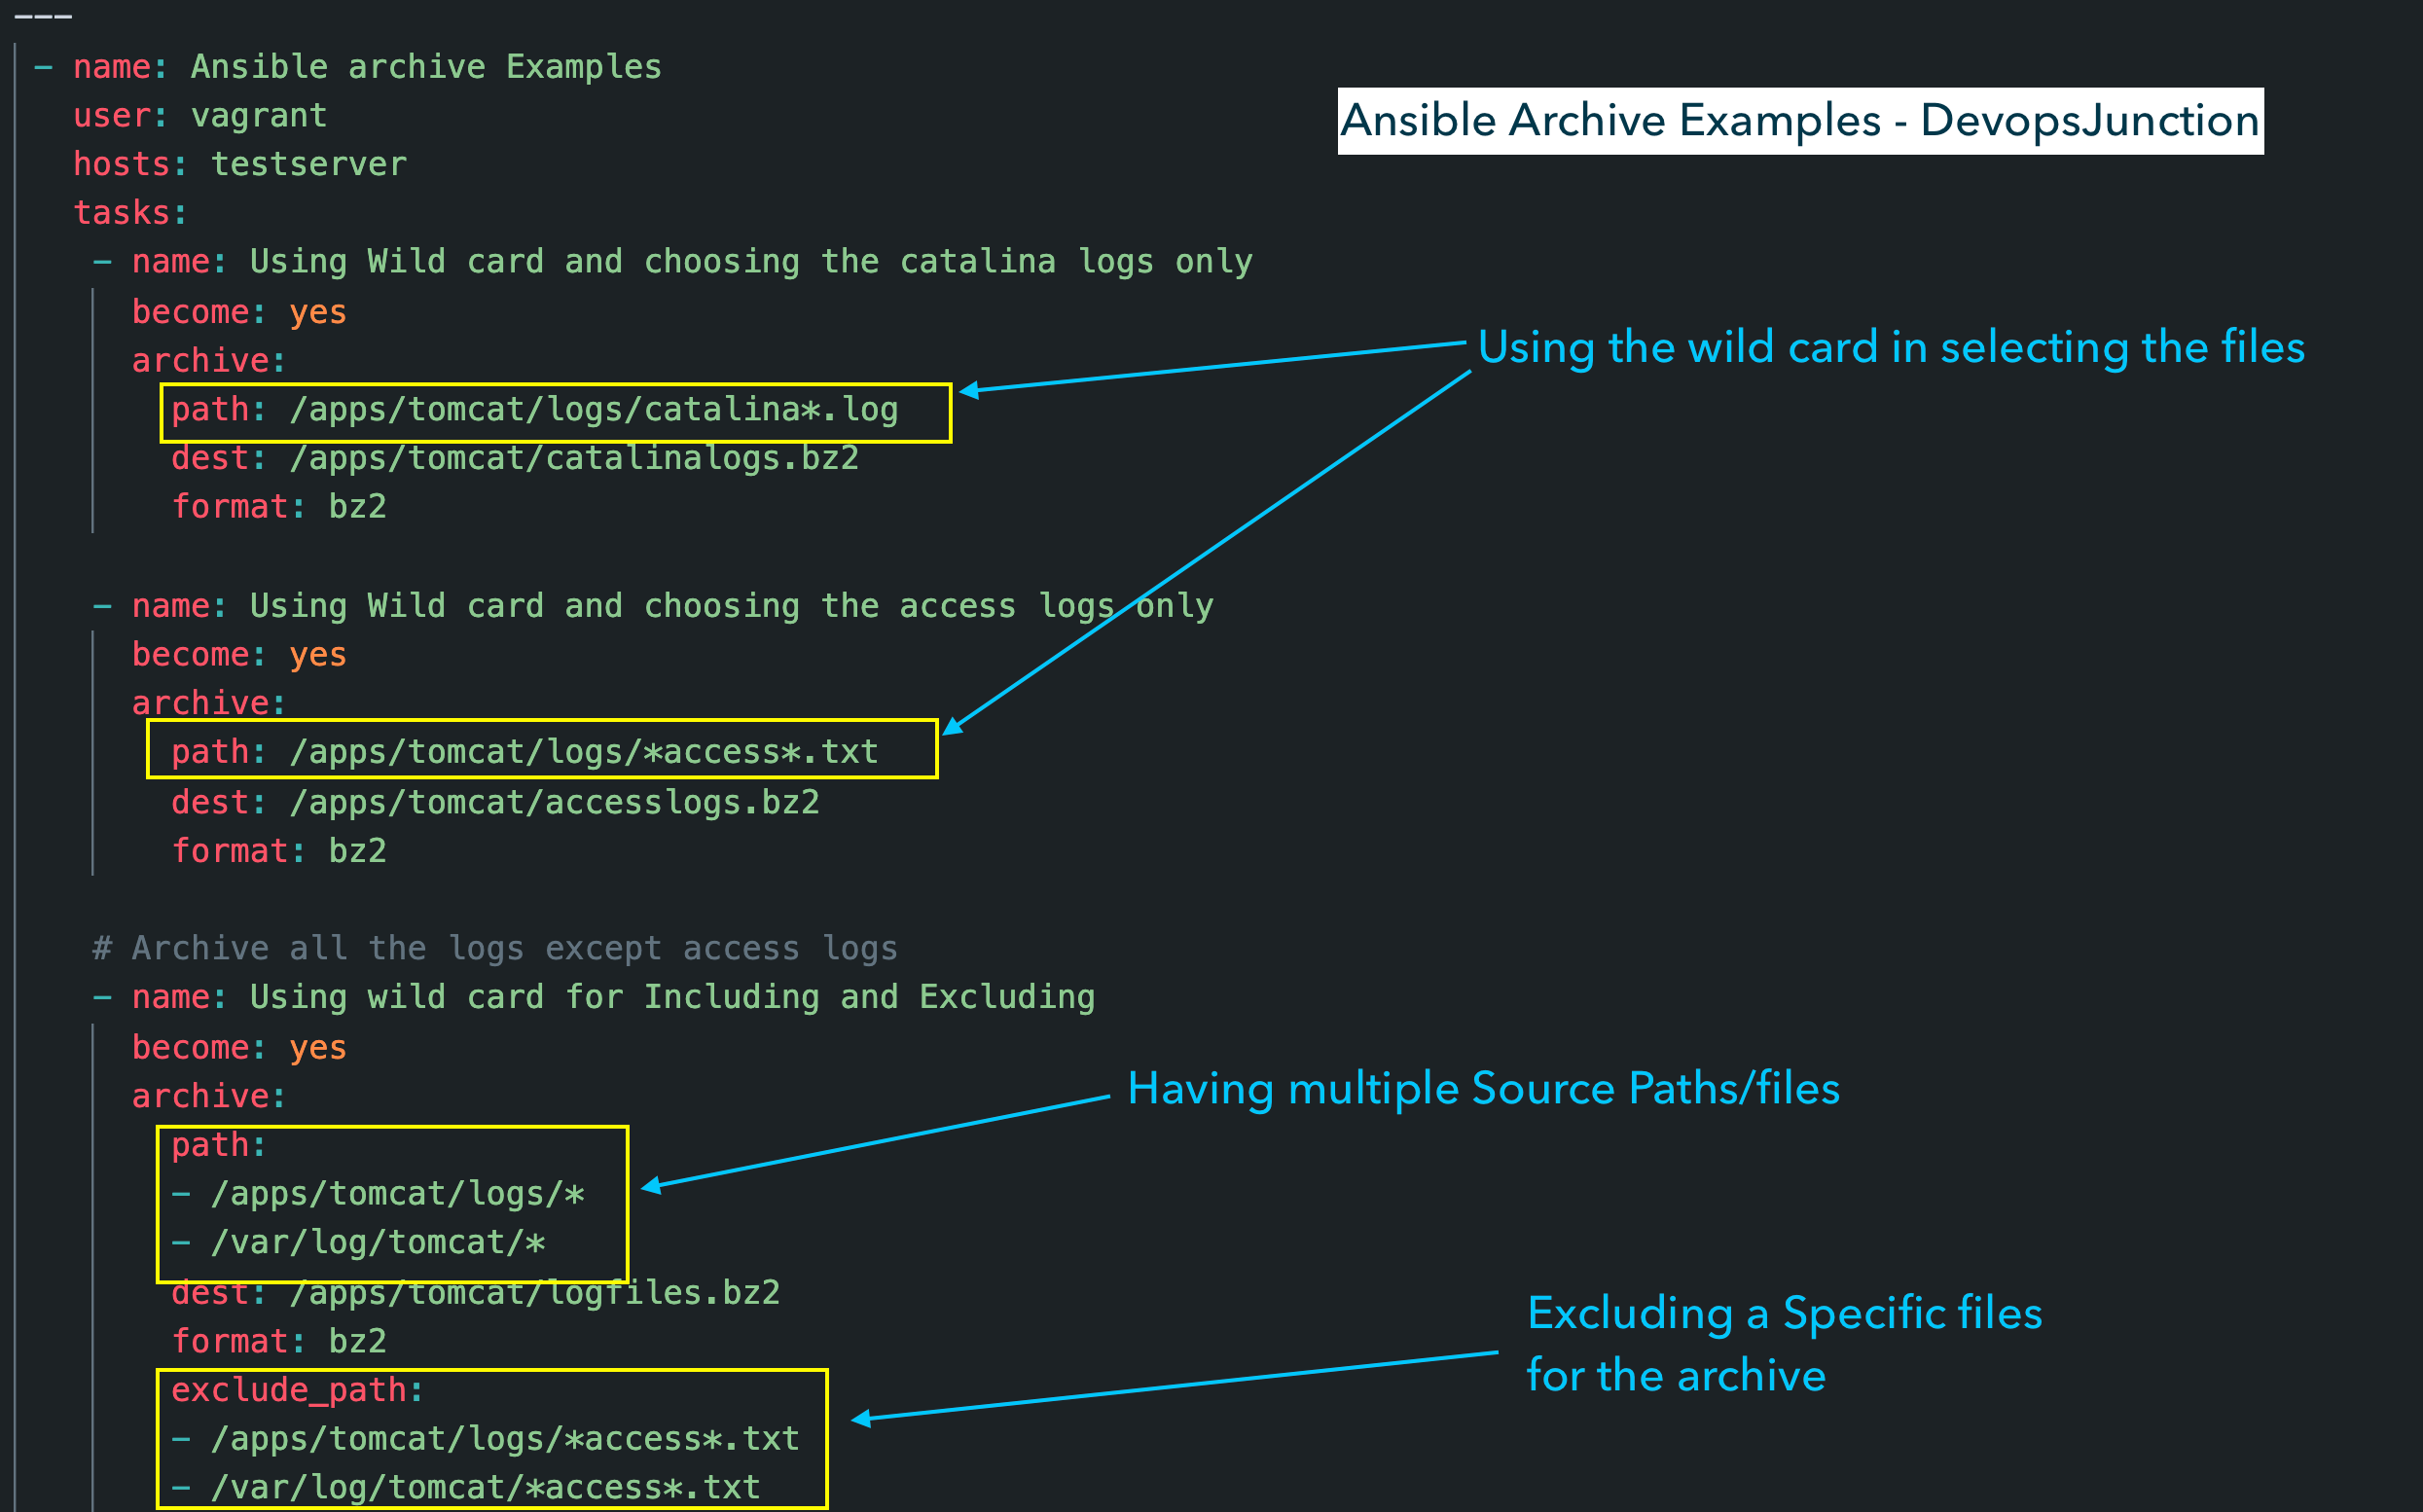
- Use a Wild card to select the files
- Exclude a few specific files while adding the rest into the archive
- Take files from multiple source path while creating the archive
Here is the playbook that covers and solves all these three questions
---
 - name: Ansible archive Examples
   user: vagrant
   hosts: testserver
   tasks:
    - name: Using Wild card and choosing the catalina logs only
      become: yes
      archive:
        path: /apps/tomcat/logs/catalina*.log
        dest: /apps/tomcat/catalinalogs.tar.bz2
        format: bz2

    - name: Using Wild card and choosing the access logs only
      become: yes
      archive:
        path: /apps/tomcat/logs/*access*.txt
        dest: /apps/tomcat/accesslogs.tar.bz2
        format: bz2

    # Archive all the logs except access logs
    - name: Using wild card for Including and Excluding
      become: yes
      archive:
        path:
        - /apps/tomcat/logs/*
        - /var/log/tomcat/*
        dest: /apps/tomcat/logfiles.tar.bz2
        format: bz2
        exclude_path:
        - /apps/tomcat/logs/*access*.txt
        - /var/log/tomcat/*access*.txt
The first two are too self-descriptive we just use the wild card character to select specific files for our archiving process but the third one is a little tricky but great.
If you look at it, we have two parameters here. One is path which is to select the files from the different source location and it is too generic as it has just * wild card character so it would take everything under those directories irrespective of their type, extension etc.
Now let's suppose we are sending these logs to the third party for analysis but don't want to give out your user info which is captured in the access log file. we can exclude the access log files alone using exclude_path parameter.
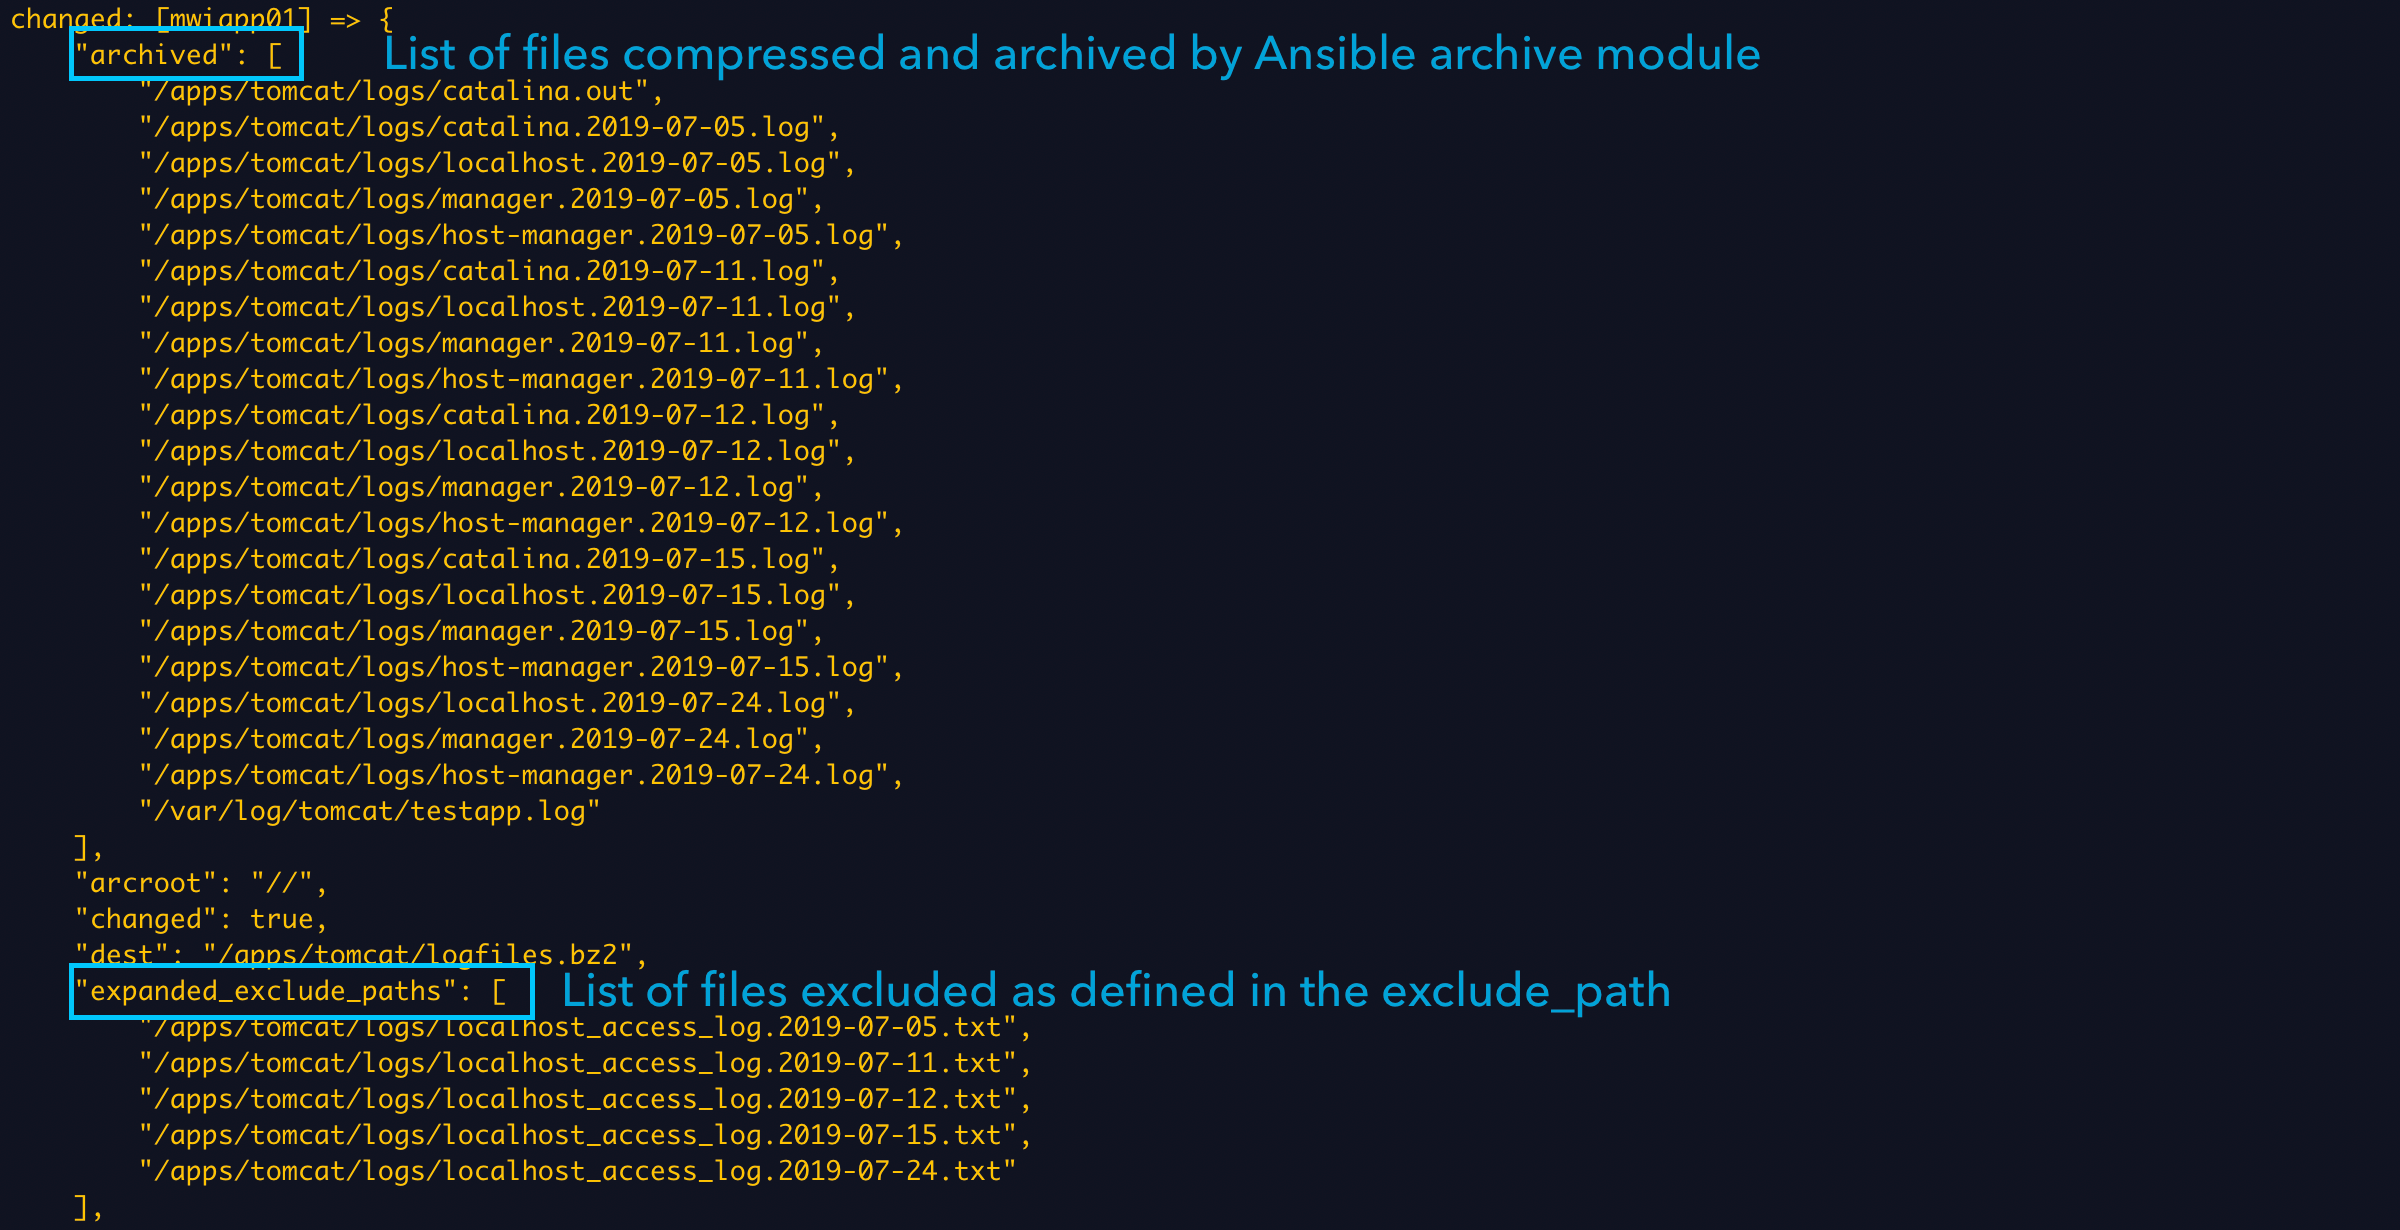
If you want to know the list of files archived and excluded you can write your own debug task in your playbook or you can simply execute your playbook with more verbose/debug levels like -vvv
ansible-playbook playbook.yaml -vvv
In the result, you would be able to see two return variables named archived and expanded_exclude_paths
Example 8: Ansible archive multiples files with loop - multiple single files
So far the examples we have seen are about creating a Single Archive file with multiple source files in it. Now we are going to see how to create archive on multiple single files.
Now we are going to see, How to Zip a list of files with Ansible archive module.
To be more precise, let me give a requirement here, Let's suppose that we want to compress the yesterday log files exactly at 00:01 AM every day. earlier we used to write Shell scripts to first find the files and then archive each of them. Something like this
find /apps/tomcat/logs -name "*.log" -mtime +1 -exec gzip {} \;

(or)

find /apps/tomcat/logs -name "*.log" -mtime +1 | xargs gzip
Here is the Ansible playbook which exactly does the same thing but using the Ansible Find module and Ansible Archive module instead of the Shell commands
I insist you read the comments on the Playbook to understand it better.
In a Summary. We have two tasks first task is with Ansible find module to find files under /apps/tomcat/logs with different extensions, this extension filtering is achieved using the patterns this task would run and store the file names into a output variable named output which will be used by ansible archive.
The second task is with Ansible archive module and with_items loop iteration where we iterate through the output variables we got from the ansible find module task and, we are passing each module as a path parameter and doing the normal compression using bz2 format.
One special thing we added in our second task is appending the date as we are compressing and archiving each file for better tracking. ( Ideally, that's what we do in the realtime log management )
ansible_date_time.date.replace('-','') this is an ansible built-in variable
---
 - name: Ansible archive Examples
   user: vagrant
   hosts: testserver
   tasks:

    - name : Find files ending with extensions
      become: true
      find:
       paths: /apps/tomcat/logs
       file_type: file
       # find files with different extensions
       patterns:
         - '.*\.log$'
         - '.*\.out$'
         - '.*\.txt$'
       use_regex: yes
       age: 1d
       age_stamp: mtime
      register: output

    - name: archive the files
      become: yes
      become_user: tomcat
      archive:
        remove: yes
        # Receive Each Element from the Loop
        path: "{{ item.path }}"
        # Creating a file with Date filename-DDMMYY.bz2 format
        dest: "{{ item.path }}-{{ansible_date_time.date.replace('-','')}}.bz2"
        format: bz2
      # Loop Statement, Goes through the find command output array
      with_items: "{{ output.files }}"
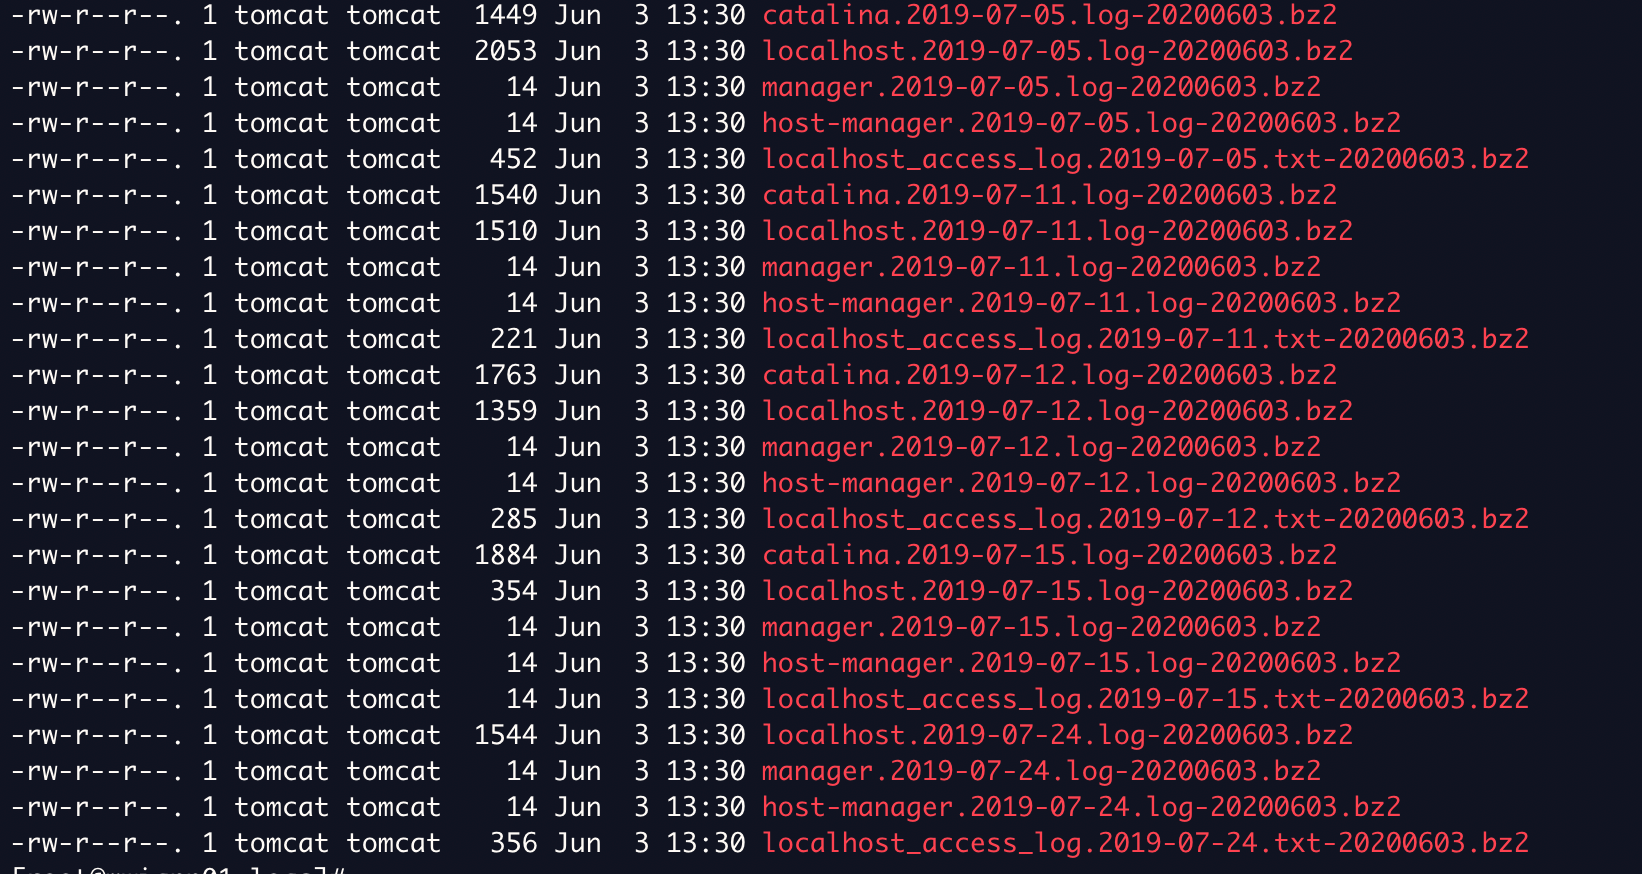
The result would be something like this
How to Unarchive the files with Ansible - Additional
So far we learnt how to archive the files the other part of this equation is to unarchive these files. For unarchiving you should use ansible unarchive module.
I wrote an article on the same. Check that out
Cheers
Sarav AK

Follow me on Linkedin My Profile Follow DevopsJunction onFacebook orTwitter For more practical videos and tutorials. Subscribe to our channel
Signup for Exclusive "Subscriber-only" Content


