In this post, we are going to see how to Create a simple VueJS Web Application, Deploy the VueJS web application to Docker, How to create Docker Images and start the container from the images, How to manage the docker container and How to deploy the VueJS Application in production using NGINX etc.
Docker VueJS Web Application Example is the objective of this post.
VueJS is an open-source progressive JavaScript framework for building user interfaces and single-page applications.
Docker is a container management system, It helps us to create, manage and administrate containers in an easy and efficient way.
Shortly put, This post is all about Dockerising VueJS.
Want to know more about what is container and containerisation, Refer this link
The Index
This is the summary of topics we are going to see in this article.
- What are we going to build - Docker VueJS Web Application
- Installing Docker, NodeJS & Vue CLI
- VueJS Web Application Setup
- Creating VueJS Project
- Updating the initial page of our project (optional)
- Test our Web Application Locally Before Packaging it as Container.
- Docker Configuration and Setup
- Create a Dockerfile
- Build a Docker Vue JS Image using Dockerfile
- Start the Container from the Image we have created
- Validate the web application Running inside Container
- Securing Vue JS Application using NGINX (Optional)
- Create a Dockerfile
- Build a Docker Vue JS Image using Dockerfile
- Start the Container from the Image we have created
- Validate the web application Running inside Container
What are we going to build - Docker VueJS Web Application
Before proceeding to the steps of creating and development of Vue JS web Application and Docker Image. Let us see how is our desired result is going to be
Installing Docker, NodeJS & Vue CLI
In order to follow this article, It's good to have the following environment set at your host machine.
Note*: This is not inside the container. This is a Host machine ( Local Environment) where you have Docker installed (or) going to install.
Machine: Mac/Windows
Docker Installation: Docker CE
➜  docker version
Client: Docker Engine - Community
 Version:           19.03.8
 API version:       1.40
 Go version:        go1.12.17
 Git commit:        afacb8b
 Built:             Wed Mar 11 01:21:11 2020
 OS/Arch:           darwin/amd64
 Experimental:      true

Server: Docker Engine - Community
 Engine:
  Version:          19.03.8
  API version:      1.40 (minimum version 1.12)
  Go version:       go1.12.17
  Git commit:       afacb8b
  Built:            Wed Mar 11 01:29:16 2020
  OS/Arch:          linux/amd64
  Experimental:     true
Package Manager: NPM
➜ npm version
{npm: '6.14.5',
  ares: '1.15.0',
  brotli: '1.0.7',
  cldr: '35.1',
  http_parser: '2.9.3',
  icu: '64.2',
  llhttp: '2.0.4',
  modules: '72',
  napi: '5',
  nghttp2: '1.40.0',
  node: '12.16.1',
  openssl: '1.1.1d',
  tz: '2019c',
  unicode: '12.1',
  uv: '1.34.0',
  v8: '7.8.279.23-node.31',
  zlib: '1.2.11'}
Server Framework: NodeJS
➜ npm --version
6.14.5
JavaScript Framework: VueJS
➜  ~ vue – version
@vue/cli 4.4.1
IDE: Visual Studio Code in my case.
Vue JS Web Application Setup
In this segment, we are going to create a sample Vue JS specific configuration steps like how to create a Vue JS Web Application. You can exclude below steps by cloning project from this link
git clone https://github.com/hanu-developer/docker-vuejs.git
Step 1: Creating Vue JS Project
Run this below command which will initialise the project creation.
vue create docker-vuejs
You will be prompted to pick a preset. You can either choose the default preset which comes with a basic Babel + ESLint setup, or select "Manually select features" to pick the features you need.
In this case i select default setup because it's great for quickly prototyping a new project, while the manual setup provides more options that are likely needed for more production-oriented projects.


Step 2: Updating initial page of your Project (Optional)
Update your HelloWorld.vue as below
<template>
  <div class="hello">
    <div style="padding:40px;">
      <h1>
        Hello from
        <span style="color:#29558C">Middleware[i</span>
        <span style="color:#AD5353">]nventory</span>
      </h1>
      <p>
        It is good to have you here this is a Simple Page in
        <span class="bg-info">Vue JS</span> and Running on
        <span class="bg-success">Docker Container</span>
      </p>
    </div>
  </div>
</template>
<script>
export default {
  name: "HelloWorld",
  props: {
    msg: String
  }
};
</script>
<! – Add "scoped" attribute to limit CSS to this component only – >
<style scoped>
</style>
<template>
  <div id="app">
    <HelloWorld />
  </div>
</template>

<script>
import HelloWorld from "./components/HelloWorld.vue";

export default {
  name: "App",
  components: {
    HelloWorld
  }
};
</script>

<style>
#app {
  font-family: Avenir, Helvetica, Arial, sans-serif;
  -webkit-font-smoothing: antialiased;
  -moz-osx-font-smoothing: grayscale;
  text-align: center;
  color: #2c3e50;
  margin-top: 60px;
}
</style>
Test Our Web Application Locally Before Packaging it as Container
By executing below command npm will facilitate our web application to run locally.
npm run serve
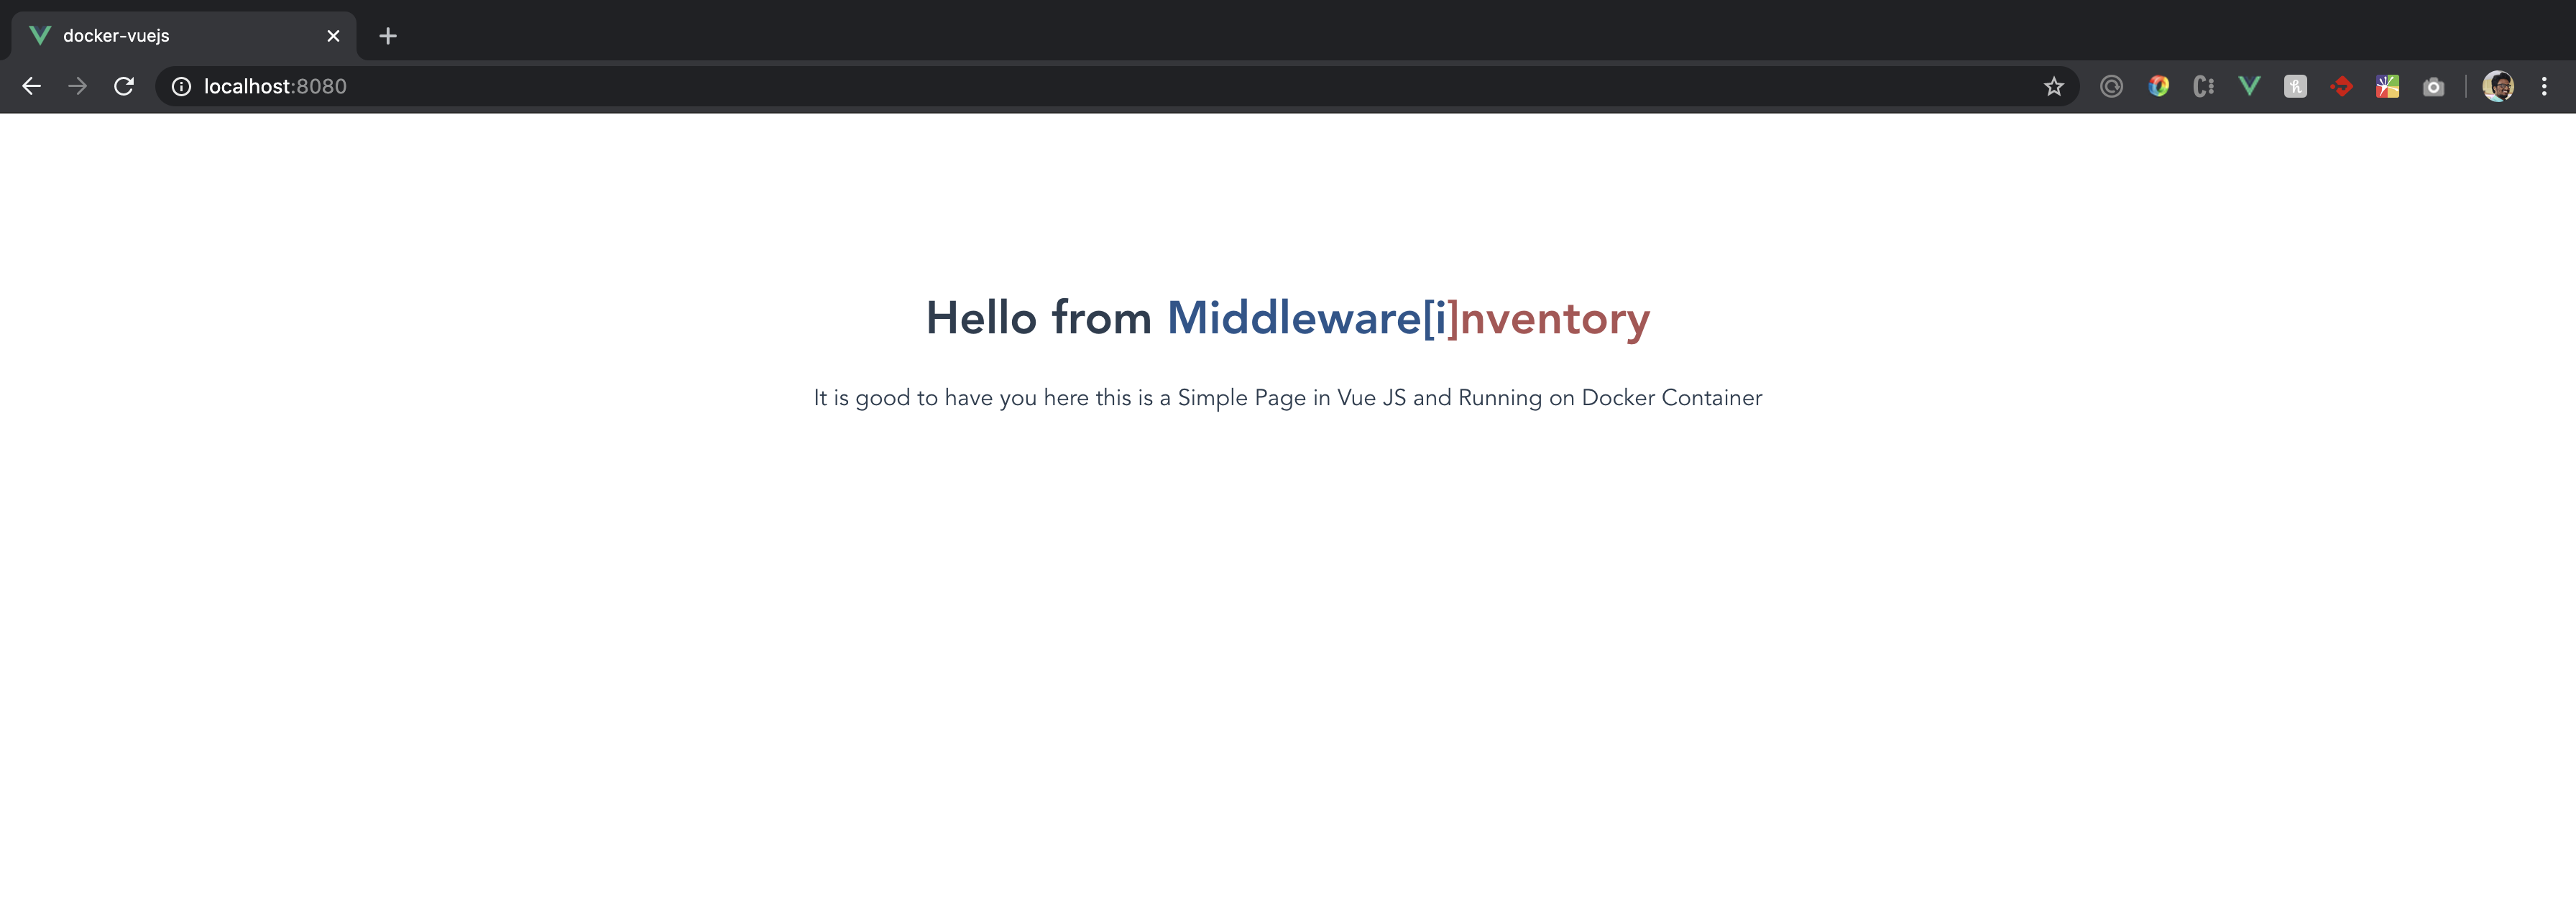
Now go to your browser and access http://localhost:8080 and make sure you see something like this
Docker Configuration and Setup
In this segment, we are going to containerise our application we have created. In other words, we are going to create an image which can be used by anyone to create a container and to achieve the same result as we did.
Step 1: Creating a Dockerfile
This is a Simply a manifest on how your image should be created. Docker uses this manifest or configuration file to create the image.
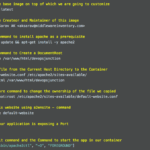
In the project root directory create a new file named Dockerfile and place the following content.
# Choose the Image which has Node installed already
FROM node:lts-alpine

# install simple http server for serving static content
RUN npm install -g http-server

# make the 'app' folder the current working directory
WORKDIR /app

# copy both 'package.json' and 'package-lock.json' (if available)
COPY package*.json ./

# install project dependencies
RUN npm install

# copy project files and folders to the current working directory (i.e. 'app' folder)
COPY . .

# build app for production with minification
RUN npm run build

EXPOSE 8080
CMD [ "http-server", "dist" ]
If you can read the comments in the file you can easily understand what each line is intended to do.
Note*: As per Docker Syntax, Dockerfile is the righteous name of Manifest file with D capital with no file extension, If you are thinking that there is a mistake. No there is Not.
Step 2: Build a Docker Vue JS Image using Dockerfile
Using the Dockerfile we have created. Let us create an Image.
Note*: Before Creating the Image, Please be aware, It is a good practice that you name your images with your docker username in a prefix, It would enable you to share your work(images) with other people easily in future with the help of docker hub which we will see later in this article.
Having said that it is always recommended to name your images after your docker username. I am going to do the same and my docker username is hanu4u89.
➜  docker build -t hanu4u89/docker-vuejs .
Sending build context to Docker daemon  148.9MB
Step 1/9 : FROM node:lts-alpine
 ---> 1c342643aa5c
Step 2/9 : RUN npm install -g http-server
 ---> Using cache
 ---> 4b694787bf68
Step 3/9 : WORKDIR /app
 ---> Using cache
 ---> ca44474a9a31
Step 4/9 : COPY package*.json ./
 ---> 7445777e1d03
Step 5/9 : RUN npm install
 ---> Running in 7b1626f81e7f

added 1273 packages from 867 contributors and audited 1279 packages in 20.909s

46 packages are looking for funding
  run `npm fund` for details

found 0 vulnerabilities

Removing intermediate container 7b1626f81e7f
 ---> e00a6897748d
Step 6/9 : COPY . .
 ---> 20d850147946
Step 7/9 : RUN npm run build
 ---> Running in b6b9a4846c06

> docker-vuejs@0.1.0 build /app
> vue-cli-service build

-  Building for production...
 DONE  Compiled successfully in 5205ms12:30:10 AM

  File                                 Size               Gzipped
  dist/js/chunk-vendors.f0b6743d.js    89.18 KiB          31.93 KiB
  dist/js/app.b67b4f73.js              2.76 KiB           1.31 KiB
  dist/css/app.d40fc157.css            0.16 KiB           0.14 KiB

  Images and other types of assets omitted.

 DONE  Build complete. The dist directory is ready to be deployed.
 INFO  Check out deployment instructions at https://cli.vuejs.org/guide/deployment.html

Removing intermediate container b6b9a4846c06
 ---> 413a8b4aecf5
Step 8/9 : EXPOSE 8080
 ---> Running in 62693b309f53
Removing intermediate container 62693b309f53
 ---> f9f5bc9983ee
Step 9/9 : CMD [ "http-server", "dist" ]
 ---> Running in bfa51a7f512d
Removing intermediate container bfa51a7f512d
 ---> 02bf40ad9f77
Successfully built 02bf40ad9f77
Successfully tagged hanu4u89/docker-vuejs:latest
In the preceding snippet, you can see we have successfully created an image and named it as hanu4u89/docker-vuejs
The command we used to build the Image from the Dockerfile is
docker build -t hanu4u89/docker-vuejs .
Here the PERIOD/DOT at the end is intentional and it represents the current directory. With this command issued, Docker looks for a Dockerfile in the current directory and create the image out of it
To validate if your image has created and to know the list of images available in your system locally. use the following command.
docker images
Step 3: Start the container from the image we have created
The Image we have created in Step2 is ready to be started and it can now become a Fully Qualified and Operational Container.
The following Command would create and start the Container from the image we have created
docker run -it -p 8081:8080 -d – name docker-vuejs hanu4u89/docker-vuejs
Here
-it – This flag sets the container in Interactive mode and allocate a Dedicated TTY id for later SSHing.
-d – This flag sets the container to run in the background.
-p 8081:8080 – Port Forwarding Between Host and the Container. Right to the colon is a container and Left to the colon is Host. 8081 is the Host and 8080 is the container Port.
--name – Once started docker daemon assigns a random string name to the container. But i recommend defining a name can be handy way to add meaning to a container.
docker-vuejs – Name of the container we are starting ( Replacement of Container ID).
hanu4u89/docker-vuejs – The name of the image from which we are going to create a Container.
Step 4: Validate the Web Application running inside the Container
Having started the Container with Port Forwarding to the host machine on Port 8081. You should be able to access the website from the Host machine (mac/windows) at http://localhost:8081
If everything is done correctly, We should be able to see our desired website which we have tested locally.
Yay. That’s all. It is that simple to develop a Web Application in Vue JS and running it on the Docker Container.
Thanks to Evolution of IT.
Securing Vue JS Application using NGINX
Above created Docker Vue JS Web Application is powerful enough for production usage, but it's simple and hackable enough to be used for testing, local development and learning.
For complex production use cases it may be wiser to use giants like NGINX or Apache. In our case we are using NGINX to serve our Vue JS Web Application because it is considered as one of the most performant and tested solutions.
Step 1: Creating a Dockerfile
Let's refactor our Dockerfile to use NGINX or Delete the old Dockerfile and create a new one.
# build stage
FROM node:lts-alpine as build-stage
WORKDIR /app
COPY package*.json ./
RUN npm install
COPY . .
RUN npm run build

# production stage
FROM nginx:stable-alpine as production-stage
COPY --from=build-stage /app/dist /usr/share/nginx/html
EXPOSE 80
CMD ["nginx", "-g", "daemon off;"]
Step 2: Build a Docker Vue JS image using Dockerfile
➜  docker build -t hanu4u89/docker-vuejs-nginx .
Sending build context to Docker daemon  148.9MB
Step 1/10 : FROM node:lts-alpine as build-stage
 ---> 1c342643aa5c
Step 2/10 : WORKDIR /app
 ---> Running in 85955f5faa4a
Removing intermediate container 85955f5faa4a
 ---> 597534e7f448
Step 3/10 : COPY package*.json ./
 ---> 21c8acaa8351
Step 4/10 : RUN npm install
 ---> Running in c71034cdb324

added 1273 packages from 867 contributors and audited 1279 packages in 22.383s

46 packages are looking for funding
  run `npm fund` for details

found 0 vulnerabilities

Removing intermediate container c71034cdb324
 ---> 115c03b5f8be
Step 5/10 : COPY . .
 ---> e3d3f3ba66da
Step 6/10 : RUN npm run build
 ---> Running in df514c99701b

> docker-vuejs@0.1.0 build /app
> vue-cli-service build

-  Building for production...
 DONE  Compiled successfully in 5261ms1:17:05 AM

  File                                 Size               Gzipped
  dist/js/chunk-vendors.f0b6743d.js    89.18 KiB          31.93 KiB
  dist/js/app.b67b4f73.js              2.76 KiB           1.31 KiB
  dist/css/app.d40fc157.css            0.16 KiB           0.14 KiB

  Images and other types of assets omitted.

 DONE  Build complete. The dist directory is ready to be deployed.
 INFO  Check out deployment instructions at https://cli.vuejs.org/guide/deployment.html

Removing intermediate container df514c99701b
 ---> f7184a45cb6b
Step 7/10 : FROM nginx:stable-alpine as production-stage
stable-alpine: Pulling from library/nginx
cbdbe7a5bc2a: Already exists
6ade829cd166: Pull complete
Digest: sha256:2668e65e1a36a749aa8b3a5297eee45504a4efea423ec2affcbbf85e31a9a571
Status: Downloaded newer image for nginx:stable-alpine
 ---> ab94f84cc474
Step 8/10 : COPY --from=build-stage /app/dist /usr/share/nginx/html
 ---> 8434beddfb05
Step 9/10 : EXPOSE 80
 ---> Running in 09a17a45ba18
Removing intermediate container 09a17a45ba18
 ---> eafd2720389b
Step 10/10 : CMD ["nginx", "-g", "daemon off;"]
 ---> Running in c7596bdcab42
Removing intermediate container c7596bdcab42
 ---> 55339fd8493d
Successfully built 55339fd8493d
Successfully tagged hanu4u89/docker-vuejs-nginx:latest
The command we used to build the Image from the Dockerfile is
docker build -t hanu4u89/docker-vuejs-nginx .
Step 3: Start the container from the image we have created
docker run -it -p 8080:80 -d --name docker-vuejs-nginx hanu4u89/docker-vuejs-nginx
Step 4: Validate the Vue JS Web Application running inside the container
You should be able to access the website from the Host machine (mac/windows) at http://localhost:8080
Hope this helps.
If you like it share it with your friends and bookmark our page.
Cheers,
Hanu
Find me on LinkedIn