Every organization out there has a single agenda, that their application should be up and running all the time, including at the time of a new release.
To keep the application live at the time of deployment companies will follow different approaches to succeed in zero downtime deployment like
- Multi-Service Deployment
- Rolling Deployment
- Blue-Green Deployment
- Canary Deployment.
In this article, we are going to talk about the more efficient Blue Green deployment strategy.
The Blue-Green deployment strategy can be achieved in many ways. Even by redirecting the traffic manually.
In this article, we will see how to do aws Blue Green Deployment for an application hosted on EC2 instances using Jenkins as a CI/CD platform.
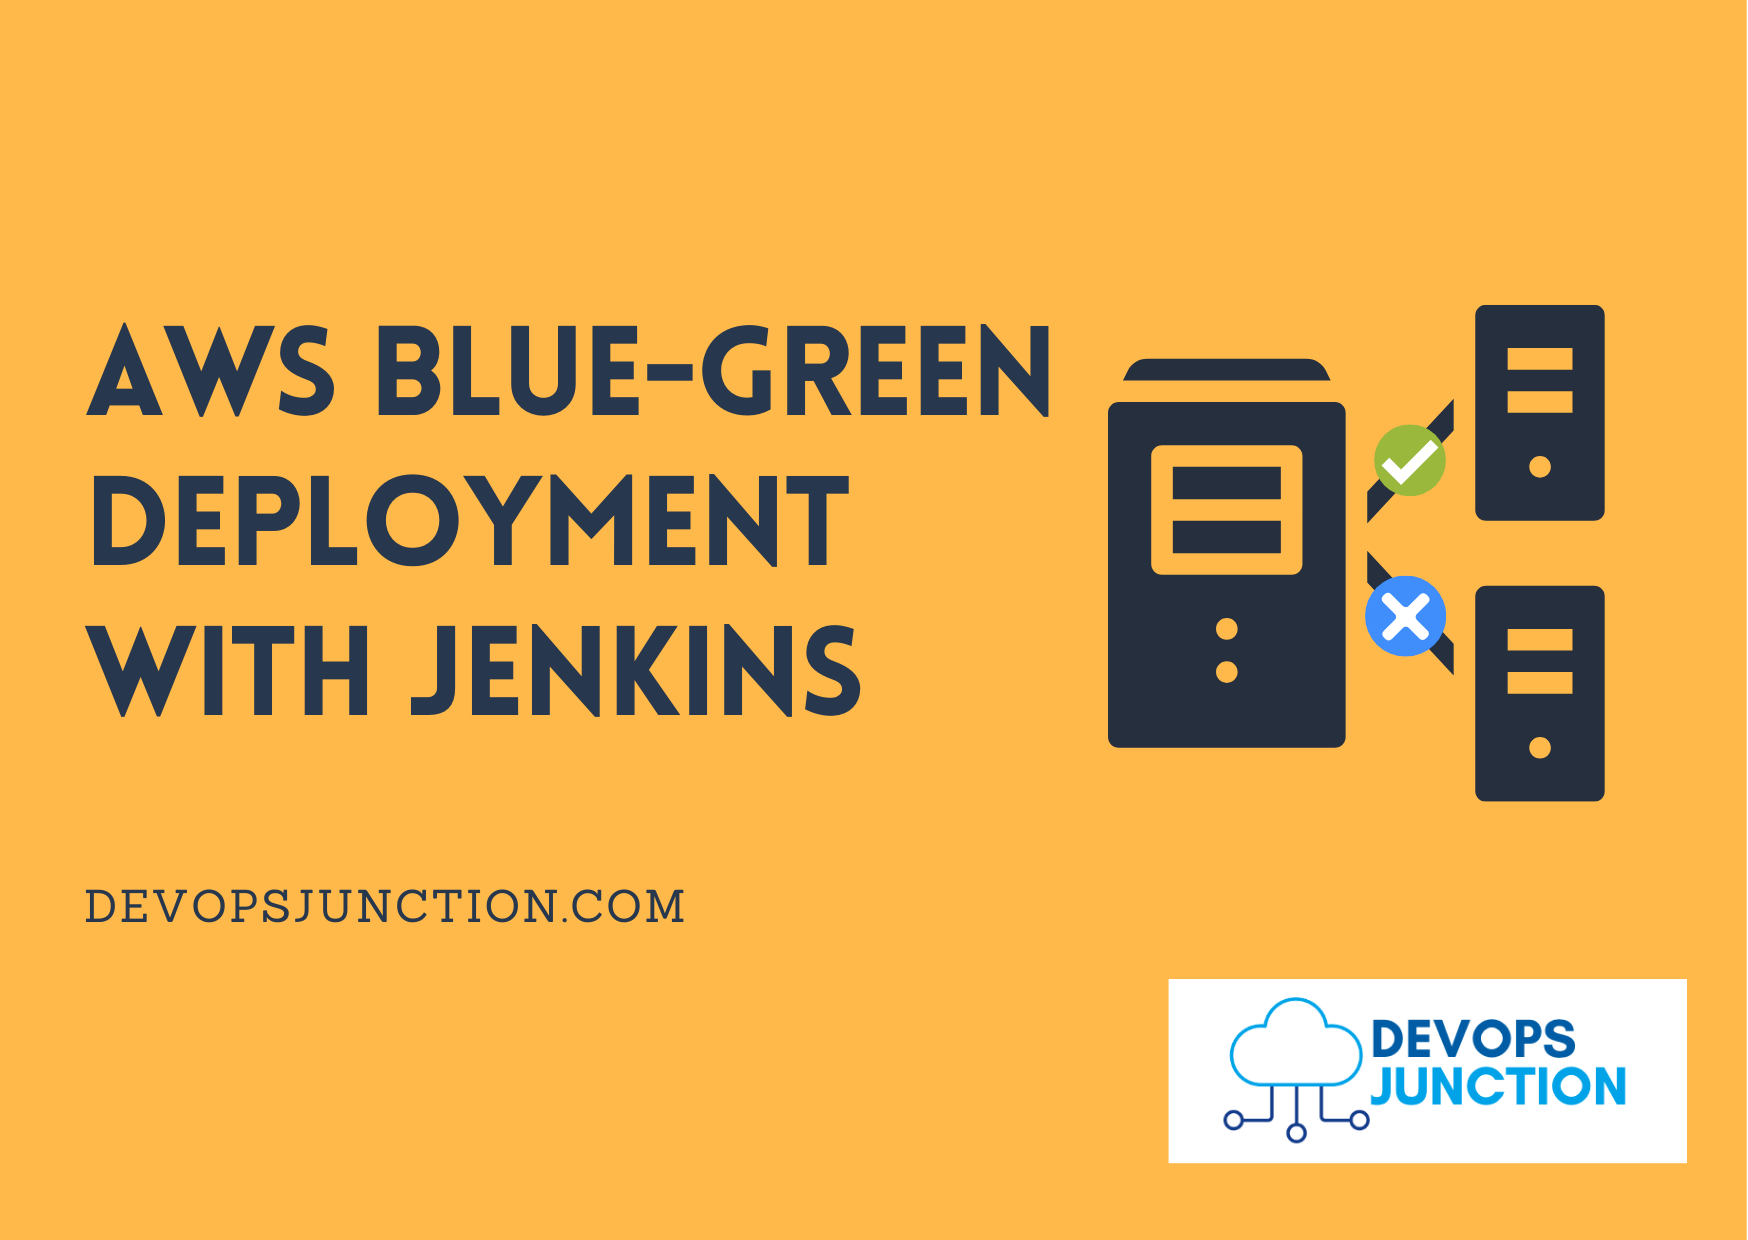
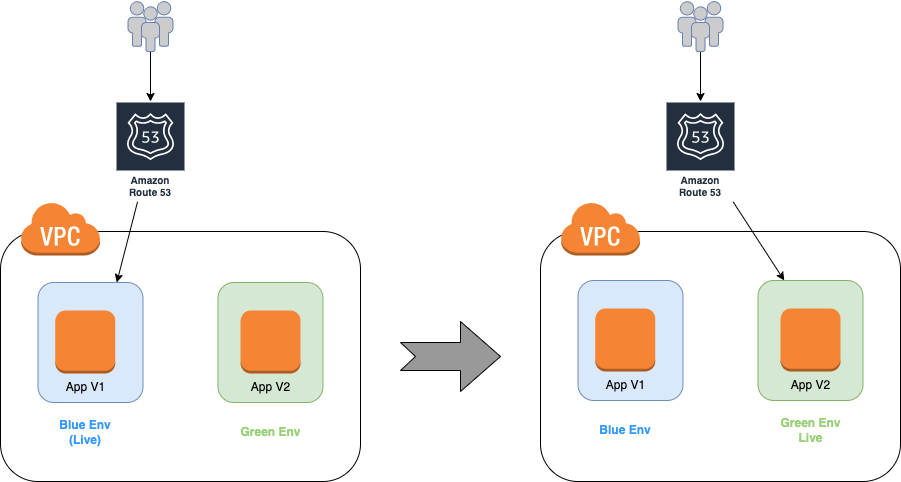
What is Blue-Green Deployment?
Blue-Green deployment is a deployment strategy in which you create two separate, but identical environments.
One environment (blue) is running the current application version and one environment (green) is running the new application version.
Using the Blue-Green deployment strategy increases application availability and reduces deployment risk by simplifying the rollback process if a deployment fails.
Once testing has been completed on the green environment, live application traffic is directed to the green environment and the blue environment is deprecated.
May the following diagram makes sense what is Blue Green deployment.
Infrastructure setup
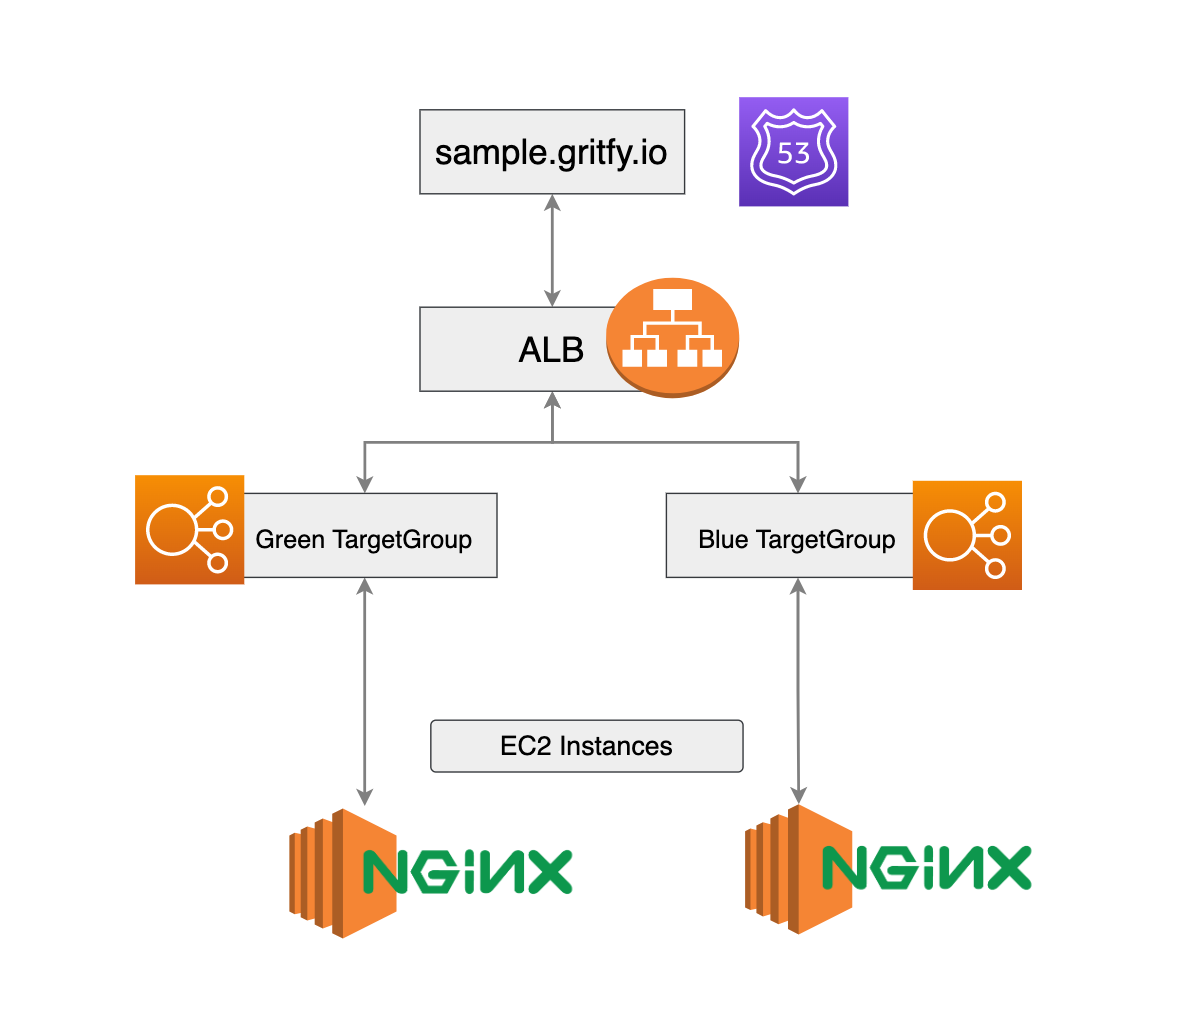
Before going any further let us peek into the infra I have set up today.
I have my sample application running in multiple EC2 instances and they are grouped into 2 Target Groups one is Blue and another one is Green.
Both these target groups are attached to an Application Load Balancer(ALB) listening at port 80 with HTTP protocol.
Our setup is a simple web application powered by NGINX
In my case, I have taken NGINX as my webserver to host a simple website but in real-time your application could be different technology altogether ( J2EE Application Server, Tomcat, Python Django, Express NodeJS etc)
But the logic would remain the same. You can have two identical copies of your application and attach them to the Blue and Green target group
In case you want to stick to our setup and try it. Go ahead and do the same using the following references.
- Launching an EC2 instance and installing NGINX*
- Creating an Application Load Balancer(ALB)
- Creating HTTP Listener for ALB
Whether you are trying this on your application or following our example and setup nginx.
By now, you should have the following things ready
- Application Load Balancer
- Target Groups named Green and Blue are associated with ALB
- Identical EC2 instances added as a member to Target groups
If everything is configured correctly your ALB listener should look something like the below.

you can see my ALB has Green and Blue Target group
Deployment tools(CD) and Repository
Now we are going to see how to achieve this Blue and Green strategy with our application deployment.
When we say deployment we need the following two things
- Where the source code is saved - Git repository ( Bitbucket, Gitlab, Github etc)
- How the deployment is done. ( Jenkins, Gitlab Pipeline, Github Action etc)
So in our case, we have our source code on github and we are going to use the famous Jenkins as our CD - continuous deployment tool.
Having said that below are the prerequisites for you to implement the Blue-Green deployment strategy.
Prerequisites
- Install AWS CLI on the Jenkins Machine
- Jenkins must have Git integration with proper Authentication.
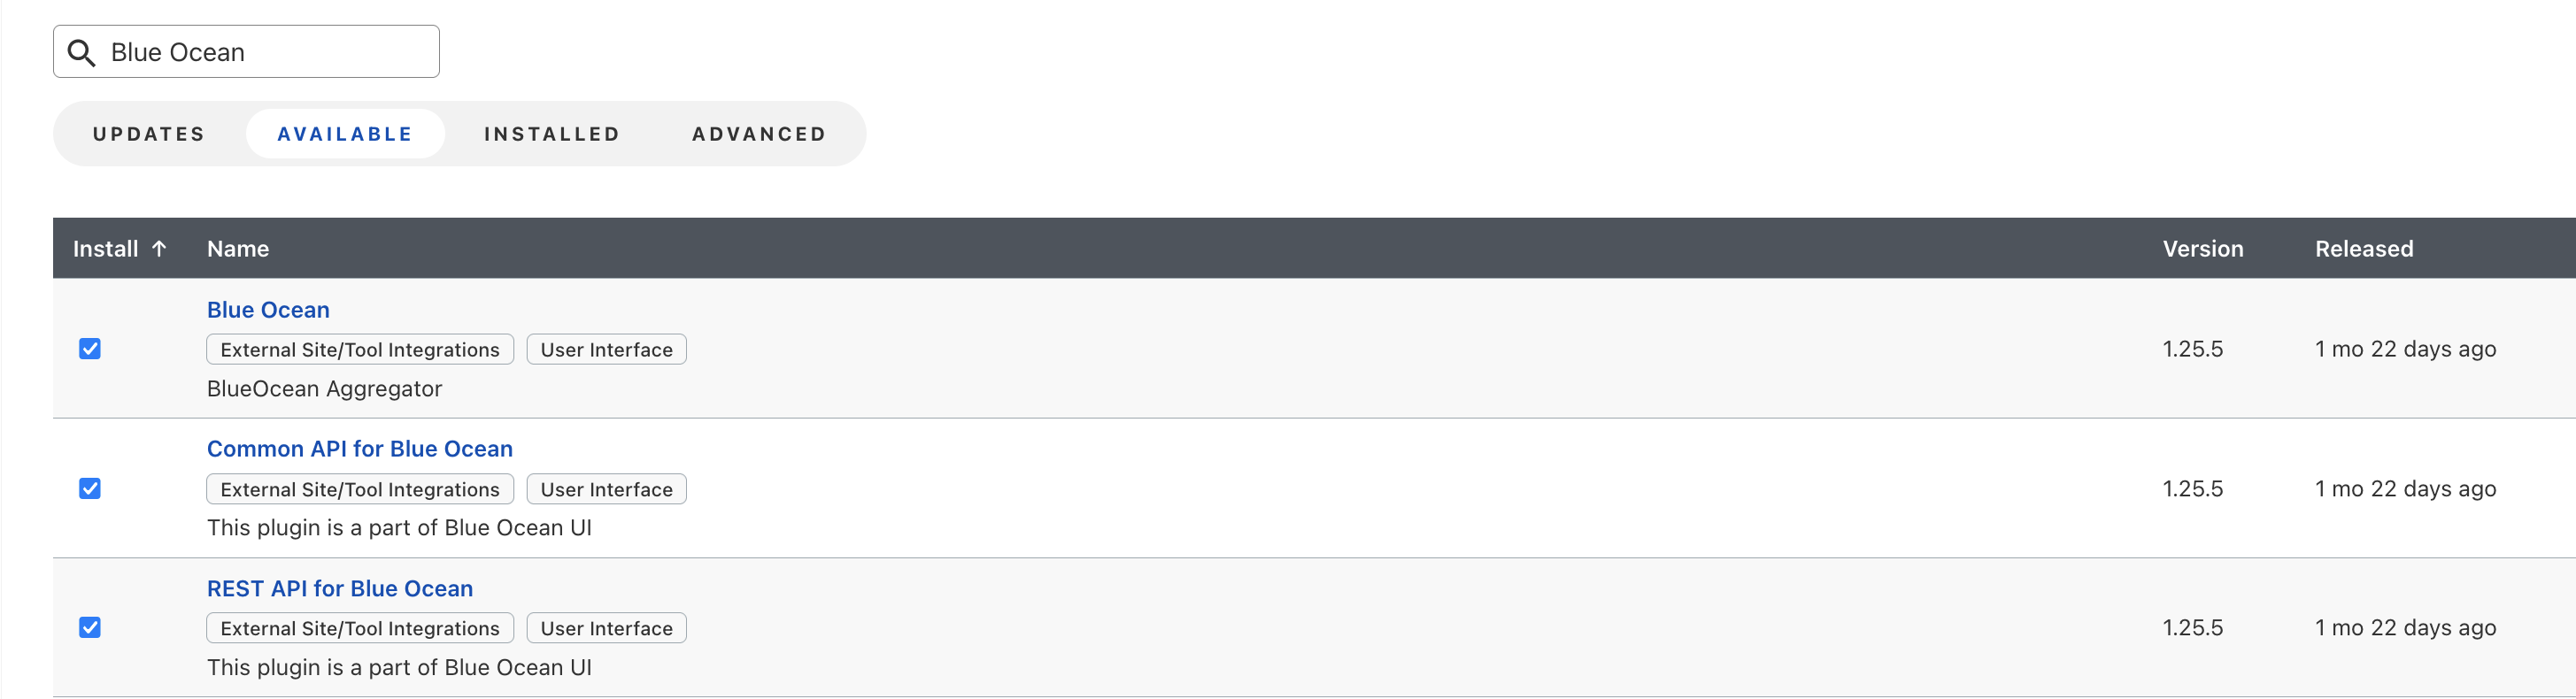
- Install Blue Ocean Plugin for better UI [optional].
AWS CLI Installation and Configuration
If you already have the AWS CLI installed and configured in your Jenkins machine. please ignore this section and move on or follow through.
Based on the Operating System where your Jenkins is running, the AWS CLI installation and command might vary.
Amazon has given clear instructions on how to install AWS CLI on each platform. Choose any of the following links and get your AWS CLI installed and ready on the Jenkins server.
- AWS CLI version 2 on Linux or Unix
- AWS CLI version 2 on macOS
- Installing AWS CLI version 2 on Windows
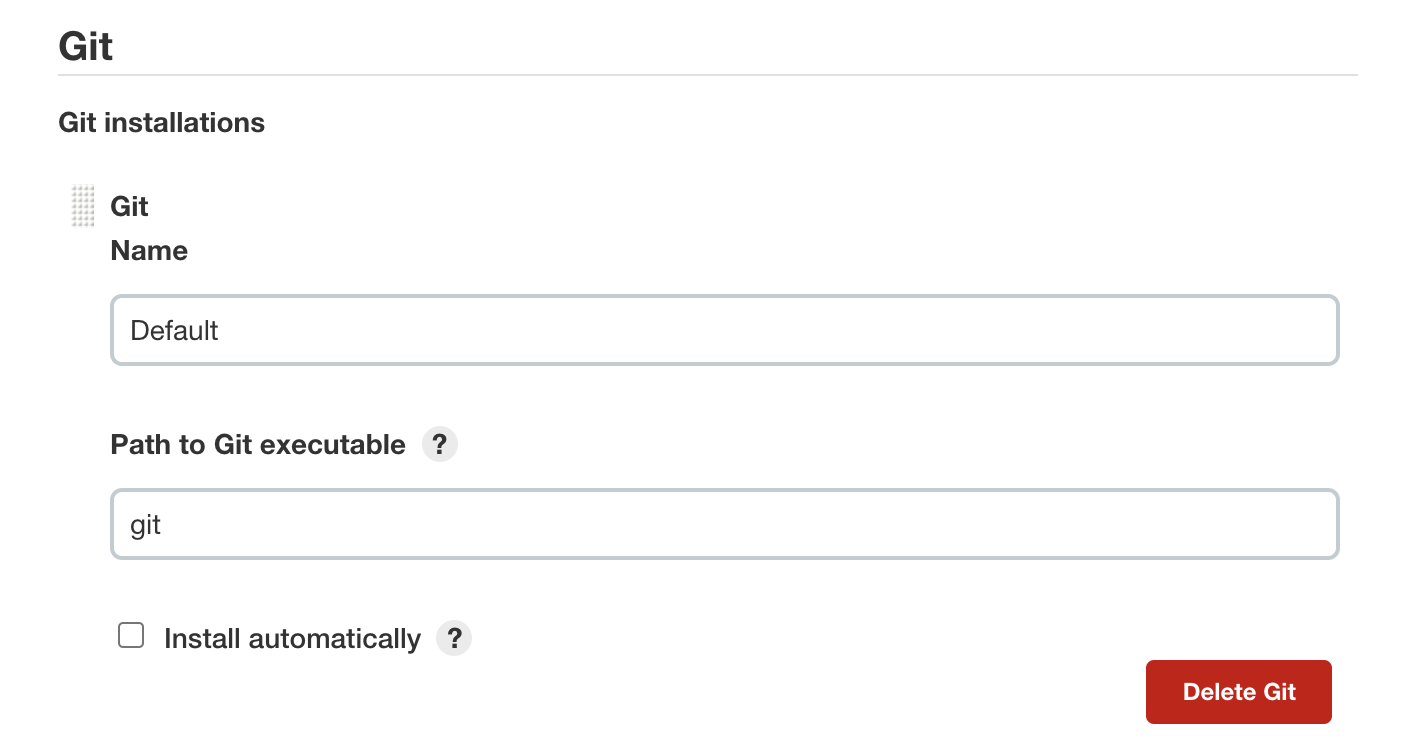
Jenkins Git setup
In Jenkins UI, go to Manage Jenkins -> Global Tool Configuration Section of Jenkins.
Note: If you don't see a Manage Jenkins Option, You need to consult with your Administrator. It might be due to insufficient privileges.
Install the Blue Ocean plugin
The Plus and also the minus of Jenkins is having to find the right plugin for everything.
So we are going to use a plugin too named AWS Lambda Plugin for our deployment
Get it installed by these steps
Go to Manage Jenkins -> Manage Plugins -> Available -> AWS Lambda Plugin
Create and Configure Source Code Management (Git)
Since our Sourcecode, the Python Helloworld code is saved in a remote Version Control repository ( GitLab, GitHub, bitbucket etc)
we should have configured git to be able to connect with the right credentials so that it can pull the code.
I presume you have already done the GIT - Jenkins integration and moving on.
Now let us create a new Job as a freestyle project.
Go to Dashboard -> New Item (Freestyle project)
Click on Source Code Management and update the Repository URL field with the project repository URL on the configuration page.

If you haven't added any credentials yet, click on Add. Upon adding it, you would be able to select it from the credentials dropdown.
I use the default branch(*/blue-green-deployment) to deploy in this example.
Pipeline Script & Project Setup for Blue-Green Deployment
In this segment, we are going to create sample configuration steps by adding a basic HTML file & Jenkins pipeline script. You can exclude the below steps by cloning the project from this link.
Updating Home page (Optional)
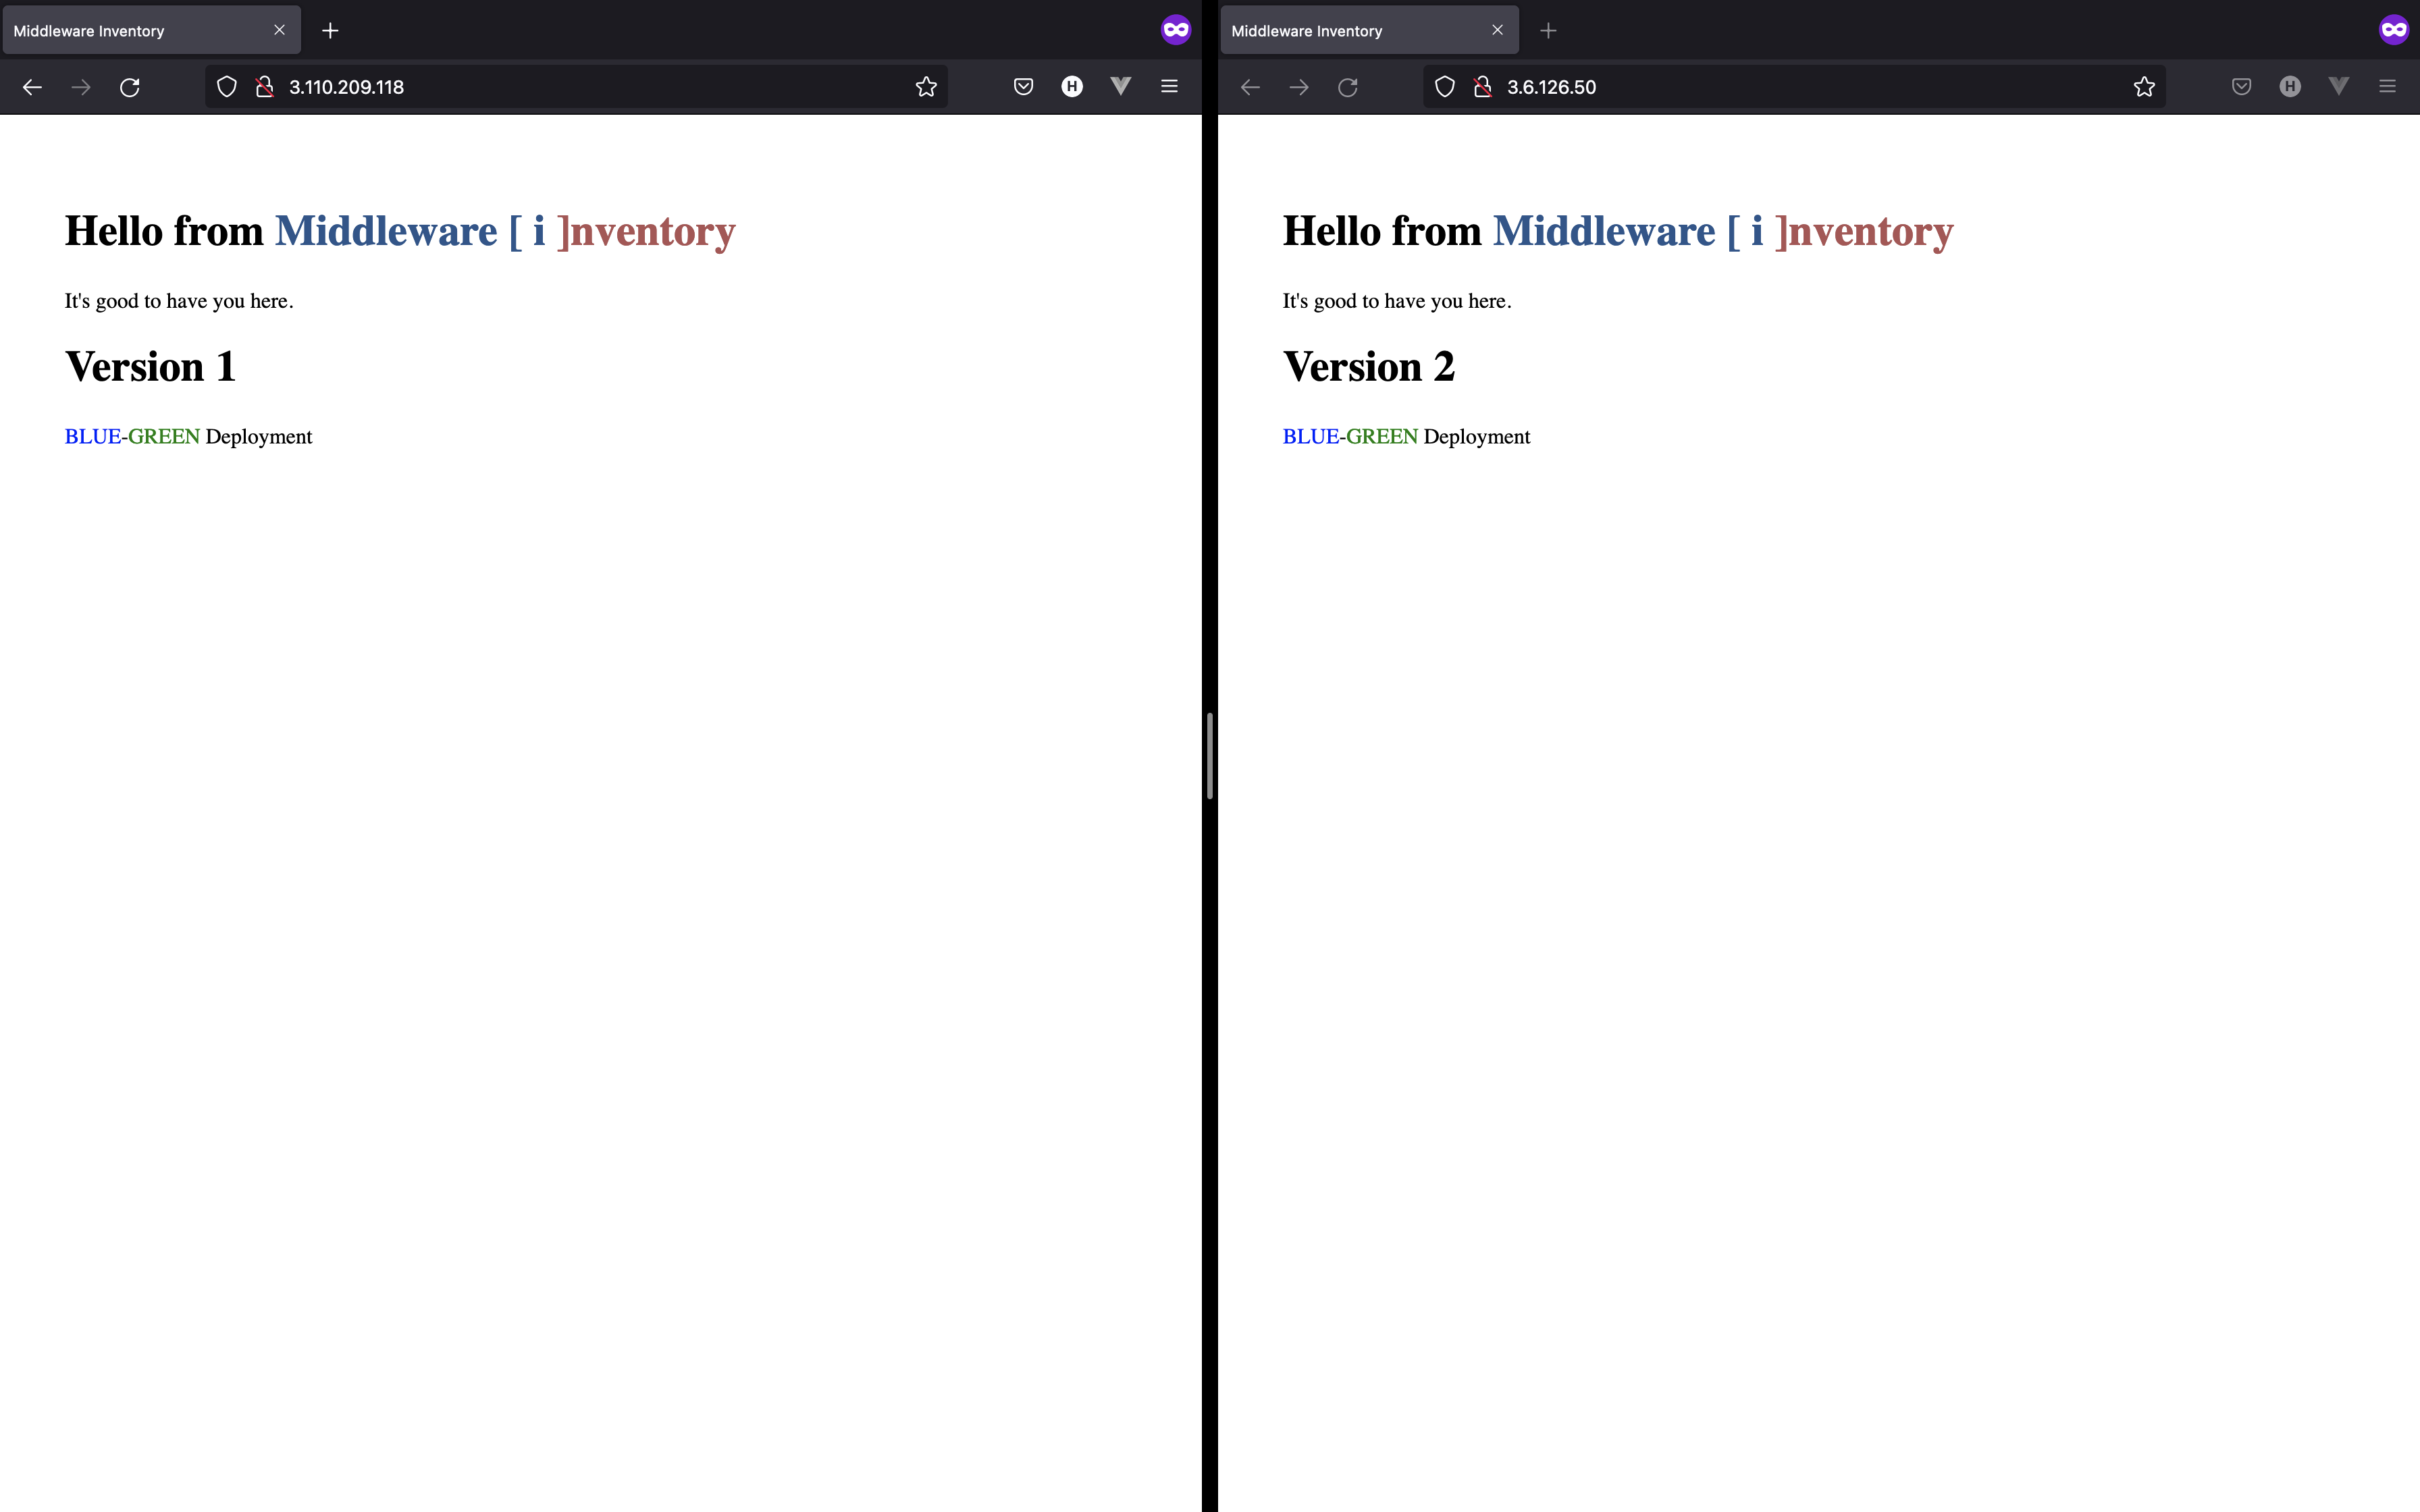
Update your Index.html as below
<html>
  <title>Middleware Inventory</title>
  <div class="hello">
    <div style="padding:40px;">
      <h1>
        Hello from
        <span style="color:#29558C">Middleware [ i</span>
        <span style="color:#AD5353">]nventory</span>
      </h1>
      <p>
        It's good to have you here. <h1>Version 1</h1>
        <span class="bg-info" style="color:blue">BLUE</span>-<span style="color:green">GREEN</span>
        <span class="bg-success"> Deployment</span>
      </p>
    </div>
  </div>
</html>
Update Jenkinsfile with pipeline script
Update your Jenkinsfile/pipeline syntax as below
Note: Please update your respective environment values as per your infrastructure & instance IPs to deploy it to EC2 instances.
- listenerARN - ALB listener ARN
- blueARN - Blue Target group ARN
- greenARN - Green Target group ARN
pipeline {
agent any
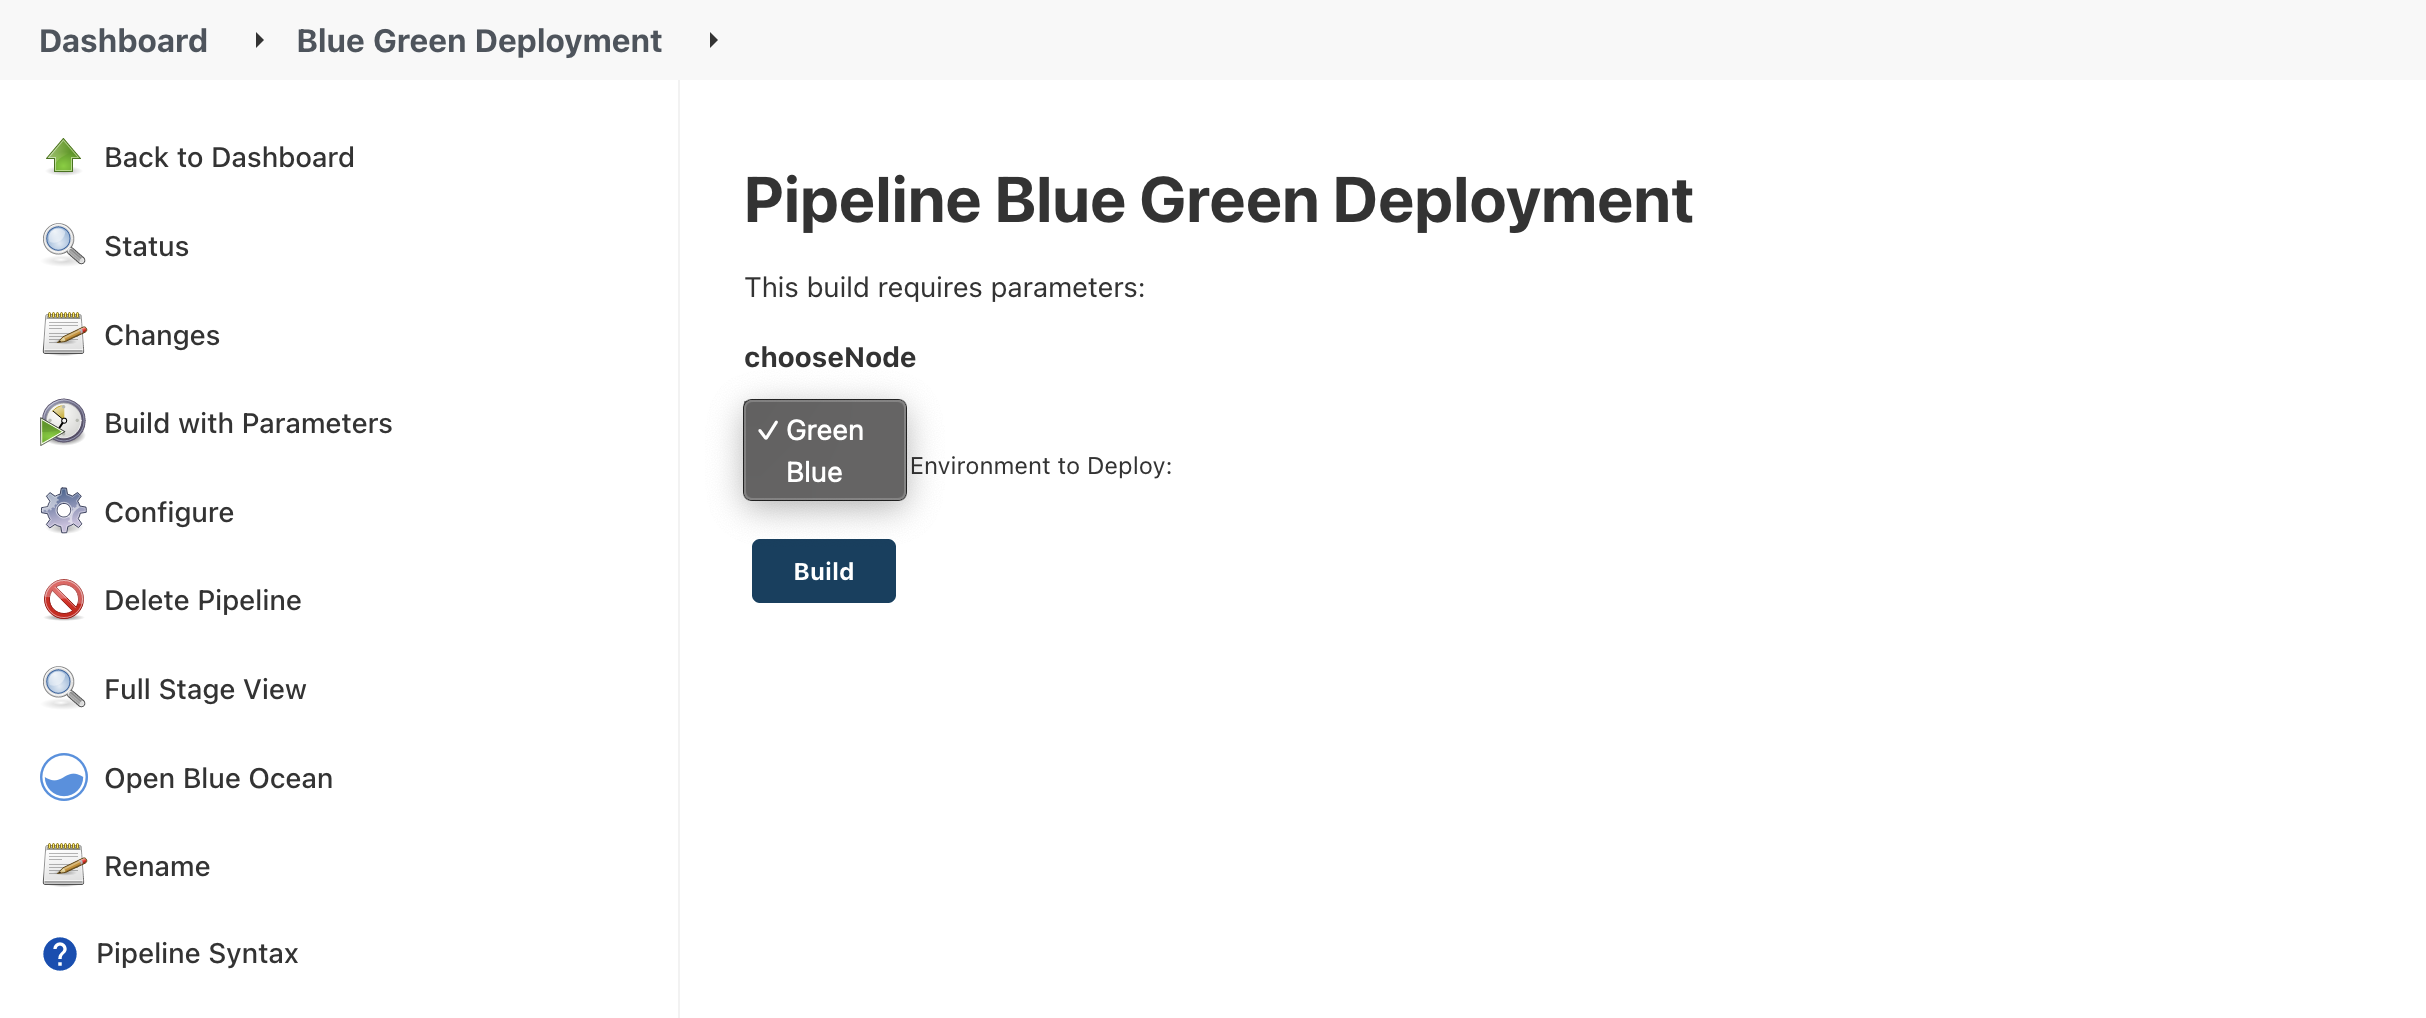
parameters {
choice (name: 'chooseNode', choices: ['Green', 'Blue'], description: 'Choose which Environment to Deploy: ')
}
environment {
listenerARN = 'arn:aws:elasticloadbalancing:ap-south-1:745825563476:listener/app/blue-green/a201cfaa8896efbc/42dd93cfc6ceb733'
blueARN = 'arn:aws:elasticloadbalancing:ap-south-1:745825563476:targetgroup/blue/2e98c824a11a99c8'
greenARN = 'arn:aws:elasticloadbalancing:ap-south-1:745825563476:targetgroup/Green/1aa96e9ddb6bd5c5'
}
stages {
stage('Deployment Started') {
parallel {
stage('Green') {
when {
expression {
params.chooseNode == 'Green'
}
}
stages {
stage('Offloading Green') {
steps {
sh """aws elbv2 modify-listener – listener-arn ${listenerARN} – default-actions '[{"Type": "forward","Order": 1,"ForwardConfig": {"TargetGroups": [{"TargetGroupArn": "${greenARN}", "Weight": 0 },{"TargetGroupArn": "${blueARN}", "Weight": 1 }],"TargetGroupStickinessConfig": {"Enabled": true,"DurationSeconds": 1}}}]'"""
}
}
stage('Deploying to Green') {
steps {
sh '''scp -r index.html [email protected]:/usr/share/nginx/html/
ssh -t [email protected] -p 22 << EOF
sudo service nginx restart
'''
}
}
stage('Validate and Add Green for testing') {
steps {
sh """
if [ "\$(curl -o /dev/null – silent – head – write-out '%{http_code}' http://3.6.126.50/)" -eq 200 ]
then
echo "** BUILD IS SUCCESSFUL **"
curl -I http://3.6.126.50/
aws elbv2 modify-listener – listener-arn ${listenerARN} – default-actions '[{"Type": "forward","Order": 1,"ForwardConfig": {"TargetGroups": [{"TargetGroupArn": "${greenARN}", "Weight": 0 },{"TargetGroupArn": "${blueARN}", "Weight": 1 }],"TargetGroupStickinessConfig": {"Enabled": true,"DurationSeconds": 1}}}]'
else
echo "** BUILD IS FAILED ** Health check returned non 200 status code"
curl -I http://3.6.126.50/
exit 2
fi
"""
}
}
}
}
stage('Blue') {
when {
expression {
params.chooseNode == 'Blue'
}
}
stages {
stage('Offloading Blue') {
steps {
sh """aws elbv2 modify-listener – listener-arn ${listenerARN} – default-actions '[{"Type": "forward","Order": 1,"ForwardConfig": {"TargetGroups": [{"TargetGroupArn": "${greenARN}", "Weight": 1 },{"TargetGroupArn": "${blueARN}", "Weight": 0 }],"TargetGroupStickinessConfig": {"Enabled": true,"DurationSeconds": 1}}}]'"""
}
}
stage('Deploying to Blue') {
steps {
sh '''scp -r index.html [email protected]:/usr/share/nginx/html/
ssh -t [email protected] -p 22 << EOF
sudo service nginx restart
'''
}
}
stage('Validate Blue and added to TG') {
steps {
sh """
if [ "\$(curl -o /dev/null – silent – head – write-out '%{http_code}' http://3.110.209.118/)" -eq 200 ]
then
echo "** BUILD IS SUCCESSFUL **"
curl -I http://3.110.209.118/
aws elbv2 modify-listener – listener-arn ${listenerARN} – default-actions '[{"Type": "forward","Order": 1,"ForwardConfig": {"TargetGroups": [{"TargetGroupArn": "${greenARN}", "Weight": 1 },{"TargetGroupArn": "${blueARN}", "Weight": 1 }],"TargetGroupStickinessConfig": {"Enabled": true,"DurationSeconds": 1}}}]'
else
echo "** BUILD IS FAILED ** Health check returned non 200 status code"
curl -I http://3.110.209.118/
exit 2
fi
"""
}
}
}
}
}
}
}
}
Build your Jenkins job
Green Deployment
Before the Deployment, you could see the weight of the Green Target group had been marked as Zero.
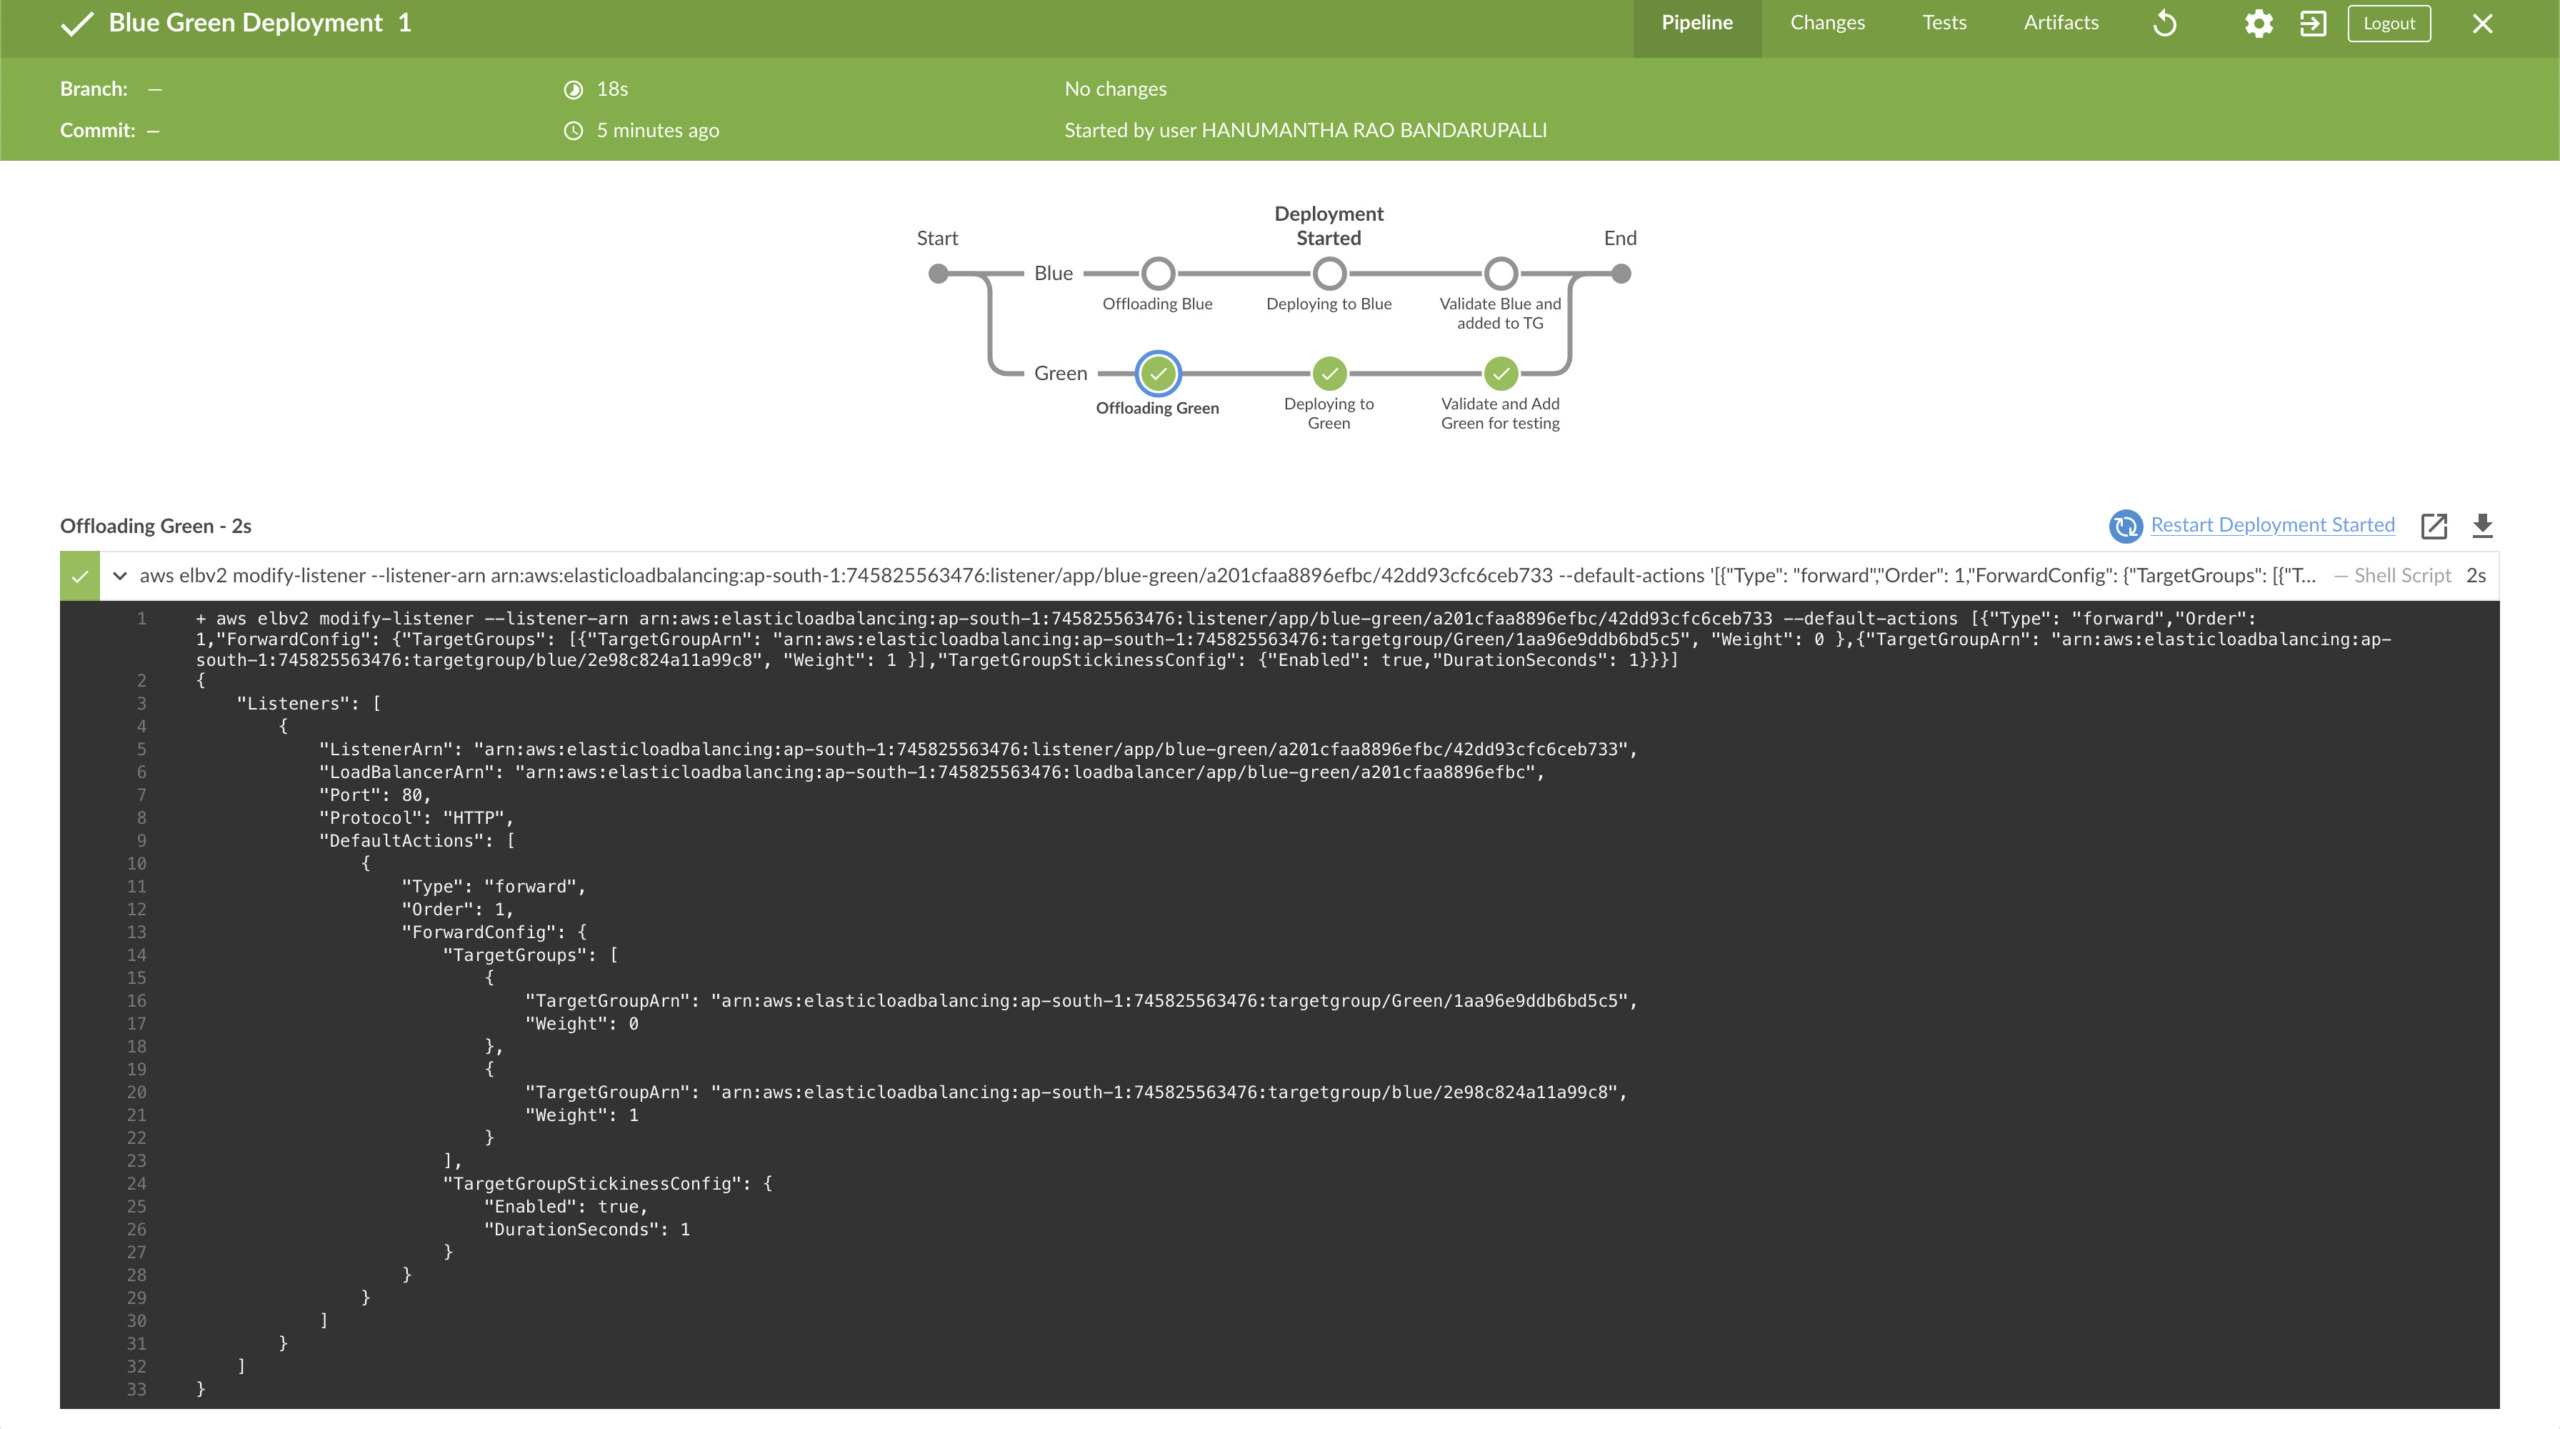
Upon validation Green Environment which has the latest code has been marked enabled for taking live traffic.
{
    "Listeners": [
        {
            "ListenerArn": "arn:aws:elasticloadbalancing:ap-south-1:745825563476:listener/app/blue-green/a201cfaa8896efbc/42dd93cfc6ceb733",
            "LoadBalancerArn": "arn:aws:elasticloadbalancing:ap-south-1:745825563476:loadbalancer/app/blue-green/a201cfaa8896efbc",
            "Port": 80,
            "Protocol": "HTTP",
            "DefaultActions": [
                {
                    "Type": "forward",
                    "Order": 1,
                    "ForwardConfig": {
                        "TargetGroups": [
                            {
                                "TargetGroupArn": "arn:aws:elasticloadbalancing:ap-south-1:745825563476:targetgroup/Green/1aa96e9ddb6bd5c5",
                                "Weight": 1
                            },
                            {
                                "TargetGroupArn": "arn:aws:elasticloadbalancing:ap-south-1:745825563476:targetgroup/blue/2e98c824a11a99c8",
                                "Weight": 0
                            }
                        ],
                        "TargetGroupStickinessConfig": {
                            "Enabled": true,
                            "DurationSeconds": 1
                        }
                    }
                }
            ]
        }
    ]
}
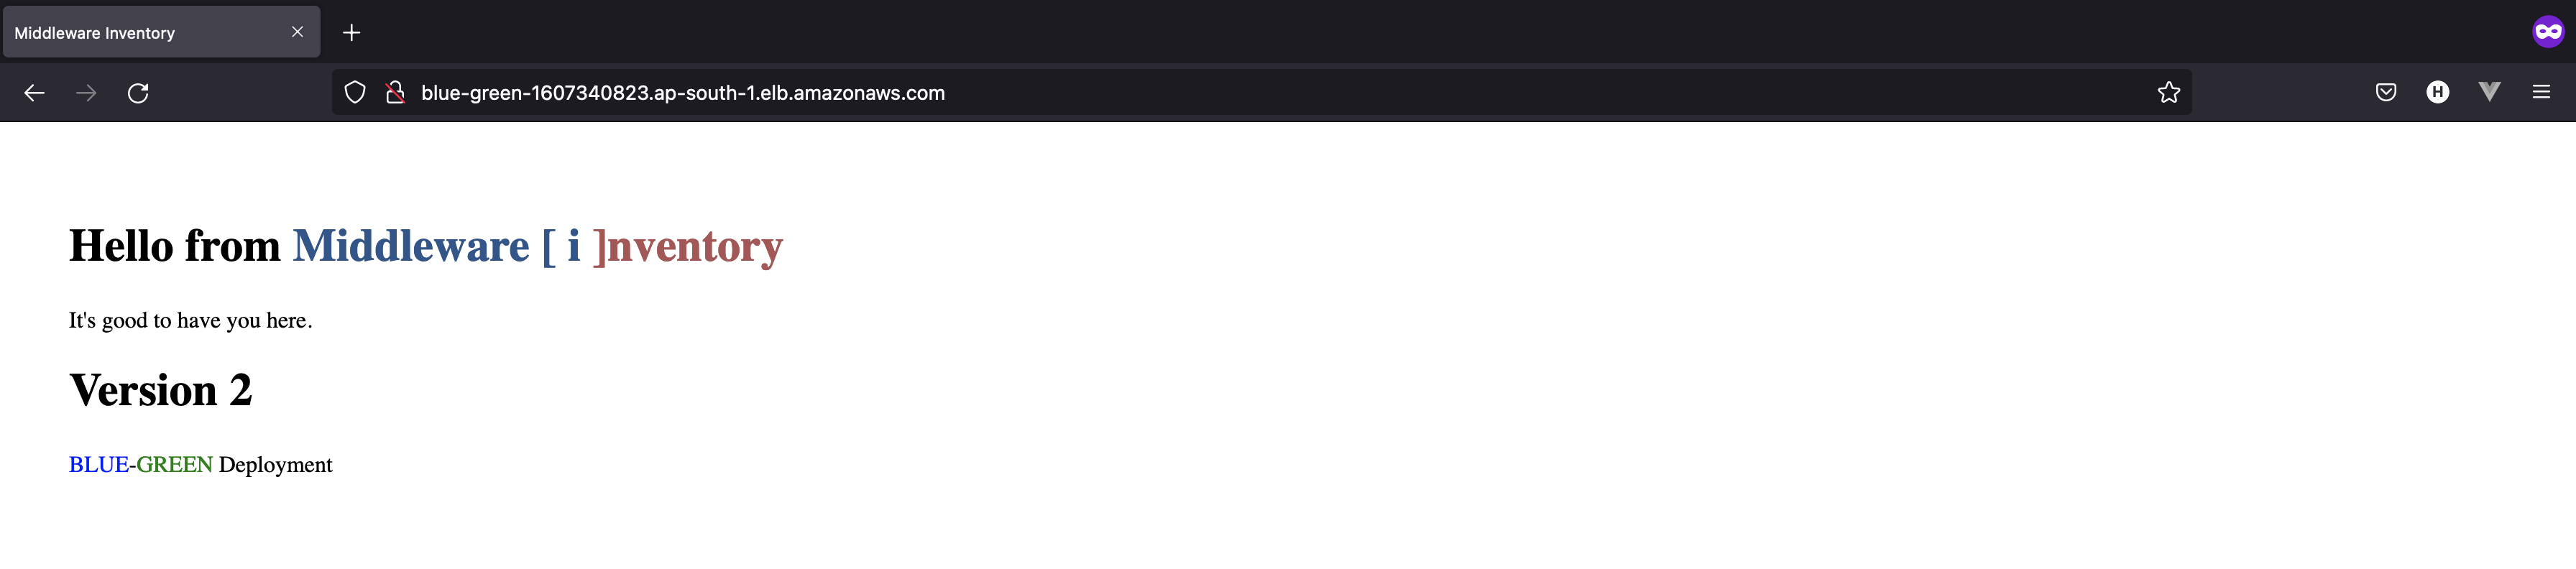
After the successful deployment to Green, you can see that Green has Version 2 & Blue instance has Version 1
Blue Deployment
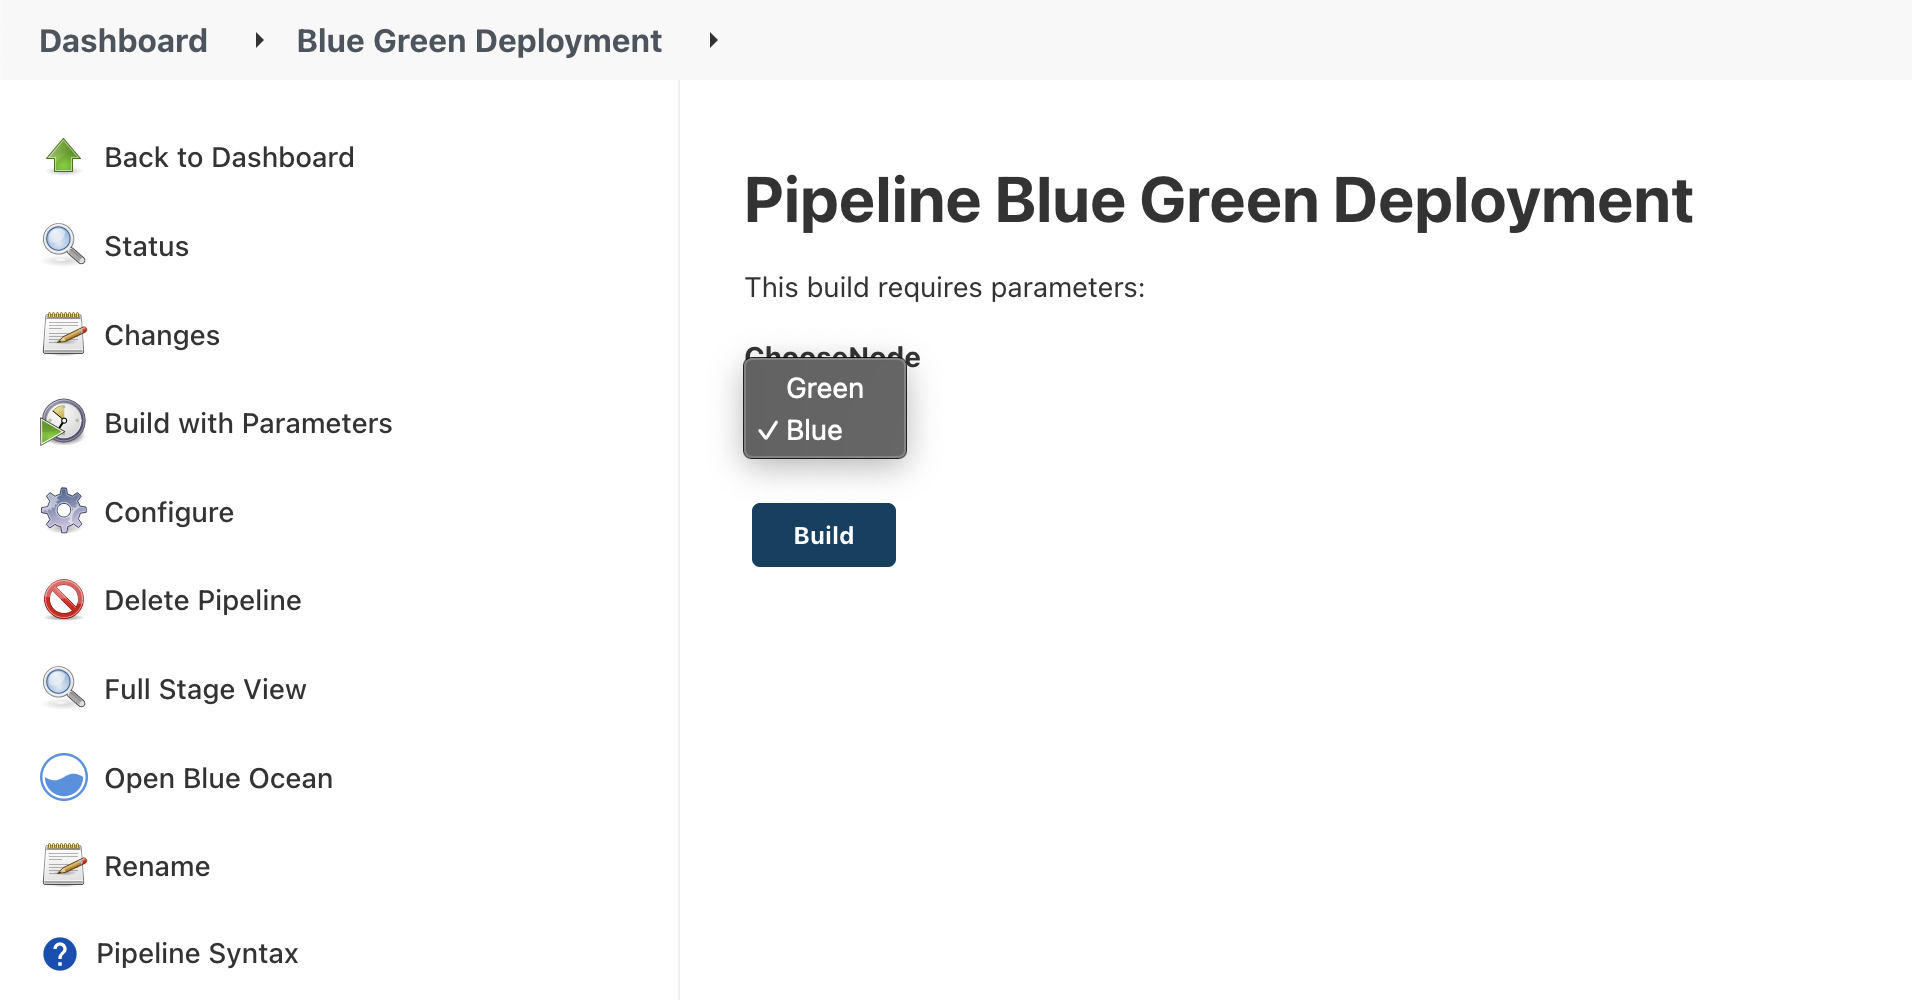
After the successful deployment to both environments, a new version of the application will be available for users.
Conclusion
Today in this article we have learned to implement a fully automated Blue-Green Deployment strategy on AWS EC2 instances using Jenkins CI/CD.
If you are reading this I hope this article has been useful. If not please feel free to leave a comment and help me improve.
Co Authored by
Hanu & Sarav
Follow us on Facebook or Twitter For more practical videos and tutorials. Subscribe to our channel Find me on Linkedin My Profile For any Consultation or to hire us [email protected] If you like this article. Show your Support! Buy me a Coffee.
Signup for Exclusive "Subscriber-only" Content