Karpenter Auto Scaler is fairly advanced and provides a lot of Customization options than its predecessor Cluster Auto Scaler. (CA)
In our previous article, we have seen how to install and set up Karpenter Auto Scaler into a new EKS Cluster using Terraform.
In this article, we are going to see how to install and configure the karpenter Auto scaler into an existing EKS Cluster.
This can be also considered as a migration guide from Cluster Auto Scaler to Karpenter
Configuring Environment Variables
Open your favourite terminal and set the environment variables. I am using Mac OS and iterm2 as my terminal.
You can choose a terminal as per your choice.
Once the Environment variables are set in the terminal, you must continue to use the same terminal until the end of this post.
If you are opening a new tab or new terminal, You might have to set these Environment variables once again before Proceeding
⇒ export KARPENTER_VERSION=v0.16.1
⇒ export CLUSTER_NAME="gritfy-01"
⇒ export AWS_DEFAULT_REGION="us-east-1"
⇒ export AWS_ACCOUNT_ID="$(aws sts get-caller-identity – query Account – output text)"
⇒ export CLUSTER_ENDPOINT="$(aws eks describe-cluster – name ${CLUSTER_NAME} – query "cluster.endpoint" – output text)"
⇒ echo $KARPENTER_VERSION $CLUSTER_NAME $AWS_DEFAULT_REGION $AWS_ACCOUNT_ID $CLUSTER_ENDPOINT
v0.16.1 gritfy-01 us-east-1 75*********3 https://A271E5***************5AC8.gr7.us-east-1.eks.amazonaws.com
Launch the Cloudformation template to Create IAM instance Role
Now we need to create the IAM instance Role which would be mapped for the EC2 worker nodes once the karpenter provisions them.
⇒ curl -fsSL https://karpenter.sh/"${KARPENTER_VERSION}"/getting-started/getting-started-with-eksctl/cloudformation.yaml  > $TEMPOUT \
&& aws cloudformation deploy \
  – stack-name "Karpenter-${CLUSTER_NAME}" \
  – template-file "${TEMPOUT}" \
  – capabilities CAPABILITY_NAMED_IAM \
  – parameter-overrides "ClusterName=${CLUSTER_NAME}"
Creating IAM Identity Mapping
This command adds the Karpenter node role to your aws-auth config map, allowing nodes with this role to connect to the cluster.
⇒ eksctl create iamidentitymapping \
  – username system:node:{{EC2PrivateDNSName}} \
  – cluster "${CLUSTER_NAME}" \
  – arn "arn:aws:iam::${AWS_ACCOUNT_ID}:role/KarpenterNodeRole-${CLUSTER_NAME}" \
  – group system:bootstrappers \
  – group system:nodes
2022-09-05 14:06:51 [ℹ]  adding identity "arn:aws:iam::751115992403:role/KarpenterNodeRole-gritfy-01" to auth ConfigMap
Create the KarpenterController IAM Role
Karpenter requires permissions like launching instances. This will create an AWS IAM Role, and Kubernetes service account, and associate them using IRSA.
⇒ eksctl create iamserviceaccount \
  – cluster "${CLUSTER_NAME}" – name karpenter – namespace karpenter \
  – role-name "${CLUSTER_NAME}-karpenter" \
  – attach-policy-arn "arn:aws:iam::${AWS_ACCOUNT_ID}:policy/KarpenterControllerPolicy-${CLUSTER_NAME}" \
  – role-only \
  – approve
If your cluster is not having an IRSA enabled. you might see some errors like this
2022-09-05 14:08:50 [!] no IAM OIDC provider associated with cluster, try 'eksctl utils associate-iam-oidc-provider – region=us-east-1 – cluster=gritfy-01'
in that case, you can allow the IRSA with the following command
⇒ eksctl utils associate-iam-oidc-provider – region=us-east-1 – cluster=gritfy-01 – approve
now retry the previous command and it would succeed
⇒ eksctl utils associate-iam-oidc-provider – region=us-east-1 – cluster=gritfy-01 – approve
2022-09-05 14:09:34 [ℹ]  will create IAM Open ID Connect provider for cluster "gritfy-01" in "us-east-1"
2022-09-05 14:09:36 [✔]  created IAM Open ID Connect provider for cluster "gritfy-01" in "us-east-1"
Kubernetes|⇒ eksctl create iamserviceaccount \
  – cluster "${CLUSTER_NAME}" – name karpenter – namespace karpenter \
  – role-name "${CLUSTER_NAME}-karpenter" \
  – attach-policy-arn "arn:aws:iam::${AWS_ACCOUNT_ID}:policy/KarpenterControllerPolicy-${CLUSTER_NAME}" \
  – role-only \
  – approve
2022-09-05 14:16:26 [ℹ]  1 iamserviceaccount (karpenter/karpenter) was included (based on the include/exclude rules)
2022-09-05 14:16:26 [!]  serviceaccounts that exist in Kubernetes will be excluded, use – override-existing-serviceaccounts to override
2022-09-05 14:16:26 [ℹ]  1 task: { create IAM role for serviceaccount "karpenter/karpenter" }
2022-09-05 14:16:26 [ℹ]  building iamserviceaccount stack "eksctl-gritfy-01-addon-iamserviceaccount-karpenter-karpenter"
2022-09-05 14:16:27 [ℹ]  deploying stack "eksctl-gritfy-01-addon-iamserviceaccount-karpenter-karpenter"
2022-09-05 14:16:27 [ℹ]  waiting for CloudFormation stack "eksctl-gritfy-01-addon-iamserviceaccount-karpenter-karpenter"
2022-09-05 14:16:58 [ℹ]  waiting for CloudFormation stack "eksctl-gritfy-01-addon-iamserviceaccount-karpenter-karpenter"
Install Karpenter using helm chart
this command would deploy the helm chart in your cluster.
helm upgrade – install – namespace karpenter – create-namespace \
  karpenter karpenter/karpenter \
  – version ${KARPENTER_VERSION} \
  – set serviceAccount.annotations."eks\.amazonaws\.com/role-arn"=${KARPENTER_IAM_ROLE_ARN} \
  – set clusterName=${CLUSTER_NAME} \
  – set clusterEndpoint=${CLUSTER_ENDPOINT} \
  – set aws.defaultInstanceProfile=KarpenterNodeInstanceProfile-${CLUSTER_NAME} \
  – wait # for the defaulting webhook to install before creating a Provisioner
Once the helm chart is installed successfully you can validate if the Karpenter namespace is ready and it might have launched two pods
You can validate it by issuing the following command
⇒ kubectl get pods -n karpenter
If you use the following command you can see there are two containers in each pod
Note*: This command uses sort and column Linux commands for formatting
⇒ kubectl get pods -n karpenter -o jsonpath='{"PODNAME\tNAMESPACE\tCONTAINERS"}{"\n"}{range .items[*]}{"\n"}{.metadata.name}{"\t"}{.metadata.namespace}{"\t"}{range .spec.containers[*]}{.name}{"=>"}{.image}{","}{end}{end}' |sort|column -t
If your PODS are up and running, it is a half victory for us
Now we need to create a Provisioner.
What is provisioner in Karpenter?
Provisioner is the key differentiator between the legacy Cluster Auto Scaler and Karpenter.
AWS Karpenter Provides a lot of customization possibilities for designing our worker nodes. Unlike the legacy Cluster Auto Scaler.
In the provisioner definition, we can define what subnets, and what security groups to be used while launching the EC2 instances
Before we cover some more on the provisioner part. Let us take a quick look on how a simple provisioner definition looks like
apiVersion: karpenter.sh/v1alpha5
kind: Provisioner
metadata:
  name: default
spec:
  requirements:
    - key: karpenter.sh/capacity-type
      operator: In
      values: ["spot"]
  limits:
    resources:
      cpu: 1000
  provider:
    subnetSelector:
      karpenter.sh/discovery: ${CLUSTER_NAME}
    securityGroupSelector:
      karpenter.sh/discovery: ${CLUSTER_NAME}
  ttlSecondsAfterEmpty: 30
EOF
But we are not going to use this provisioner as it would create some default and minimal launch templates and worker nodes for us.
So we are going to customize it further.
As part of our customization, we need to create our own Launch template
Launch template, as the name suggest helps us to create Multiple EC2 instances with the same configuration ( template)
Why do we need a Customized Launch Template?
The provisioner can auto-create the launch templates with the default configuration but the problem is that
Let's say you want to customize the EC2 instances which are launched as worker nodes and perform some of the listed below tasks
- Change the Key pair (or) add a key pair with a new worker nodes
- Change the Disk Size or add more disks
- Customize the Subnet and/or Security group
- Adding Special User startup data or scripts
Except for local testing or for development purposes. I would encourage you to use your custom launch template
Now let us get some necessary information of the cluster before we create the launch template.
Collect the Cluster Data - to add it to USER DATA of EC2
In this step, we are going to collect some configuration data from our EKS cluster.
This data is needed for the Launch template user_data ( startup boot time script) configuration.
user_data contains a list of shell commands ( shell script) that would be executed during the boot-up / start time of the worker node.
Why cluster-specific information is needed? for the Launch template
We have mentioned this cluster-specific information that we are going to collect would be used in creating the proper startup (user_data)
ideal EKS worker node startup script aka user_data would look something like this
#!/bin/bash
set -ex
B64_CLUSTER_CA=LS0tLS1CRUdJTiBDRVJUSUZJQ0FURS0tLS0tCk1JSUM1ekNDQWMrZ0F3SUJBZ0lCQURBTkJna3Foa2lHOXcwQkFRc0ZBREFWTVJNd0VRWURWUVFERXdwcmRXSmwKY201bGRHVnpNQjRYRFRJeE1UQXdOekUwTXpneE5Gb1hEVE14TVRBd05URTBNemd4TkZvd0ZURVRNQkVHQTFVRQpBeE1LYTNWaVpYSnVaWFJsY3pDQ0FTSXdEUVlKS29aSWh2Y05BUUVCQlFBRGdnRVBBRENDQVFvQ2dnRUJBS0Q4CmdoQ0JQM2ZaelhhMXgwL3lYa1RSQzlOb3F4cGtTYzFtanZiaFgra0ZmM0crUnEvM3FqNGpwS3hmbytoRjgrQzcKL3hnTjFRNjQ********anR0RW1YQVRSQTdYYkpuMmlnU1pGdTBhWkxiMnAvWjVHKzhkdXVxcm1WMHlHS2ZlQ21CbDNnZnVZCmREUEZCcUY4Z292bHZKc2hlRXA3OGEzSFI4TWx6SUUxaW10NVhzN24rMG9JU05QVWd4US8vZURkK2djOXhHcVYKdFJhZVJCcWJmNm9iajVGalZkbVpOSnowOTJsOVVYSjI3ZitEQUNuTmk0TUVVTWxEUUhFQ2dUY09RcC9ZcDZzQwpEV09wWFhVYW5GOEIwcm51U2MrUWlXVmJCdjZHS1FhUzR1SWFNWG5QYThCMnp4amJQQ0Z1L2YzZmtRT0pVMCtIClAyV2c1bThKclNNWmpWRFB3a2lKbERHTXFCdjZoZlJXbGNRYgotLS0tLUVORCBDRVJUSUZJQ0FURS0tLS0tCg==

API_SERVER_URL=https://A271E535C*******561C6445AC8.gr7.us-east-1.eks.amazonaws.com

K8S_CLUSTER_DNS_IP=172.20.0.10

/etc/eks/bootstrap.sh gritfy-01 – b64-cluster-ca $B64_CLUSTER_CA – apiserver-endpoint $API_SERVER_URL – dns-cluster-ip $K8S_CLUSTER_DNS_IP
If you look at the last line of the preceding user_data shell script. you can see we are calling a specific script named /etc/eks/bootstrap.sh
This script
/etc/eks/bootstrap.shwould be available only if you choose the right AMI which can power your EKS cluster.You can find more about the EKS optimized AMIs here
This script is to get the EC2 instance ready to be attached to the Kubernetes eco-system. this installs various tools like
- Docker/ContinerD ( Container Runtime Engine)
- Kubelet
- Networking Plugins in CNI
- KubeProxy and more.
If you look at the way we are invoking this script you can see we are passing three additional arguments such as
b64-cluster-caBase 64 Cluster CA Certificateapiserver-endpointHTTPS URL of the API Serverdns-cluster-ipDNS IP of the Kubernetes ( hope you remember that K8s has its internal IP and DNS)
/etc/eks/bootstrap.sh gritfy-01 – b64-cluster-ca $B64_CLUSTER_CA – apiserver-endpoint $API_SERVER_URL – dns-cluster-ip $K8S_CLUSTER_DNS_IP
Now, where do we get this information? we can get this information using aws eks CLI command
For this command to work you must have set up the aws CLI.
If you are new to it, refer to our exclusive article on aws cli here
Here are the commands you might have to use to get different key items
b64-cluster-ca
⇒ aws eks describe-cluster – name ${CLUSTER_NAME} – query "cluster.certificateAuthority.data" – output text
api-server-endpoint
⇒ aws eks describe-cluster – name ${CLUSTER_NAME} – query "cluster.endpoint" – output text
dns-cluster-ip
⇒ aws eks describe-cluster – name ${CLUSTER_NAME} – query "cluster.kubernetesNetworkConfig.serviceIpv4Cidr" – output text
Once you have got the key items needed you can make a note of them and use them during the Launch template creation in the next step
There is one more item you need to collect which is a security group associated with the existing nodes
How to find the Security groups associated with my EKS cluster
You can find the master security group associated with your EKS cluster from the AWS Admin console itself
Go to EKS > Clusters > Choose the cluster
In the Networking tab, you can find the primary security group and secondary security group.
This Security group is not sufficient at times for the EC2 worker nodes.
Since this is your existing EKS cluster there must be some additional configuration changes done to the node group and the Launch template underneath
so the right way to check the security groups is to refer to the existing worker nodes
you can do this by going here
Go to EKS > Clusters > Choose your cluster Compute > Click on the existing worker node
Once the particular node is open click the instance_id it would take you to the EC2 service screen where you can find the security groups associated with your existing worker node
Once you have noted down the security groups. we can move on to creating the Launch template
Create a Launch template with Terraform
We have collected all the data needed now let us create the launch template.
We are going to use Terraform to create our launch template
Terraform code for the Launch template creation is available on my github repository here
You can clone the repository using the following command
⇒ git clone https://github.com/AKSarav/EKS_launch_template
Once you have downloaded the code. You can start with terraform plan
You need to pass the necessary startup argument
- security_group_ids security group IDs for the launch template machines
- ami_id amazon eks optimized ami
- disksize EBS volume size of the worker nodes
- lt_name name to the launch template being created
- iam_instance_profile IAM instance profile name ( IAM role name)
- keypair_name Key Pair name, If do not have already, create one
here is the command, please make sure to update the values after the =sign before trying this at your end
⇒ terraform plan -out tfplan.out \
  -var 'security_group_ids=["sg-xxxxxxxxxx", "sg-xxxxxxxxxx"]' \
  -var ami_id=ami-0d78302dd24db83c7 \
  -var disksize=100 \
  -var lt_name=karpenter-lt-eks-qa01 \
  -var iam_instance_profile=KarpenterNodeInstanceProfile-gritfy-01 \
  -var keypair_name=jumphost-gritfy
we also have -out to store the output of the plan to tfplan.out file which would be used in the next stage
Always make sure what changes are being done on the plan state so that you would not end up with surprises.
Once you are satisfied with the plan.
Now we can go ahead and execute terraform apply command to apply the changes.
⇒ terraform apply tfplan.out
here is a glimpse of the execution output for both these commands
⇒ terraform plan -out tfplan.out -var ami_id=ami-0d78302dd24db83c7 -var disksize=100 -var lt_name=karpenter-lt-eks-qa01 -var iam_instance_profile=KarpenterNodeInstanceProfile-gritfy-01 -var keypair_name=jumphost-gritfy

Terraform used the selected providers to generate the following execution plan. Resource actions are
indicated with the following symbols:
  + create

Terraform will perform the following actions:

  # aws_launch_template.eks-lt will be created
  + resource "aws_launch_template" "eks-lt" {
      + arn                    = (known after apply)
      + default_version        = (known after apply)
      + ebs_optimized          = "true"
      + id                     = (known after apply)
      + image_id               = "ami-0d78302dd24db83c7"
      + key_name               = "jumphost-pp"
      + latest_version         = (known after apply)
      + name                   = "karpenter-lt-eks-qa01"
      + name_prefix            = (known after apply)
      + tags_all               = (known after apply)
      + user_data              = "IyEvYmluL2Jhc2gKc2V0IC1leApCNjRfQ0xVU1RFUl9DQT1MUzB0TFMxQ1JVZEpUaUJEUlZKVVNVWkpRMEZVUlMwdExTMHRDazFKU1VNMWVrTkRRV01yWjBGM1NVSkJaMGxDUVVSQlRrSm5hM0ZvYTJsSE9YY3dRa0ZSYzBaQlJFRldUVkpOZDBWUldVUldVVkZFUlhkd2NtUlhTbXdLWTIwMWJHUkhWbnBOUWpSWVJGUkplRTFVUVhkT2VrVXdUWHBuZUU1R2IxaEVWRTE0VFZSQmQwNVVSVEJOZW1kNFRrWnZkMFpVUlZSTlFrVkhRVEZWUlFwQmVFMUxZVE5XYVZwWVNuVmFXRkpzWTNwRFEwRlRTWGRFVVZsS1MyOWFTV2gyWTA1QlVVVkNRbEZCUkdkblJWQkJSRU5EUVZGdlEyZG5SVUpCUzBRNENtZG9RMEpRTTJaYWVsaGhNWGd3TDNsWWExUlNRemxPYjNGNGNHdFRZekZ0YW5aaWFGZ3JhMFptTTBjclVuRXZNM0ZxTkdwd1MzaG1ieXRvUmpnclF6Y0tMM2huVGpGUk5qUTVWMWRrY25GeVpGQktMMWRWZEVFNGMxRmxjRkJzWVRka1FUUXdSVVpaYW5SUGQyRnlUWGhFVlVwNFZUWkxNVGRDVG5jMlptaEZVUXA0U0ZvcldWTk1iMFY1Tm01T1ltVm1LMEZJZDJabllVRTFVMEowYTJ0S1dIZFhkWGxpZUV4c1lXRklLMjFrWVZWQ1NXOU9lbmx5VUN0aWJEVTVMeko1Q25Ob1V6UnNVVFZXYkRsNGJuRnZLMlpSVG1Wb04wUm9hbWR4TW14TlRTOUJiRGRNTmtKMU0wVjRLMGc1TkdoeFZHSnpVR295VURJMVJteEdOeTluZW5jS00zUllWVkZyZFZKTWRVZDVVVmxLU0V4Q1lqbGtibmcwTjBwMGFIWjJZeXRZVEdOQloyOTJTbGxOTUV4aVkwVkxlRFJoUVdaek1FWktTWGhxUkdGblpncEZWR2hUYzNJMVQwaHRkalJwWjJRemF6WmpRMEYzUlVGQllVNURUVVZCZDBSbldVUldVakJRUVZGSUwwSkJVVVJCWjB0clRVRTRSMEV4VldSRmQwVkNDaTkzVVVaTlFVMUNRV1k0ZDBoUldVUldVakJQUWtKWlJVWk5lRGhGWWtGeGFVUTBjVVZvTUhCWWVXb3llRlZGZVRSc1JrWk5RVEJIUTFOeFIxTkpZak1LUkZGRlFrTjNWVUZCTkVsQ1FWRkJSM1JXTlZwd2NuWlJTRXRvUlhNM1ltSlJSazVJZG14bFNHeERSMnhOTUVveVRHSlpNSEZqYlVjeGQwZHZVM1JwTWdwVWJUVnlZbU5EYW5SMFJXMVlRVlJTUVRkWVlrcHVNbWxuVTFwR2RUQmhXa3hpTW5BdldqVkhLemhrZFhWeGNtMVdNSGxIUzJabFEyMUNiRE5uWm5WWkNtUkVVRVpDY1VZNFoyOTJiSFpLYzJobFJYQTNPR0V6U0ZJNFRXeDZTVVV4YVcxME5WaHpOMjRyTUc5SlUwNVFWV2Q0VVM4dlpVUmtLMmRqT1hoSGNWWUtkRkpoWlZKQ2NXSm1ObTlpYWpWR2FsWmtiVnBPU25vd09USnNPVlZZU2pJM1ppdEVRVU51VG1rMFRVVlZUV3hFVVVoRlEyZFVZMDlSY0M5WmNEWnpRd3BFVjA5d1dGaFZZVzVHT0VJd2NtNTFVMk1yVVdsWFZtSkNkalpIUzFGaFV6UjFTV0ZOV0c1UVlUaENNbnA0YW1KUVEwWjFMMll6Wm10UlQwcFZNQ3RJQ2xBeVYyYzFiVGhLY2xOTldtcFdSRkIzYTJsS2JFUkhUWEZDZGpab1psSlhiR05SWWdvdExTMHRMVVZPUkNCRFJWSlVTVVpKUTBGVVJTMHRMUzB0Q2c9PQoKQVBJX1NFUlZFUl9VUkw9aHR0cHM6Ly9BMjcxRTUzNUM1MTJCOTJDRThDMkE1NjFDNjQ0NUFDOC5ncjcudXMtZWFzdC0xLmVrcy5hbWF6b25hd3MuY29tCgpLOFNfQ0xVU1RFUl9ETlNfSVA9MTcyLjIwLjAuMTAKCi9ldGMvZWtzL2Jvb3RzdHJhcC5zaCBxYS0wMSAtLWI2NC1jbHVzdGVyLWNhICRCNjRfQ0xVU1RFUl9DQSAtLWFwaXNlcnZlci1lbmRwb2ludCAkQVBJX1NFUlZFUl9VUkwgLS1kbnMtY2x1c3Rlci1pcCAkSzhTX0NMVVNURVJfRE5TX0lQ"
      + vpc_security_group_ids = [
          + "sg-xxxxxxxxxx",
          + "sg-xxxxxxxxxx",
        ]

      + block_device_mappings {
          + device_name = "/dev/sda1"

          + ebs {
              + iops        = (known after apply)
              + throughput  = (known after apply)
              + volume_size = 100
              + volume_type = (known after apply)
            }
        }

      + iam_instance_profile {
          + name = "KarpenterNodeInstanceProfile-gritfy-01"
        }

      + metadata_options {
          + http_endpoint               = (known after apply)
          + http_protocol_ipv6          = (known after apply)
          + http_put_response_hop_limit = (known after apply)
          + http_tokens                 = (known after apply)
          + instance_metadata_tags      = (known after apply)
        }

      + monitoring {
          + enabled = true
        }
    }

Plan: 1 to add, 0 to change, 0 to destroy.

────────────────────────────────────────────────────────────────────────────────────────────────────────────

Saved the plan to: tfplan.out

To perform exactly these actions, run the following command to apply:
    terraform apply "tfplan.out"
launchtemplate|⇒ terraform apply "tfplan.out"
aws_launch_template.eks-lt: Creating...
aws_launch_template.eks-lt: Creation complete after 2s [id=lt-0d56e9c204f8d5694]

Apply complete! Resources: 1 added, 0 changed, 0 destroyed.
Remember, we are going to use the launch template name lt_name within our provisioner.
Now the launch template is ready. we can use this launch template in our provisioner.
TAG the Subnets for the Provisioner
Now we have the launch template with the necessary information already configured like security_group ids and IAM roles etc.
Now, we need to pass the subnet IDs to Karpenter
How to identify the Subnets being used in my existing cluster
You can easily find the subnets of your existing cluster by checking the network settings of the currently running worker machine ( Since its a existing cluster)
We can use the following AWS CLI commands to find out the subnets which are currently being used
First List down the node groups of your existing EKS cluster with the following command
# aws eks list-nodegroups – cluster-name dev-01
From the result of the previous command choose one of the returned node groups and describe it like below to get to the subnets
aws eks describe-nodegroup – cluster-name dev-01 – nodegroup-name <nodegroup-name> – query 'nodegroup.subnets' – output text
Here is the execution output of these commands, when executed at my end

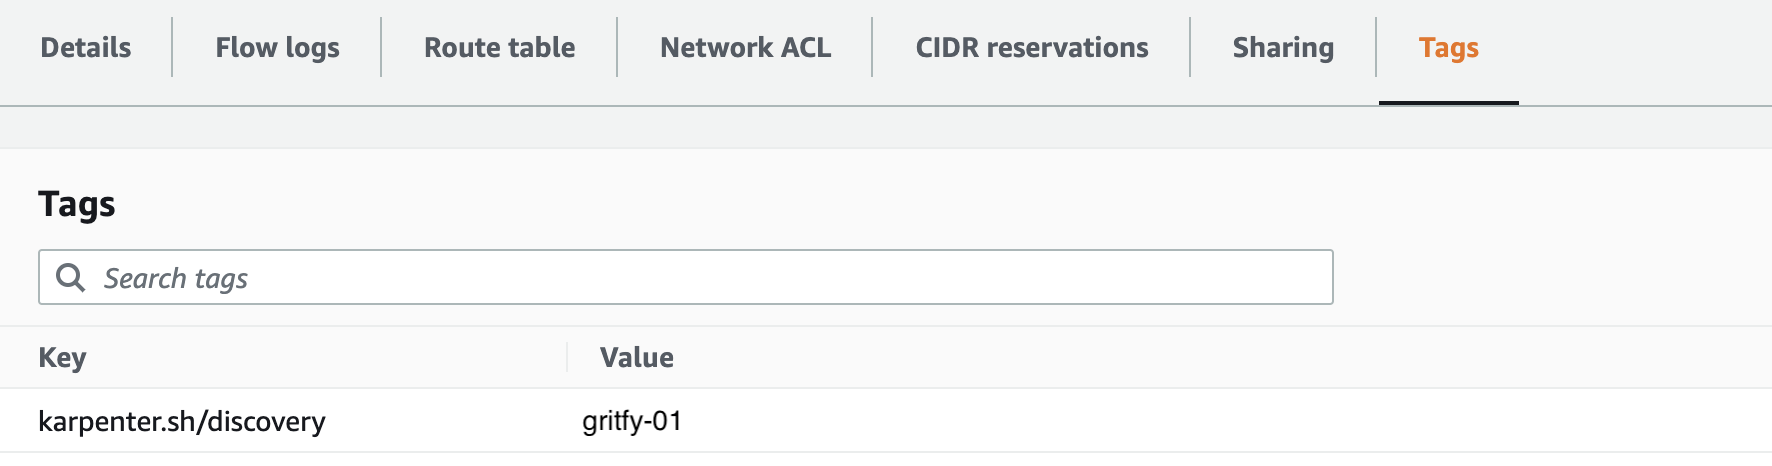
You can tag these subnets manually or choose to tag either few of them based on the free IP availability
Once you have decided on the subnets, you can use the aws cli command to tag them all
aws ec2 create-tags \
    – tags "Key=karpenter.sh/discovery,Value=${CLUSTER_NAME}" \
    – resources subnet-ids
Or you can manually tag them on the AWS Management console.
karpenter.sh/discovery : cluster_name
Here is the snapshot taken at my end with a similar tag and my cluster name gritfy-01
You can use the following one-liner shell command to find and tag all the existing subnets of your EKS cluster
for NODEGROUP in $(aws eks list-nodegroups – cluster-name ${CLUSTER_NAME} \
    – query 'nodegroups' – output text); do aws ec2 create-tags \
        – tags "Key=karpenter.sh/discovery,Value=${CLUSTER_NAME}" \
        – resources $(aws eks describe-nodegroup – cluster-name ${CLUSTER_NAME} \
        – nodegroup-name $NODEGROUP – query 'nodegroup.subnets' – output text )
done
Quick Recap
- We have set environment variables in our terminal with the cluster properties
- Created IAM instance role with Cloud Formation Template
- Created IAM Identity Mapping - Adding Entry to aws-auth config map
- Service Account creation with IAM role - IRSA
- Installed Karpenter using Helm Chart
- Discussed what Karpenter Provisioner is and why we need a Custom Launch template
- Collected the Cluster config data and Security group for the Launch template Creation
- Created Launch template using Terraform and with the data collected in the previous step
- Identify the existing Subnets (or) create new ones and TAG them for the provisioner to find and use it
These are the steps we have accomplished so far in our article and now we have everything in order for us to do our final step, creating the provisioner
Unlike the Cluster Auto Scaler, We have a special controller named Karpenter provisioner which takes care of launching the nodes as per demand using our Custom Launch template and the Subnets
with no further ado, let us create our provisioner
Creating the Provisioner
In the beginning, we have seen a default provisioner manifest file, It had minimal configuration required for the provisioner
But we chose to use custom Launch templates as we had reasons.
Now here is our modified provisioner YAML configuration file
apiVersion: karpenter.sh/v1alpha5
kind: Provisioner
metadata:
  name: default
spec:
  limits:
    resources:
      cpu: 2k
  provider:
    apiVersion: extensions.karpenter.sh/v1alpha1
    kind: AWS
    launchTemplate: karpenter-lt-eks-qa01
    subnetSelector:
      karpenter.sh/discovery: gritfy-01
  requirements:
  - key: karpenter.sh/capacity-type
    operator: In
    values:
    - spot
  - key: kubernetes.io/arch
    operator: In
    values:
    - amd64
  ttlSecondsAfterEmpty: 30
Let us decode this file to understand it better
- kind - to define what kind of definition it is, it is a provisioner
- metadata.name - what is the name of provisioner
- spec
- limits.resources.cpu - maximum number of CPUs Karpenter can create ( you can also use memory in here)
- provider
- apiVersion - version of the karpeter definition
- kind - AWS provider ( Karpenter have future plans to extend to other cloud providers)
- launchTemplate - we are defining the name of the launch template we have created earlier in our article
- subnetSelector - Since we have not hardcoded the subnet into the launch template and tagged them manually, we are defining what
tagsit should look for to find the right subnet. If you remember, we tagged the subnets earlier withkarpenter.sh/discovery: cluster-name
- requirements
- key: karpenter.sh/capacity-type defining our requirements for the node, should it be spot or on-demand instance etc
- key: kubernetes.io/arch defining what OS architecture that Karpenter can provision like
amdorarmremember sometimes if you choose the architecture wrong or use both of them on the same cluster. Daemonsets and pods with specific OS architecture requirements might fail. you have to choose it right. Mostly it would beamd
Note*: Provisioner do provide various options to further customize your workload and requirements, Please refer to this provisioner documentation and write your own if you need to use the full potential of Karpenter
Now go ahead and apply this provisioner by saving this into some file named yaml or by copying the following heredoc shell command
$ cat <<EOF | kubectl apply -f -
apiVersion: karpenter.sh/v1alpha5
kind: Provisioner
metadata:
name: default
spec:
limits:
resources:
cpu: 2k
provider:
apiVersion: extensions.karpenter.sh/v1alpha1
kind: AWS
launchTemplate: karpenter-lt-eks-qa01
subnetSelector:
karpenter.sh/discovery: gritfy-01
requirements:
- key: karpenter.sh/capacity-type
operator: In
values:
- spot
- key: kubernetes.io/arch
operator: In
values:
- amd64
ttlSecondsAfterEmpty: 30
EOF
Now once you have applied it either by yaml file or by the heredoc.
You should see the Karpenter provisioner listed when you execute the following kubectl command
$ kubectl get provisioner default
Now your provisioner is ready
Karpenter is now active and ready to begin provisioning nodes. Create some pods using a deployment, and watch Karpenter provision nodes in response.
Validating Karpenter Logs
Now you must be able to see Karpenter pods running in a dedicated namespace called karpenter
Check if the pods are running and their names.
kubectl get pods -n karpenter
Once you know the karpenter POD names, check the logs
kubectl logs <pod-name> -n karpenter -c controller
Remember we spoke earlier that karpenter has a multi-container setup
- controller - which controls and manages the scheduling
- webhook - to keep the configuration in Sync with API server
here in the preceding command, we are checking controller logs by mentioning -c controller in the kubectl logs command
Remove Cluster Auto Scaler
Now that karpenter is running we can disable the cluster autoscaler. To do that we will scale the number of replicas to zero.
To get rid of the instances that were added from the node group we can scale our nodegroup down to a minimum size to support Karpenter and other critical services. We suggest a minimum of 2 nodes for the node group.
Note: If your workloads do not have pod disruption budgets set, the following command will cause workloads to be unavailable.
If you have a lot of nodes or workloads you may want to slowly scale down your node groups by a few instances at a time. It is recommended to watch the transition carefully for workloads that may not have enough replicas running or disruption budgets configured.
Conclusion
In this lengthy article, I have tried to cover my experience and how did I implement Karpenter in our existing EKS cluster and migrated from Cluster Auto Scaler.
If you have any questions or need additional clarifications anywhere, please do reach out to me in the comments. I will try to help.
Cheers
Sarav AK

Follow me on Linkedin My Profile Follow DevopsJunction onFacebook orTwitter For more practical videos and tutorials. Subscribe to our channel
Signup for Exclusive "Subscriber-only" Content