In this article, we are going to see how to create internal and external load balancers using the Kubernetes service on EKS
When we think about making an application or deployment available externally or internally over a Domain name
We think of Kubernetes Ingress but that's not the only way to expose your service.
There are three ways to make service available externally ( Irrespective of External or Internal Load balancer )
Three Ways to expose a Service through AWS Load Balancer
Setting the Service type to Nodeport
services that need to be exposed to the outside world can be configured with the node port. In this method, each cluster node opens a port on the node itself (hence this name was given ) and redirects traffic received on that port to the underlying service
You can add the selective machines/nodes into a Target group of existing or new Load Balancers.
The target group would be using NodePort as the target port
Setting the Service type to Loadbalancer ( Discussed in this article )
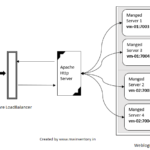
an extension of the NodePort type—This makes the service accessible through a dedicated load balancer, provisioned from the cloud infrastructure Kubernetes is running on.
The load balancer redirects traffic to the node port across all the nodes. Clients connect to the service through the load balancer’s IP.
In this type Load Balancer Creation and Targetgroup creation would all be done automatically.
In the case of EKS Cluster LB Controller would take care of that job. Which needs to be manually installed and set up.
Creating an Ingress resource ( Not covered in this article )
A radically different mechanism for exposing multiple services through a single IP address. It operates at the HTTP level (network layer 7) and can thus offer more features than layer 4 services can. that's what we are going to see in this article. It is more like AWS Application Load Balancers.
We are not going to cover Ingress in this article. we have a dedicated article for K8s ingress. you can refer
In this article we are going to use only Service and with a type of Load Balancer.
Setting the Service type to LoadBalancer does not automatically create the load balancer for you.
For EKS to be able to create a Load Balancer, it needs to have certain configurations and Service accounts created.
To facilitate EKS to create and manage AWS Load Balancers. we need to deploy an additional controller named AWS LB Controller which was earlier known as AWS Ingress controller.
Installing AWS LB Controller add on to EKS
Here are the quick installation and configuration steps to install AWS LB Controller on your EKS Cluster.
We presume you have installed EKS Cluster already.
if you have not created it yet. Refer to this article to create EKS Cluster to Karpenter Autoscaling - Terraform
To manage your existing EKS Cluster, AWS provides a CLI named eksctlwhich you can download/install from here.
eksctl can make use of your awscli profiles for authentication and to communicate to your AWS account.
Enabling OIDC in our EKS Cluster
let us begin with enabling OpenID Connect(OIDC) in our EKS Cluster. this lets our IAM roles be associated directly with Kubernetes service accounts.
It is a new feature where you can associate IAM roles with your Kubernetes Service accounts directly. Read more about it here
⇒ eksctl utils associate-iam-oidc-provider \
    – region us-east-2 \
    – cluster gritfyeks \
    – approve
Creating IAM Policy
Once we have enabled the OIDC in our EKS cluster. we can go ahead and download the iam_policyconfiguration needed to be created.
You can directly download it using curl
⇒ curl -o iam_policy.json https://raw.githubusercontent.com/kubernetes-sigs/aws-load-balancer-controller/v2.2.0/docs/install/iam_policy.json
Content of the iam_policy.json file available in Github if you would like to directly copy
Now you can use this json file to create your iam policy using aws iam create-policycommand
⇒ aws iam create-policy \
    – policy-name AWSLoadBalancerControllerIAMPolicy \
    – policy-document file://iam_policy.json
Creating IAM Service Account and Attach the Policy
Now it's time to create an iamserviceaccount in our EKS cluster. we are going to use eksctl for the same.
you need to update the clustername and region before trying this out
this creates a service account named aws-load-balancer-controllerin kube-system namespace and this service, account is associated with IAM policy we created earlier.
You might have to just change the following things before running the command
- ClusterName
- Policy ARN - ( Just AWS Account Number is enough)
- AWS account Region
⇒ eksctl create iamserviceaccount \
--cluster ${YOUR_CLUSTER_NAME} – region ${YOUR_AWS_REGION} \
--namespace kube-system \
--name aws-load-balancer-controller \
--attach-policy-arn arn:aws:iam::${YOUR_AWS_ACCOUNT_NUMBER}:policy/AWSLoadBalancerControllerIAMPolicy \
--override-existing-serviceaccounts \
--approve
Now we have the necessary service accounts and OIDC in place. Now we can go ahead and deploy the aws-load-balancer-controller using helm
Installing AWS load balancer controller in EKS with Helm
If you do not have helm installed in your local system. Please install it before continuing. you can find more information about helm here
Let us begin with adding the necessary charts and repository to helm
# helm repo add eks https://aws.github.io/eks-charts
# helm repo update
Once you have executed the helm repo add and helm repo update
you are good to install the aws-load-balancer-controller
⇒ helm install aws-load-balancer-controller eks/aws-load-balancer-controller \
  -n kube-system \
  – set clusterName=${Your Cluster Name} \
  – set serviceAccount.create=false \
  – set serviceAccount.name=aws-load-balancer-controller
Once the helm chart is successfully deployed. we can verify by listing the aws-load-balancer-controller deployment on the kube-system namespace
⇒ kubectl get deployments aws-load-balancer-controller -n kube-system
NAME READY UP-TO-DATE AVAILABLE AGE
aws-load-balancer-controller 2/2 2 2 56s
Once you have validated that the deployment is present and LIVE. Now we can move on to the next phase of this article.
We are going to deploy and test some sample applications in our EKS Cluster.
This is the Image or Application we are going to deploy.
Docker Tomcat Example - Dockerfile for Tomcat, Docker Tomcat Image
Creating a new deployment in EKS Cluster
To test the load balancer we. need to first deploy some applications to the Kubernetes cluster.
I have taken our famous aksarav/tomcat8 image and deployed it to the cluster with the following single line command
⇒ kubectl create deployment tomcatinfra – image=saravak/tomcat8
deployment.apps/tomcatinfra created
But in real-time you would ideally be creating a deployment with YAML with much more customizations
Since our objective is to test the load balancer with EKS am fastening this with single line deployment creation
Now the deployment is created. The next stage is where the Load Balancer is going to be created.
Creating AWS EKS Load Balancer External - from K8s Service
Now we need to expose our application as a service. To keep things simple we are going to use one-liner commands for this
⇒ kubectl expose deployment tomcatinfra – port=80 – target-port=8080 – type LoadBalancer
  service/tomcatinfra exposed
when you run the kubectl expose command with your deployment name and the port. Service would be auto-created
Here is the YAML file of the service, if you do not want to use the one-liner command
apiVersion: v1
kind: Service
metadata:
  name: tomcatappsvc
spec:
  ipFamilies:
  - IPv4
  ipFamilyPolicy: SingleStack
  ports:
  - name: http
    port: 80
    targetPort: 8080
  selector:
    app: tomcatinfra
  type: LoadBalancer
As you can see, We are also defining what type of service has to be created using --type LoadBalancer in both formats
If all configurations are in place and done right. You would be able to see that a new Load Balancer is created

By default when you expose a service. it would become a publicaly available load balancer. In order to make it private we need to special annotations. Will get there.
For now, we have tested how to create an External Load Balancer with aws-load-balancer-controller and expose our deployment as a service
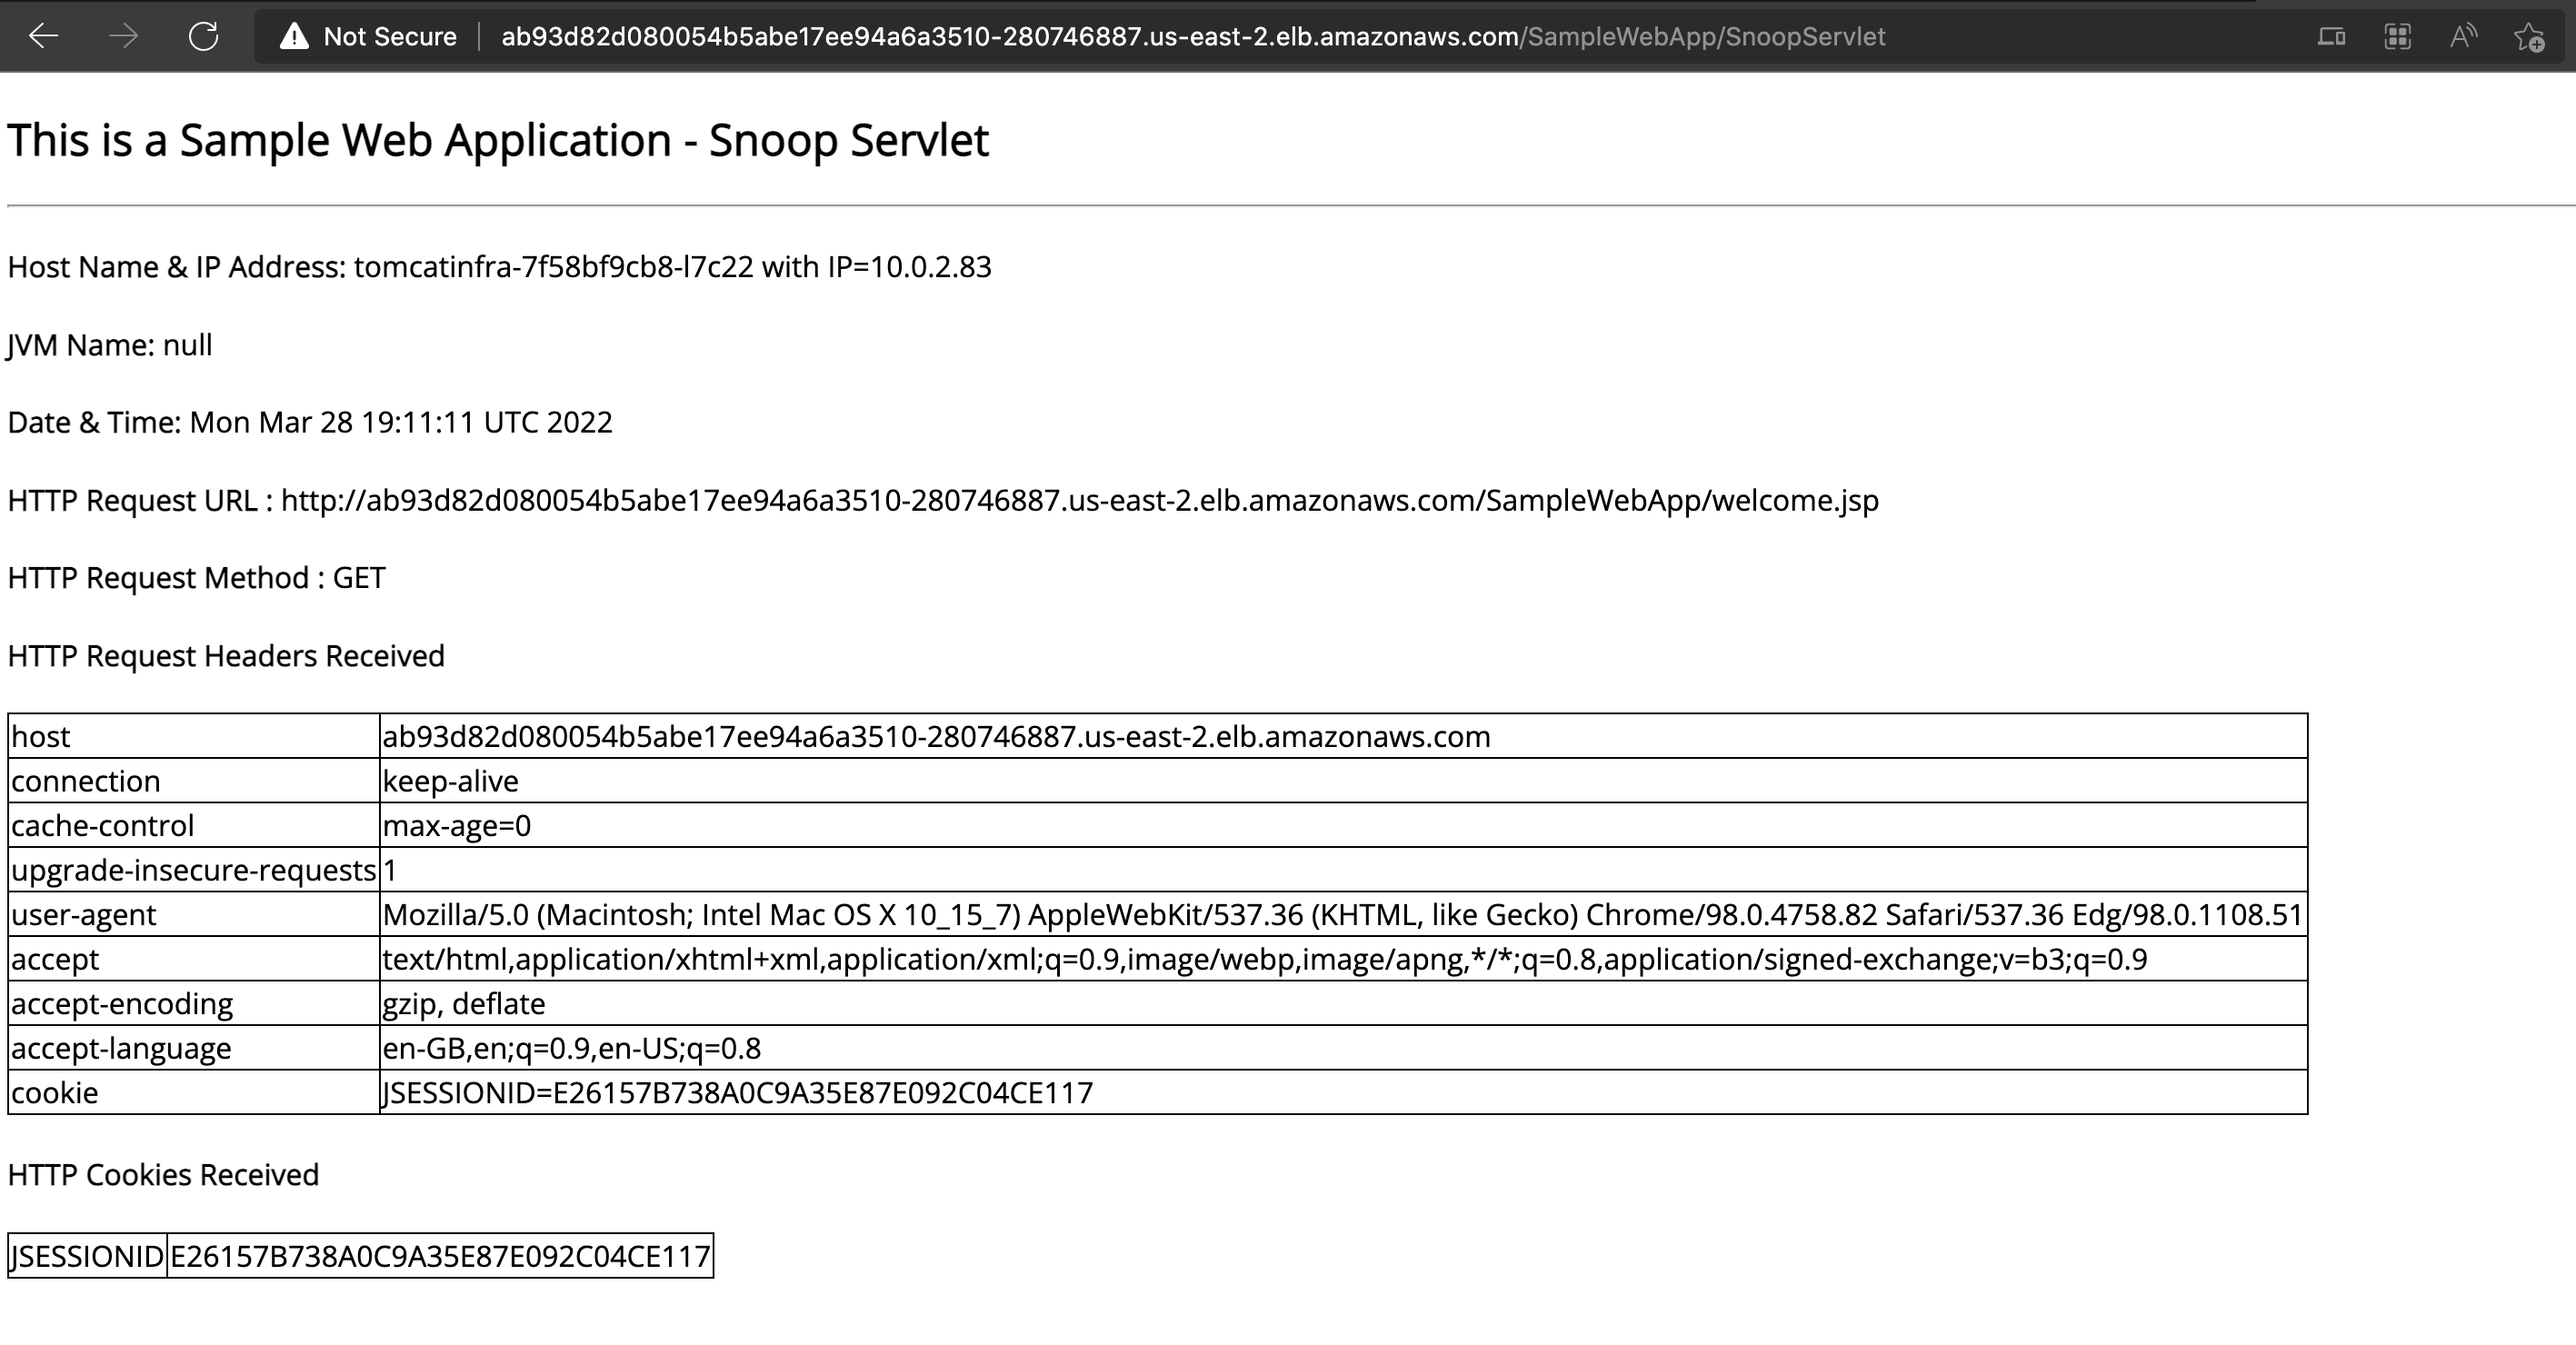
Now let us access our application to validate if it is accessible
Creating EKS Network Load Balancer Internal - from K8s Service
We have seen how to create an external load balancer with service. we have used a one-liner command to expose our deployment.
It has created the External Load Balancer automatically.
Now we are going to see how to create Internal Load Balancer with Service.
By default when you create a service it would expose the load balancer to the public. but this can be controlled using certain annotations
Let us take a look at the YAML file we are going to use to create our service.
As Classic Load Balancer is going to be deprecated shortly by AWS. I have chosen NLB. So we are now going to create internal network load balancer with EKS
apiVersion: v1
kind: Service
metadata:
  annotations:
    service.beta.kubernetes.io/aws-load-balancer-internal: "true"
    service.beta.kubernetes.io/aws-load-balancer-scheme: internal
    service.beta.kubernetes.io/aws-load-balancer-type: nlb
spec:
  ipFamilies:
  - IPv4
  ipFamilyPolicy: SingleStack
  ports:
  - name: http
    port: 80
    targetPort: 8080
  selector:
    app: tomcatinfra
  type: LoadBalancer
Our deployment is still the same as we have used in the last example.
kubectl create deployment tomcatinfra – image=saravak/tomcat8
This is a simple Tomcat Application that exposes a port 8080 in our service that's the target port and our Service Load balancer is going to listen on port 80
TargetPort should always point to the application exposed port. 80 => 8080
Now let us create the service using this YAML file and validate.
kubectl apply -f internalservice.yml
here is a quick video record of me applying this YAML file in my EKS cluster.

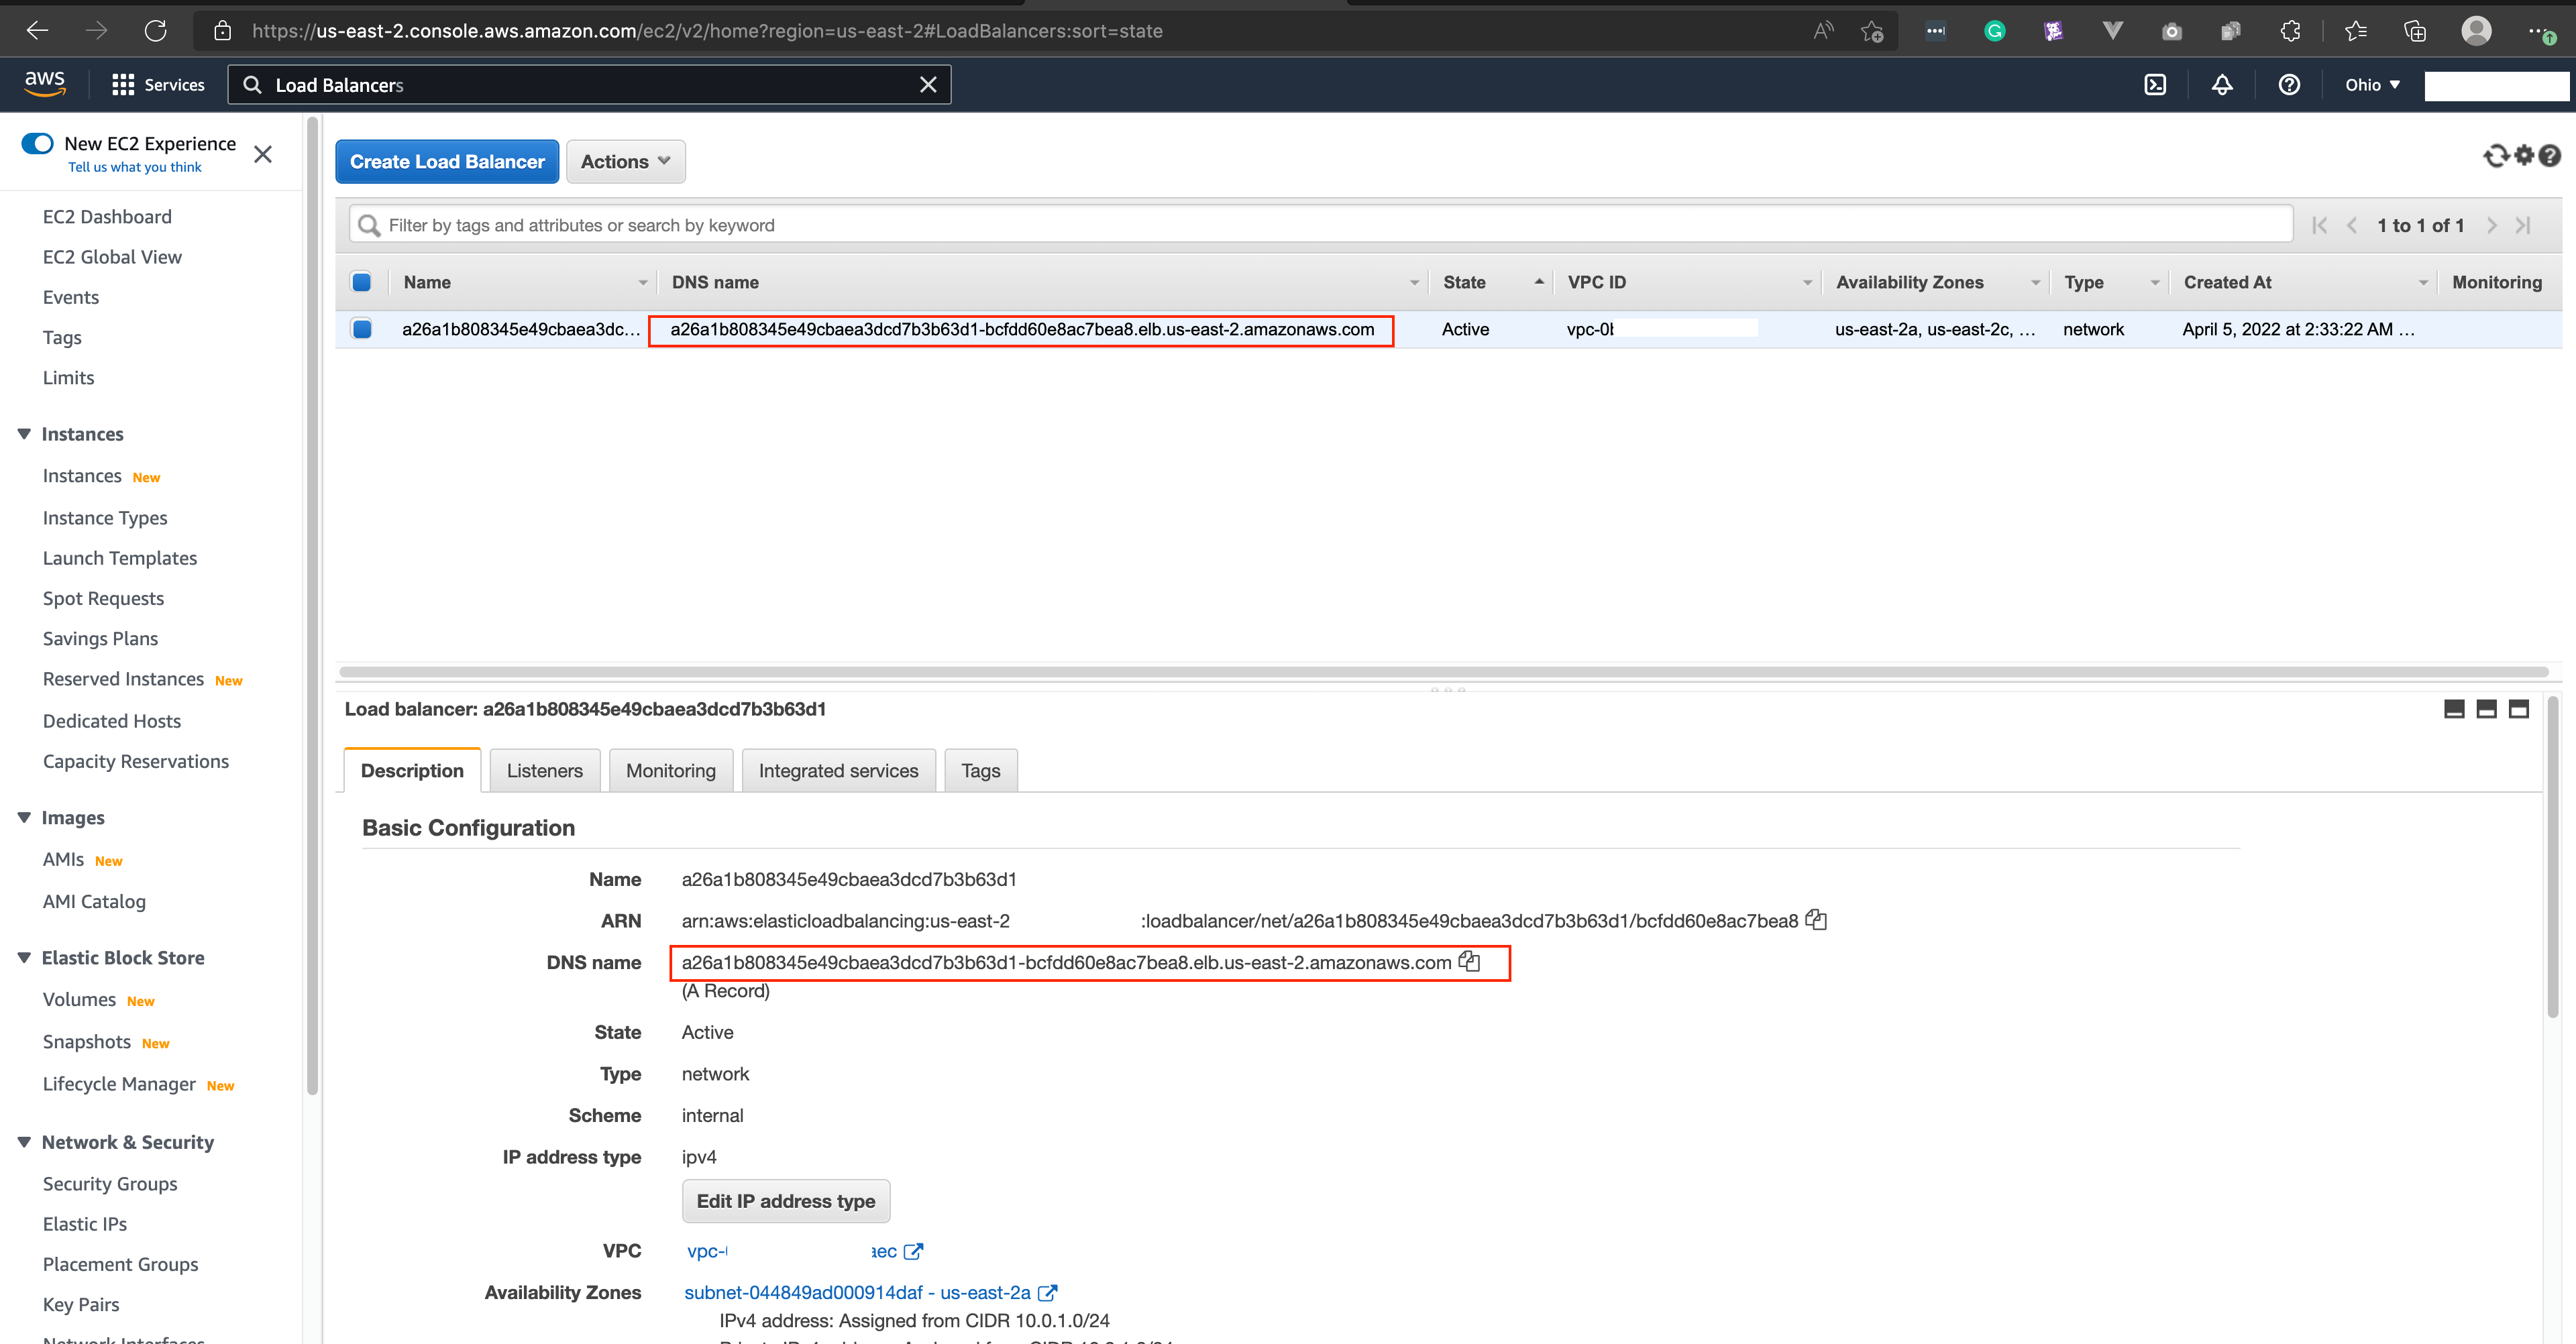
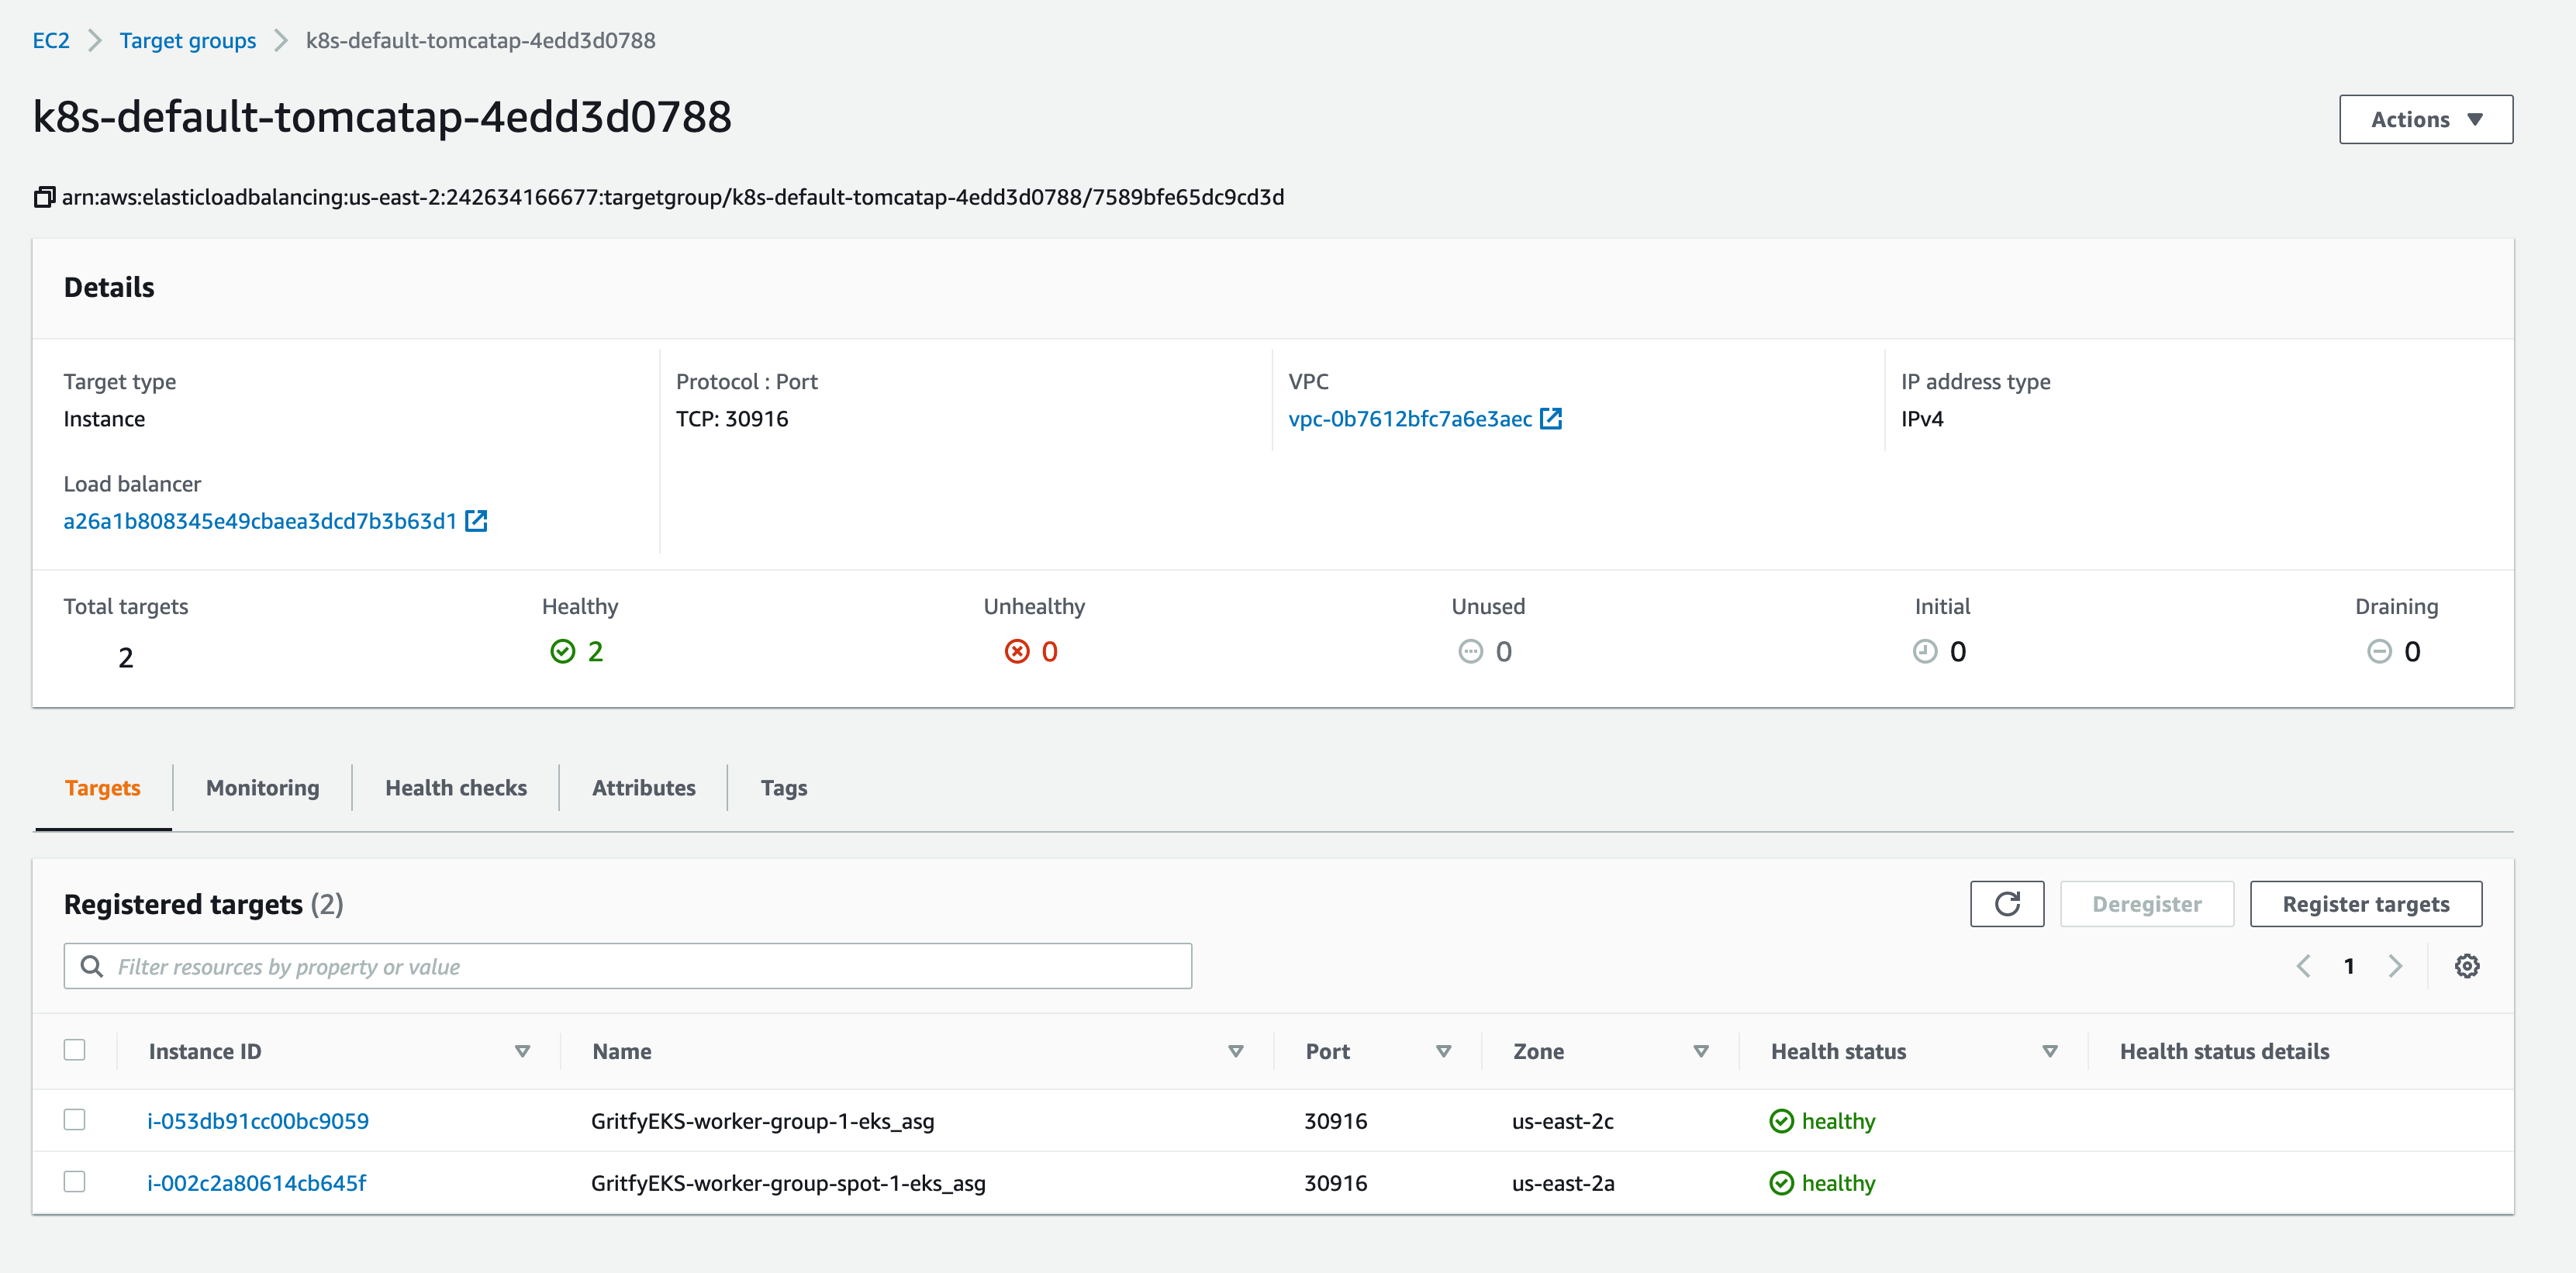
As you have seen in the screen record the internal Load Balancer was created.
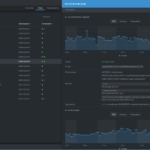
Here are some more screenshots I have taken from the AWS console for the Load Balancer
As you can see a new network Load Balancer has been created and the schema is set to internal
It means we have successfully created an internal load balancer using LB Controller
Since this is an internal load balancer, you have to be present within the VPC internal network to be able to access this.
If you have VPN servers. that's the best way to connect to the internal network
Otherwise, you can launch a machine on the VPC and try to access it from there. that's what am going to do
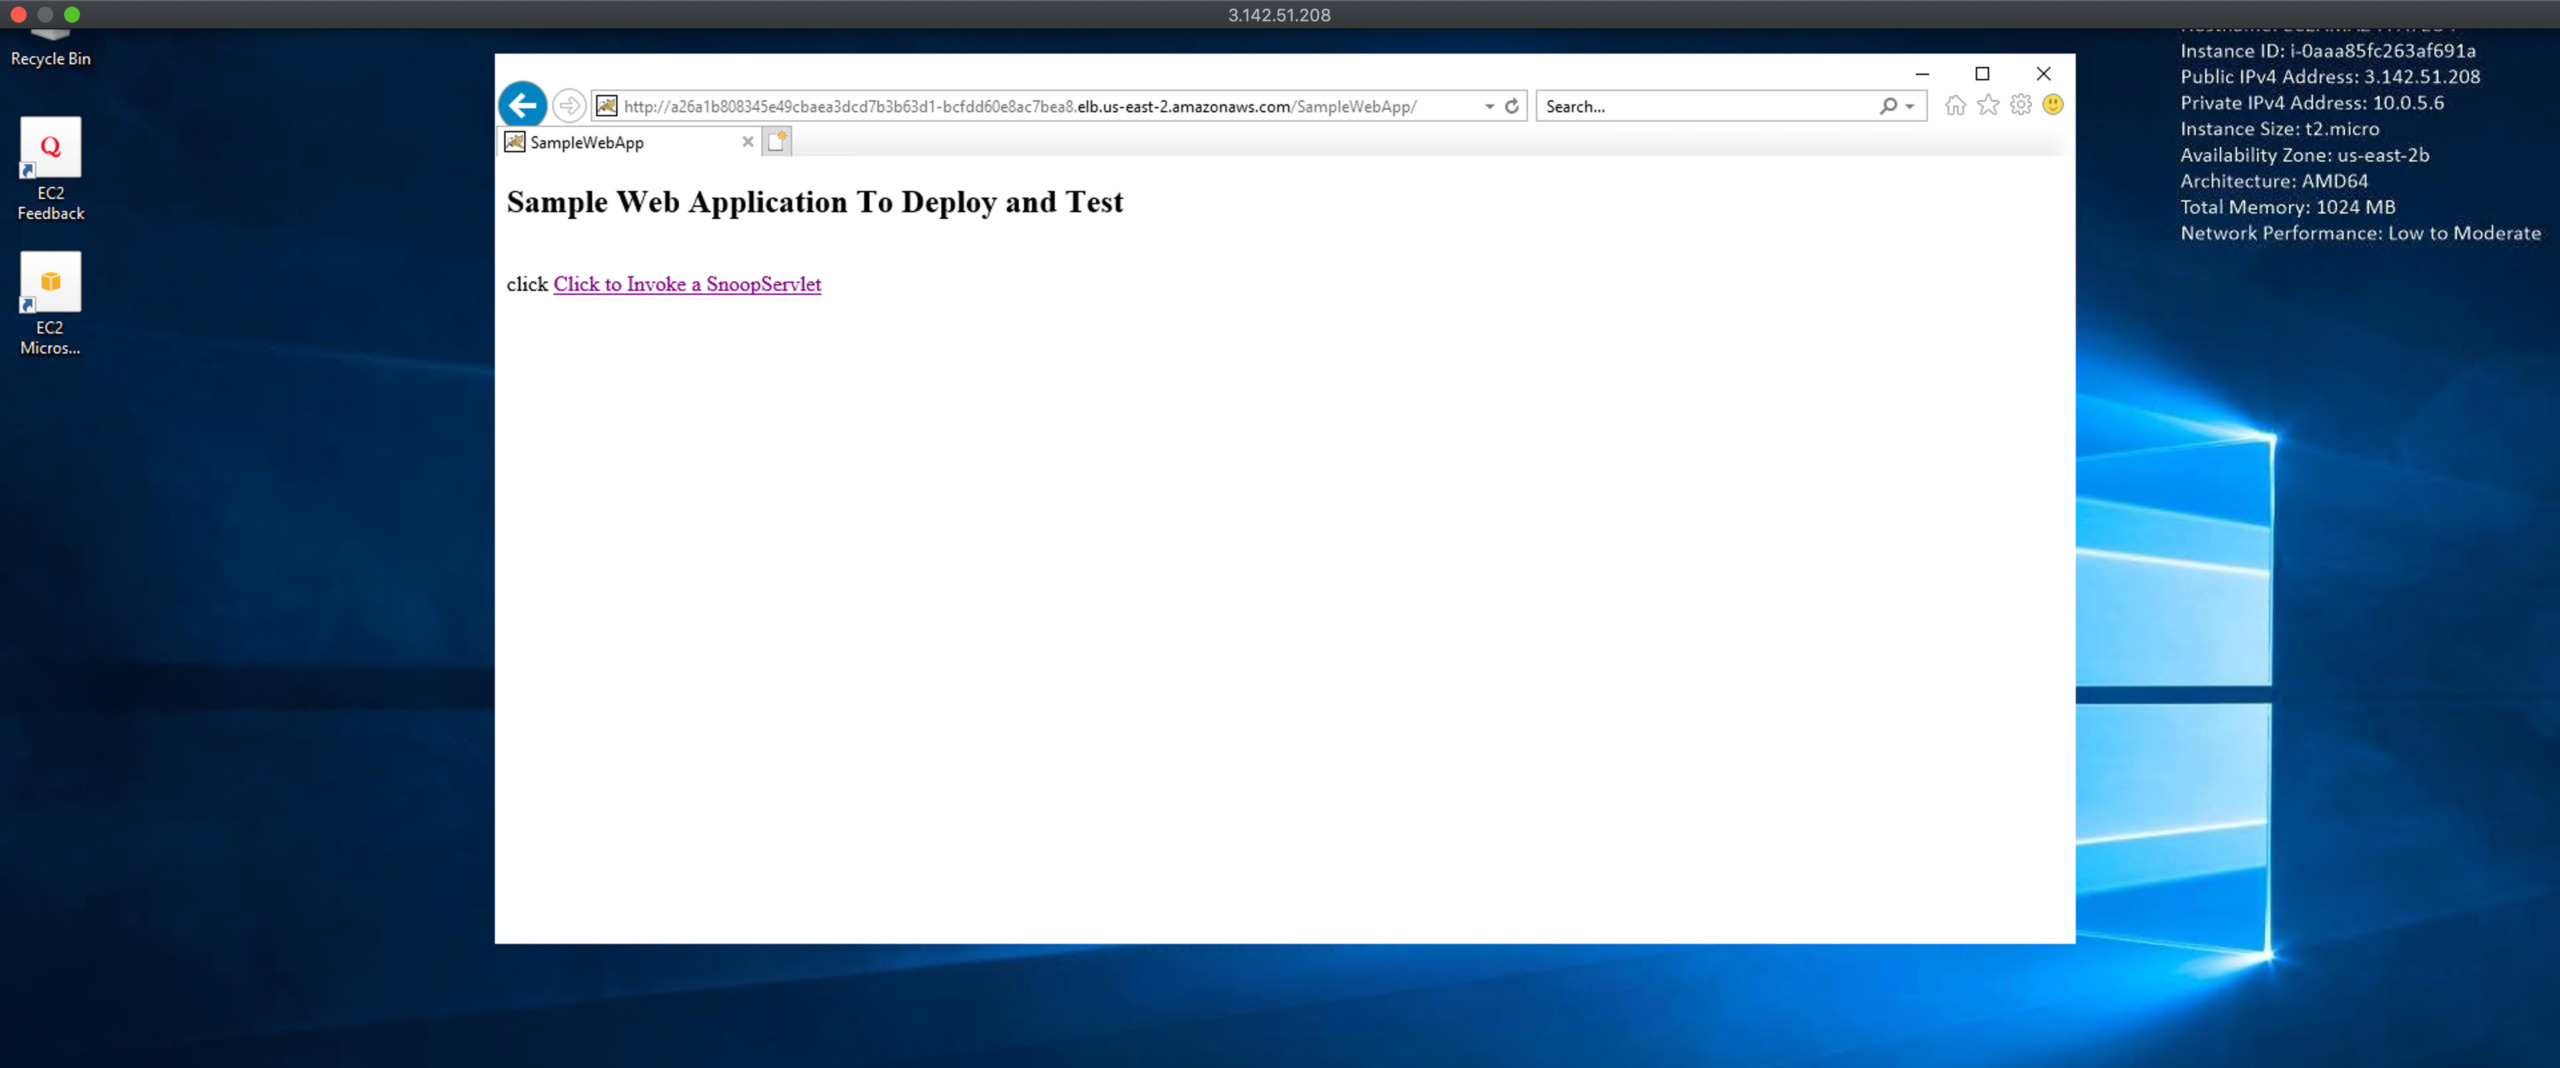
I launched a new Windows server on the same VPC we have created manually and going to test this Load balancer from there
You can see that the URL is available and accessible from the windows server launched on the same VPC but not externally.
The only difference between the external load balancer creation and internal load balancer creation is the annotation we are setting.
There are more Annotations available which you can explore List of EKS Load Balancer Annotations
More Annotations to Customize the LoadBalancer Creation
We have used only a few annotations which are necessary for making the LB an internal Load Balancer.
I know there are more options to configure/customize during the LB creation and there are more annotations available as well.
Here are some things you can customize and control using Annotations.
- Healthcheck attributes
- Enabling Access log
- Adding SSL Certificate and TLS Listener to your NLB
Find the complete list of LoadBalancer Annotations for EKS here
Conclusion
In this article, we have seen how to create Internal and external load balancers using LB Controller on EKS.
We also have installed the LB Controller on our EKS Cluster and deployed a sample application and exposed it as a service and created an internal network load balancer and external Load balancer.
We also validated the internal NLB with a machine created and available on the local VPC.
If you have any questions. please do let me know on the comments section
For any professional support reach us at [email protected]
Thanks
Sarav

Follow me on Linkedin My Profile Follow DevopsJunction onFacebook orTwitter For more practical videos and tutorials. Subscribe to our channel
Signup for Exclusive "Subscriber-only" Content