In this article, we will learn in detail how to exec shell commands on the container or pod using kubectl.
We will learn how to execute bash or any shell commands using kubectl and exec any command into a container or pod
Let us start,
Before we begin, all the examples am going to execute today/in this article are based on the tomcat docker image we published earlier
To stay in sync with me, follow this article and create some sample namespace and single container and multi-container deployments/pods.
Create a single container, multi container deployments - For testing
Before we begin, I have two deployments one with a single container in a pod and another with a sidecar container ( one main + one sidecar)
When dealing with PODs with multiple containers, you need to specify which container you want to execute the command into.
We will see examples of kubectl exec with both single container pod and multi container pod
We have two deployments as represented in the following image.
- tomcat-nginx - multi container deployment ( sidecar)
- tomcatinfra - single container deployment

To stay in sync with me, you can do the same setup by executing the following commands
First, let us create a namespace, I am creating a new namespace named test-ns
$ kubect create namespace test-ns
Creating a Single Container deployment
$ kubectl create deployment tomcatinfra – image=saravak/tomcat8 -n test-ns
Creating a Multi Container deployment
$ kubectl create deployment tomcat-nginx – image=saravak/tomcat8,nginx -n test-ns
Validating the deployments
$ kubectl get deployment -n test-ns
NAME           READY   UP-TO-DATE   AVAILABLE   AGE
tomcat-nginx   1/1     1            1           31s
tomcatinfra    0/1     1            0           8s
Validating the pods
$ kubectl get pods -n test-ns
NAME                            READY   STATUS    RESTARTS   AGE
tomcat-nginx-78d457fd5d-446wx   2/2     Running   0          2m14s
tomcatinfra-7f58bf9cb8-bk654    1/1     Running   0          111s
To get the list of containers in each pod with nice formatting ( Note you might need JQ and awk be installed for this command to work)
$ kubectl get pod -o "custom-columns=PodName:.metadata.name,Containers:.spec.containers[*].name,Image:.spec.containers[*].image" -n test-ns

PodName                         Containers      Image
tomcat-nginx-78d457fd5d-446wx   tomcat8,nginx   saravak/tomcat8,nginx
tomcatinfra-7f58bf9cb8-bk654    tomcat8         saravak/tomcat8
Here is the terminal record of me doing the same steps
Kubectl exec command syntax
This is the syntax of the kubectl exec command.
The syntax is a little self-explanatory, we will see more examples so that you would understand this even better.
kubectl exec (POD | TYPE/NAME) [-c CONTAINER] [flags] – COMMAND [args...] [options]
One thing you might have noticed is that double dash (--), It is intentionally kept to separate the arguments you want to pass to the command from the kubectl arguments.
Let's suppose you want to pass some complicated commands like ls -lrt |awk '{print $9}' that time this would be really helpful.
With that said, let us move on to the examples.
Kubectl exec examples
We have listed various examples of kubectl exec here. you can refer to them and let us know in the comments section for more or any feedback.
All my commands are executed on the local namespace we have created and I have two pods
- tomcatinfra-7f58bf9cb8-bk654 - Single Container POD
- tomcat-nginx-78d457fd5d-446wx - Multi Container POD
Kubectl exec into pod - Executing commands inside POD
Now let us see how to execute a shell command into a pod using kubectl exec.
As we have already mentioned If it is a single container pod, you do not have to mention the container name with -c
If it is a multi-container pod. you need to mention which container, the command should be executed using -c
Note*: In a multi container pod, if you are not mentioning the desired container name, the first container would be taken by default.
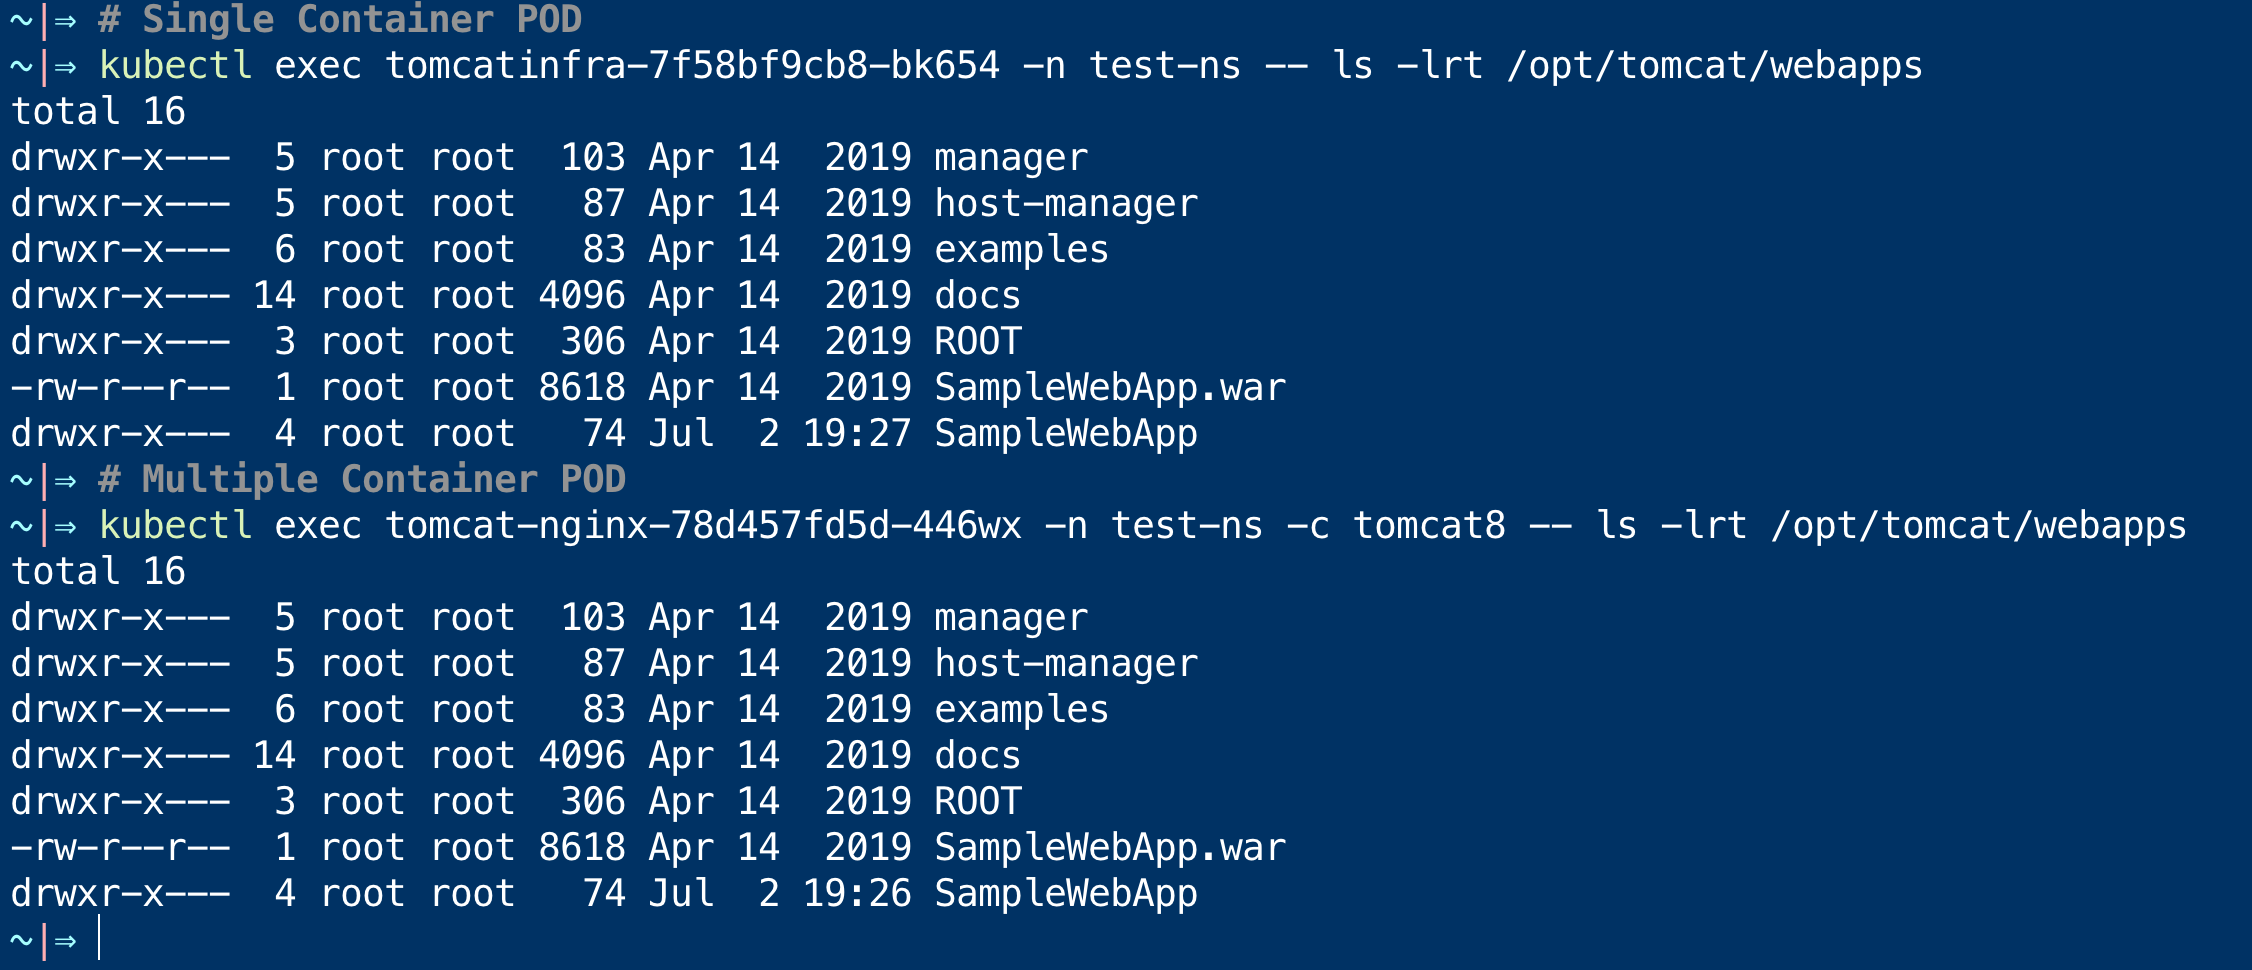
Now we are going to execute some Linux commands on a Single container pod first.
Let us execute a simple ls -lrt command
$ kubectl exec tomcatinfra-7f58bf9cb8-bk654 -n test-ns – ls -lrt /opt/tomcat/webapps
Now let us execute the same command on the Multi Container pod.
As we mentioned earlier, we need to use -c to specify the container name. In our case -c tomcat8
$ kubectl exec tomcat-nginx-78d457fd5d-446wx -n test-ns -c tomcat8 – ls -lrt /opt/tomcat/webapps
Here is the snapshot of the execution
Now we have learnt how to execute a command into a container on the pod.
In multi container pod if you are not specifying the container name with option -c it would default to the first container
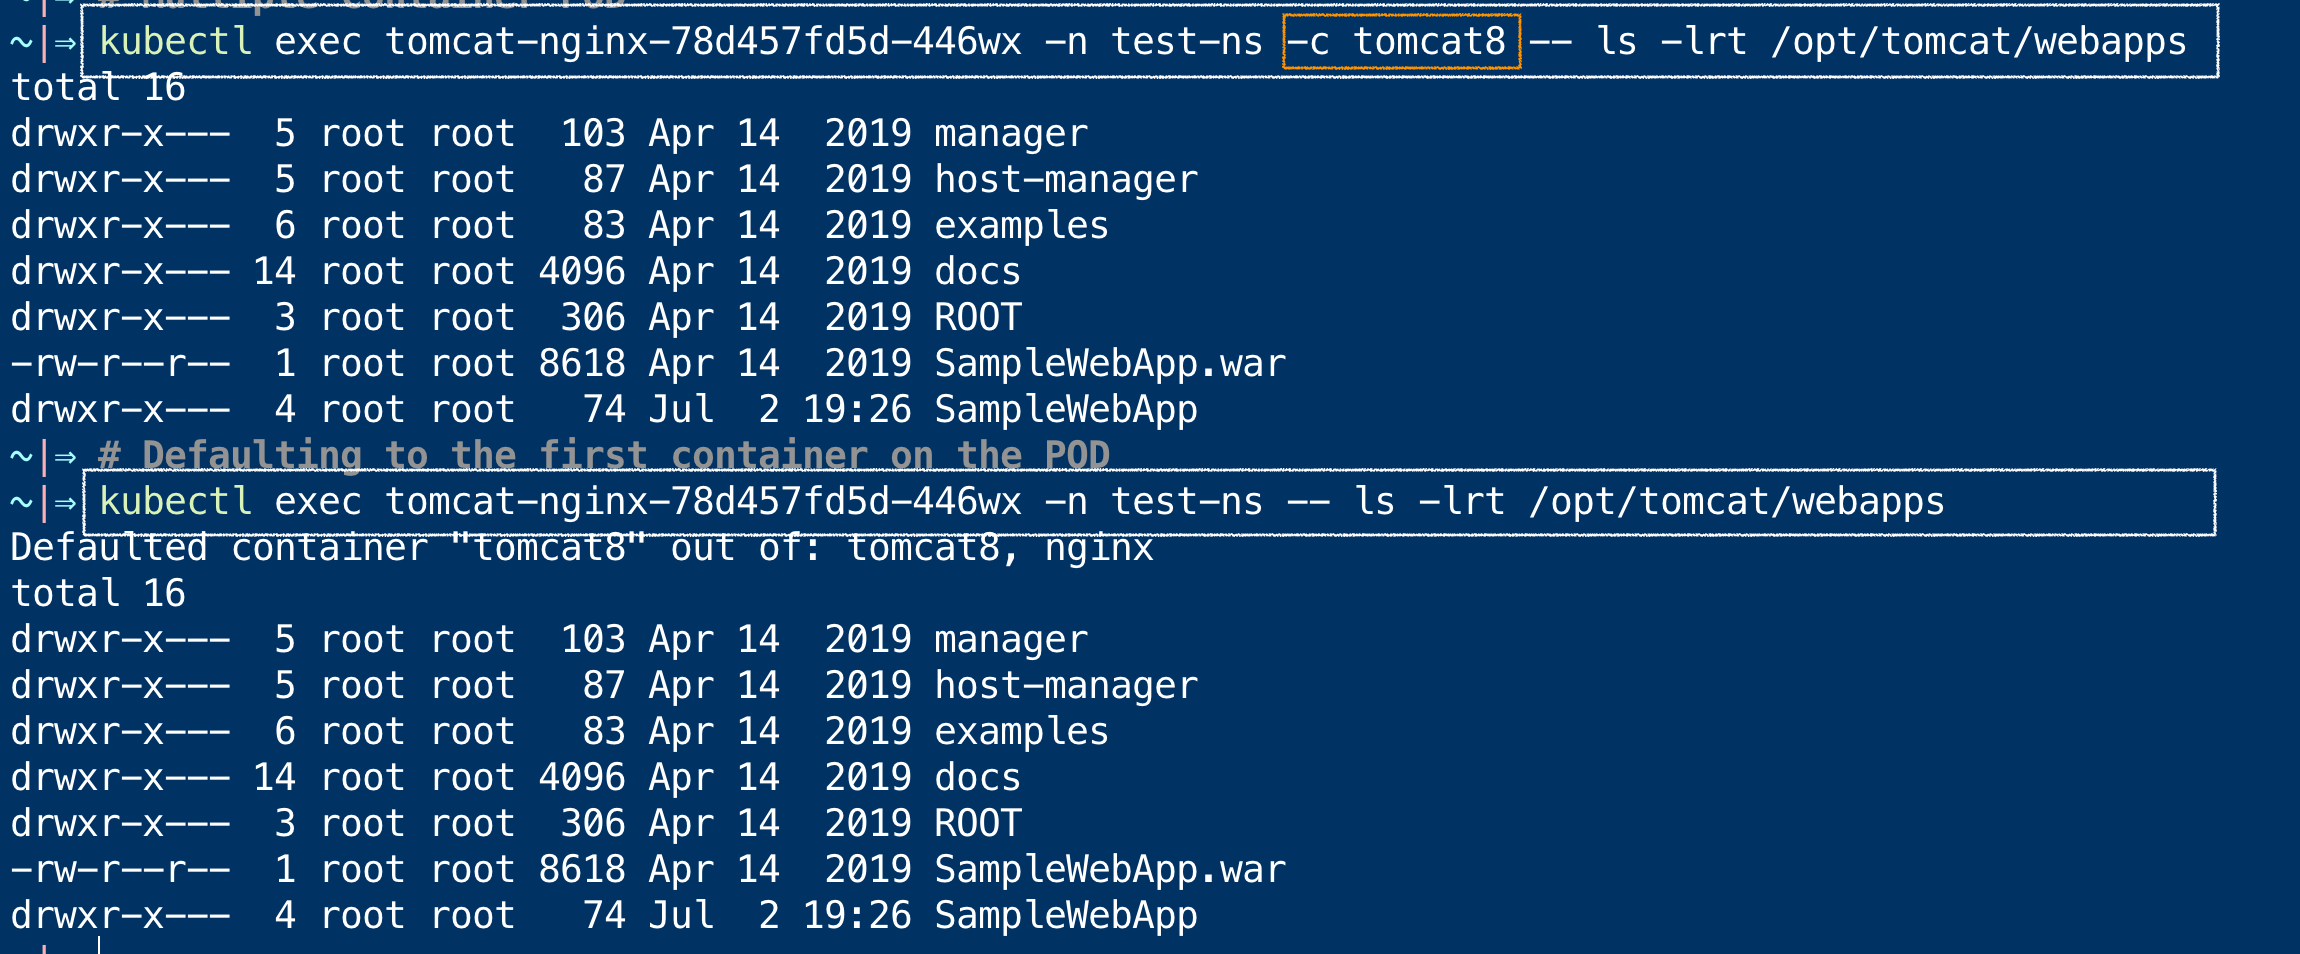
In the preceding snapshot. you can see if you are not using the -c it would be defaulting to the first container. It would also print a message Defaulted Container
Running Complex Shell commands with Kubectl exec
As we have seen earlier, anything after the double dash -- would be considered as a shell command and passed to the container
so you would be able to execute any complex shell commands with | pipes and awk, sed etc.
as long as you are having the commands available on the container. it would/should be accepted and executed.
Here is a screenshot of us trying to run some complex shell commands with sed and awk
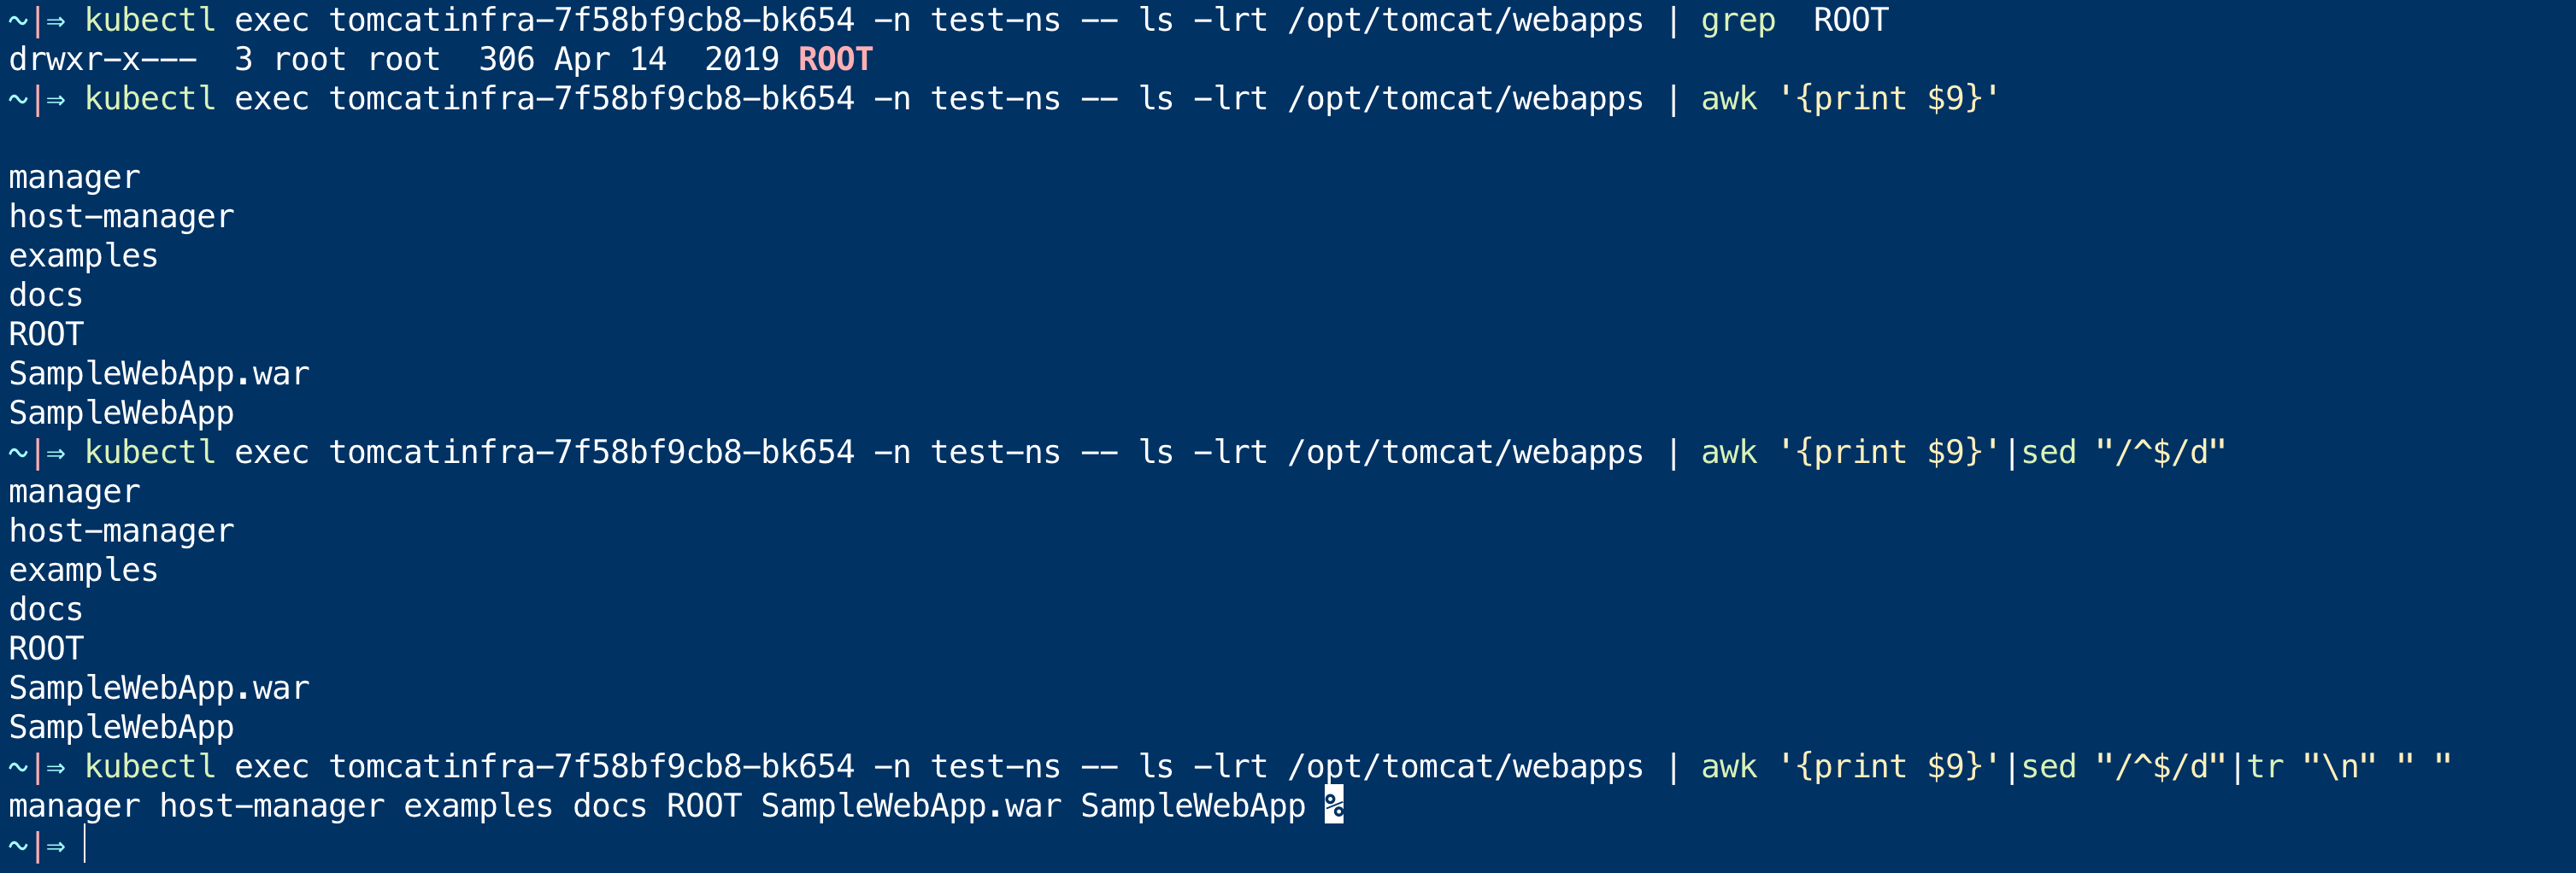
All the commands you see on the preceding screenshot are given below for you to copy and try
# grep for a specific file or directory

kubectl exec tomcatinfra-7f58bf9cb8-bk654 -n test-ns – ls -lrt /opt/tomcat/webapps | grep  ROOT

# with some awk print only file and directory names, the column 9

kubectl exec tomcatinfra-7f58bf9cb8-bk654 -n test-ns – ls -lrt /opt/tomcat/webapps | awk '{print $9}'

# removing the extra line at the beginning using sed

kubectl exec tomcatinfra-7f58bf9cb8-bk654 -n test-ns – ls -lrt /opt/tomcat/webapps | awk '{print $9}' | sed "/^$/d"

# I want my output in a single line

kubectl exec tomcatinfra-7f58bf9cb8-bk654 -n test-ns – ls -lrt /opt/tomcat/webapps | awk '{print $9}'| sed "/^$/d"| tr "\n" " "
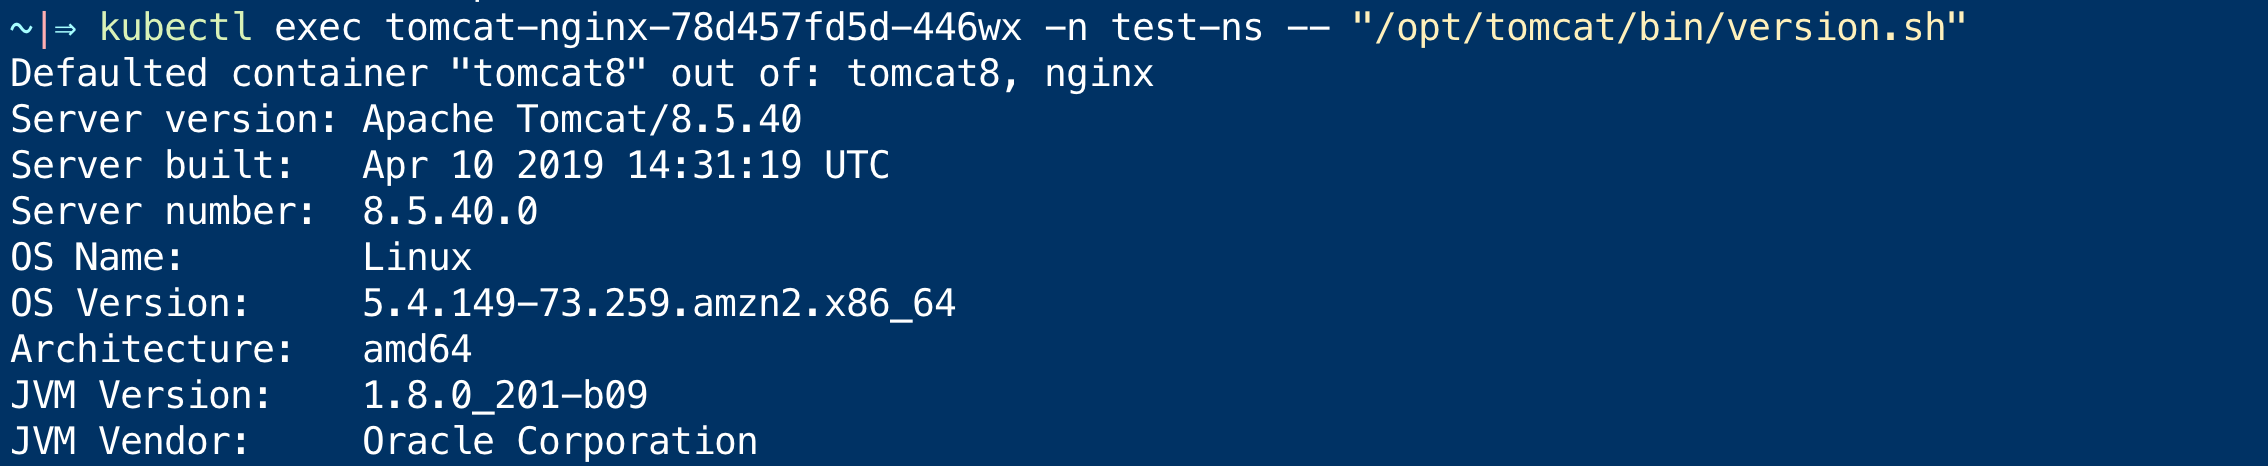
Executing shell scripts with kubectl exec
Now we have learnt how to execute commands into the pod and on the specific container using the -c option
We have seen how to execute some Linux commands using kubectl exec on the previous example.
While Shell scripts are also a bunch of Linux commands.
how do we run shell scripts with kubectl exec ?. let us see an example.
Here is a screenshot of me executing a shell script
Running some while loop without Interactive Terminal - Inline Scripting
Sometimes you would not want to login to the POD and create a shell script and execute it.
You can just write it as a single-line script and execute it in a similar way as we did for the commands.
Here is one example where I am running a while loop on a container without terminal

Since it is a while true loop it would keep your session active. to stop it you need to CTRL+C.
This is another way to keep your session active without having to SSH or go to terminal
Note*: If you look closely we have one extra command before the while loop. which is
bash -cthis technically means that we are running the bash command with the script as an argument. this is a way to invoke a inline shell script using bash shell
Here is the command we have used on the screenshot, for you to copy and try
$ kubectl exec tomcat-nginx-78d457fd5d-446wx -n test-ns – bash -c "while true; do date; sleep 3; done"
So what if there is no bash on the container ?
In the previous command, we have seen bash -c and a while loop passed as an argument.
It worked because my container had a bash. What if there is no bash shell on the container.
It would fail.
You might see some errors like this
OCI runtime exec failed: exec failed: container_linux.go:380: starting container process caused: exec: "bash": executable file not found in $PATH: unknown
command terminated with exit code 126
so it is not always good to assume that we have bash in the container. but we have a workaround to try all the shells before we give up.
Will see that soon.
Kubectl exec bash - Opening SSH Terminal to the pod
Let us presume the container we want to SSH to or take a terminal has a bash shell installed
So to open a shell/terminal. with the learning we already have. let us frame a command
$ kubectl exec tomcat-nginx-78d457fd5d-446wx -n test-ns -c nginx – bash

$ kubectl exec tomcat-nginx-78d457fd5d-446wx -n test-ns -c tomcat8 – bash
but this is wrong. the command you have given previously might not let you into a terminal.
This would execute the bash command as we wanted to but will it give you a terminal access ? No.
To get SSH or Terminal access to the container on the POD using kubectl exec.
You need to use the option -i and -t
- -i represents that we want kubectl exec to run this interactive session
- -t represents that kubectl exec should get a terminal ID allotted.
Both have to be given for opening a proper SSH terminal to the POD/container.
Here is a quick video where we demonstrate how to SSH or take the terminal into the container and what happens if we are not using both the options
So here are the right commands you have to use to SSH into the pod or the container. ( make sure you update the pod name and ns name with yours )
$ kubectl exec tomcat-nginx-78d457fd5d-446wx -n test-ns -c tomcat8 -i -t – bash
So as we mentioned, we have presumed that bash is present on the container. In my case it was.
What if there is no bash and how would you take terminal or SSH into the container/pod
Kubectl exec SSH into the terminal without bash
When you are not sure what shell would be available on the container, or when you know that bash may not be there but to try it out
There is a command we can use to test major shells before giving up
This is a recommended way to gain SSH or terminal access or Simply POD SHELL access.
$ kubectl exec PODNAME -n NAMESPAE -c CONTAINER_NAME -i -t – sh -c "clear; (bash || ash || sh || ksh || csh || zsh )"
In the preceding command, we are trying all the shells before we give up. we check if any one of the shell is available on the container
- bash
- ash
- sh
- KSH
- zsh
You can add more shells of your choice with || shell name on the command
Take a look at the following terminal record to understand how it works in real time
Conclusion
In this article we have seen examples of kubectl exec and covered few topics
- how to ssh or open pod shell using kubectl exec
- how to execute a command into the pod or container
- choosing the container name using option -c
- interactive terminal option and why both are important
- exec inline shell scripts using bash -c
- how to run multiple complex commands using kubectl exec etc.
Hope this helps you and if you have any questions or feedback. please do let us know on the comments section.
If you have any requirements on cloud/DevOps (or) Looking for a DevOps mentor or Support as a service. do visit https://gritfy.com or email us at [email protected]
Cheers
Sarav AK

Follow me on Linkedin My Profile Follow DevopsJunction onFacebook orTwitter For more practical videos and tutorials. Subscribe to our channel
Signup for Exclusive "Subscriber-only" Content