In this article, we are going to see how to set up compute infrastructure consisting of virtual private cloud, subnets, internet gateway, NAT gateway, route tables and EC2 instances in Amazon web services using one of the most competent IaC tool 'Pulumi'
In addition to this, we shall see how to set up 'bastion host' in order to connect to instances running in the private subnet.
By following this article you should be able to set up your AWS infrastructure with following resources without any hustle
- A virtual private cloud (VPC) in your AWS account
- Two subnets inside VPC - 1 public subnet, 1 private subnet
- Internet gateway attached to VPC
- Elastic IP
- A NAT gateway attached to public subnet
- Route table attached to the internet gateway - public route table
- Route table attached to NAT gateway - private route table
- A security group consisting of inbound and outbound rules
- An ec2 key-pair
- Two ec2 instances - 1 public instance, 1 private instance
Pre-requisites
- An AWS Account
- An AWS CLI needs to be installed
- Your AWS credentials.
- You can create a new Access Key on this page. link
- Python3 needs to be installed on the machine
- Pulumi Engine needs to be installed in the machine. link
Set-up Instructions
-
Install Python3, pulumi locally.
-
Set up AWS credentials in ~/.aws/credentials.
- The easiest way to do so is by setting up the AWS CLI.
-
once
aws-cliis installed in the host machine, set up AWS credentials using the below command$ aws configure- This will ask for your AWS access key and AWS Secret as below
- AWS Access Key ID [None] : ******
- AWS Secret Access Key [None] : ******
- Default region name : [leave it none, press enter]
- Default output format : [leave it none, press enter]
- This will ask for your AWS access key and AWS Secret as below
Creating a workspace and Initialising Pulumi
Create an empty directory and then run the ‘pulumi new’ command as this command generates a set of pre-defined files (requirements.txt, Pulumi.yaml,__main__.py)
$ pulumi new
The pulumi new command creates a new Pulumi project with some basic set of files based on the cloud and language specified.
If you are running pulumi new or most other pulumi commands for the first time, you will be prompted to log in to the Pulumi service. The Pulumi CLI works in the background with the Pulumi service in order to deliver a reliable experience. It is free for individual use.
Create a directory with some valid name
mkdir pulumi-devops-junction
Get into that directory
cd pulumi-devops-junction
Inside that directory execute the pulumi new command
pulumi new
Once you execute the ‘Pulumi new’ command, you should see an output similar to below
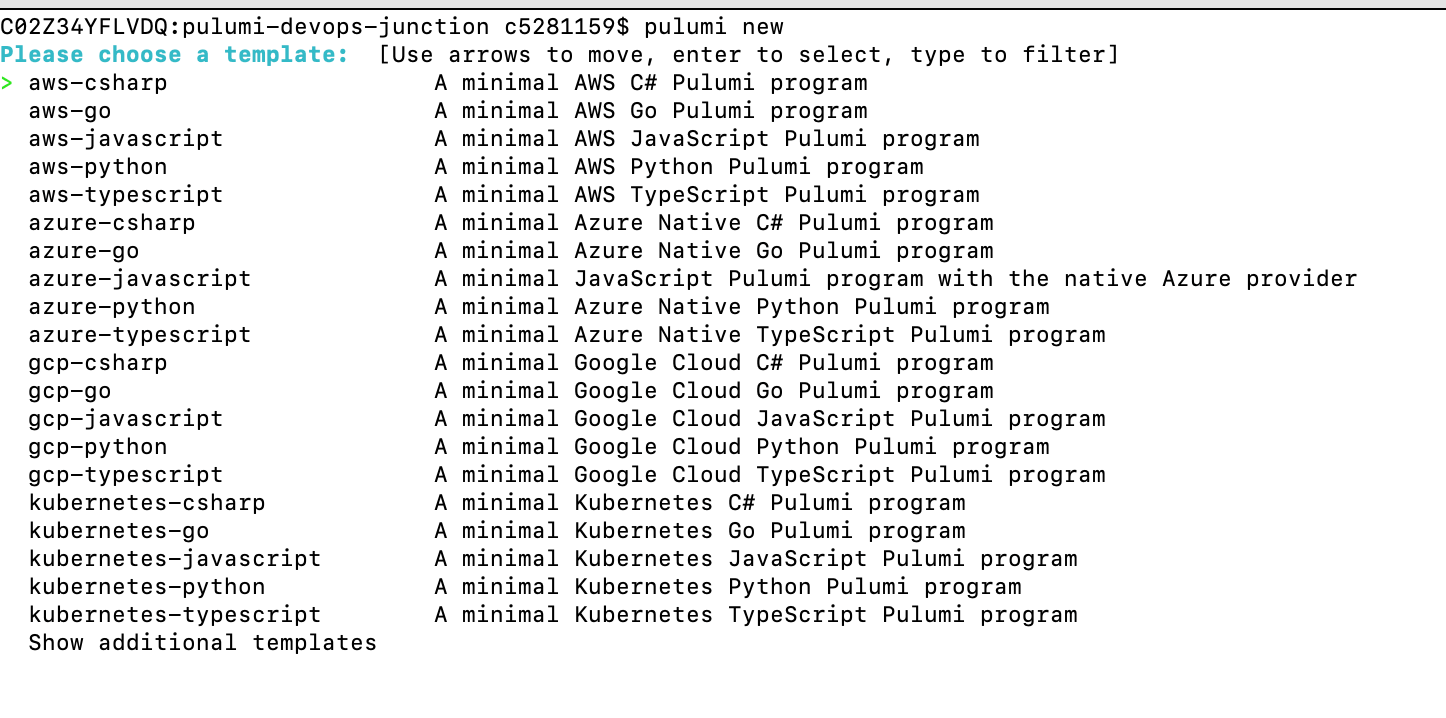
Using the up-down arrow key, select the aws-python option. Press Enter
Specify the following information
- Project Name
- Project Description
- Stack Name
- Aws Region
If you hit enter without giving any values pulumi will consider default values. Once you specify all details, pulumi will run and try to install all necessary libs. You should see output similar to below

Now our pulumi project is set up and ready!! and we are ready to go and make changes in the placeholder code.
Pulumi Python script to set up infrastructure in AWS - Pulumi AWS Example
Now we have the default files created, It's time to update the placeholder file with our sourcecode.
copy the below content into __main.py__and replace the existing content.
"""An AWS Python Pulumi program"""


import pulumi
import pulumi_aws as aws
from pulumi import export

config = pulumi.Config()
data = config.require_object("data")

virtualprivatecloud = aws.ec2.Vpc(data.get("vpc_name"), cidr_block=data.get("vpc_cidr"))

igw = aws.ec2.InternetGateway(data.get("igw_name"),
    vpc_id=virtualprivatecloud.id,
    tags={
        "Name": data.get("igw_name"),
    })

privatesubnet = aws.ec2.Subnet(data.get("prv_subnet_name"),
    vpc_id=virtualprivatecloud.id,
    cidr_block=data.get("prv_cidr"),
    map_public_ip_on_launch=False,
    tags={
        "Name": data.get("prv_subnet_name"),
    })

publicsubnet = aws.ec2.Subnet(data.get("pub_subnet_name"),
    vpc_id=virtualprivatecloud.id,
    cidr_block=data.get("pub_cidr"),
    map_public_ip_on_launch=True,
    tags={
        "Name": data.get("pub_subnet_name"),
    })

eip = aws.ec2.Eip(data.get("eip_name"),
    vpc=True)

natgateway = aws.ec2.NatGateway(data.get("natgw_name"),
    allocation_id=eip.allocation_id,
    subnet_id=publicsubnet.id,
    tags={
        "Name": data.get("natgw_name"),
    },
    opts=pulumi.ResourceOptions(depends_on=[igw]))

pubroutetable = aws.ec2.RouteTable(data.get("pubrttable_name"),
    vpc_id=virtualprivatecloud.id,
    routes=[
        aws.ec2.RouteTableRouteArgs(
            cidr_block="0.0.0.0/0",
            gateway_id=igw.id,
        )
    ],
    tags={
        "Name": data.get("pubrttable_name"),
    })

prvroutetable = aws.ec2.RouteTable(data.get("prvrttable_name"),
    vpc_id=virtualprivatecloud.id,
    routes=[
        aws.ec2.RouteTableRouteArgs(
            cidr_block="0.0.0.0/0",
            gateway_id=natgateway.id,
        )
    ],
    tags={
        "Name": data.get("prvrttable_name"),
    })

pub_route_association = aws.ec2.RouteTableAssociation(
        data.get("pubrtasst_name"),
        route_table_id=pubroutetable.id,
        subnet_id=publicsubnet.id
)

prv_route_association = aws.ec2.RouteTableAssociation(
        data.get("prvrtasst_name"),
        route_table_id=prvroutetable.id,
        subnet_id=privatesubnet.id
)

sg = aws.ec2.SecurityGroup(
        data.get("sec_grp_name"),
        description="Allow HTTP traffic to EC2 instance",
        ingress=[{
                "protocol": "tcp",
                "from_port": 80,
                "to_port": 80,
                "cidr_blocks": ["0.0.0.0/0"],
            },
        {
            "protocol": "tcp",
            "from_port": 443,
            "to_port": 443,
            "cidr_blocks": ["0.0.0.0/0"],
        },
        {
            "protocol": "tcp",
            "from_port": 22,
            "to_port": 22,
            "cidr_blocks": ["0.0.0.0/0"],
        }
        ],
    egress=[
        {
            "protocol": "-1",
            "from_port": 0,
            "to_port": 0,
            "cidr_blocks": ["0.0.0.0/0"],

        }
    ],
    vpc_id=virtualprivatecloud.id
)

keypair = aws.ec2.KeyPair("keypair", public_key=data.get("public_key"))

ami = aws.ec2.get_ami(
        most_recent="true",
        owners=["099720109477"],
)


user_data = """
#!/bin/bash
echo "Hello, world!" > index.html
nohup python -m SimpleHTTPServer 80 &
"""

bastion_ec2_instance = aws.ec2.Instance(
        data.get("ec2_bastion_name"),
        instance_type=data.get("ec2_bastion_type"),
        vpc_security_group_ids=[sg.id],
        ami=ami.id,
        key_name=keypair.key_name,
        user_data=user_data,
        subnet_id=publicsubnet.id,
        associate_public_ip_address=True,
)


private_ec2_instance = aws.ec2.Instance(
        data.get("ec2_private_name"),
        instance_type=data.get("ec2_private_type"),
        vpc_security_group_ids=[sg.id],
        ami=ami.id,
        key_name=keypair.key_name,
        subnet_id=privatesubnet.id,
)
Update the Values in the Variables file
All the input parameters for this project is maintained in pulumi.dev.yaml file. Change values in this file as per your requirement
config:
  aws:region: us-east-1
  pulumi-ec2:data:
    active: true
    vpc_name: devopsjunc-vpc
    vpc_cidr: 10.0.0.0/16
    igw_name: devopsjunc-igw
    prv_subnet_name: devopsjunc-private-subnet
    pub_subnet_name: devopsjunc-public-subnet
    prv_cidr: 10.0.1.0/24
    pub_cidr: 10.0.0.0/24
    eip_name: devopsjunc-eip
    natgw_name: devopsjunc_ngw
    pubrttable_name: devopsjunc_pubrttable
    prvrttable_name: devopsjunc_prvrttable
    pubrtasst_name: devopsjunc_pub_rt_asst
    prvrtasst_name: devopsjunc_prv_rt_asst
    sec_grp_name: devopsjunc_sec_grp
    public_key: <paste your public key content here>
    ec2_bastion_name: devopsjunc_ec2_bastion
    ec2_bastion_type: t2.micro
    ec2_private_name: devopsjunc_ec2_private
    ec2_private_type: t2.micro
Pulumi.*.yaml is a configuration file where we can maintain our input parameters and the same can be used in our code. more like a variables file. in terraform it is *.tfvars file
In addition to this, you need to generate ssh keys which are used to get into the private instance
Creating SSH Keys
Create a directory called .ssh in your home directory. ( if not already exists)
Execute the below-mentioned commands to generate SSH keys ( or you can choose to use your existing key)
mkdir .ssh
cd .ssh
ssh-keygen -f devopsjunckeypair
Next, you need to add the newly created ssh keys to a key chain. If you have chosen your existing key add that to ssh-add
ssh-add -K devopsjunckeypair
Creating the AWS Infrastructure with Pulumi up
As we have done all the planning tasks, Now run the Pulumi up command.
Like Terraform plan or Terraform apply command Pulumi will try to get your confirmation before moving on.
You can simply choose no if you just want to plan or dry run and choose yes to apply the changes.
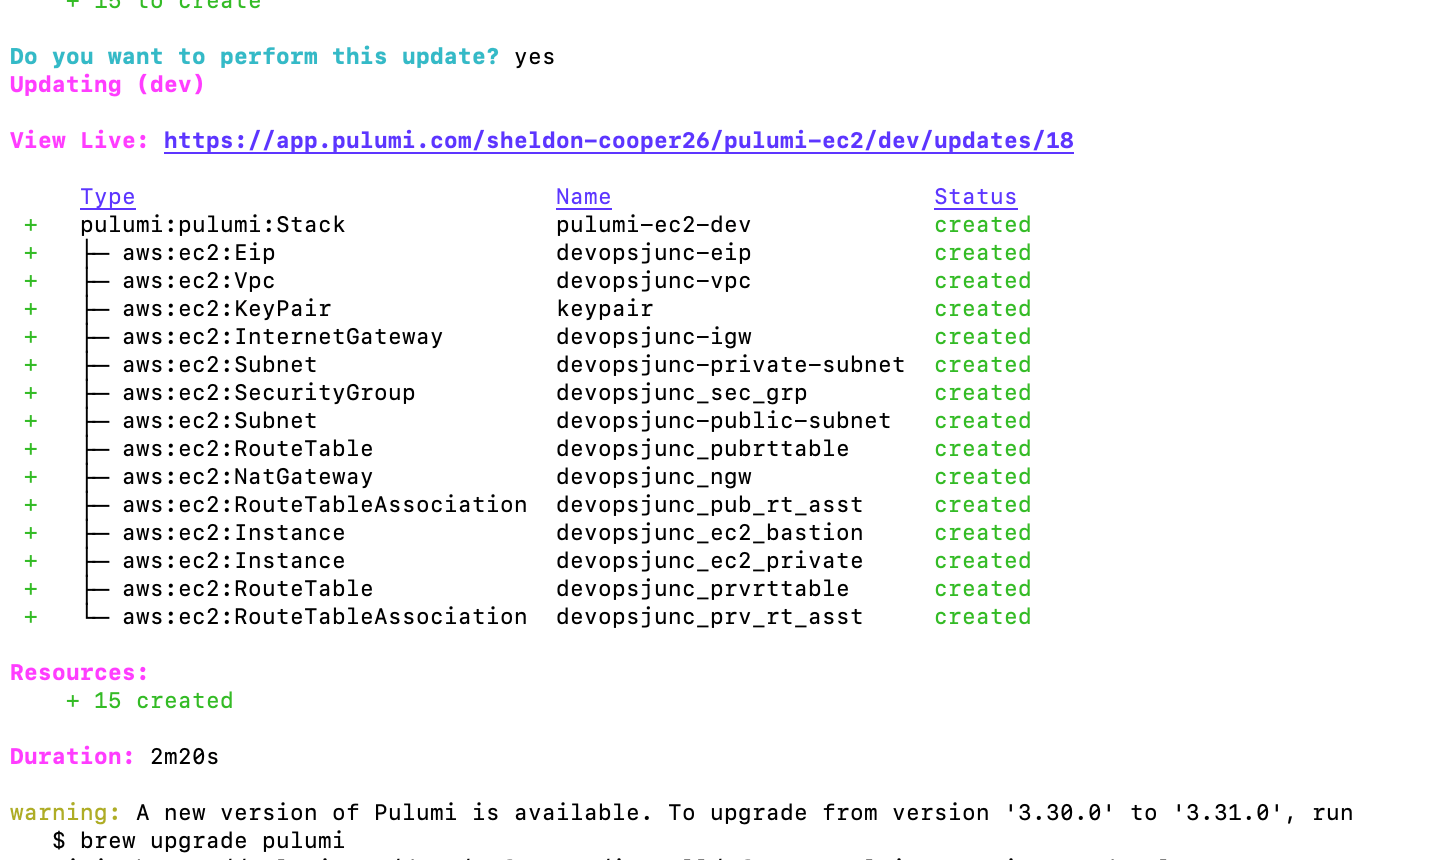
You should see output similar to below
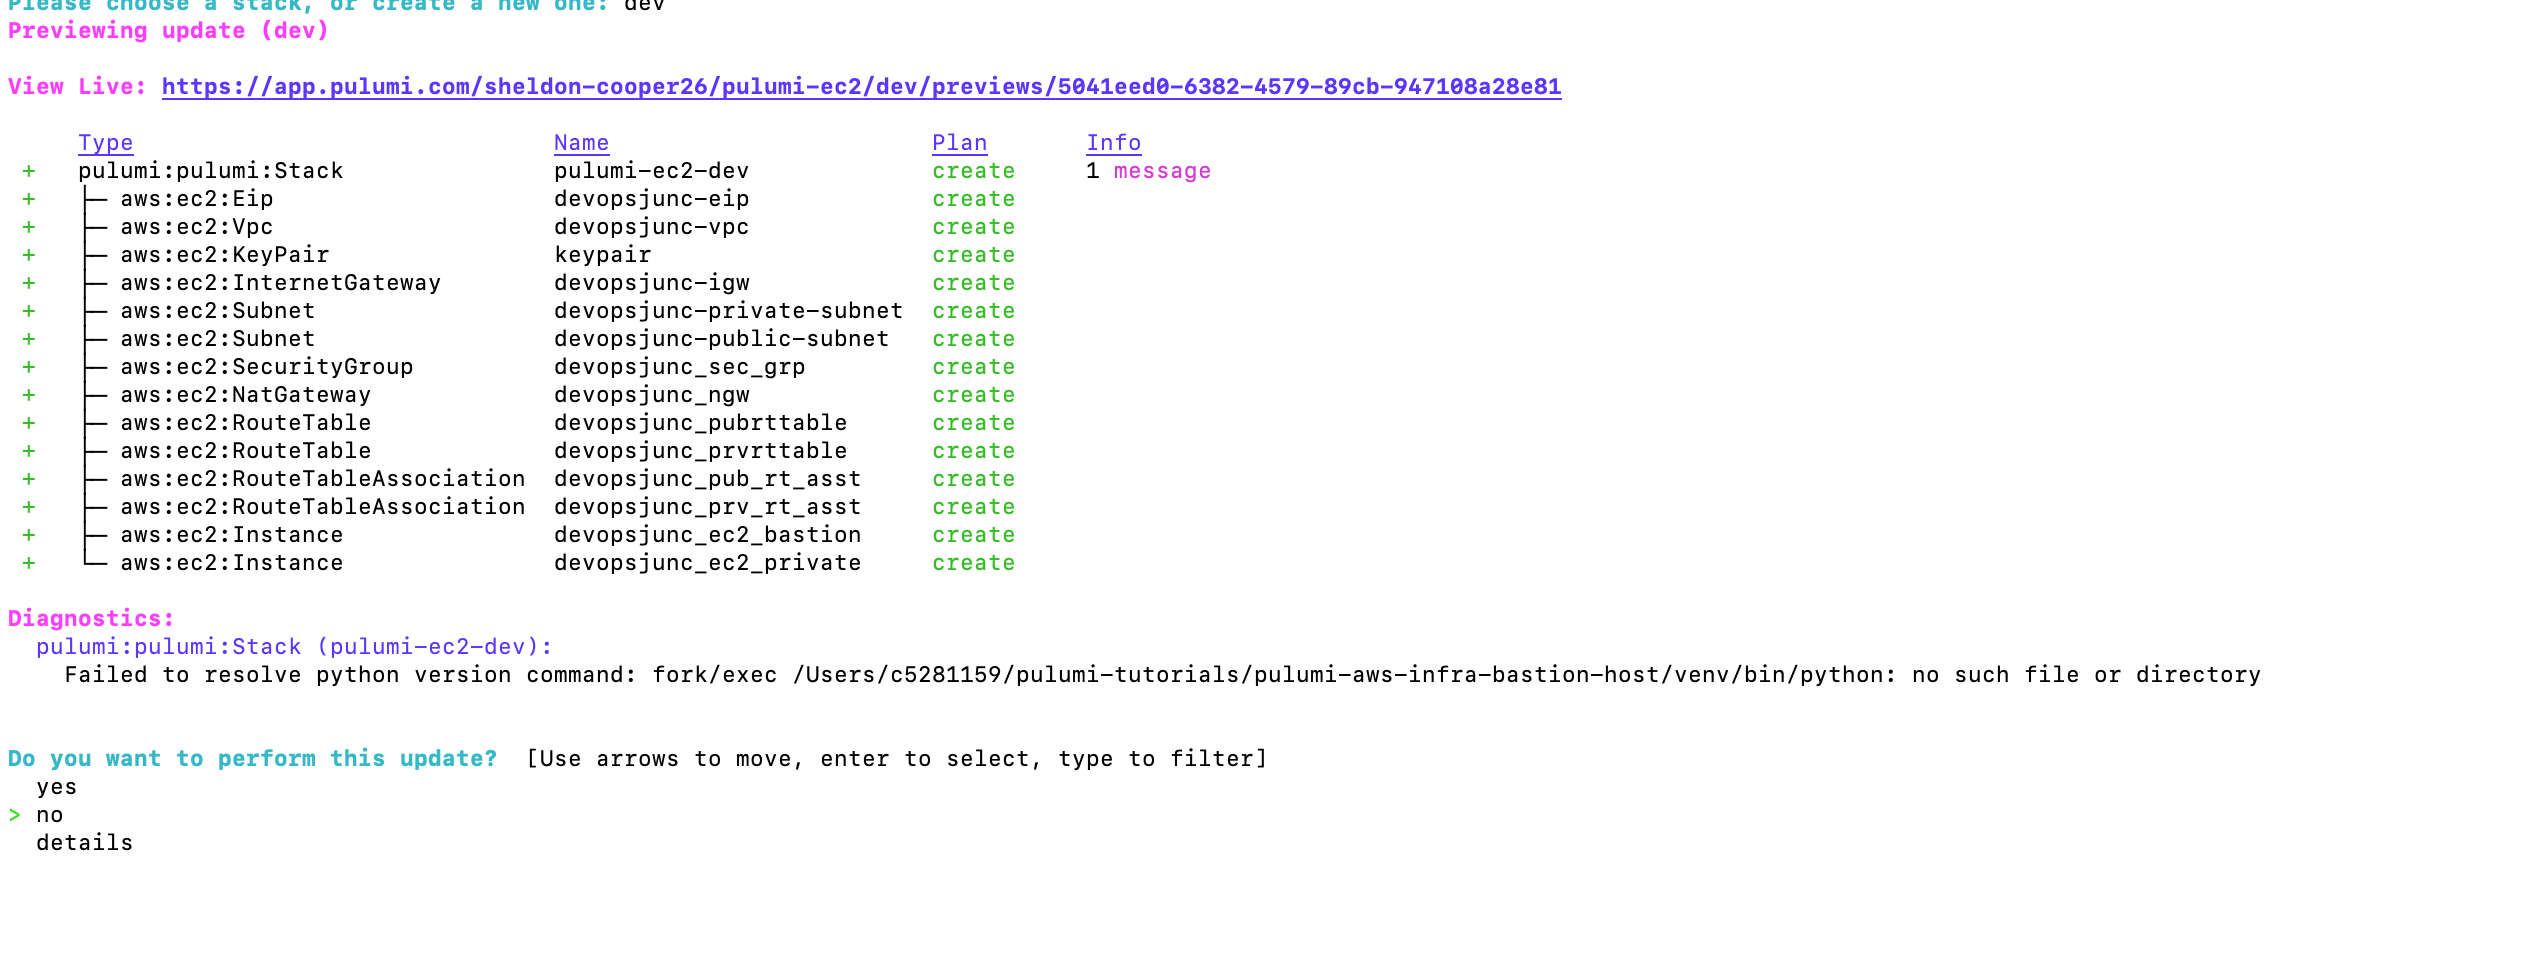
Select Yes for the question Do you want to perform this update question and pulumi will create your desired infrastructure for you.
Configuraing SSH to connect through Bastion
Now, Create an ssh config file inside the .ssh directory (This directory you would have created in earlier steps)
cd ~/.ssh
touch config
Add the below contents to your ssh config file , this is to tell your ssh to pass through bastion while reaching your private instance
Host bastion-instance
   HostName <Bastion Public IP>
   User ubuntu

Host private-instance
   HostName <Private IP>
   User ubuntu
   ProxyCommand ssh -q -W %h:%p bastion-instance
Short note on ssh config file:-
The ssh program on a host receives its configuration from either the command line or from configuration files ~/.ssh/config and /etc/ssh/ssh_config.
Command-line options take precedence over configuration files. The user-specific configuration file ~/.ssh/config is used next. Finally, the global /etc/ssh/ssh_config file is used. The first obtained value for each configuration parameter will be used.
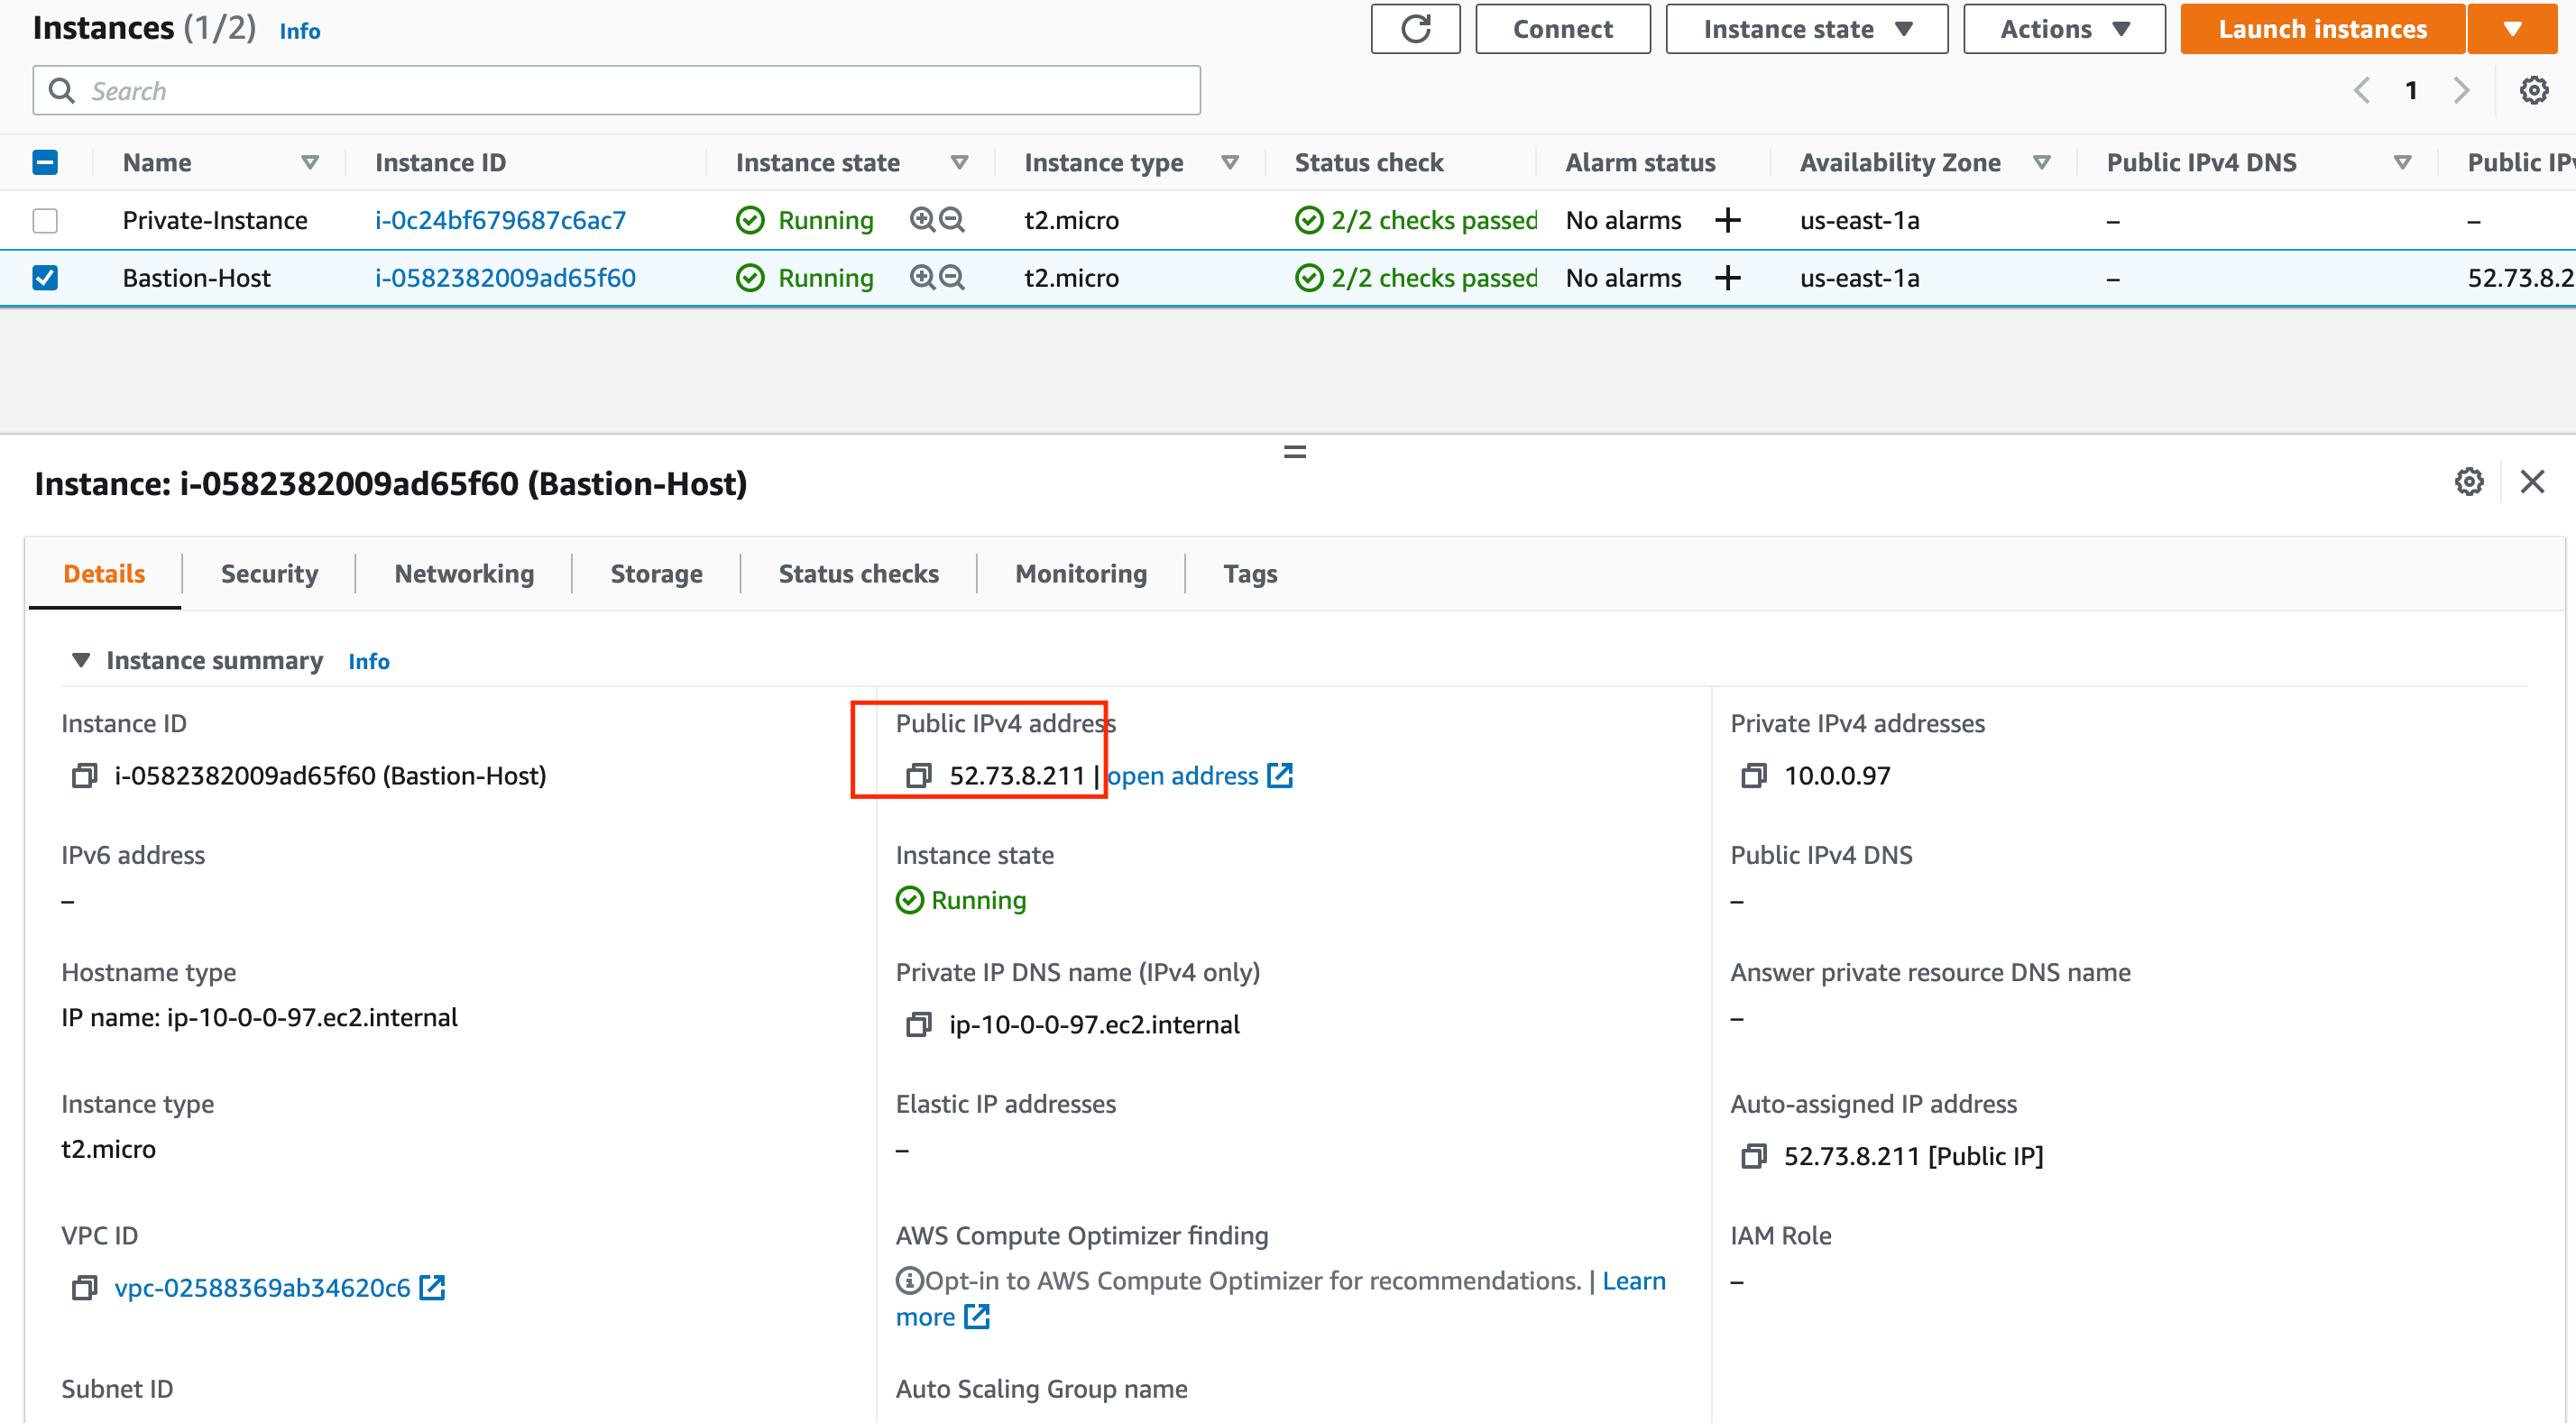
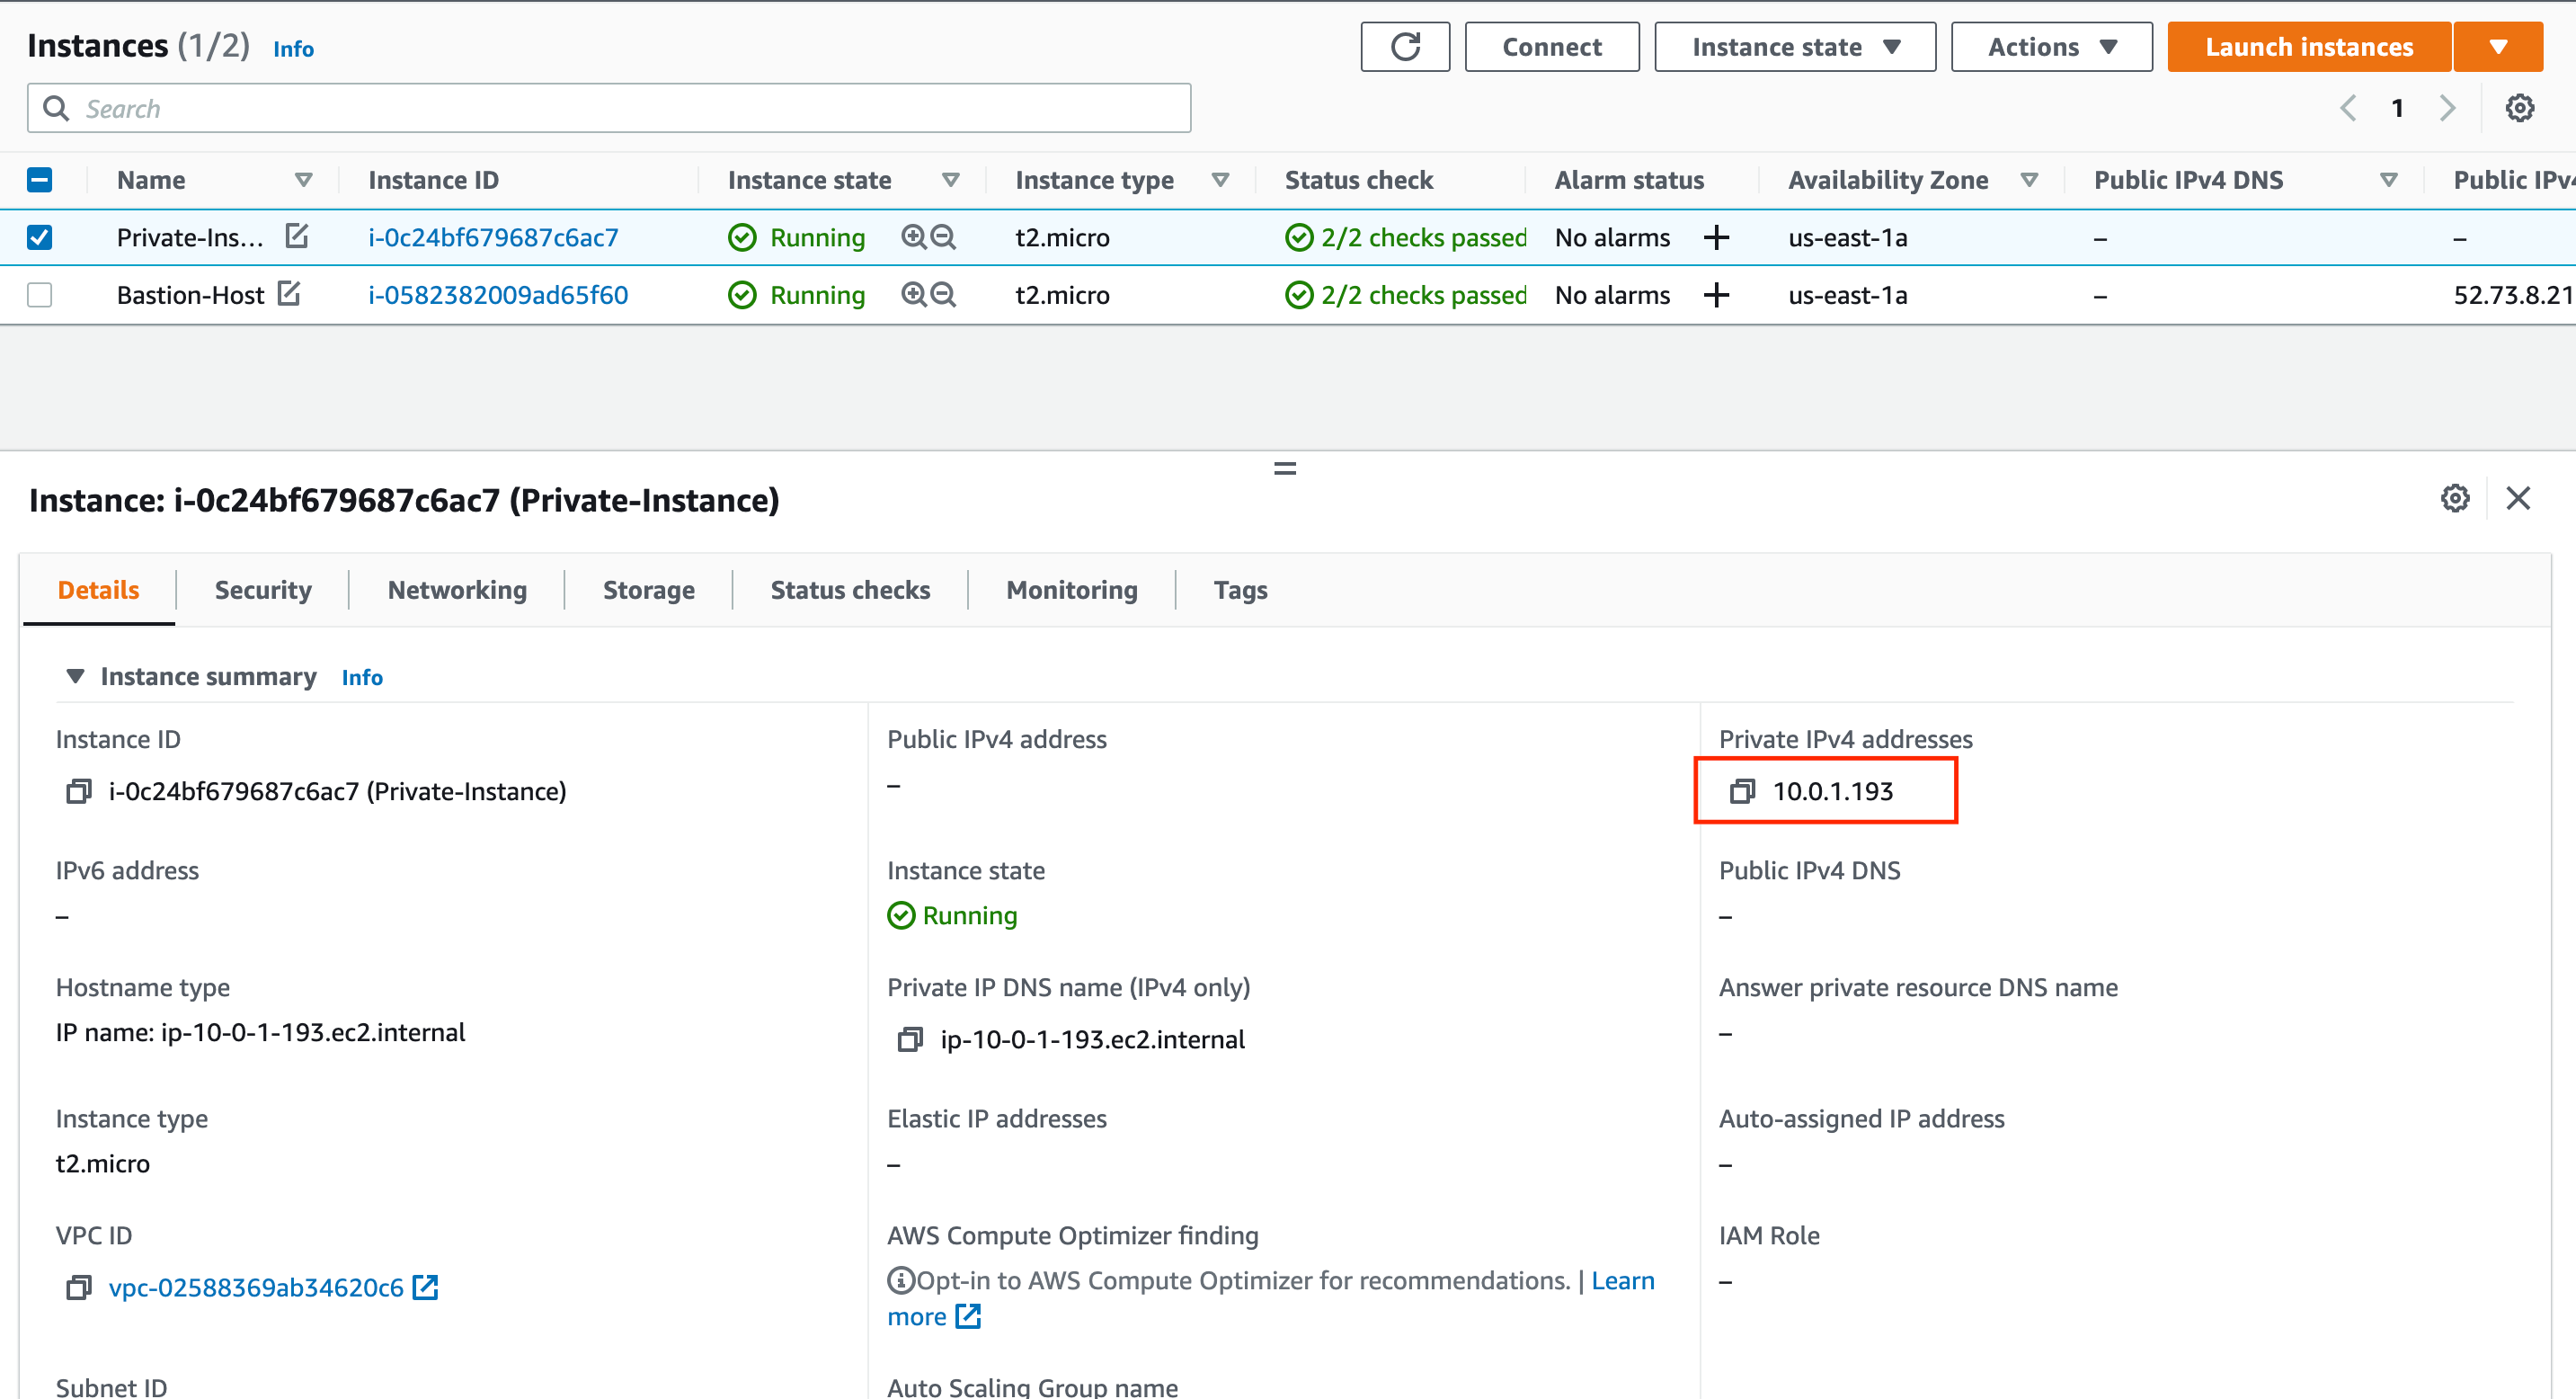
You can get Bastion public IP and Private IP from AWS console
SSH to Private EC2 instance using Bastion - Validation
Now let's try to connect to these instances using ssh
You should update your ssh config file with bastion host IP address and username (Ubuntu - in this case) and private instance IP address and username.
Next, try to do ssh using the 'bastion-instance' variable name
# Connect to the bastion host:
ssh -A bastion-instance

Perfect!!, We are able to connect to bastion host without any hustle.
Next, we shall connect to a private instance. Since the private instance is not exposed to the outer internet, we cannot access it as it is using private IP.

As expected, it failed. Hence we use a proxy command which uses bastion-host in turn gets connected to the private instance.
Look for this below entry in your ssh config file
ProxyCommand ssh -q -W %h:%p bastion-instanceNow, let's try to connect to the private instance using the 'private-instance' variable name (As mentioned in the ssh config file)
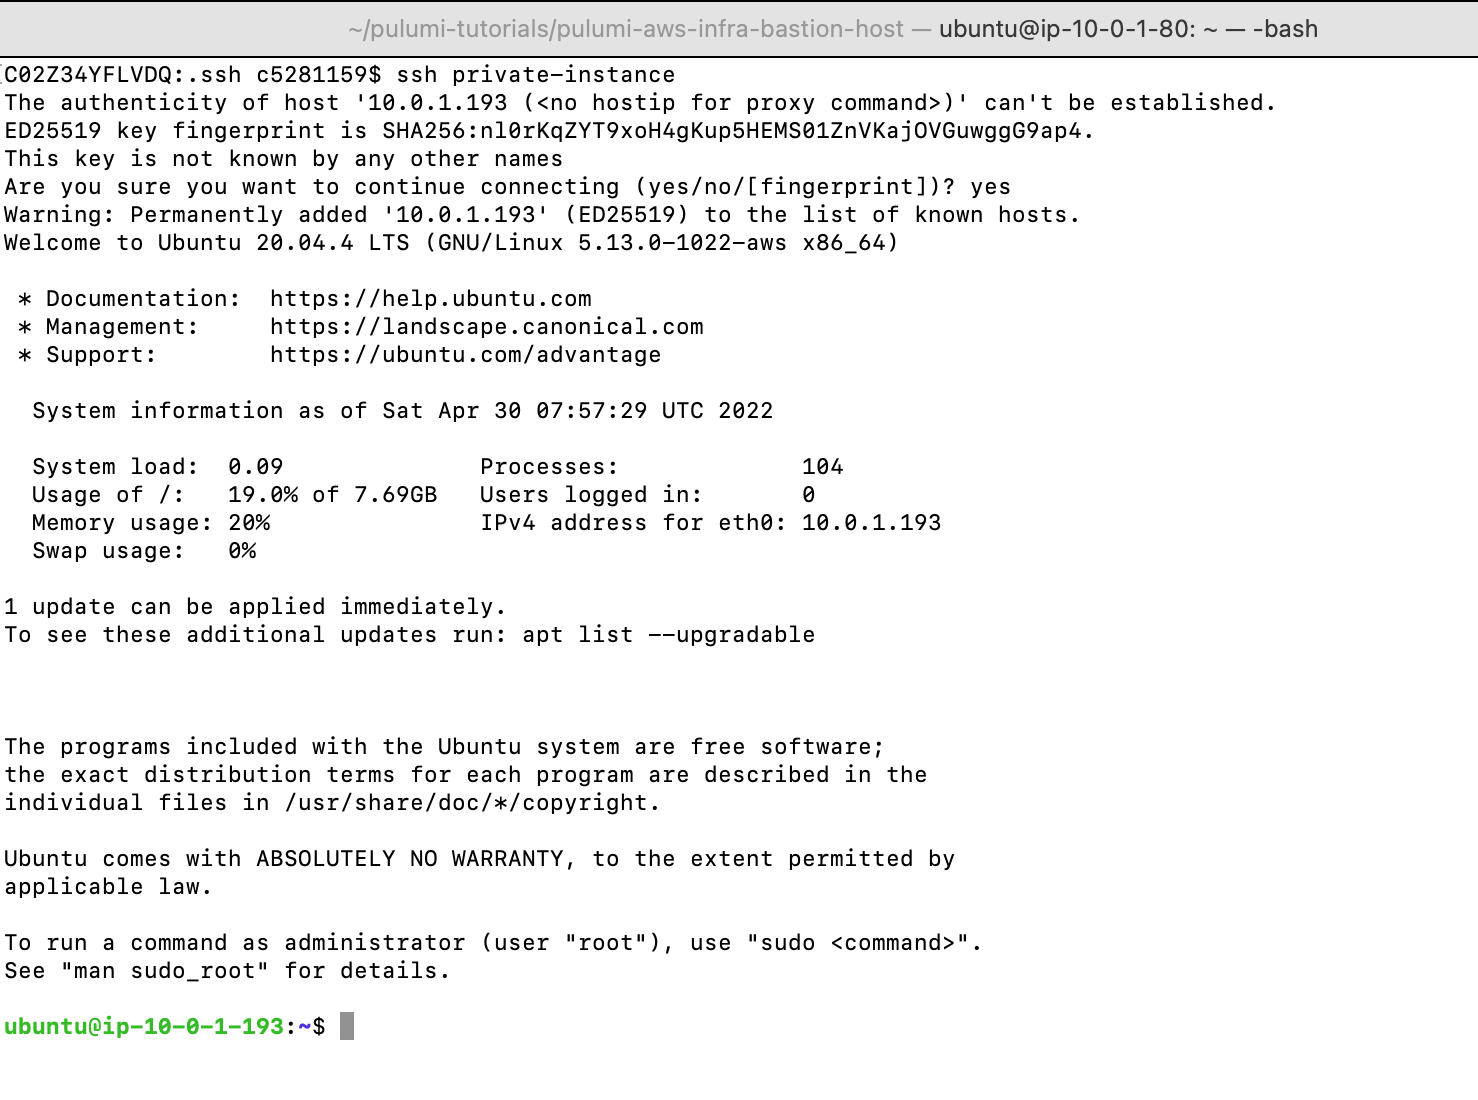
Voila!!, you got logged into your private instance using the ssh client. Now, you can play around and execute all commands as per your need.
There we go, We have successfully created a fully functioning AWS infrastructure with VPC, Private and Public Subnets, Ec2 instances and Bastion with Pulumi.
GitHub Link for the Sourcecode
You can download the source code from this GitHub link
Conclusion
We have learnt how to set up fully pledged to compute infra in AWS using pulumi
During the implementation, we learned some details about bastion-hosts and their uses, and some information on the ssh config file.
Hope you enjoyed this article and would give it a try on your own. Until then, Happy learning 🙂
For any help, please reach out to us in the Comments
For Professional help on DevOps, reach out to us at [email protected]
Thanks and Regards,
Tapan Hegde
Follow us onFacebook orTwitter For more practical videos and tutorials. Subscribe to our channel Find me on Linkedin My Profile For any Consultation or to hire us [email protected] If you like this article. Show your Support! Buy me a Coffee.
Signup for Exclusive "Subscriber-only" Content