PHP is a well known server side scripting language and one of the best languages out there for web development. There are many websites developed using PHP including facebook.
LAMP stack has always been a competitive to Java middleware stack. LAMP is an acronym driven from the collaboration of four open source components. Linux Operating system, Apache WebServer, MySQL RDBMS, PHP. LAMP is most preferred stack in the dynamic web site development and web applications.
Objective of this post is to cover the basic installation and configuration steps of PHP and Joomla on Linux Mint/ Ubuntu Operating System. Joomla is a content management system and an open source platform on which WebSites and web applications can be created.(like WordPress) Joomla connects you to Mysql or Postegre SQL in order to make proper content management.
This is our LAMP stack product information
L => Linux MintA => Apache 2.4M => MySQL 5.6.30P => PHP 7.0.10
Let's Begin!.
Start with the updating the apt-get repository
mwi@mwi-virtual-machine /opt/sara/softwares $ sudo apt-get update
Install the PHP latest version using "apt-get" command.
sudo apt-get install php7.0 php7.0-cgi php7.0-mysql libapache2-mod-php7.0 php7.0-xml
Note*: Here we install few important packages, to get the list of available packages try apt-cache command like this.
`sudo apt-cache search php|grep -i 7.0`
once the packages installed, we will be able to verify it by typing the command "php -v" it should return the version of php
mwi-virtual-machine modules # php -v
PHP 7.0.10-2+deb.sury.org~trusty+1 (cli) ( NTS )
Copyright (c) 1997-2016 The PHP Group
Zend Engine v3.0.0, Copyright (c) 1998-2016 Zend Technologies
with Zend OPcache v7.0.10-2+deb.sury.org~trusty+1, Copyright (c) 1999-2016, by Zend Technologies
We should also make sure that we have the "lib module so " files generated for apache2
Note*: In my case the apache version is apache 2.4 and the module so files would be created under /usr/lib/apache2/modules
Go to the apache2 modules directory and make sure that we have libphp7.0.so file
mwi-virtual-machine modules # pwd
/usr/lib/apache2/modules
mwi-virtual-machine modules # ls -lrt|grep -i lib
-rw-r--r – 1 root root 4168024 Aug 29 17:51 libphp7.0.so
mwi-virtual-machine modules #
Now this is the time for doing apache configuration changes.
goto the apache configuration root directory /etc/apache2/sites-enabled
Edit your httpd.conf (or) virtualhost configuration file. Here I am using the default virtualhost configuration file named "000-default.conf"
With in the <VirtualHost></VirtualHost> tags. Append the below lines and save.
<FilesMatch \.php$>
SetHandler application/x-httpd-php
</FilesMatch>
In the same virtual host file, find the DocumentRoot directive element. It will be something like this
DocumentRoot /var/www/html
In the Document Root directory, create a new PHP file named info.php and copy these two lines
<?php
phpinfo();
mwi-virtual-machine sites-enabled # cat > /var/www/html/info.php
<?php
phpinfo();
mwi-virtual-machine sites-enabled # cat /var/www/html/info.php
<?php
phpinfo();
mwi-virtual-machine sites-enabled #
Now you can restart your apache2 web server using your normal procedure. I am using service restart method
mwi-virtual-machine softwares # service apache2 restart
* Restarting web server apache2
AH00558: apache2: Could not reliably determine the server's fully qualified domain name, using 127.0.1.1. Set the 'ServerName' directive globally to suppress this message
[ OK ]
mwi-virtual-machine softwares #
Well!. Now we have a php enabled apache web server and here's how we should test it.
Access your default website/virtual host with the uri "/info.php" . It should serve the PHP page which we have just created.

Setup Joomla
Download joomla from https://www.joomla.org/download.html
Extract the downloaded zip file into any directory which is going to act as your joomla home. In my case its /opt/joomla
As we have extracted the joomla, we will now be having the below list files
mwi-virtual-machine joomla # ls -lrt
total 108
-rw-r--r-- 1 root root 1690 Aug 4 23:44 web.config.txt
drwxr-xr-x 2 root root 4096 Aug 4 23:44 tmp
drwxr-xr-x 5 root root 4096 Aug 4 23:44 templates
-rw-r--r-- 1 root root 836 Aug 4 23:44 robots.txt.dist
-rw-r--r-- 1 root root 4514 Aug 4 23:44 README.txt
drwxr-xr-x 15 root root 4096 Aug 4 23:44 plugins
drwxr-xr-x 27 root root 4096 Aug 4 23:44 modules
drwxr-xr-x 20 root root 4096 Aug 4 23:44 media
-rw-r--r-- 1 root root 18092 Aug 4 23:44 LICENSE.txt
drwxr-xr-x 11 root root 4096 Aug 4 23:44 libraries
drwxr-xr-x 5 root root 4096 Aug 4 23:44 layouts
drwxr-xr-x 4 root root 4096 Aug 4 23:44 language
drwxr-xr-x 14 root root 4096 Aug 4 23:44 installation
-rw-r--r-- 1 root root 1393 Aug 4 23:44 index.php
drwxr-xr-x 2 root root 4096 Aug 4 23:44 includes
drwxr-xr-x 5 root root 4096 Aug 4 23:44 images
-rw-r--r-- 1 root root 2969 Aug 4 23:44 htaccess.txt
drwxr-xr-x 17 root root 4096 Aug 4 23:44 components
drwxr-xr-x 2 root root 4096 Aug 4 23:44 cli
drwxr-xr-x 2 root root 4096 Aug 4 23:44 cache
drwxr-xr-x 2 root root 4096 Aug 4 23:44 bin
drwxr-xr-x 11 root root 4096 Aug 4 23:44 administrator
mwi-virtual-machine joomla # pwd
/opt/joomla
We have to change the ownership of /opt/joomla to apache_run_user to make sure Joomla is able to read/write. In my case the user name is www-data
mwi-virtual-machine root# grep -i APACHE_RUN_USER /etc/apache2/envvars
export APACHE_RUN_USER=www-data
mwi-virtual-machine root# chown -R www-data:www-data /opt/joomla
mwi-virtual-machine root#
Now It's a time to go back to the apache configuration directory (/etc/apache2/sites-enabled) and to make some configuration changes which is essential for Joomla.
Edit the same virtual host file (000-default.conf) and append this single line
Alias /service /opt/joomla
Restart your web server and access the site using the URI "/service" in my case it is http://mwi-virtual-machine/service
If we have done everything perfect, we should be able to see the Joomla installer page.

Before we move forward and configure Joomla.
There are two must do things we should accomplish
Task1) We must have created a database in mysql db . I named it as joomladb. ( This post does not cover the mysql installation in detail as we primarily cover joomla)
mysql> show databases;
+--------------------+
| Database |
+--------------------+
| information_schema |
| mysql |
| performance_schema |
+--------------------+
3 rows in set (0.00 sec)
mysql> create database joomladb;
Query OK, 1 row affected (0.02 sec)
mysql>
Task2:) We can have FTP server installed(optional), I have usedvsftpd daemon.
Here I have given the quick installation steps of vsftpd.
Installation
mwi-virtual-machine ~ # sudo apt-get install vsftpd
Reading package lists... Done
Building dependency tree
Reading state information... Done
The following NEW packages will be installed:
vsftpd
0 upgraded, 1 newly installed, 0 to remove and 521 not upgraded.
Need to get 111 kB of archives.
After this operation, 361 kB of additional disk space will be used.
Get:1 http://archive.ubuntu.com/ubuntu/ trusty-updates/main vsftpd amd64 3.0.2-1ubuntu2.14.04.1 [111 kB]
Fetched 111 kB in 1s (78.6 kB/s)
Preconfiguring packages ...
Selecting previously unselected package vsftpd.
(Reading database ... 182896 files and directories currently installed.)
Preparing to unpack .../vsftpd_3.0.2-1ubuntu2.14.04.1_amd64.deb ...
Unpacking vsftpd (3.0.2-1ubuntu2.14.04.1) ...
Processing triggers for man-db (2.6.7.1-1ubuntu1) ...
Processing triggers for ureadahead (0.100.0-16) ...
ureadahead will be reprofiled on next reboot
Setting up vsftpd (3.0.2-1ubuntu2.14.04.1) ...
vsftpd start/running, process 5952
Processing triggers for ureadahead (0.100.0-16) ...
Make sure the server listens on port 21
mwi-virtual-machine ~ # netstat -ntlp|grep -i 21
tcp 0 0 0.0.0.0:21 0.0.0.0:* LISTEN 5952/vsftpd
By default, All server accounts would be able to use the ftp with their account credentials
mwi-virtual-machine ~ # ftp localhost
Connected to localhost.
220 (vsFTPd 3.0.2)
Name (localhost:mwi): mwi
331 Please specify the password.
Password:
230 Login successful.
Remote system type is UNIX.
Using binary mode to transfer files.
ftp> exit
221 Goodbye.
Now, We should enter the details such as SiteName and User account details , DB details, FTP Details.
I am naming my site as AKSarav's Blog

Once you have done entering all these details on the welcome page, click Next Button to configure the Database Details.
we have to enter the DB name we have just created.

As we complete entering the Database details we can proceed to FTP layer details and then to Summary/Overview page.
Configuring FTP is completely optional


If we have proper configuration and permission, we will be able to remove the installation folder by clicking the Remove Installation Folder button. Or you can remove the directory located at /opt/joomla/installation manually.
Once we have removed the installation directory, we can access the site at http://<sitename>/service . In my case its http://mwi-virtual-machine/service

Joomla Administration page has lot of widgets and plugins to make your website development a piece of
cake
cake
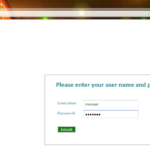
We can access the admin page at http://sitename/service/administration. In my case its http://mwi-virtual-machine/service/administrator/
This page is protected with Form based authentication and we should use the credentials, we have mentioned in the installation home page to login.

As we log in, we can use the Control panel to manage our site. (Design/Development/Add/Remove post and much more.)

Enjoy Joomla!....
Hope it helps.
If you like this, please share with your friends
Feed back/Queries ? Please comment.
Thanks,
AkSarav