Designing WEB Applications with Web Browser-based security is very common.
There are three types of Authentication methods generally being used as follows
- Basic Authentication
- Form-Based Authentication
- SSL Client Cert Authentication
Most of the Web Applications are using Form Based Authentication method where the user will be
submitting their credentials through the HTML form.
Credentials would further be transmitted to the server over HTTP(S) as an additional security measure.
Now we are going to see how to develop a web application with Form Based Authentication in J2EE (JSP and Tomcat)
We gave instructions and Source code for both Java and Python based Web Application.
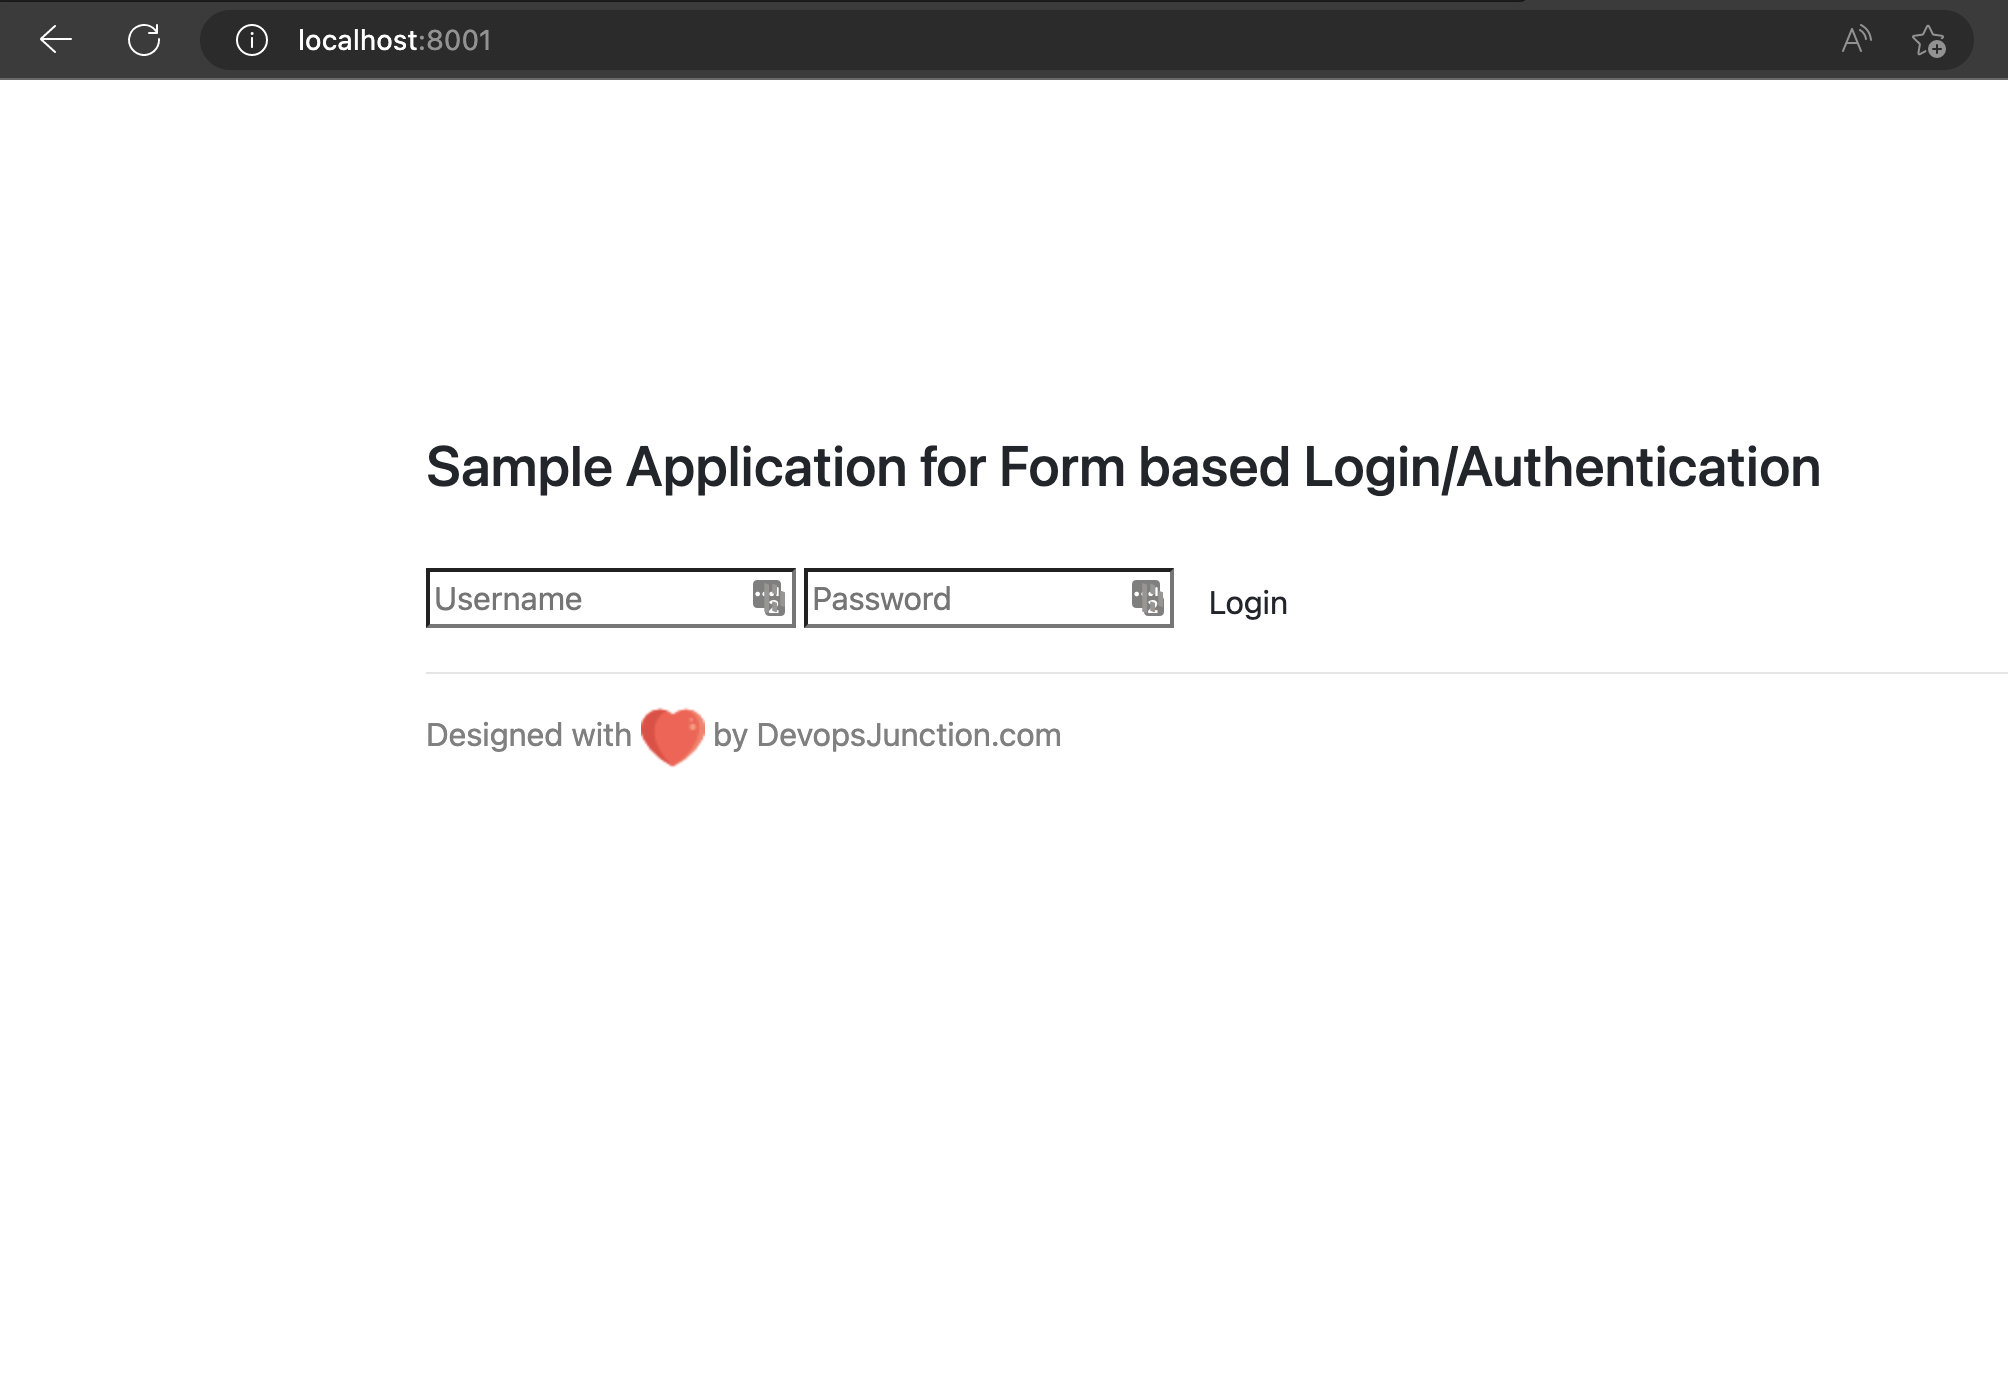
Python Flask Web Application - Form based Authentication
Here is a quick look of the Flask Web Application with Form based Authentication
How to use the application - Without Python Virtual Environment
- Clone the repository
- Install the necassary packages with the following command
pip install -r requirements.txt - Start the Application
flask run – host 0.0.0.0 – port 8001 - Access the application at
http://localhost:8001
With Python Virtual Environment
- Clone the repository
- Run the following commands to start the Application
# python -m venv venv # source venv/bin/activate # pip install -r requirements.txt # flask run – host 0.0.0.0 – port 8001 - Access the application at
http://localhost:8001
Java Web Application - Form based Authentication
These are the steps to create a Form Authentication enabled Web Application.
Prerequisites - for Java Web Application
- Apache Tomcat Server 7 (or) above
- Editors like Notepad ++
Source code and Setup Instructions for the Java Web Application
Step1: Create one directory named "TestSecApp"
Step2: Under "TestSecApp" Create another directory named "WEB-INF"
Step3: Copy All these files with their respective name under "TestSecApp" Directory
error.html
<html>
    <head>
        <title>ERROR PAGE 404</title>
    </head>
    <body>
        <H1> CUSTOMER ERROR MESSAGE: THE PAGE YOU HAVE REQUESTED IS NOT FOUND </H1>
    </body>
</html>
fail_login.jsp
<html>

<head>
    <link rel="stylesheet" href="style1.css" type="text/css" media="all">
    <title>Login failed</title>
</head>

<body bgcolor=#ffffff>
    <div id="login">
        <center>
            <h2>Authentication Failure.</h2> <a href="login.jsp">Return to login page</a>
        </center>
    </div>
</body>

</html>
login.jsp
<html>

<head>
    <link rel="stylesheet" href="style1.css" type="text/css" media="all">
    <title>Security WebApp login page</title>
</head>

<body bgcolor="white">
    <div id="login">
        <blockquote>
            <h2>Please enter your user name and password:</h2>
            <p>
            <form method="POST" action="j_security_check">
                <div id="box1">
                    <p>Username:<input id="textbox1" type="text" name="j_username"> </p>
                    <p>Password:<td><input id="textbox1" type="password" name="j_password"> </p> <br> <input
                        id="button1" type=submit value="Submit">
                </div>
            </form>
        </blockquote>
    </div>
</body>
</html>
logout.jsp
<html>

<head>
    <link rel="stylesheet" href="style1.css" type="text/css" media="all">
    <title>Welcome Back</title>
</head>

<body bgcolor=#ffffff>
    <div id="login">
        <center> <br> <br>
            <%@ page session="true" %> User '<%=request.getRemoteUser()%>' has been logged out. <% session.invalidate();
                        %> <br> <a href="login.jsp">Click here to login again</a>
        </center>
    </div>
</body>

</html>
Test.jsp
<!DOCTYPE html>
<html>

<head>
    <title>Browser Based Authentication Example Welcome Page</title>
    <script src="https://ajax.googleapis.com/ajax/libs/jquery/1.11.3/jquery.min.js"></script>
    <script> $(document).ready(function () { $("#div1").animate({ left: "200px", top: "200px", right: "200px", bottom: "200px" }); }); </script>
    <style>
        #div1 {
            position: absolute;
            left: 0px;
            background-color: #68A3B3;
            border: 2px silver solid;
            color: white;
            text-align: center;
        }
    </style>
</head>
<div id="div1">
    <h1> Browser Based Authentication Example Welcome Page </h1>
    <h1>
        <p> Welcome <%= request.getRemoteUser() %>!
    </h1> <a href="logout.jsp"> Logout </a>
</div>
</body>

</html>
style1.css
#login
 {
   position: absolute;
   left : 400px;
   right: 400px;
   top: 200px;
   bottom: 200px;
   border: 2px silver solid;
   color: #389093;
 }
 h2
 {
 color: 389093;

 }

 #message
 {
  color: violet;

 }
 #box1
 {
   padding: 5px;
 }
 #textbox1
 {
   position: absolute;
   left: 140px;
  padding: 5px;
  width: 200px;
 }

 #textbox1:hover
 {
   position: absolute;
   left: 140px;
   padding: 5px;
   width: 200px;
   border-color: violet;
   color: black;
 }

#button1
 {
  background-color: green;
  color: silver;
  font-weight: bold;
 }

#button1:hover
 {
  background-color: green;
  color: white;
  font-weight: bold;
 }
Step4: Under "WEB-INF/classes" directory copy the below file
This servlet is to print the session creation in the tomcat STDOUT. check the catalina.log once deployed to verify.
MySessionListener.java
import javax.servlet.http.HttpSessionListener;
import javax.servlet.http.HttpSessionEvent;
public class MySessionListener implements HttpSessionListener
{
    private static int sessionCount = 0;
    public void sessionCreated(HttpSessionEvent se)
    {
        sessionCount++;
        // Write to a log or do some other processing.
        System.out.println("Session has been created");
        System.out.println("Current Session count is"+sessionCount);
    }
    public void sessionDestroyed(HttpSessionEvent se)
    {
        if(sessionCount > 0)
        sessionCount--;
        //Write to a log or do some other processing.
        System.out.println("Session has been destroyed");
        System.out.println("Current Session count is"+sessionCount);
    }
}
compile the code using javac and make sure you are getting a class file getting generated MySessionListener.class
"javac MySessionListener.java"
Step 5: create "web.xml" (deployment descriptor) file under "TestSecApp/WEB-INF"
<web-app xmlns:xsi="http://www.w3.org/2001/XMLSchema-instance" xmlns="http://java.sun.com/xml/ns/javaee"
    xmlns:web="http://java.sun.com/xml/ns/javaee/web-app_2_5.xsd"
    xsi:schemaLocation="http://java.sun.com/xml/ns/javaee http://java.sun.com/xml/ns/javaee/web-app_2_5.xsd"
    id="WebApp_ID" version="2.5">
    <welcome-file-list>
        <welcome-file>Test.jsp</welcome-file>
    </welcome-file-list>
    <error-page>
        <error-code>404</error-code>
        <location>/error.html</location>
    </error-page>
    <security-constraint>
        <web-resource-collection>
            <web-resource-name>Success</web-resource-name>
            <url-pattern>/Test.jsp</url-pattern>
            <http-method>GET</http-method>
            <http-method>POST</http-method>
        </web-resource-collection>
        <auth-constraint>
            <description> These are the roles who have access. </description>
            <role-name>webuser</role-name>
        </auth-constraint>
        <user-data-constraint>
            <description> This is how the user data must be transmitted. </description>
            <transport-guarantee>NONE</transport-guarantee>
        </user-data-constraint>
    </security-constraint>
    <login-config>
        <auth-method>FORM</auth-method>
        <form-login-config>
            <form-login-page>/login.jsp</form-login-page>
            <form-error-page>/fail_login.jsp</form-error-page>
        </form-login-config>
    </login-config>
    <security-role>
        <role-name>webuser</role-name>
    </security-role>
    <listener>
        <listener-class>MySessionListener</listener-class>
    </listener>
</web-app>
Step7: Build war file using "jar -cvf" command like given below.

Step 8: Update the "TOMCAT_HOME/tomcat-users.xml" - tag.
Here mwiuser is the user id that we are going to use and it has been mapped to webuser. As per the configuration in web.xml. Any member of "webuser" group can log in and access the secured resource.

Step9: Deploy the Application to tomcat using the console (i.e: localhost:8080/manager) (or) just copy the war file you have created to the "Tomcat_home/webapps/"
Step 10: Restart the Tomcat Server.
Step11: Access the deployed application using the url
http://localhost:8080/TestSecApp
Note*: TestSecApp is the war file name which will be taken as a context root by default.
Github Repo - Source code of the Java Web Application
You can find the source code in the following Github repository
https://github.com/AKSarav/TestSecApp
Download the TestSecApp.war file from here
You can download the TestSecApp.war file directly from here
Results:
Access the application and type the username and password we mentioned in the tomcat-users.xml file.

Well. we now have our own "Secured Web Application with Form-Based Authentication".
Please let me know if you have any queries through the "comments" or write to us at [email protected]
Cheers
Sarav AK

Follow me on Linkedin My Profile Follow DevopsJunction onFacebook orTwitter For more practical videos and tutorials. Subscribe to our channel
Signup for Exclusive "Subscriber-only" Content