The Overview
This post is about the Java J2EE web application and starts with explaining what is Web Application and why they are called as WAR files and what is the Standard Directory Structure of Web Application or WAR file and What WAR files are consists of etc and continues with Development with NetBeans and Code Explanation.
You can use this application as a test war file or sample web application to deploy and test as well as a Snoop Servlet or a Lightweight Web application to monitor if the server or JVM is running fine.
This web application can be deployed to weblogic, tomcat, WebSphere and JBoss
Update:
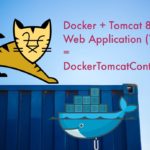
The Application is available as a Docker Container. Refer this article on how to create a Docker Container and Deploy this application.
Image can be downloaded directly from Docker Hub or you can simply pull the image
docker pull saravak/tomcat8To know more about how to create a Tomcat Docker Container and Deploy this image. Refer my another article here
What is Snoop Servlet
The SnoopServlet is a servlet to display the HTTP request information and Server information in a Debug Manner. It can be used to monitor the JVM or application server instance. This can also be used to validate the HTTP headers and Cookies being passed to the Application.
If you have come here looking for the test WAR file or a Sample web application to download and deploy and test and in the rush of downloading the WAR file quickly. Please Use the following link to download the test WAR file.
Salient features of this Sample web application
- Can be deployed in Tomcat, Weblogic, Websphere, and Jboss for testing and to monitor
- The Snoop Servlet page in the application helps you monitor the application and Node-wise Application (or) JVM[Application Server] Status
- You can deploy this application in a cluster and test which node is actually getting the request
- With this application, you can Test the Load Balancing and Failover
- The Snoop servlet collects and displays the following information of the JVM/Application Server
- The Hostname and the IP address where the JVM is hosted
- JVM Name ( works in weblogic and WebSphere)
- Date and Time of the Response
- Cookies and Headers sent with the request
If you would like to explore more and know what is Web Application and the Directory Structure of Web Application and Developing Web Application continue to read.
What is a Java Web Application
Java Web application or J2EE web application is a terminology to call the application developed with J2EE web components and designed to run on the web container of any J2EE Application server.
J2EE has various components and services and the J2EE components can be categorised into two major groups
- Web Components ( HTML, JSF, Servlet, JSP)
- EJB Components ( EJB, EDB, SDB, MDB)
The web application or a WAR is a Collective of these J2EE-defined Web Components with some Standard Directory Structure and formats.
In this post, we are going to use the Simple Web Application designed for Tomcat and Weblogic which can also be used for other application servers like JBoss and Websphere.
Where to Deploy or Host Java Web Application
Java Web Applications are archived and distributed in the form of WAR(Web Archive) or EAR(Enterprise Archive)
Based on the Type of Archive or type of Java Web Application, It can be deployed or hosted on one of the following J2EE Application servers
- Apache Tomcat - Supports only Web Archive
- JBoss - Supports both Web and Enterprise Archive
- Oracle Weblogic - Supports both Web and Enterprise Archive
- IBM Websphere - Supports both Web and Enterprise Archive
- GlassFish - Supports both WAR and EAR
Apache Tomcat is a widely used Java Web Application server and a Goto Server to host and deploy your Java Web Application
Apache Tomcat vs All other J2EE Application Servers
In Software development the trends have changed and as I am writing re-editing this article in 2023. There are a lot of reliable Web Application server solutions available from Python, GoLang, NodeJS etc
So if you ask me now, Would I choose J2EE or Java for my Web Application? I would say probably say NO.
Unless there is a specific reason like security which force me to choose Java over other Web Servers or Middleware.
But back then, before 2018 J2EE Application servers ruled the world with no major competitor.
The major difference between Tomcat and other Corporate backed J2EE application server is the support of J2EE components and services like JMS, JDBC, JNDI, EJB etc.
They are not industry buzzwords but powerful features to extend your Java Web Application
- JMS - Java Messaging service ( IBM Websphere MQ, TIBCO)
- JDBC - Java Database Connectivity
- JNDI - Java Naming Directory Index
- EJB - Enterprise Java Bean
These services made the normal Java Web Application into Enterprise level Applications that's why they are called EAR or Enterprise Archive.
These J2EE services were not supported by Tomcat because it wanted to support Java Web Applications
Does it mean Tomcat cannot host Enterprise-level Java Web Applications?
Not true, You can still deploy Enterprise grade Java Web Applications into Tomcat but they have to be designed explicitly and not depend on tomcat for these services.
Java Spring Framework has revolutionized Java Web Application Development by making it easy and affordable.
You can build your Java WebApp with Spring and deploy it to tomcat.
Since we are focusing on a Simple Java Web Application we are going to take Tomcat and WebArchive in this article
What is a WAR file and What does it mean?
When you bundle those aforementioned Web Components together in a Specific and defined architecture, it becomes a Fully Qualified Web Application, and they mostly have *.war as an extension.
WAR is an acronym for Web Archive
The Directory Structure of the WAR file.
WAR is more like a ZIP file and you can extract it with Jar command. To know what is inside the WAR file and the directory structure of the WAR file.
$ tree SampleWebApp
SampleWebApp
├── META-INF
│   ├── MANIFEST.MF
│   └── context.xml
├── WEB-INF
│   ├── classes
│   │   └── com
│   │       └── middlewareinventory
│   │           └── SnoopServlet.class
│   ├── web.xml
│   └── weblogic.xml
├── index.html
└── welcome.jsp

5 directories, 7 files
Here
WEB-INF and META-INF are Standard Directory Structure to frame a WAR file as per J2EE specifications.
where WEB-INF is mandatory for all Web Application and META-INF is optional for a Web Application. WEB-INF consists of some XML files called as Deployment Descriptors
XML files (Deployment Descriptors) [weblogic.xml, web.xml, context.xml]: These XML files are called Deployment Descriptors and they vary in content and syntax per application server
index.html: The Frontend and Welcome Page of our Application
welcome.jsp: The JSP page being used by the SnoopServlet to display with formatting
SnoopServlet.class: A compiled java Servlet file to print the HTTP Request and Server info
Developing a Simple Web Application using NetBeans IDE
- Click on File -> New Project
- Select JavaWeb under categories and let the Projects be Web Application
- In the Project Name field, Type the Name you want to set for your web application
- In the Server and Settings wizard,
- Choose the Application Server platform you want, from the Server Drop Down Weblogic, Glassfish, Tomcat
- Choose your JavaEE version
- Set the Context Path for your application ( By default, your project name)
- Click on Finish
- Once you are presented with the default index.html of your project, Update the file with your desired code.
- To Deploy and Run your application, Click on your Project Name on the Navigator on the left panel and choose your desired operation.
This way you can create a minimal and working web application for the weblogic application server and the same code can be used for Tomcat and JBoss, and there would be some little modifications may require for Websphere to make the same code to work.
Rather reinventing the wheel, you can import the SampleWebApp discussed in this post into your NetBeans IDE.
Download the NetBeans ZIP file for SampleWebApp
Steps to Import the SampleWebApp into your Netbeans IDE
- Download the ZIP distribution of SampleWebApp from here
- In Netbeans, Go to File menu and click on Import Project and then choose From ZIP
- Browse and Select the ZIP file you have downloaded in Step1
Once you have imported the Project, you can view the code and modify it and rebuild it and Deploy it to your local Application Server
Testing the Sample Web Application ( Screenshots)
In my local Infrastructure, I have deployed the subjected SampleWebApp.war into Tomcat 8 and Weblogic 12c and this is how the runtime Application looks like in the browser
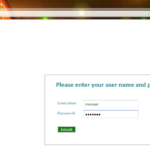
The Common Home page
The Home Page of the application is common for all the application servers and it has a link(hyperlink) to reach the SnoopServlet

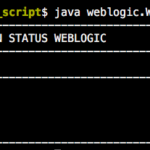
The Snoop Servlet Page
The Snoop Servlet would differ for each application server as it displays the URL it connects to and the JVM name.
The JVM Name or Application Server Instance Name will be displayed only for Weblogic Server as Tomcat has no concept of Instance name like Weblogic does.
Dont Get confused by seeing a different URL ( welcome.jsp) in the HTTP Request URL. We intentionally designed our SnoopServlet to invoke the welcome.jsp internally to display the results for better Display and Styles (CSS & tables)
SnoopServlet is displaying the Actual handling file/URI of the Request which is welcome.jsp.

Code and Explanation
The SampleWebApp.war consists of Three important files and they are given here and explained
The Index.html page
It is a simple front-end HTML file with a hyperlink to the Snoop servlet.
<!DOCTYPE html>
<!--
To change this license header, choose License Headers in Project Properties.
To change this template file, choose Tools | Templates
and open the template in the editor.
-->
<html>
    <head>
        <title>SampleWebApp</title>
        <meta charset="UTF-8">
        <meta name="viewport" content="width=device-width, initial-scale=1.0">
    </head>
    <body>
        <h2>Sample Web Application To Deploy and Test</h2>
        <br>
    <div> click <a href="SnoopServlet">Click to Invoke a SnoopServlet</a></div>
    <br>
    <br>


    </body>
</html>
The SnoopServlet
The SnoopServlet is a servlet to display the HTTP request information and Server information in a Debug manner.
For Better Code efficiency and for Good Formatting (css and tables) we have moved the Logic part which displays all these HTTP and Server information to the JSP file named welcome.jsp
So the Snoop servlet here just invokes the welcome.jsp file and that does all the work for us
Since the Servlet code is usually big, We have just given the main and primary function of servlet which is processRequest
  protected void processRequest(HttpServletRequest request, HttpServletResponse response)
            throws ServletException, IOException {
        response.setContentType("text/html;charset=UTF-8");
        try (PrintWriter out = response.getWriter()) {
          try {
            RequestDispatcher view = request.getRequestDispatcher("welcome.jsp");
            view.forward(request,response);

        } finally {
            out.close();
        }
        }

    }
The Welcome.jsp file
As said earlier, the welcome.jsp is doing all the logic required to print the Debugging information like HTTP request headers, cookies, Server related information etc.
<% –
    Document   : welcome
    Created on : 23 Jul, 2018, 5:39:03 AM
    Author     : [email protected]
--%>

<%@page contentType="text/html" pageEncoding="UTF-8"%>
<%@ page import="java.util.*" %>
<%@ page import="java.net.InetAddress" %>
<!DOCTYPE html>
<html>
    <head>
        <meta http-equiv="Content-Type" content="text/html; charset=UTF-8">
        <link href="https://fonts.googleapis.com/css?family=Open+Sans" rel="stylesheet">
        <title>Sample Web Application  - SnoopServlet</title>
        <style>
            body{
                font-family: 'Open Sans', sans-serif;
            }
            table,td,tr{
                border: 1px solid;
                border-collapse: collapse;
            }
            span{
                font-weight: normal;
                font-size: 16px;
                color: black;
            }
            </style>
    </head>
    <body>

        <%
            String hostName;
            String serverName;
            Date Time;
            String Dtime;
            hostName = InetAddress.getLocalHost().getHostName()+" with IP="+InetAddress.getLocalHost().getHostAddress()+" ";
            serverName = System.getProperty("weblogic.Name");
            Time = new Date();
            Dtime = Time.toString();
            %>

        <h2> This is a Sample Web Application - Snoop Servlet  </h2>
        <hr>

         <div>
            <h4>Host Name & IP Address: <span><%=  hostName %></span></h4>
            <h4>JVM Name: <span><%=  serverName %></span></h4>
            <h4> Date & Time: <span> <%= Dtime %> </h4>
        </div>

        <h4>HTTP Request URL : <span><%= request.getRequestURL() %></span></h4>
        <h4>HTTP Request Method : <span><%= request.getMethod() %></span></h4>

        <h4>HTTP Request Headers Received</h4>

        <table>
            <%
                Enumeration enumeration = request.getHeaderNames();
                while (enumeration.hasMoreElements())
                 {
                  String name=(String)
                  enumeration.nextElement();
                  String value = request.getHeader(name);
              %>
                <tr>
                    <td>
                        <%=name %>
                    </td>
                    <td>
                        <%=value %>
                    </td>
                </tr>
             <% } %>
        </table>

        <h4>HTTP Cookies Received</h4>

          <table>
               <%

            Cookie[] arr1= request.getCookies();
            for (int i=0; i < arr1.length; i++)
            {
                String cookiename = arr1[i].getName();
                String cookievalue = arr1[i].getValue();

            %>
                <tr>
                    <td>
                        <%=cookiename %>
                    </td>
                    <td>
                        <%=cookievalue %>
                    </td>
                </tr>
             <% } %>
        </table>


</body>
</html>
How to Handle the WAR file ( Additional Content)
There are few frequently asked questions amongst Middleware Administrators like
"How to extract the war file in windows or Linux
Display the content of the WAR file without extracting it
Extract the war file and modify something and rebuild the war file"
If that is your question too. This could help you.
Extract the WAR file using a JAR command
Just like javac and java, Jar command is also available in $JAVA_HOME/bin directory. you can use jar -cvf command to extract the WAR file
$jar -xvf SampleWebApp.war
  created: META-INF/
extracted: META-INF/MANIFEST.MF
  created: WEB-INF/
  created: WEB-INF/classes/
  created: WEB-INF/classes/com/
  created: WEB-INF/classes/com/middlewareinventory/
extracted: META-INF/context.xml
extracted: WEB-INF/classes/com/middlewareinventory/SnoopServlet.class
extracted: WEB-INF/web.xml
extracted: WEB-INF/weblogic.xml
extracted: index.html
extracted: welcome.jsp
Display what is inside the WAR file without Extracting
you can use jar -tvf command to display what is inside the war file without even having to extract it
$ jar -tvf SampleWebApp.war
     0 Sun Feb 17 21:18:48 IST 2019 META-INF/
   104 Sun Feb 17 21:18:46 IST 2019 META-INF/MANIFEST.MF
     0 Sun Feb 17 21:18:46 IST 2019 WEB-INF/
     0 Sun Feb 17 21:18:46 IST 2019 WEB-INF/classes/
     0 Sun Feb 17 21:18:46 IST 2019 WEB-INF/classes/com/
     0 Sun Feb 17 21:18:46 IST 2019 WEB-INF/classes/com/middlewareinventory/
    71 Sun Feb 17 21:18:46 IST 2019 META-INF/context.xml
  2073 Sun Feb 17 21:18:46 IST 2019 WEB-INF/classes/com/middlewareinventory/SnoopServlet.class
   688 Sun Feb 17 21:18:46 IST 2019 WEB-INF/web.xml
   568 Sun Feb 17 21:18:46 IST 2019 WEB-INF/weblogic.xml
   581 Sun Feb 17 21:18:46 IST 2019 index.html
  3097 Sun Feb 17 21:18:46 IST 2019 welcome.jsp
Re-Building the WAR file after Modification (or) Creating a WAR file
$ jar -cvf SampleWebApp.war welcome.jsp index.html WEB-INF/ META-INF/
added manifest
adding: welcome.jsp(in = 3097) (out= 1020)(deflated 67%)
adding: index.html(in = 581) (out= 323)(deflated 44%)
adding: WEB-INF/(in = 0) (out= 0)(stored 0%)
adding: WEB-INF/classes/(in = 0) (out= 0)(stored 0%)
adding: WEB-INF/classes/com/(in = 0) (out= 0)(stored 0%)
adding: WEB-INF/classes/com/middlewareinventory/(in = 0) (out= 0)(stored 0%)
adding: WEB-INF/classes/com/middlewareinventory/SnoopServlet.class(in = 2073) (out= 985)(deflated 52%)
adding: WEB-INF/web.xml(in = 688) (out= 279)(deflated 59%)
adding: WEB-INF/weblogic.xml(in = 568) (out= 260)(deflated 54%)
ignoring entry META-INF/
adding: META-INF/context.xml(in = 71) (out= 73)(deflated -2%)
ignoring entry META-INF/MANIFEST.MF
The Syntax of this command is simple.
jar -cvf <WAR file Name> <List of files to be added into WAR file seperated by space>
Further References
- J2EE Documentation - J2EE Documentation from Oracle
Hope it helps
Cheers,
Sarav AK

Follow me on Linkedin My Profile Follow DevopsJunction onFacebook orTwitter For more practical videos and tutorials. Subscribe to our channel
Signup for Exclusive "Subscriber-only" Content