In this article, I am going to discuss how we can keep safe our terraform state file using terraform cloud.
As a pioneer/Practioner of Terraform CLI, we hold responsible for Terraform state file which is the source of truth for our infrastructure.
What if we lose this state file or delete it by mistake?? This would create havoc and terraform will try to create infra resource again!!
We can keep your state file secure and share it with collaborators, by migrating it to Terraform Cloud without interrupting or recreating your existing infrastructure.
Prerequisites
- Terraform installed in local ( terraform -cli)
- Terraform cloud account
You can create an account in Terraform cloud using the below link
Step1: Create an Organization in Terraform Cloud
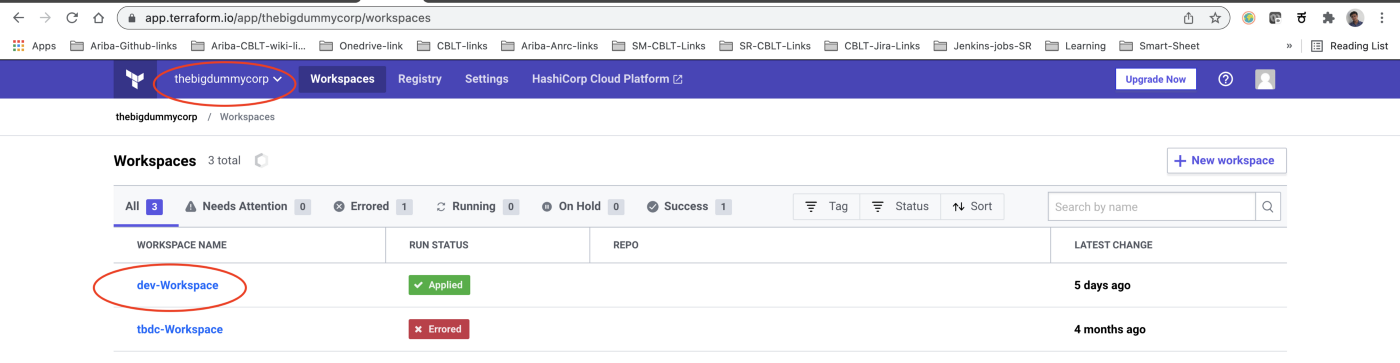
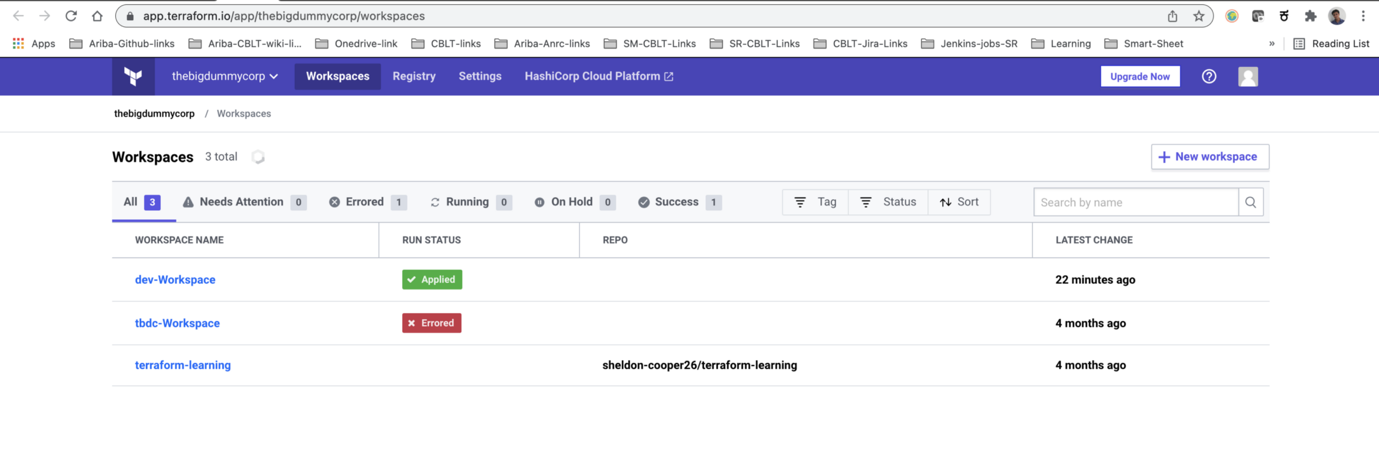
Once you have Terraform cloud account, create an organisation and workspace accordingly.
Here I have created an organisation called thebigdummycorp and two workspaces namely dev-workspace and tbdc-workspace
Step2: Create Configuration files
Create a directory by any name (For eg: check-terraform-cloud) and create a sample state file in it. Next, create a .tf file named main.tf in this directory
$ mkdir check-terraform-cloud
$ cd check-terraform-cloud
$ touch main.tf
copy and paste the below content into your main.tf
## Terraform configurationterraform {
required_providers {
    random = {
        source = "hashicorp/random"
        version = "3.0.1"
    }
}
required_version = ">= 1.1.0"
}

variable "name_length" {
    description = "The number of words in the pet name"
    default = "5"
}

resource "random_pet" "pet_name" {
    length = var.name_length
    separator = "-"
    }

output "pet_name" {
    value = random_pet.pet_name.id
}
this configuration uses the random_pet resource to generate and output a random pet name with a given number of words. The length of the name is determined by the value of the name_length variable, which defaults 5.
Step3: Initialize Terraform
Initialise directory using terraform init command
$ terraform init
$ terraform initInitializing the backend...
Initializing provider plugins...
- Finding hashicorp/random versions matching "3.0.1"...
- Installing hashicorp/random v3.0.1...
- Installed hashicorp/random v3.0.1 (signed by HashiCorp) Terraform has created a lock file .terraform.lock.hcl to record the providerselections it made above. Include this file in your version control repositoryso that Terraform can guarantee to make the same selections by default whenyou run "terraform init" in the future.
Terraform has been successfully initialized!
After Terraform initialises, apply the configuration and approve the run by typing “yes” at the prompt. (or you can pass auto approve flag to bypass prompt)
$ terraform apply
Terraform used the selected providers to generate the following execution plan. Resource actions are indicated with the following symbols:
+ createTerraform will perform the following actions:# random_pet.pet_name will be created
+ resource "random_pet" "pet_name" {
+ id = (known after apply)
+ length = 5
+ separator = "-"
}Plan: 1 to add, 0 to change, 0 to destroy.Changes to Outputs:
+ pet_name = (known after apply)

Do you want to perform these actions?

Terraform will perform the actions described above.

Only 'yes' will be accepted to approve.

Enter a value: yes

random_pet.pet_name: Creating...
random_pet.pet_name: Creation complete after 0s [id=mostly-joint-lacewing]
Apply complete! Resources: 1 added, 0 changed, 0 destroyed.

Outputs:

pet_name = "promptly-optionally-reliably-merry-vulture"
Terraform will output a five-word randomly generated pet name. Here it has generated ‘promptly-optionally-reliably-merry-vulture’
Step4: Configure Terraform Cloud
Now that we have a local state file, we need to create a cloud code block in your configuration.
The Terraform CLI workflow saves our state as a terraform.tfstate file in the directory where we run terraform apply.
To migrate your state to Terraform Cloud, update the cloud block and change the <ORG_NAME> to your Terraform Cloud organisation name.
## Terraform configuration

terraform
{
    cloud
        {
            organization = "thebigdummycorp"
            workspaces {name = "dev-Workspace"}
        }
    required_providers
        {
            random = {source = "hashicorp/random"version = "3.0.1"}
        }
    required_version = ">= 1.1.0"
}

variable "name_length" {
    description = "The number of words in the pet name"
default = "5"
}

resource "random_pet" "pet_name" {
    length = var.name_length
    separator = "-"
}
output "pet_name" {
    value = random_pet.pet_name.id
}
Here I have used organization = thebigdummycorp and workspace = dev-Workspace (Change it accordingly as per your requirement)
Replace the organisation and workspaces attribute values with the name of your Terraform Cloud organisation and desired workspace name.
While the organization defined in the cloud stanza must already exist, the workspace does not have to;
Terraform Cloud will create it if necessary. If you opt to use a workspace that already exists, the workspace must not have any existing states.
Step5: Authentication with Terraform Cloud
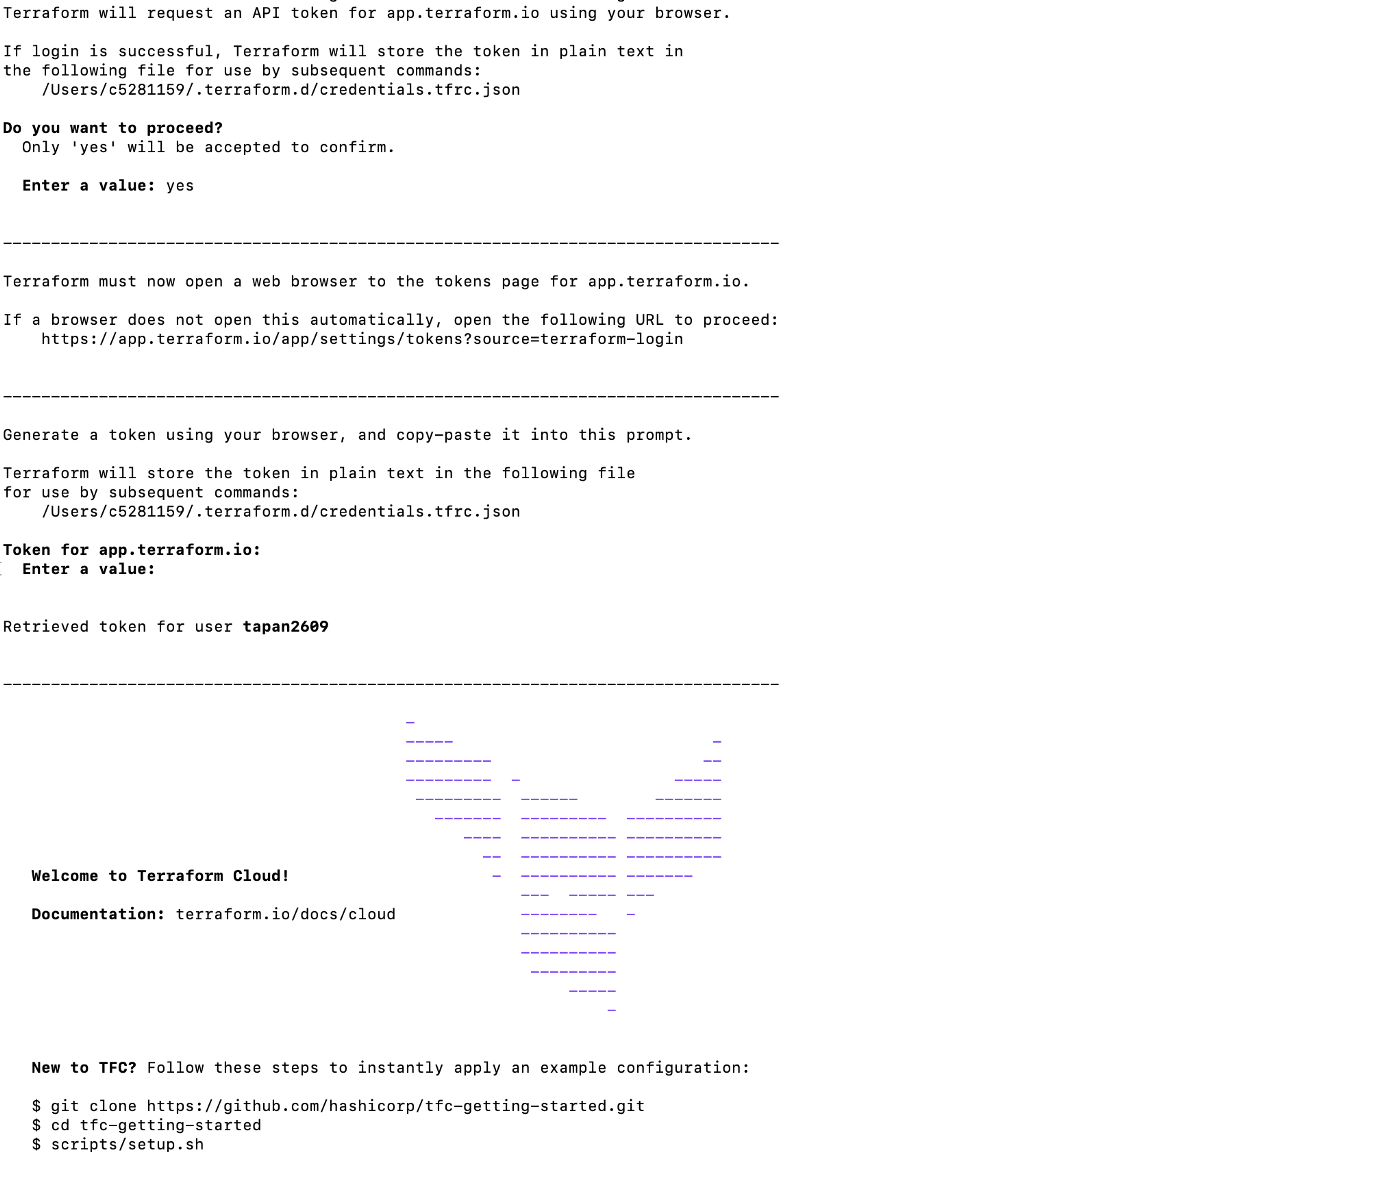
Now that we have defined our Terraform Cloud configuration, we must authenticate with Terraform Cloud in order to proceed with initialisation. In order to authenticate with Terraform Cloud, run the terraform login subcommand, and follow the prompts to log in.
$ terraform login

Terraform will request an API token for `app.terraform.io` using your browser.

If login is successful, Terraform will store the token in plain text inthe following file for use by subsequent commands:/Users/c5281159/.terraform.d/credentials.tfrc.json

**Do you want to proceed?**

Only 'yes' will be accepted to confirm.

**Enter a value:**
Enter the value as ‘Yes’ and it will open a browser prompt in Terraform cloud where we can create an API token.
(Refer to below screenshot)
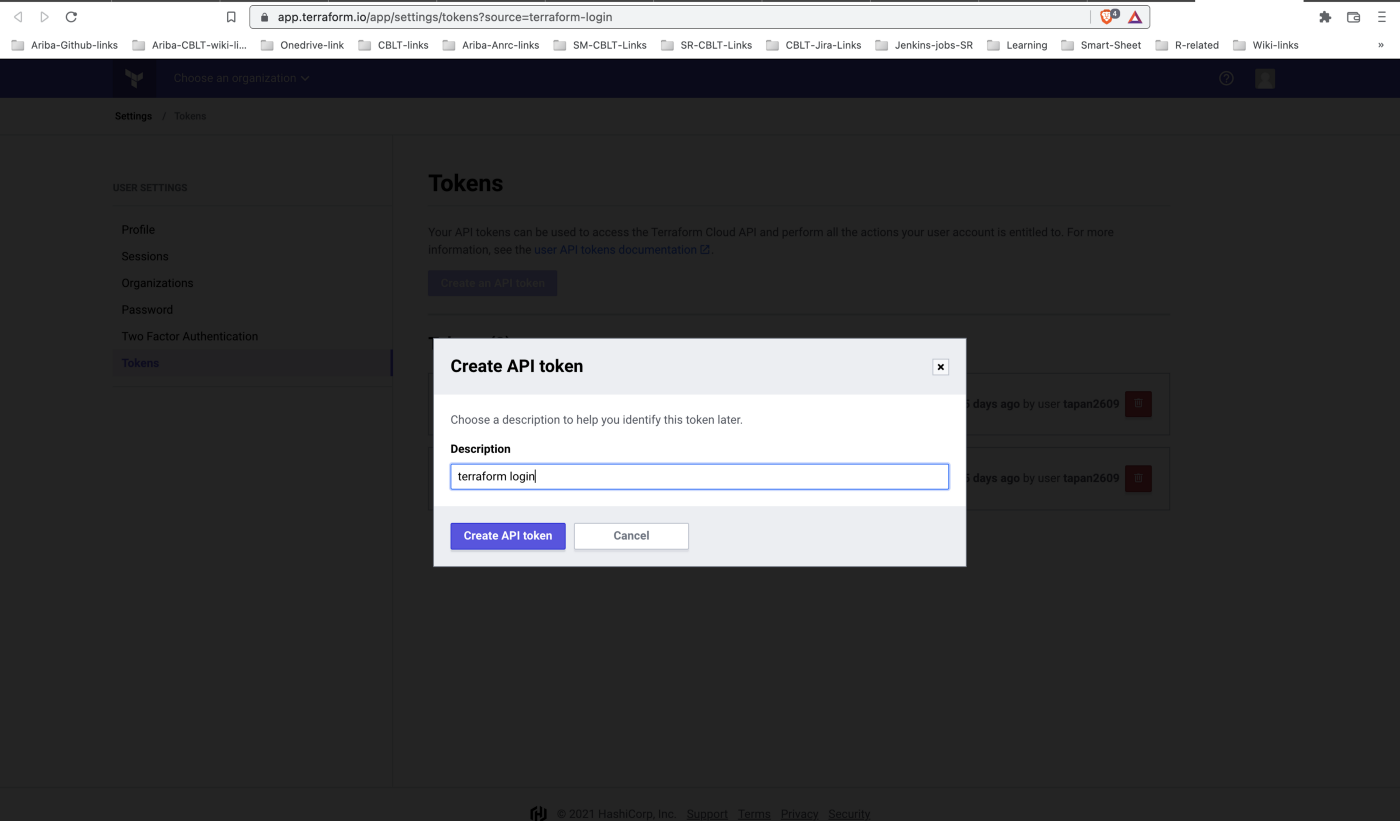
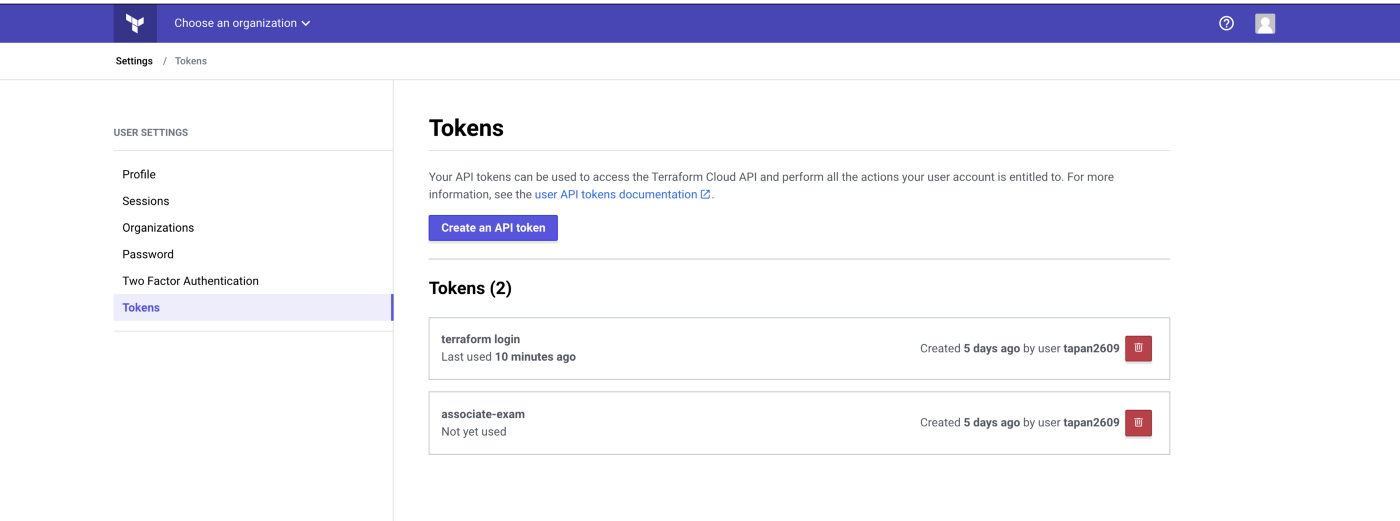
Give a valid name in the Description block and click on Create API Token
You will get a long string of tokens (keep it safe and don’t lose it)
Next in the command prompt pass this token value
Terraform will request an API token for `app.terraform.io` using your browser.

If login is successful, Terraform will store the token in plain text inthe following file for use by subsequent commands:/Users/c5281159/.terraform.d/credentials.tfrc.json

**Do you want to proceed?** Only 'yes' will be accepted to confirm.

**Enter a value:**
Once login is successful, you can see terraform console logs as below
You can see created tokens under the ‘User Settings’ tab
Step6: Migrate the state file
Once we have authenticated to Terraform Cloud, we are ready to migrate our local state file to Terraform Cloud. To begin the migration, reinitialize.
This causes Terraform to recognize your cloud block configuration.
During reinitialization, Terraform presents a prompt saying that it will copy the state file to your Terraform Cloud workspace. Enter yes and Terraform will migrate the state from your local machine to Terraform Cloud.
$ terraform init
initializing Terraform Cloud...
Do you wish to proceed?
As part of migrating to Terraform Cloud, Terraform can optionally copy your current workspace state to the configured Terraform Cloud workspace.
Answer "yes" to copy the latest state snapshot to the configured Terraform Cloud workspace.
Answer "no" to ignore the existing state and just activate the configured Terraform Cloud workspace with its existing state, if any.
Should Terraform migrate your existing state? Enter a value:
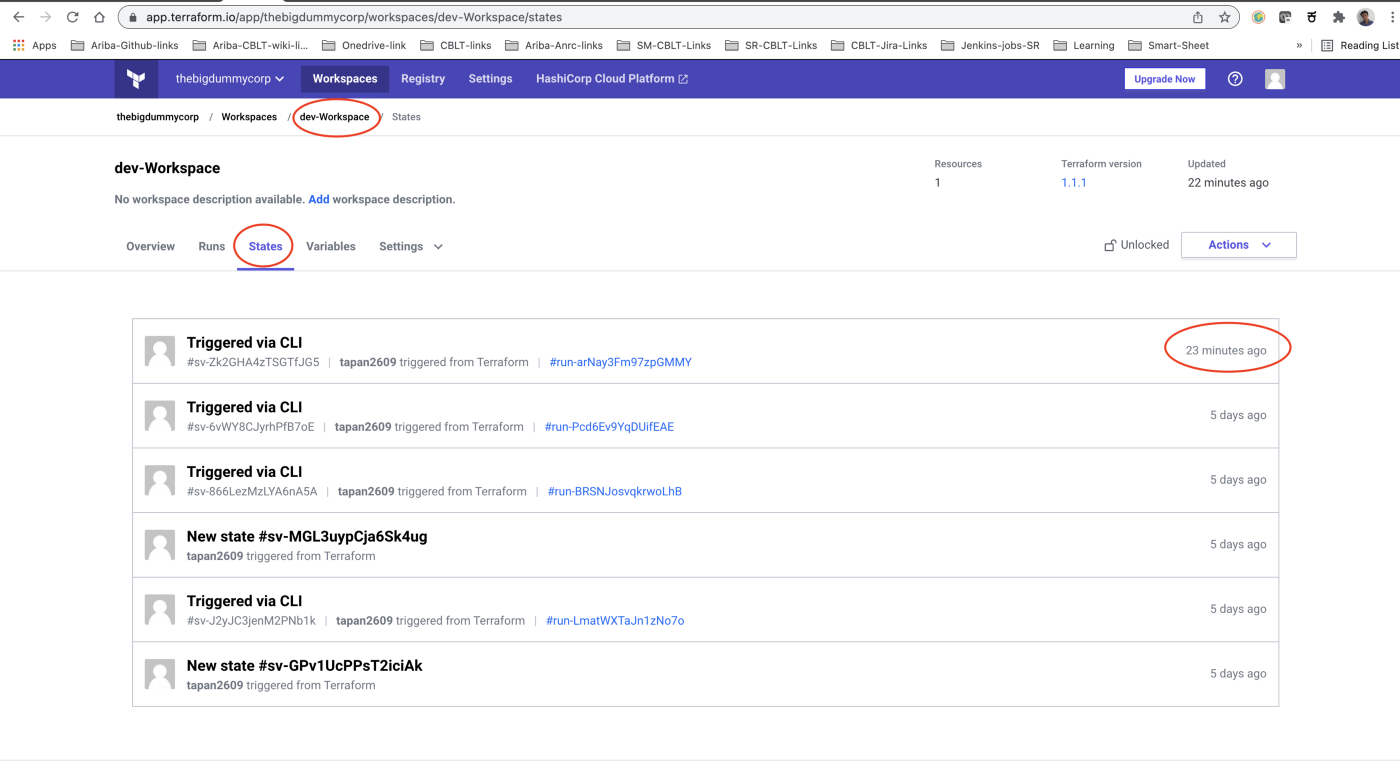
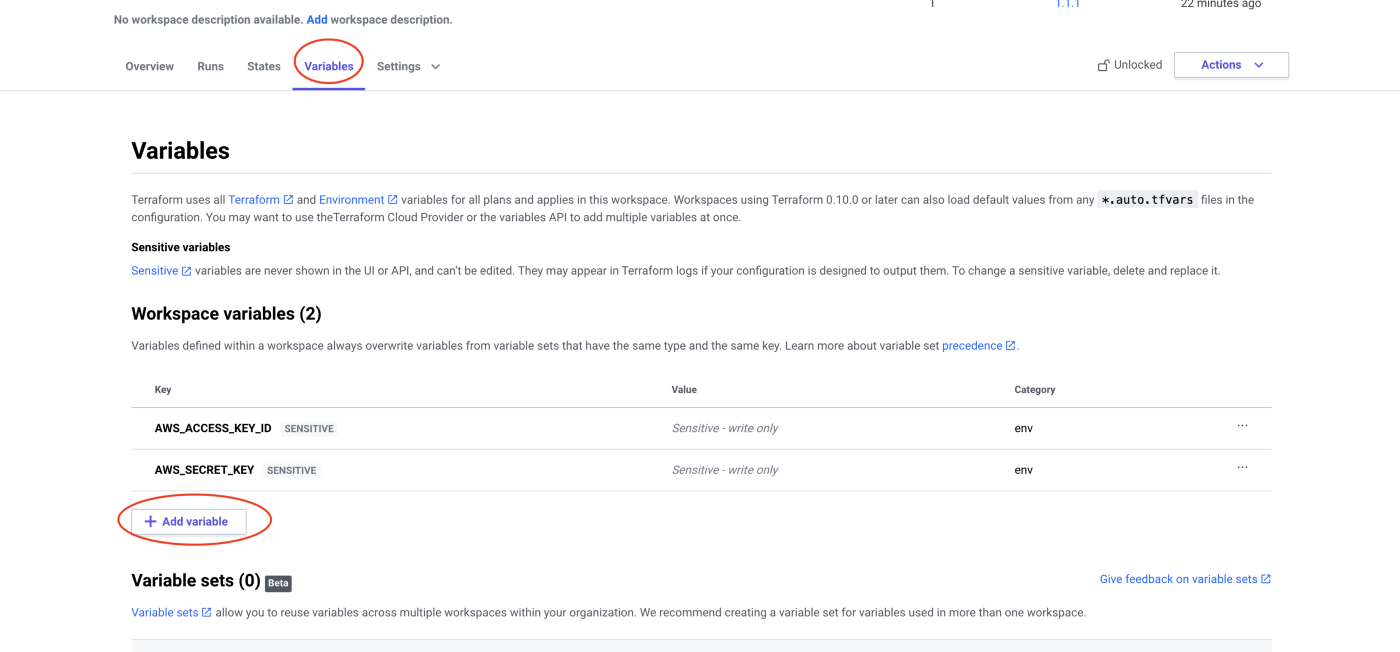
Step7: Configure the Terraform Cloud workspace
After migrating your state to Terraform Cloud, log in to the Terraform Cloud web UI, find your workspace name as defined in your cloud block, and click on it. Navigate to the States tab of the workspace, and see your first action within the workspace. (Refer below screenshots )
Remember that our configuration has a variable that we need to add to the new workspace.
Click the “Variables” tab in the workspace and then “Add variable”. Enter the name of the variable, name_length, as the key. Then enter a new value, 8, and save the variable.
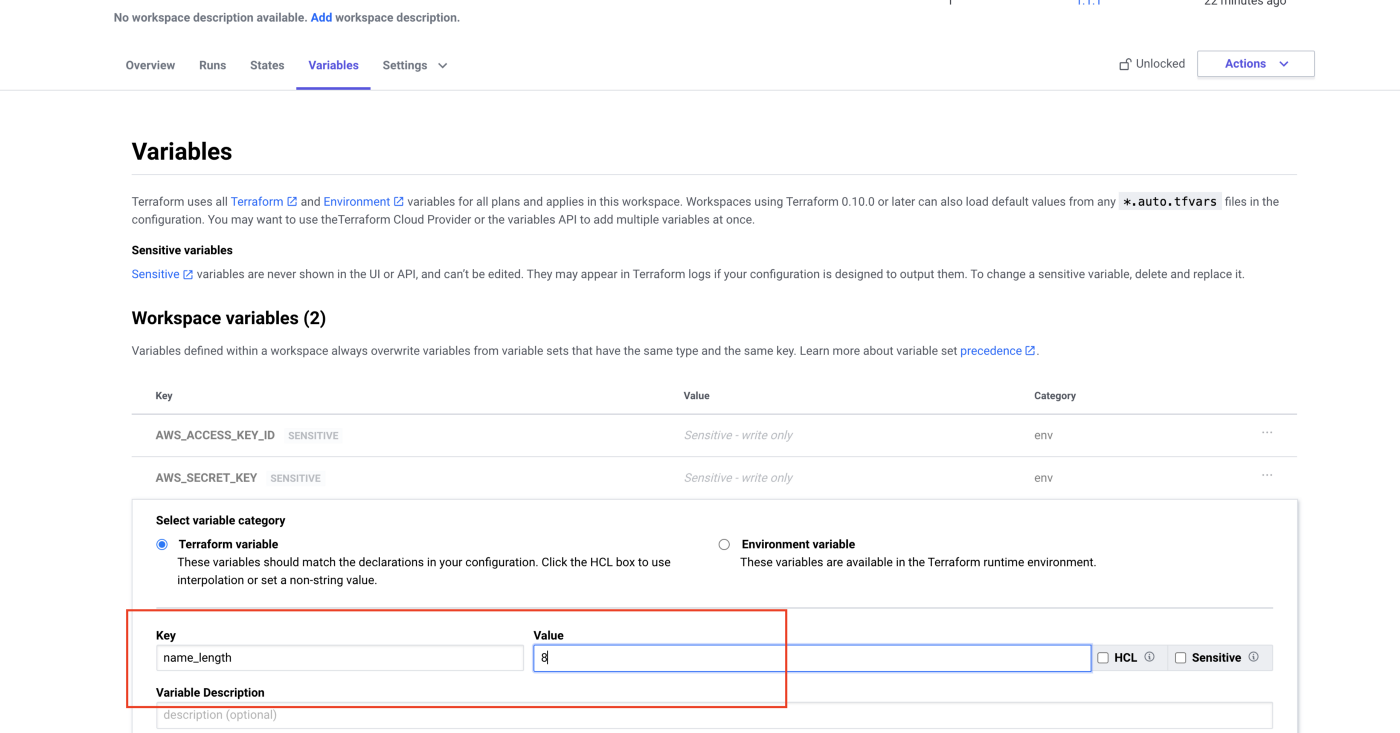
For real-world configurations, We can add cloud platform credentials and any other configuration variables to the workspace as well.
Step8: Initiate a run in the new workspace
After verifying that the state was migrated to the Terraform Cloud workspace, remove the local state file.
$ rm terraform.tfstate
Next, apply a new run
$ terraform apply
Running apply in Terraform Cloud.
Output will stream here.
Pressing Ctrl-Cwill cancel the remote apply if it's still pending.
If the apply started itwill stop streaming the logs, but will not stop the apply running remotely.
Preparing the remote apply...
To view this run in a browser, visit:<https://app.terraform.io/app/thebigdummycorp/dev-Workspace/runs/run-HJvrtZzQpFcCqHh9>
Waiting for the plan to start...
Terraform v1.1.1on linux_amd64Configuring remote state backend...
Initializing Terraform configuration...

**random_pet.pet_name: Refreshing state... [id=promptly-optionally-reliably-merry-vulture]**

Terraform used the selected providers to generate the following executionplan.

Resource actions are indicated with the following symbols:-/+ destroy and then create replacement

Terraform will perform the following actions:

**# random_pet.pet_name** must be **replaced**-/
	+ resource "random_pet" "pet_name" {
			~ id = "promptly-optionally-reliably-merry-vulture"
			-> (known after apply)
			~ length = 5 -> 8
# forces replacement

# (1 unchanged attribute hidden)}

**Plan:** 1 to add, 0 to change, 1 to destroy.

**Changes to Outputs:**

~ pet_name = "promptly-optionally-reliably-merry-vulture" -> (known after apply)

**random_pet.pet_name: Destroying... [id=promptly-optionally-reliably-merry-vulture]

random_pet.pet_name: Destruction complete after 0srandom_pet.pet_name:

Creating...random_pet.pet_name: Creation complete after 0s [id=remarkably-nominally-terminally-purely-horribly-monthly-lasting-camel]

Apply complete! Resources: 1 added, 0 changed, 1 destroyed.Outputs:**pet_name = "remarkably-nominally-terminally-purely-horribly-monthly-lasting-camel"
Observe logs carefully, it’s been mentioned that apply command is running in the cloud and we can monitor real-time logs (URL is mentioned in logs)
https://app.terraform.io/app/thebigdummycorp/dev-Workspace/runs/run-HJvrtZzQpFcCqHh9
Terraform will stream logs from Terraform Cloud and provide a link to the run in the Terraform Cloud UI. You set a new value for the name_length variable, so the resource will be replaced with one matching the new parameters.
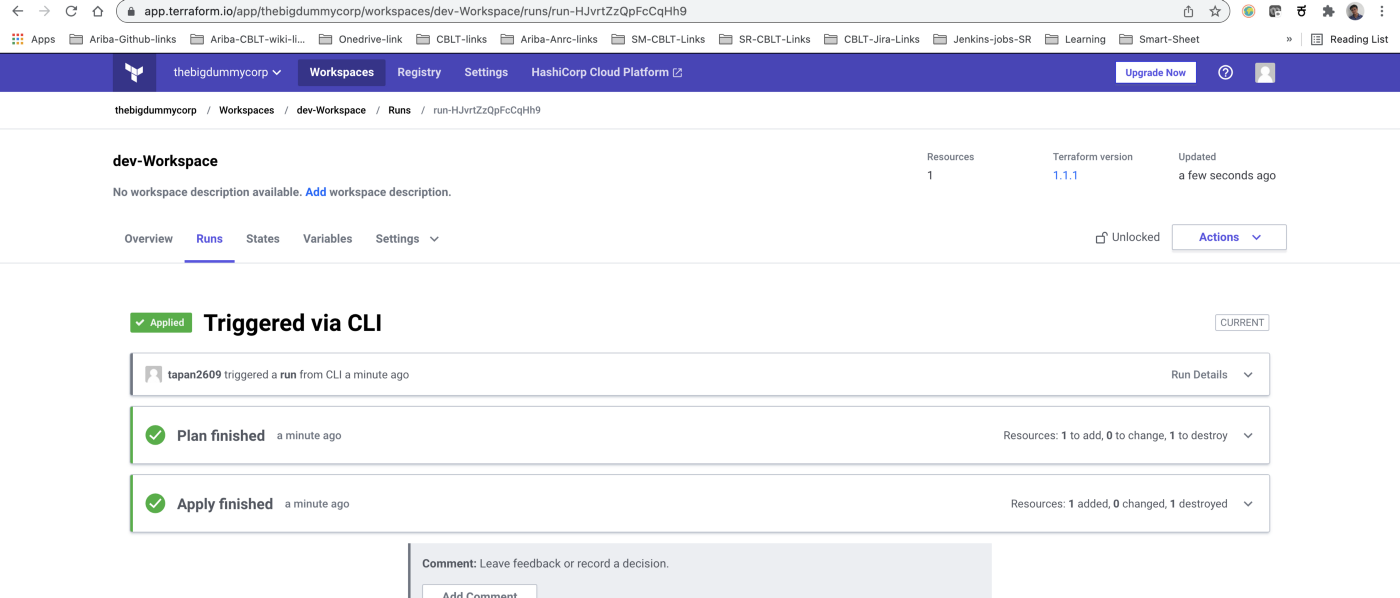

This confirms terraform is reading state files from remote terraform cloud.
This is one of the secure ways of managing your state-file in the production environment.
Cheers
Tapan Hegde