Terraform, An outstanding and innovative product from hashicorp and it is a leader in Infrastructure as Code tools Segment. Before I go any further, I think I should set the context.
In this article, we are going to learn how to use Terraform to create AWS EC2 instance and create a Terraform AWS infrastructure. We will cover few basic elements like what is Infrastructure as code, What is Terraform etc and setup AWS API authentication and start creating Terraform configuration files for AWS provisioning
What is Infrastructure as Code - Terraform
Infrastructure as Code often referred to as IaC, is where the developer or system admins write code to achieve the end state of the infrastructure or server they desire. For example, Let's suppose You want to create an infrastructure of LAMP (Linux Apache MySql PHP) along with some other Linux tools like nc, curl, Openssl etc
The traditional approach is to build the Virtual machine and install these tools one after another. While this sounds convenient. It takes hours of productivity and creates a huge delay for the server setup or provisioning
While the world is moving towards containers and desired state and auto-scale. We need something powerful to help us create instances/Infra in a single click.
Thanks to IaC.!! it helps us set up even a complicated infrastructure in a short span of time.
What tools are used in Infrastructure as Code
There are so many tools in the market helps you to achieve the IaC. Some of them are listed below.
- Chef
- Puppet
- Ansible
- SaltStack
- CloudFormation
- Terraform
All of these can manage IaC and work with different cloud providers except Cloud Formation as it was limited only to AWS. Almost all of them are OpenSource as well backed by a large community. It is always a tough choice to choose the right product from this.
While everything has its pros and cons. Terraform outruns them for the right reasons.
What is Terraform
Terraform typically means transforming (a planet) so as to resemble the earth, especially so that it can support human life.
I would say they named this product right. Terraform. In a universe of various Cloud technologies (planets) like AWS, Azure, Digital Ocean etcetera,
Terraform is an open-source infrastructure as code software tool created by HashiCorp. It enables users to define and provision a data center infrastructure using a high-level configuration language known as Hashicorp Configuration Language (HCL), or optionally JSON.
Terraform supports a number of cloud infrastructure providers such as Amazon Web Services, IBM Cloud (formerly Bluemix), Google Cloud Platform, Linode, Microsoft Azure, Oracle Cloud Infrastructure, or VMware vSphere as well as OpenStack
Since this is going to be the process of Infrastructure as a Code paradigm. We need a API programmatic access for AWS.
So we are going to programmatically create terraform ec2 instance. This article is going to all about Terraform AWS Example and how to Create EC2 instance with Terraform.
If you want to compare Terraform with other IaC products like Ansible, Cloudformation. Don't worry!. Terraform (hashicorp) themselves have done that job for you on their website
Terraform AWS Example
While AWS or Amazon web services being a leader in the cloud industry with a market share 70 percentage. I thought it would be wiser to choose AWS as our cloud provider for this post.
This post is about Terraform AWS and how to create AWS resources like EC2 instance and SecurityGroup with Terraform. Let us call it a Terraform AWS example.
Terraform and AWS go hand in hand and terraform has a lot of resources and configurations that support the entire AWS Infrastructure management tasks like AWS EC2 instance creation, Security Group creation, Virtual Private Cloud (VPC) Setup, Serverless set up, etc.
So let us go and do some farming in the AWS planet.
Authentication with AWS
In order to connect to AWS. Terraform has to successfully authenticate. It is done with the help of Programmatic API Keys (Access Key and Secret.)
Some Sample usage of these API Keys in a terraform configuration.
provider "aws" {
  region     = "us-west-2"
  access_key = "my-access-key"
  secret_key = "my-secret-key"
}
So now, we should go and create these access and secret keys for your AWS account.
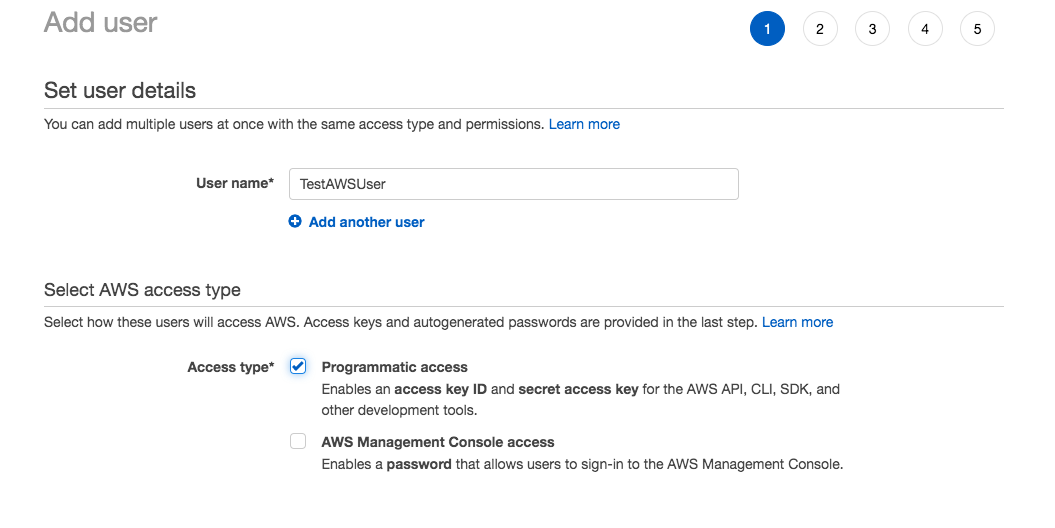
Setup Programmatic Access
Step1: Add new user and key in the UserName
Click to view the image
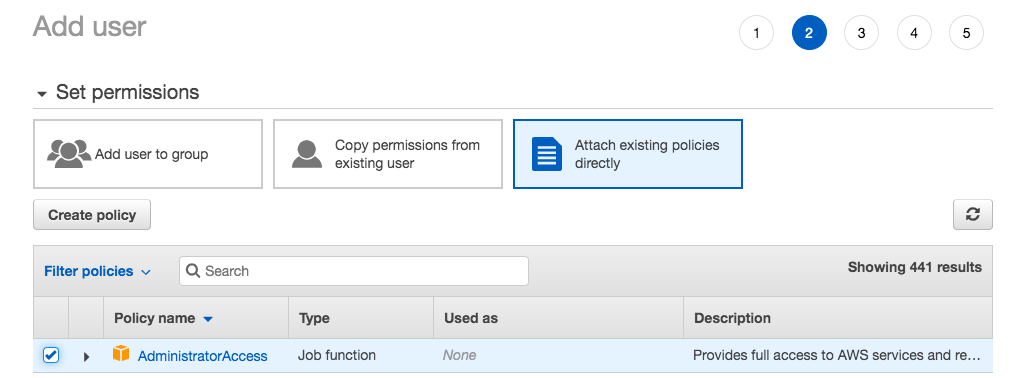
Step2: Attach Existing Policies and Select Admin
Click to view the image
Let the Values be Default Click Next till you see the following Screen
Step3: Completion and Download
Click to view the image
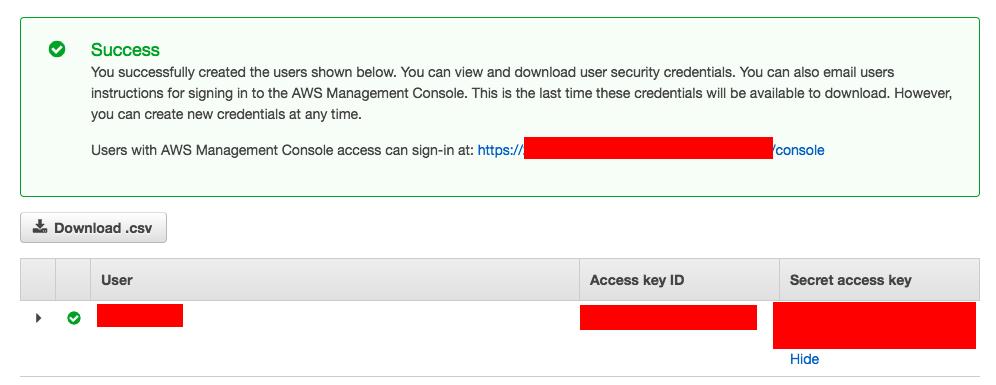
Note*: Once the Access Key ID and Secret Access Key is created you can download and save them somewhere safe and if you lost it you cannot recover (or) re-download it. You would have to create a new API key.
The best practice is to keep changing the API Access Key and recreating it. The older your API keys are the prone they are to Malicious attacks. So you should keep updating the API key and should not use the Same API key for a long period of time.
As you have downloaded the API Access and Secret keys. You need to save it right so that you can use it in terraform.
Though terraform accepts the Access Key and Secret Key hardcoded with in the configuration file. It is not recommended.
Either you should save these Keys as Environment variables (or) save it as a AWS Config profile.
As Environment Variable
In your terminal, you just have run these commands with your Access and Secret key.
$ export AWS_ACCESS_KEY_ID=AK************IEVXQ
$ export AWS_SECRET_ACCESS_KEY=gbaIbK*********************iwN0dGfS
As an AWS config Profile
In order to do this, The Simplest way is to download and setup AWS CLI
You can refer to this document how to setup AWS CLI
Download and Install Terraform CLI
Terraform is a Single file binary which you can download and run it without any additional installation.
To make this precise and Short I have not added the installation instruction of Terraform. You can find the instructions here Installing Terraform CLI
Now Let me proceed further with an assumption that you have installed the Terraform CLI.
Terraform Configuration file - A Quick intro
The input file for terraform is known as Terraform Configuration. Terraform configuration is written in a specific language named Hashicorp Configuration Language and it can optionally be written in JSON as well.
Here is the sample Terraform Configuration file saved with *.tf extension
The following file presumes that you are using the AWS Config profile. So it refers to the profile: default for the authentication.
provider "aws" {
  profile    = "default"
  region     = "us-east-1"
}

resource "aws_instance" "example" {
  ami           = "ami-2757f631"
  instance_type = "t2.micro"
}
In case if you are using the Environment variables method. You can remove the profile line alone and that should be it.
Terraform configuration file would ideally have lot of elements known as blocks such as provider , resource etcetera.
This is a Syntax of how Terraform Configuration file block is formatted
resource "aws_vpc" "main" {
  cidr_block = var.base_cidr_block
}

<BLOCK TYPE> "<BLOCK NAME>" "<BLOCK LABEL>" {
  # Block body
  <IDENTIFIER> = <EXPRESSION> # Argument
}
There are ample amount of BLOCK_TYPE available in Terraform and the resource is primary and all others are to support building that specified resource.
Some of the Terraform blocks (elements) and their purpose is given below
- providers - the provider name aws, google, azure etc
- resources - a specific resource with in the provide such as aws_instance for aws
- variable - to declare input variables
- output - to declare output variables which would be retained the Terraform state file
- local - to assign value to an expression, these are local temporary variables work with in a module
- module - A module is a container for multiple resources that are used together.
- data - To Collect data from the remote provider and save it as a data source
Create EC2 instance with Terraform - Terraform EC2
As we have crossed all the sections of basic and prerequisites. We are now ready to move forward to the practical application of Terraform and we are going to create an EC2 instance with terraform.
These are the list of steps we are going to perform
- Create a Directory and Download the following file and save it as
main.tf - Execute the command
terraform initto initialize - Execute the command
terraform planto check what change would be made. ( Should always do it) - If you are happy with the changes it is claiming to make, then execute
terraform applyto commit and start the build
Step1: Creating a Configuration file for Terraform AWS
Copy the following content and save it as main.tf and make sure that the directory has no other *.tf files present, as terraform would consider all the files ending with .tf extension
I have given some explanation before each block on the configuration to explain the purpose of the block.
In an overview, This is what we are doing in this configuration file.
- A Variable block where we define all the resource names that we are going to be using within the Terraform configuration
- The second block is to tell Terraform to choose the right provider, in our case it is
awsand we are also defining the region in this block on which our resources should be created - Creating a Security Group with inbound and outbound rules. We have two inbound rules and one outbound rule. we use lifecycle block to tell terraform to create the replacement resources first before destroying the live ones. this way we reduce downtime
- Creating an EC2 instance, The instance type would be picked up from the variables block and we give some meaningful
tagsfor management and future identification - Once the EC2 instance created, we would get the public IP of the instance. We are saving it as an output variable. The output variables would be saved locally and can be viewed anytime in the future with
terraform outputcommand
The Terraform AWS Example configuration file
Here is the Terraform configuration file or manifest to create EC2 instance.
variable "awsprops" {
    type = "map"
    default = {
    region = "us-east-1"
    vpc = "vpc-5234832d"
    ami = "ami-0c1bea58988a989155"
    itype = "t2.micro"
    subnet = "subnet-81896c8e"
    publicip = true
    keyname = "myseckey"
    secgroupname = "IAC-Sec-Group"
  }
}

provider "aws" {
  region = lookup(var.awsprops, "region")
}

resource "aws_security_group" "project-iac-sg" {
  name = lookup(var.awsprops, "secgroupname")
  description = lookup(var.awsprops, "secgroupname")
  vpc_id = lookup(var.awsprops, "vpc")

  // To Allow SSH Transport
  ingress {
    from_port = 22
    protocol = "tcp"
    to_port = 22
    cidr_blocks = ["0.0.0.0/0"]
  }

  // To Allow Port 80 Transport
  ingress {
    from_port = 80
    protocol = ""
    to_port = 80
    cidr_blocks = ["0.0.0.0/0"]
  }

  egress {
    from_port       = 0
    to_port         = 0
    protocol        = "-1"
    cidr_blocks     = ["0.0.0.0/0"]
  }

  lifecycle {
    create_before_destroy = true
  }
}


resource "aws_instance" "project-iac" {
  ami = lookup(var.awsprops, "ami")
  instance_type = lookup(var.awsprops, "itype")
  subnet_id = lookup(var.awsprops, "subnet") #FFXsubnet2
  associate_public_ip_address = lookup(var.awsprops, "publicip")
  key_name = lookup(var.awsprops, "keyname")


  vpc_security_group_ids = [
    aws_security_group.project-iac-sg.id
  ]
  root_block_device {
    delete_on_termination = true
    iops = 150
    volume_size = 50
    volume_type = "gp2"
  }
  tags = {
    Name ="SERVER01"
    Environment = "DEV"
    OS = "UBUNTU"
    Managed = "IAC"
  }

  depends_on = [ aws_security_group.project-iac-sg ]
}


output "ec2instance" {
  value = aws_instance.project-iac.public_ip
}
Step2: Initialize Terraform
Once we have saved the File in the newly created directory, we need to initialize terraform
If you have used Git this is similar to git init where we set up some local repository and initialize
➜  terraform init

Initializing the backend...

Initializing provider plugins...
- Checking for available provider plugins...
- Downloading plugin for provider "aws" (hashicorp/aws) 2.44.0...

The following providers do not have any version constraints in configuration,
so the latest version was installed.

To prevent automatic upgrades to new major versions that may contain breaking
changes, it is recommended to add version = "..." constraints to the
corresponding provider blocks in configuration, with the constraint strings
suggested below.

* provider.aws: version = "~> 2.44"

Terraform has been successfully initialized!

You may now begin working with Terraform. Try running "terraform plan" to see
any changes that are required for your infrastructure. All Terraform commands
should now work.

If you ever set or change modules or backend configuration for Terraform,
rerun this command to reinitialize your working directory. If you forget, other
commands will detect it and remind you to do so if necessary.
Once the Initialization completed. You can execute the terraform plan command to see what changes are going to be made.
Step3: Pre-Validate the change - A pilot run
Execute the terraform plan command and it would present some detailed info on what changes are going to be made into your AWS infra.
the -out tfplan is to save the result given by plan so that we can refer it later and apply it as it is without any modification.
It also guarantees that what we see in the planning phase would be applied when we go for committing it.
Click to expand
➜
terraform plan -out tfplan
Refreshing Terraform state in-memory prior to plan...
The refreshed state will be used to calculate this plan, but will not be
persisted to local or remote state storage.


------------------------------------------------------------------------

An execution plan has been generated and is shown below.
Resource actions are indicated with the following symbols:
  + create

Terraform will perform the following actions:

  # aws_instance.project-iac will be created
  + resource "aws_instance" "project-iac" {
      + ami                          = "ami-0c1beas670a989155"
      + arn                          = (known after apply)
      + associate_public_ip_address  = true
      + availability_zone            = (known after apply)
      + cpu_core_count               = (known after apply)
      + cpu_threads_per_core         = (known after apply)
      + get_password_data            = false
      + host_id                      = (known after apply)
      + id                           = (known after apply)
      + instance_state               = (known after apply)
      + instance_type                = "t2.micro"
      + ipv6_address_count           = (known after apply)
      + ipv6_addresses               = (known after apply)
      + key_name                     = "mysecurekey"
      + network_interface_id         = (known after apply)
      + password_data                = (known after apply)
      + placement_group              = (known after apply)
      + primary_network_interface_id = (known after apply)
      + private_dns                  = (known after apply)
      + private_ip                   = (known after apply)
      + public_dns                   = (known after apply)
      + public_ip                    = (known after apply)
      + security_groups              = (known after apply)
      + source_dest_check            = true
      + subnet_id                    = "subnet-81b8c8e"
      + tags                         = {
          + "Environment" = "DEV"
          + "Managed"     = "IAC"
          + "Name"        = "SERVER01"
          + "OS"          = "UBUNTU"
        }
      + tenancy                      = (known after apply)
      + volume_tags                  = (known after apply)
      + vpc_security_group_ids       = (known after apply)

      + ebs_block_device {
          + delete_on_termination = (known after apply)
          + device_name           = (known after apply)
          + encrypted             = (known after apply)
          + iops                  = (known after apply)
          + kms_key_id            = (known after apply)
          + snapshot_id           = (known after apply)
          + volume_id             = (known after apply)
          + volume_size           = (known after apply)
          + volume_type           = (known after apply)
        }

      + ephemeral_block_device {
          + device_name  = (known after apply)
          + no_device    = (known after apply)
          + virtual_name = (known after apply)
        }

      + network_interface {
          + delete_on_termination = (known after apply)
          + device_index          = (known after apply)
          + network_interface_id  = (known after apply)
        }

      + root_block_device {
          + delete_on_termination = true
          + encrypted             = (known after apply)
          + iops                  = (known after apply)
          + kms_key_id            = (known after apply)
          + volume_id             = (known after apply)
          + volume_size           = 50
          + volume_type           = "gp2"
        }
    }

  # aws_security_group.project-iac-sg will be created
  + resource "aws_security_group" "project-iac-sg" {
      + arn                    = (known after apply)
      + description            = "IAC-Sec-Group"
      + egress                 = [
          + {
              + cidr_blocks      = [
                  + "0.0.0.0/0",
                ]
              + description      = ""
              + from_port        = 0
              + ipv6_cidr_blocks = []
              + prefix_list_ids  = []
              + protocol         = "-1"
              + security_groups  = []
              + self             = false
              + to_port          = 0
            },
        ]
      + id                     = (known after apply)
      + ingress                = [
          + {
              + cidr_blocks      = [
                  + "0.0.0.0/0",
                ]
              + description      = ""
              + from_port        = 22
              + ipv6_cidr_blocks = []
              + prefix_list_ids  = []
              + protocol         = "tcp"
              + security_groups  = []
              + self             = false
              + to_port          = 22
            },
          + {
              + cidr_blocks      = [
                  + "0.0.0.0/0",
                ]
              + description      = ""
              + from_port        = 80
              + ipv6_cidr_blocks = []
              + prefix_list_ids  = []
              + protocol         = ""
              + security_groups  = []
              + self             = false
              + to_port          = 80
            },
        ]
      + name                   = "IAC-Sec-Group"
      + owner_id               = (known after apply)
      + revoke_rules_on_delete = false
      + vpc_id                 = "vpc-5629832d"
    }

Plan: 2 to add, 0 to change, 0 to destroy.

------------------------------------------------------------------------

This plan was saved to: tfplan

To perform exactly these actions, run the following command to apply:
    terraform apply "tfplan"
You can verify the outputs shown and what resources are going to be created or destroyed. Sometimes while doing a modification to the existing resources, Terraform would have to destroy the resource first and recreate it. in such cases, It would mention that it is going to destroy.
You should always look for the + and - signs on the terraform plan output.
Besides that, you should also monitor this line every time you run this command to make sure that no unintended result happen
Plan: 2 to add, 0 to change, 0 to destroy.
Step4: Go ahead and Apply it with Terraform apply
When you execute the terraform apply command the changes would be applied to the AWS Infra.
If terraform plan is a trial run and test. terraform apply is real-time and production.
Since we have saved the plan output to a file named tfplan to guarantee the changes. we need to use this file as an input while running the apply command
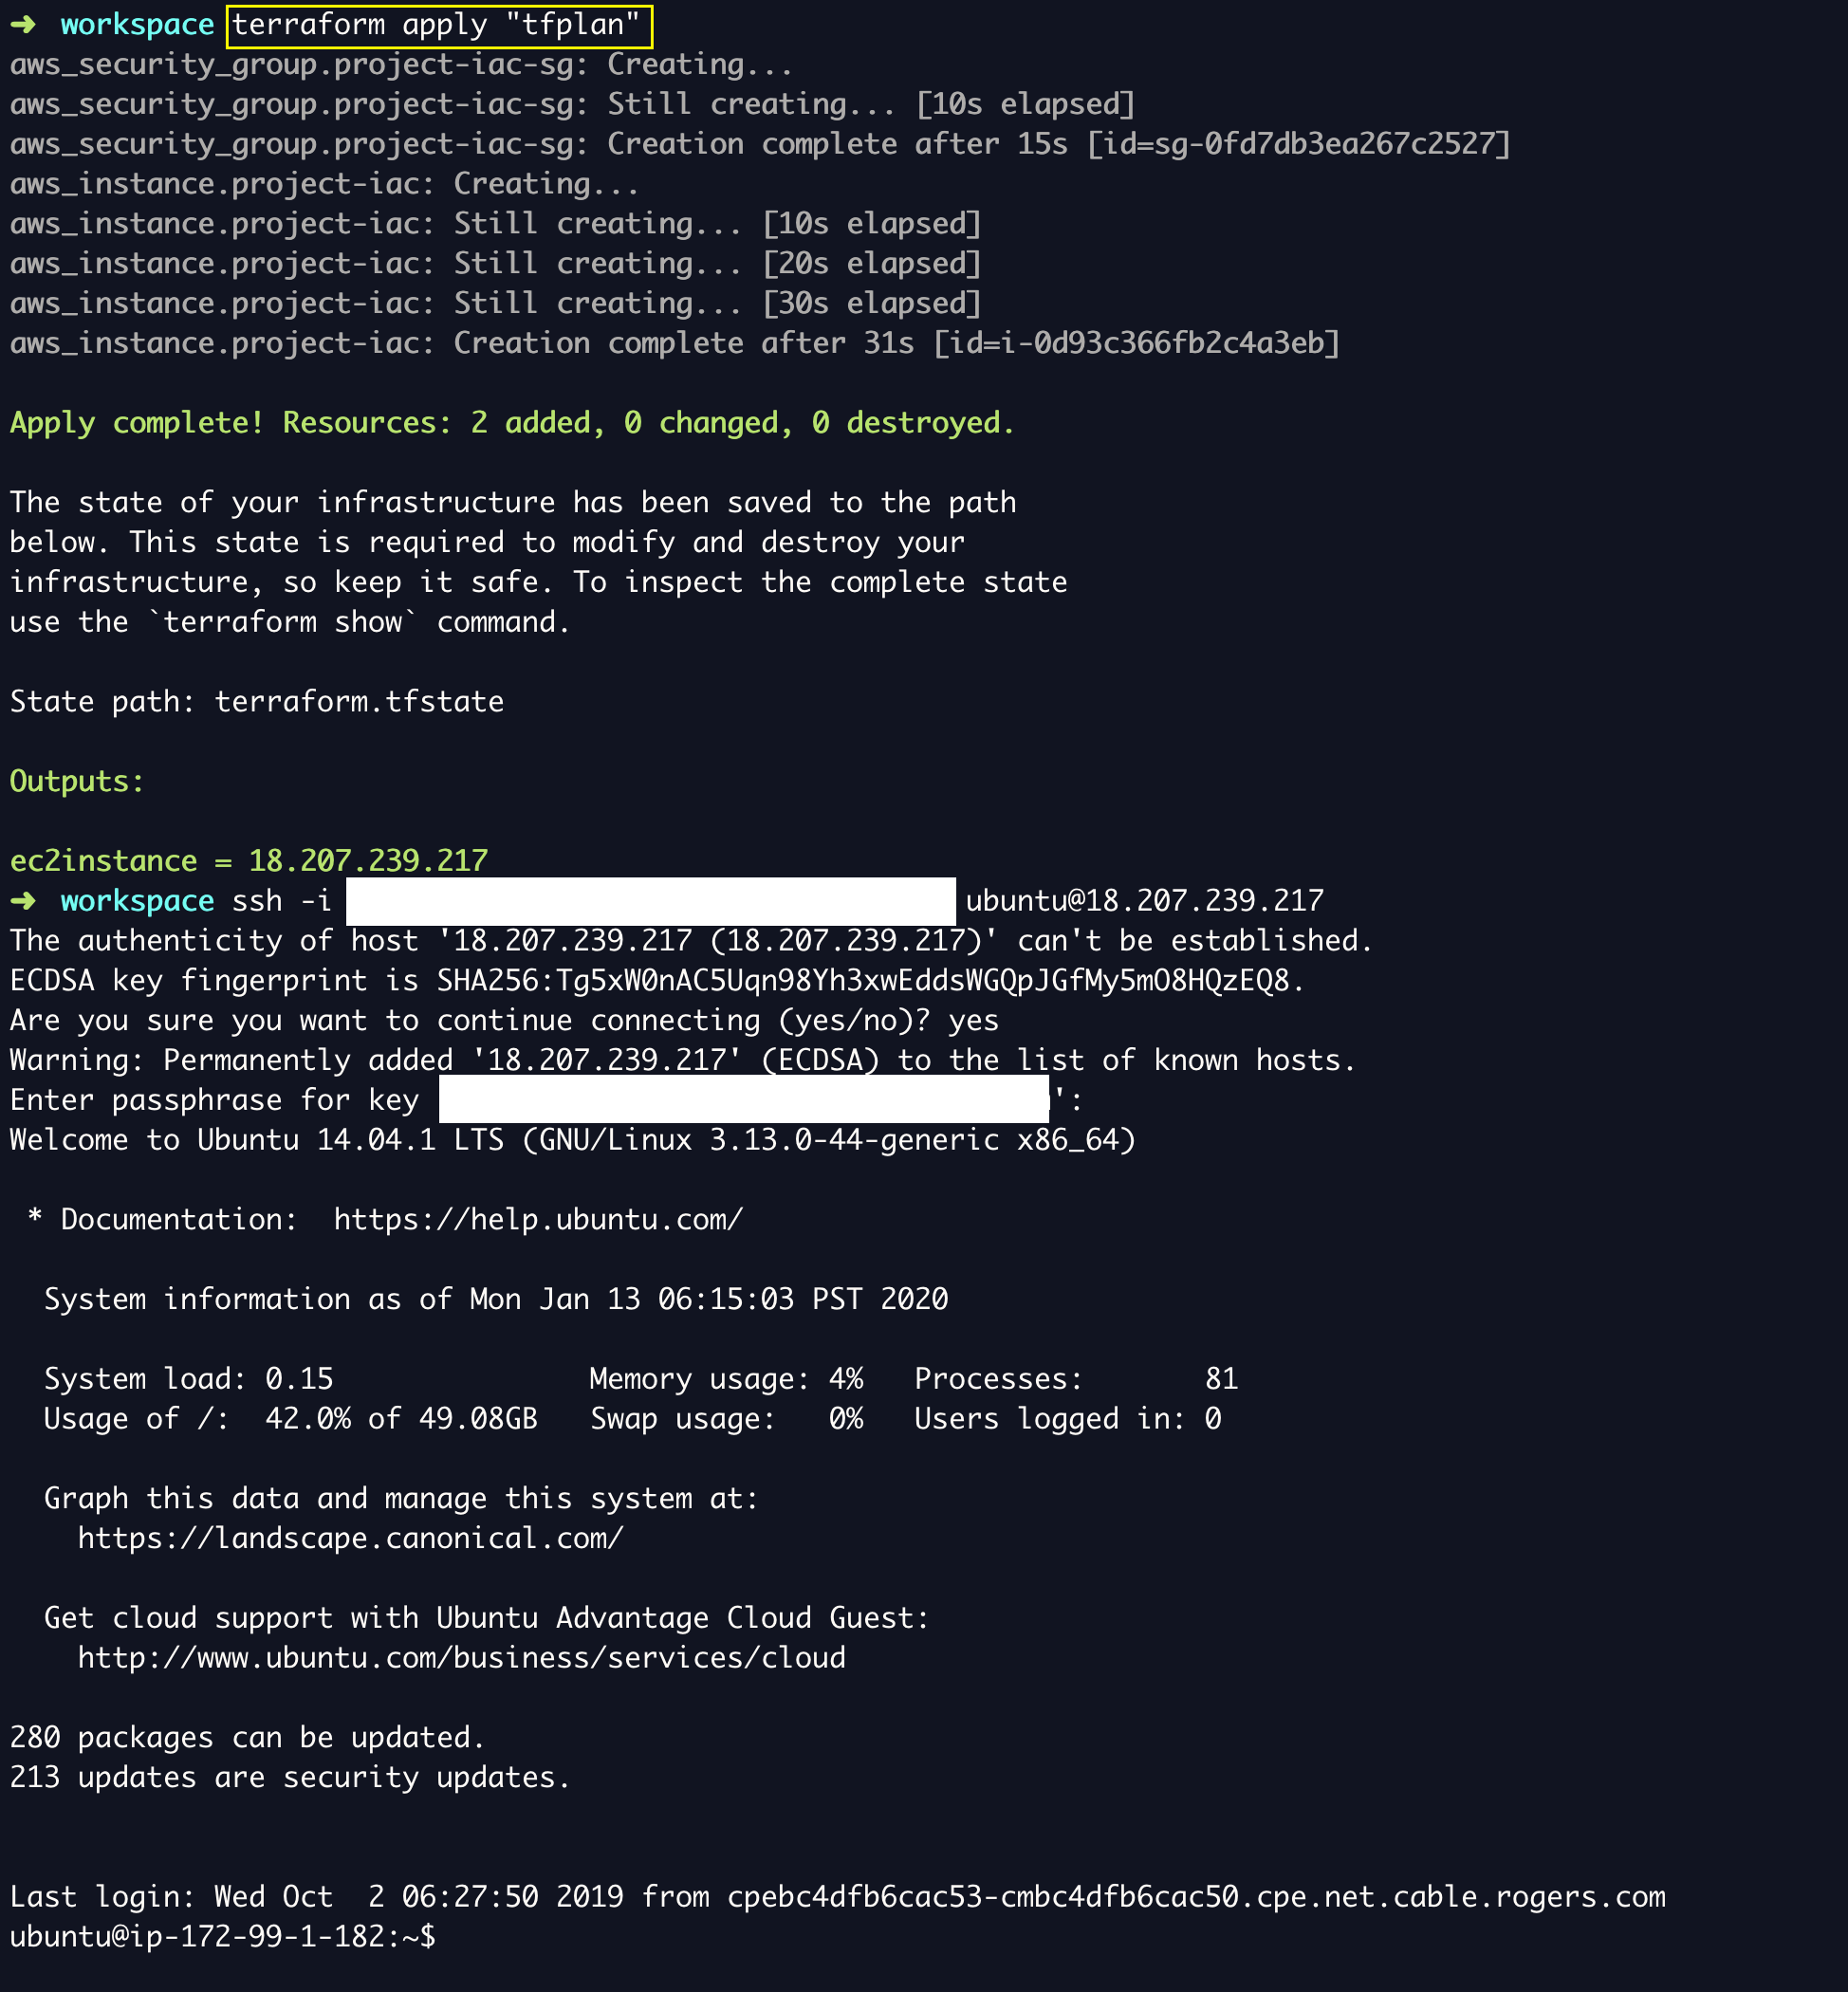
➜  terraform apply "tfplan"
aws_security_group.project-iac-sg: Creating...
aws_security_group.project-iac-sg: Still creating... [10s elapsed]
aws_security_group.project-iac-sg: Creation complete after 15s [id=sg-0fd7db3ea267c2527]
aws_instance.project-iac: Creating...
aws_instance.project-iac: Still creating... [10s elapsed]
aws_instance.project-iac: Still creating... [20s elapsed]
aws_instance.project-iac: Still creating... [30s elapsed]
aws_instance.project-iac: Creation complete after 31s [id=i-0d93c366fb2c4a3eb]

Apply complete! Resources: 2 added, 0 changed, 0 destroyed.

The state of your infrastructure has been saved to the path
below. This state is required to modify and destroy your
infrastructure, so keep it safe. To inspect the complete state
use the `terraform show` command.

State path: terraform.tfstate

Outputs:

ec2instance = 18.207.239.217
From the preceding output, you can see the instance creation took only 31 seconds and it completed and gave us the public ip as an output
Whenever we want this IP, we can come to this directory and execute terraform output to get it.
Refer the following snapshot where I have successfully SSHed to the server using the public IP
So we have Successfully created an EC2 instance and a Security Group and logged into the Server.
Since this is a test instance, I want to destroy the resources I have created and I can do it by executing terraform destroy command.
Hope this article helps you understand, How Terraform AWS or Terraform EC2 instance creation works in real-time.
How to Create EC2 instance with user_data - Custom Startup Script
So far we have seen all the basics of Terraform and how to create our first EC2 instance with Terraform.
In real time, we might need more than just creating a single instance. we might want to run some custom startup shell scripts and do some installations etc.
In such cases, we can use EC2 user_data feature and define a set of commands or scripts that needs to be executed during the server initialization.
we have a dedicated article that talks about this in detail. Please read the same here
Terraform AWS EC2 user_data example – aws_instance| Devops Junction
How to Create Multiple EC2 instances with different Configuration
Now you have learnt how to create EC2 instance with Terraform and with user_data as well.
In real-time use cases you would not be created just once EC2 instance but many at once.
To address the same I have written an article to cover how to create multiple Ec2 instances with different instance types and configuration
Terraform Create Multiple EC2 with different Configs – for_each and count together
Our Other Terraform Articles
We have various articles on Terraform that covers basic to advanced topics of Terraform.
If you in the learning path. please do take a look by following this link
Further reads
If you would like to give a chance to Terraform and want to learn all the bits and pieces of it. Read this book and I highly recommend it
Click anywhere on the image to buy it on amazon.

Hope this article is helpful, If you have any feedback or issues please let me know on the comments section.
Rate this article [ratings]
Cheers
Sarav

Follow me on Linkedin My Profile Follow DevopsJunction onFacebook orTwitter For more practical videos and tutorials. Subscribe to our channel
Signup for Exclusive "Subscriber-only" Content