In this article we are going to see how to create AWS EC2 instance with user_data.
While launching AWS Ec2 instances we might want to add some customizations to it like adding a key and executing few shell commands or scripts to make sure they are ready to launch your application.
We can do this level of customization during the image build time with packer as well.
But with terraform we can do it on the go and have different set of user_data for different set of machines you are launching with help of Loop or conditional statements
If you are new to Terraform and trying to work with AWS EC2 for the first time.
please start with our Terraform AWS Basic Introduction article and come back here
To the objective now.
Terraform script to create EC2 with user_data
Here is the terraform configuration file with user_data field
Before using the script. please make sure you update the following elements on the script.
- aws region
- aws profile ( if removed default would be taken)
- changing the prefix default value to what you desire
- change the ami ID
- instance_type
- count ( no of instances to launch)
- security group id
- user_data ( replace it with whatever commands or script you want to execute)
- subnet_id
provider "aws" {
  region = "us-east-1"
  profile = "dev"
}

variable "prefix" {
  description = "servername prefix"
  default = "gritfyapp"
}

resource "aws_instance" "web" {
  ami           = "ami-007a18d38016a0f4e"
  instance_type = "t3.medium"
  count = 1
  vpc_security_group_ids = [
    "sg-0d8bdc71aee9f"
  ]
  user_data = <<EOF
#!/bin/bash
echo "Copying the SSH Key Of Jenkins to the server"
echo -e "#Jenkins\nssh-rsa AAAAB3NzaC1yc2EAAAADAQABAAAB*******************F/SNZPMT4Qm/RVgBbIhG8VsoDhGM0tgIzWyTaNxDPSDx/yzJ8FQwCKOH6YR3RugLvTU+jDKvI8BWOnMM5cgrbfKbBssUyJSdWI86py4bi05A3X6O5+6xS6IvQbZwlbJiu/DbgAcvGLiq1mDi77O+DvU22RNgCB9hGddryWc3nTDOMyVaex5EdfvgxEli1DAM2YYr/DdxVvdzkrP/1fol6t+XT4FeQyW/KcQuRA53qG0aSYlSN/6NUO3OGuLn [email protected]\nssh-rsa AAAAB3NzaC1yc2EAAAADAQABAAAPlhbcDQ06FO8euMxVvsglV4gqhD0v1l8h+bk/X+eJWqQMHZ0CXzsywTe+32zdu9JydbwiQiMIlDwFy0nsyX+quzLupYejrAtFFOKoFSzNB3ng69KSV+M6kUZdXHfP9PjYt5wZfOW0h/W9+2Oz406UjpeaW5t9XPftx784nLsocR3d7mosIgLMXkFLijOfJknhEKWxMmvkwV15fcuPfpRhvJkFDCmpFMBTaOwE2rDuj22r0Z4bI78CdtZgTSB5eK1YebOtEUllB+pwoMA40cNgnivd [email protected]" >> /home/ubuntu/.ssh/authorized_keys

echo "Mount NFS"
sudo mount -t nfs4 -o nfsvers=4.1,rsize=1048576,wsize=1048576,hard,timeo=600,retrans=2,noresvport fs-******.efs.us-east-1.amazonaws.com:/ /sharedrive

echo "Installing NodeExporter"
mkdir /home/ubuntu/node_exporter
cd /home/ubuntu/node_exporter
wget https://github.com/prometheus/node_exporter/releases/download/v1.2.2/node_exporter-1.2.2.linux-amd64.tar.gz
tar node_exporter-1.2.2.linux-amd64.tar.gz
cd node_exporter-1.2.2.linux-amd64
./node_exporter &

echo "Changing Hostname"
hostname "${var.prefix}${count.index+1}"
echo "${var.prefix}${count.index+1}" > /etc/hostname


EOF
  subnet_id = "subnet-00514b9f4cd6d4"
  tags = {
    Name = "${var.prefix}${count.index}"
  }
}

output "instances" {
  value       = "${aws_instance.web.*.private_ip}"
  description = "PrivateIP address details"
}
As part of user_data we are doing the following tasks
- Copying few SSH public keys. prefarably Jenkins for Deployment automation
- Mounting an NFS ( this can be done with /etc/fstab but still )
- Installing Node Exporter for monitoring
- Changing the hostname based on the count index ( gritfyapp1, gritfyapp2 etc)
Since the count is set to 1 here we would be creating only one instance with the hostname gritfyapp1
Terraform Planning Phase
Now do Terraform Plan with the -out file and I always recommend to write the plan as a out file and use it to make sure what you see is what you get.
here my out file name is tfplandev.out
Be aware, If you are choosing the wrong out file by mistake during
terraform apply.you might probably change the existing infrastrucuture associated with that out file ( accidently).
so always make sure you are using the right out file.
With Great Automation comes Great Risk. Be mindful.
With Terraform. You can create an Entire Infra in seconds and destroy it too.
⇒ terraform plan -out tfplandev.out

Terraform used the selected providers to generate the following execution plan. Resource actions are indicated with the following symbols:
  + create

Terraform will perform the following actions:

  # aws_instance.web[0] will be created
  + resource "aws_instance" "web" {
      + ami                                  = "ami-007a18d38016a0f4e"
      + arn                                  = (known after apply)
      + associate_public_ip_address          = (known after apply)
      + availability_zone                    = (known after apply)
      + cpu_core_count                       = (known after apply)
      + cpu_threads_per_core                 = (known after apply)
      + disable_api_termination              = (known after apply)
      + ebs_optimized                        = (known after apply)
      + get_password_data                    = false
      + host_id                              = (known after apply)
      + id                                   = (known after apply)
      + instance_initiated_shutdown_behavior = (known after apply)
      + instance_state                       = (known after apply)
      + instance_type                        = "t3.medium"
      + ipv6_address_count                   = (known after apply)
      + ipv6_addresses                       = (known after apply)
      + key_name                             = (known after apply)
      + monitoring                           = (known after apply)
      + outpost_arn                          = (known after apply)
      + password_data                        = (known after apply)
      + placement_group                      = (known after apply)
      + primary_network_interface_id         = (known after apply)
      + private_dns                          = (known after apply)
      + private_ip                           = (known after apply)
      + public_dns                           = (known after apply)
      + public_ip                            = (known after apply)
      + secondary_private_ips                = (known after apply)
      + security_groups                      = (known after apply)
      + source_dest_check                    = true
      + subnet_id                            = "subnet-00514f1f4cd6d4"
      + tags                                 = {
          + "Name" = "gritfyapp0"
        }
      + tags_all                             = {
          + "Name" = "gritfyapp0"
        }
      + tenancy                              = (known after apply)
      + user_data                            = "18c4585c1e3bc1876dcc291a16e0d6933761dbc2"
      + user_data_base64                     = (known after apply)
      + vpc_security_group_ids               = [
          + "sg-0d8bd6e7baee9f",
        ]

      + capacity_reservation_specification {
          + capacity_reservation_preference = (known after apply)

          + capacity_reservation_target {
              + capacity_reservation_id = (known after apply)
            }
        }

      + ebs_block_device {
          + delete_on_termination = (known after apply)
          + device_name           = (known after apply)
          + encrypted             = (known after apply)
          + iops                  = (known after apply)
          + kms_key_id            = (known after apply)
          + snapshot_id           = (known after apply)
          + tags                  = (known after apply)
          + throughput            = (known after apply)
          + volume_id             = (known after apply)
          + volume_size           = (known after apply)
          + volume_type           = (known after apply)
        }

      + enclave_options {
          + enabled = (known after apply)
        }

      + ephemeral_block_device {
          + device_name  = (known after apply)
          + no_device    = (known after apply)
          + virtual_name = (known after apply)
        }

      + metadata_options {
          + http_endpoint               = (known after apply)
          + http_put_response_hop_limit = (known after apply)
          + http_tokens                 = (known after apply)
        }

      + network_interface {
          + delete_on_termination = (known after apply)
          + device_index          = (known after apply)
          + network_interface_id  = (known after apply)
        }

      + root_block_device {
          + delete_on_termination = (known after apply)
          + device_name           = (known after apply)
          + encrypted             = (known after apply)
          + iops                  = (known after apply)
          + kms_key_id            = (known after apply)
          + tags                  = (known after apply)
          + throughput            = (known after apply)
          + volume_id             = (known after apply)
          + volume_size           = (known after apply)
          + volume_type           = (known after apply)
        }
    }

Plan: 1 to add, 0 to change, 0 to destroy.

Changes to Outputs:
  + instances = [
      + (known after apply),
    ]

─────────────────────────────────────────────────────────────────────────────────────────────────────────────────────────────────────────────────────────────────

Saved the plan to: tfplandev.out

To perform exactly these actions, run the following command to apply:
    terraform apply "tfplandev.out"
Terraform Applying Phase
Now do Terraform apply "outfilename" with the right out file you have created in the previoius step
As mentioned earlier, please make sure you are using the right out file. One single manual error with Terraform can cost you a production downtime
⇒ terraform apply "tfplandev.out"
aws_instance.web[0]: Creating...
aws_instance.web[0]: Still creating... [10s elapsed]
aws_instance.web[0]: Still creating... [20s elapsed]
aws_instance.web[0]: Creation complete after 23s [id=i-07af45d2a5eafa]

Apply complete! Resources: 1 added, 0 changed, 0 destroyed.

Outputs:

instances = [
  "10.0.4.142",
]
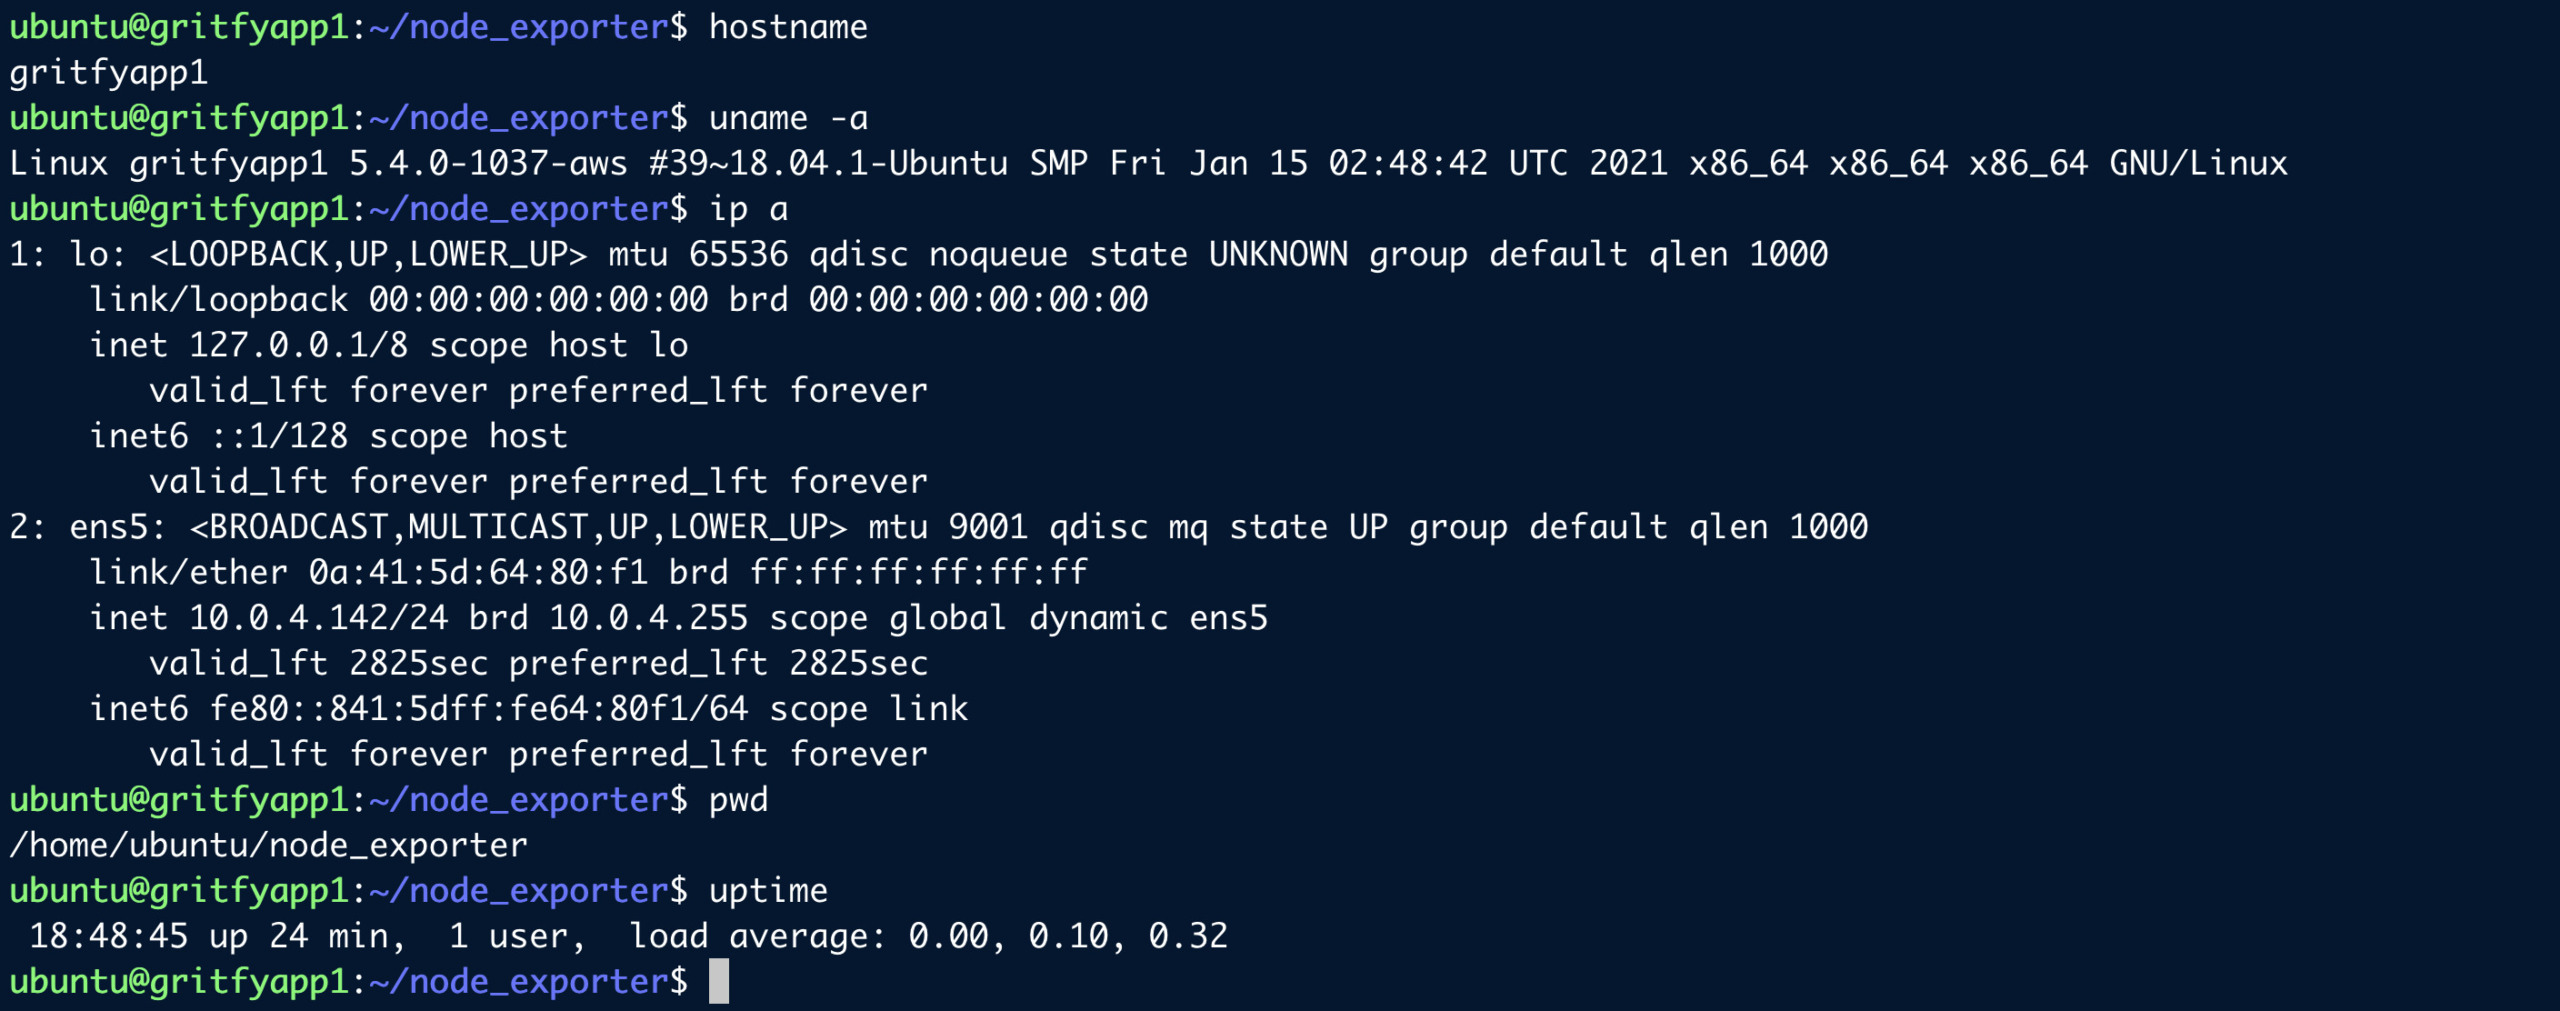
Now if you login to the server you can see the hostname set to gritfyapp1 with all other three tasks completed.
installation of node exporter, addition of key into authorized_keys and EFS mount.
Validate the changes specified on user_data
Refer the following screen shot where I have logged in to the server to validate if all my user_data tasks are executed.
If I see the hostname changed as I login, that itself is a clear sign the user_data has worked fine.
Just in case if any one of the commands are failed and you want to debug.
All the echo statements we have given in user_data along with any error while applying the user_data would be captured on the System boot log.
In case of ubuntu it is /var/log/syslog
Using Shell script in Terraform user_data
In the previous example we have seen how to use inline shell commands with aws_instance user_data but to keep things cleaner It is advised to use shell script instead of commands and EOF.
So we present you an example on how to pass Shell script as a user_data while creating EC2 instance
The same Terraform script we have written earlier can be written like this and all the Shell commands we had between EOF be saved into a file, in our case init.sh
All those lines are now being replaced with a single line.
user_data = "${file("init.sh")}"
Here is the cleaner version of the same Terraform script we used before.
provider "aws" {
  region = "us-east-1"
  profile = "dev"
}
variable "prefix" {
  description = "servername prefix"
  default = "gritfyapp"
}
resource "aws_instance" "web" {
  ami           = "ami-007a18d38016a0f4e"
  instance_type = "t3.medium"
  count = 1
  vpc_security_group_ids = [
    "sg-0d8bdc71aee9f"
  ]
  user_data = "${file("init.sh")}"
  subnet_id = "subnet-00514b9f4cd6d4"
  tags = {
    Name = "${var.prefix}${count.index}"
  }
}
output "instances" {
  value       = "${aws_instance.web.*.private_ip}"
  description = "PrivateIP address details"
}
Here is the content of the init.sh file
#!/bin/bash
echo "Copying the SSH Key Of Jenkins to the server"
echo -e "#Jenkins\nssh-rsa AAAAB3NzaC1yc2EAAAADAQABAAAB*******************F/SNZPMT4Qm/RVgBbIhG8VsoDhGM0tgIzWyTaNxDPSDx/yzJ8FQwCKOH6YR3RugLvTU+jDKvI8BWOnMM5cgrbfKbBssUyJSdWI86py4bi05A3X6O5+6xS6IvQbZwlbJiu/DbgAcvGLiq1mDi77O+DvU22RNgCB9hGddryWc3nTDOMyVaex5EdfvgxEli1DAM2YYr/DdxVvdzkrP/1fol6t+XT4FeQyW/KcQuRA53qG0aSYlSN/6NUO3OGuLn [email protected]\nssh-rsa AAAAB3NzaC1yc2EAAAADAQABAAAPlhbcDQ06FO8euMxVvsglV4gqhD0v1l8h+bk/X+eJWqQMHZ0CXzsywTe+32zdu9JydbwiQiMIlDwFy0nsyX+quzLupYejrAtFFOKoFSzNB3ng69KSV+M6kUZdXHfP9PjYt5wZfOW0h/W9+2Oz406UjpeaW5t9XPftx784nLsocR3d7mosIgLMXkFLijOfJknhEKWxMmvkwV15fcuPfpRhvJkFDCmpFMBTaOwE2rDuj22r0Z4bI78CdtZgTSB5eK1YebOtEUllB+pwoMA40cNgnivd [email protected]" >> /home/ubuntu/.ssh/authorized_keys

echo "Mount NFS"
sudo mount -t nfs4 -o nfsvers=4.1,rsize=1048576,wsize=1048576,hard,timeo=600,retrans=2,noresvport fs-******.efs.us-east-1.amazonaws.com:/ /sharedrive

echo "Installing NodeExporter"
mkdir /home/ubuntu/node_exporter

cd /home/ubuntu/node_exporter

wget https://github.com/prometheus/node_exporter/releases/download/v1.2.2/node_exporter-1.2.2.linux-amd64.tar.gz

tar node_exporter-1.2.2.linux-amd64.tar.gz

cd node_exporter-1.2.2.linux-amd64

./node_exporter &

echo "Changing Hostname"
hostname "${var.prefix}${count.index+1}"
echo "${var.prefix}${count.index+1}" > /etc/hostname
While referring the shell script with in file the path is relative. Simple init.sh means that the tf and the sh files are present on the same directory level.
Since we are talking about AWS user_data here. we need to know some basics on how AWS EC2 interpret the user_data scripts
Here are some pointers to remember
- User data shell scripts must start with the Shebang
#!characters and the path to the interpreter you want to read the script (commonly /bin/bash). - Scripts entered as user data are run as the
rootuser, so no need to use the sudo command in the init script. - When a user data script is processed, it is copied to and run from
/var/lib/cloud/instances/. The script is not deleted after it is run and can be found in this directory with the nameinstance-id/user-data.txtSo to check if your shell script made to the server refer this directory and the file. - The cloud-init output log file (
/var/log/cloud-init-output.log) captures console output of your user_data shell script. to know how your user_data shell script was executed and its output check this file.
Hope this helps. If you have any questions or need help. please let us know in comment section
Safeguard your State files with Terraform Cloud ( Additional )
We have an article that talks about how to store your TF state files in Terraform cloud securely. Take a look
Store terraform state file on Terraform cloud Remote | Devops Junction
Cheers
Sarav

Follow me on Linkedin My Profile Follow DevopsJunction onFacebook orTwitter For more practical videos and tutorials. Subscribe to our channel
Signup for Exclusive "Subscriber-only" Content