Infrastructure as Code is a Brilliant Concept in DevOps and Packer and Terraform are two major technologies/products in this segment. Thanks to HashiCorp
Imagine that you need to create an AWS EC2 instance for your company or for learning purpose with your AWS free tier account.
How do you do that?
Probably Logging into the AWS console would your choice. But do you know it is really not a Good Practice to create AWS images from Console. In fact, you should not log in to AWS console often. It is a poor security practice.
Programmatic Approach is the Only Solution. AWS CLI is there which can help create EC2 instances and AMI(Amazon Machine Image) but the learning curve of AWS CLI is little complex and it is not robust ( according to me at least)
Why Packer over AWS CLI
Let us pretend that you are going to a Jungle for trekking like Bear Grylls. Would you prefer taking a Swiss Army Knife [All in one tool] or multiple separate tools for each Single-task?
If you ask me, I would say the Swiss Army Knife would be my option to reduce some load in my back bag.
Packer is like the Swiss Army Knife here. With Packer, you can build Images for multiple technologies and cloud providers like AWS, Azure, Docker, Digital Ocean etc.
So you learn a Single Technology [Packer] and Create Images across multiple Cloud Providers and Container technologies. Is not that Nice.
With Packer and Terraform On Board, you can easily achieve Infrastructure as Code and DevOps practices in your Organization.
The Objective
The Objective of this post is to talk about the Packer image creation (for aws) with an example template Step by Step.
We are going to build an Amazon Machine Image using Packer. Come's lets Packer Build.
We are Going to Perform the following Steps as part of this post
- Setup your AWS Programmatic Access using Key and Secret
- Install Packer
- Choose the AMI Base Image [ Amazon Machine Image] from AWS Console
- Create a Security Group to Allow SSH and HTTP/HTTPS requests
- Create SSH KeyPair - For Team to use it while Logging in via SSH
- Create a Sample Packer AWS (or) AMI Image Creation Template
- Validate the Packer Template
- Export your AWS Key and Secret
- Run the Packer Template and Create The AMI Image
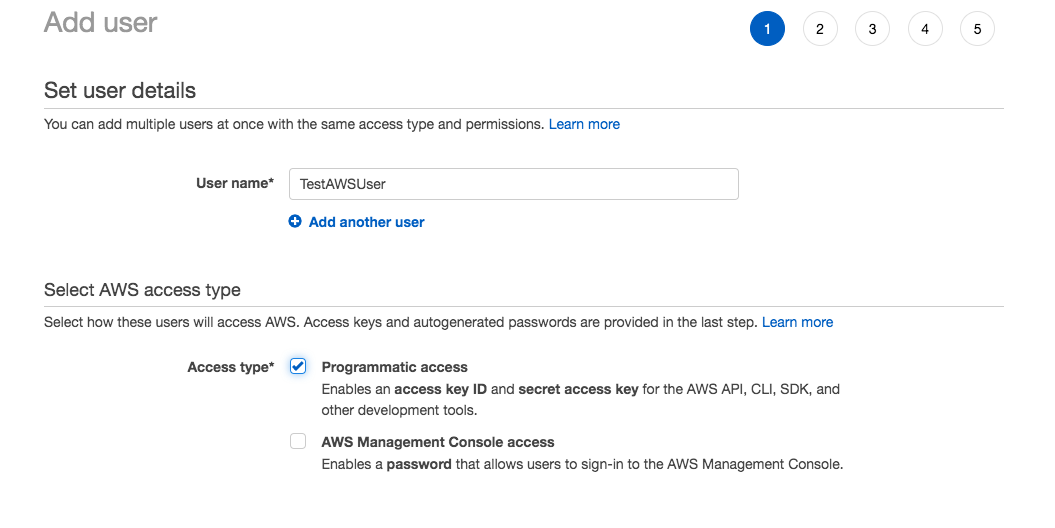
Step1: Get your Programmatic Access / Create Access Key and Secret from AWS
Add new user and key in the UserName
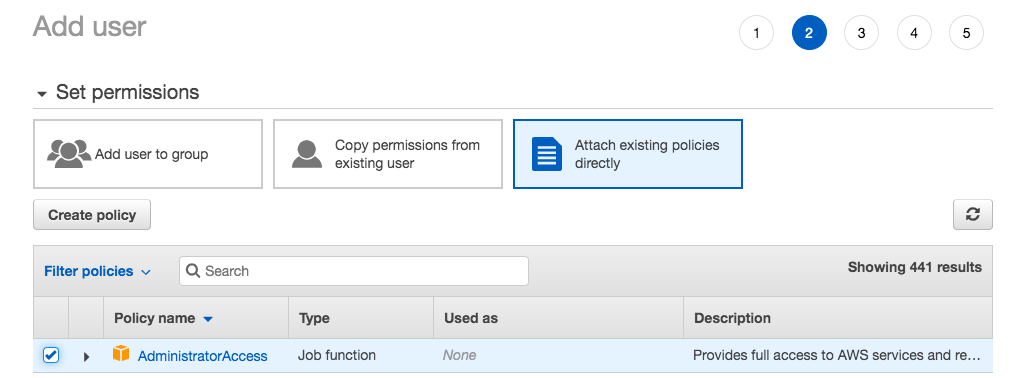
Attach Existing Policies and Select Admin
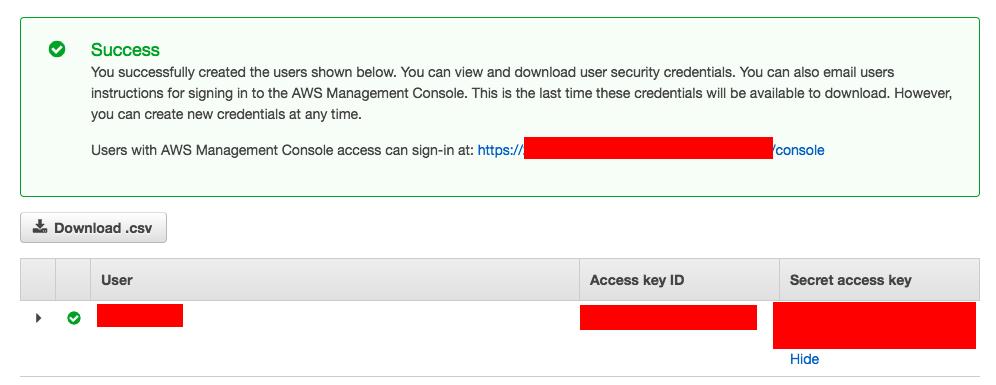
Let the Values be Default Click Next till you see the following Screen
Completion
Step2: Install Packer
-
Download Packer https://www.packer.io/downloads.html
-
Unzip the downloaded file and there will be a Single File named packer
- I have installed the packer in
/apps/packer - Let us add this path into the
$PATHvariable andBASH_PROFILEfile as well for better convenience and to call packer any location without having to refer the full path of the packer. - Add the /apps/packer at the end of the
export PATH=*lineexport PATH=/usr/local/Cellar/openssl/1.0.2p/bin:$PATH:/apps/packer/
- To validate if it is working just type
packer -version
Step3: How to Choose the AMI Base Image for Packer
Before we build the Packer Template file we need to be ready with the AMI name and Since AMI is specific to the region. The AMI image worked on the us-east region may not work with the us-west region.
So you need to validate the AMI [ your base image] before you run the Packer Template [JSON file]
To Select the Base Image [AMI] and to get the name of and the owner of the image. you need to go to AWS Console or Have access to AWS CLI.
Let us show you how to choose the AMI image from AWS Console
Login to AWS Console and Click on AMI on the left
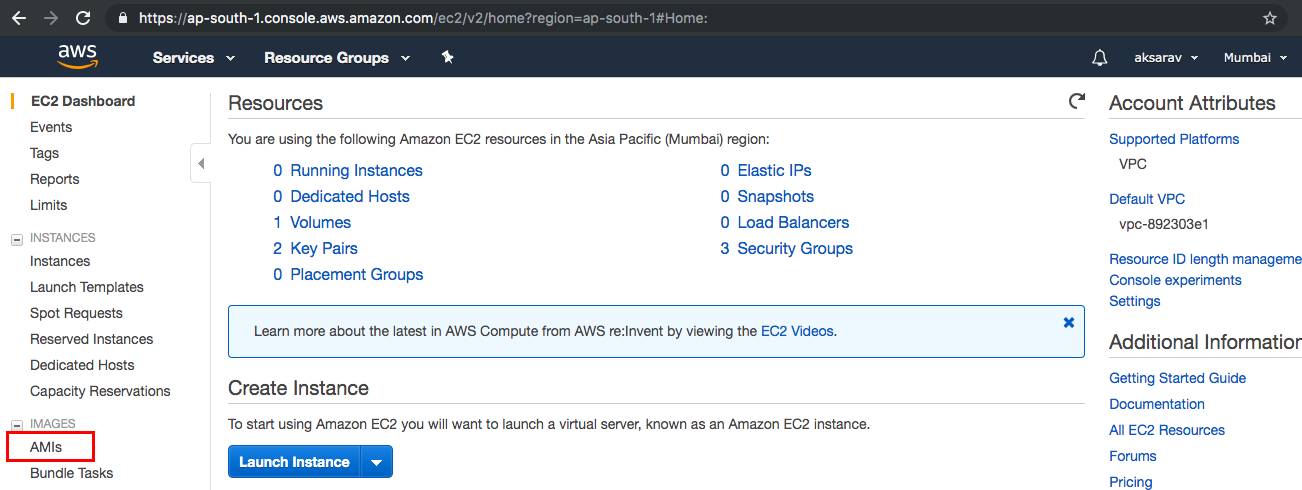
On the AMI Page. Choose Public Images on the left Search bar drop down.
Use the Filters Like Platform, Architecture etc to choose the Image you want. Copy the AMI Name and Owner
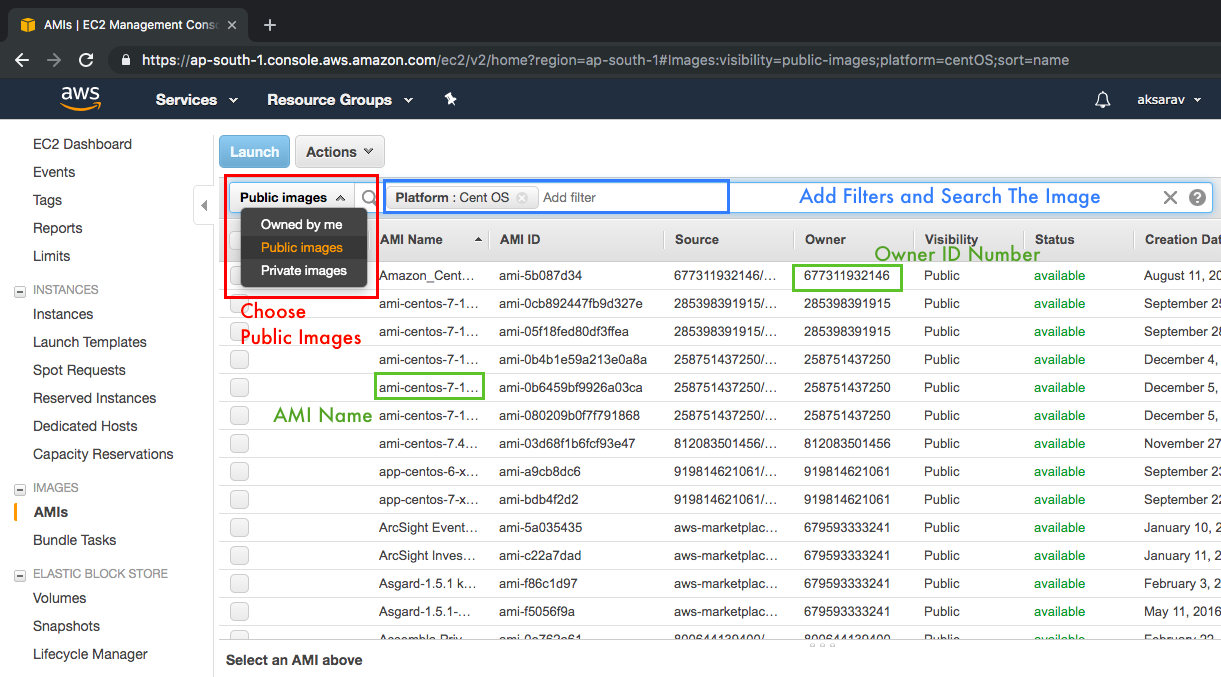
From the Base Image we selected, we are going to Create our Packer Image
I am going with Ubuntu 16 Xenial for this post
Step4: Create a Security Group to Allow SSH and HTTP/HTTPS requests
On the AWS console, Right Panel Click on the Security Groups and Click on Create Security Group button.
On the Modal Fill the Port details. Since we are going to build Tomcat I am allowing access to 8080 and 8443 and SSH.
For additional Security, I am Choosing My IP as the accepted Source for SSH so that only My Public IP would only be allowed to SSH.
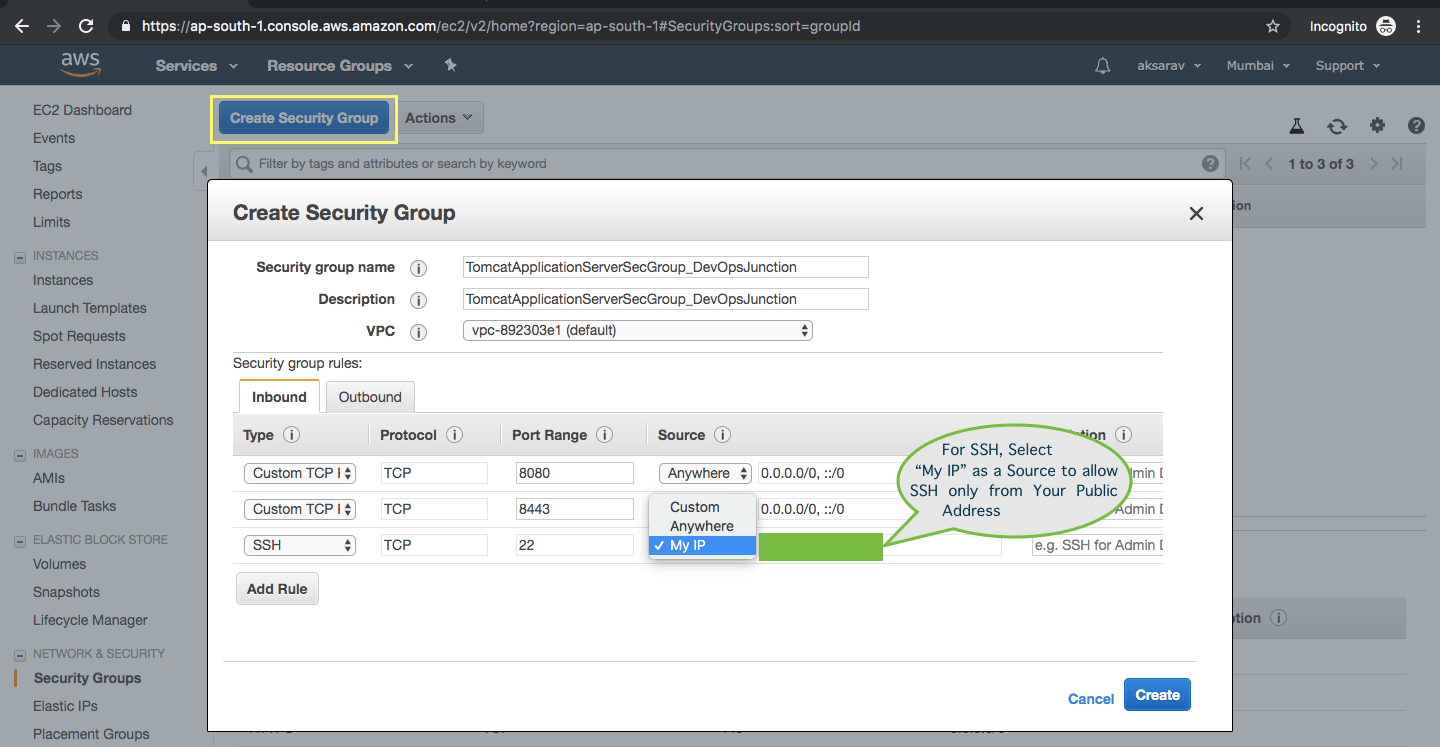
After creating, On the Security Groups List. Copy the Security Group ID we need it for our Packer Template
Step5: Create SSH Key Pair
On the AWS Console Right Panel choose the Key Pairs Option and click on the "Create Key Pair" Button
Enter some Name and Click on Create. The download of a Pem file would initiate
Secure the Downloaded *.pem file really really Safe. Whoever has access to this pem file can access your AWS resources.
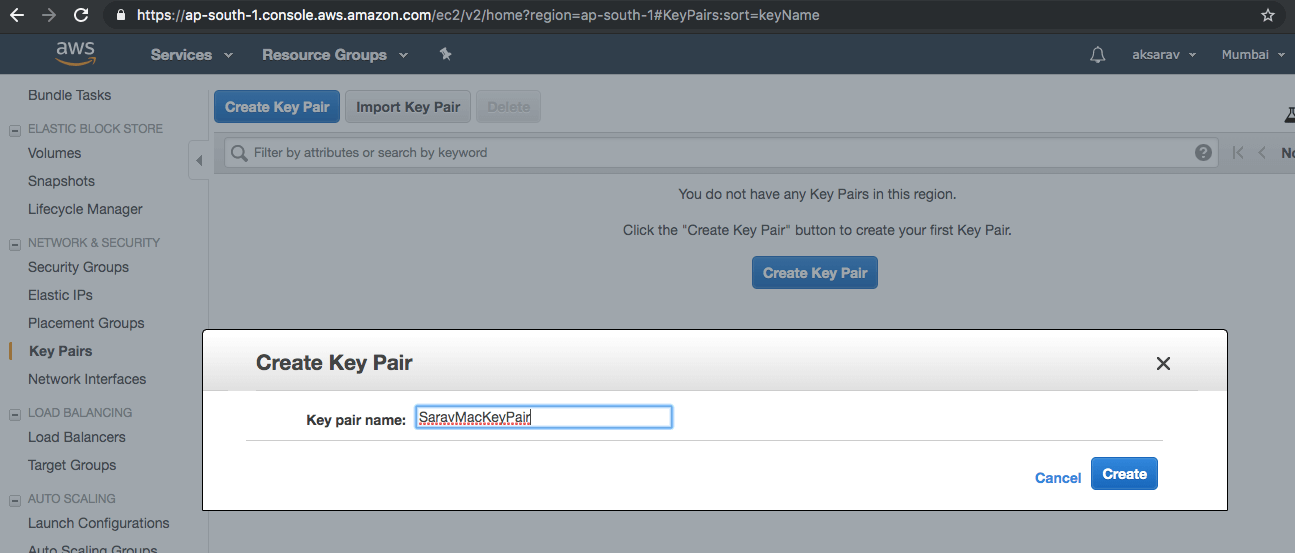
Remember the name of this KeyPair we need this name for our Packer Template.
Save this file in a location where you are going to keep the JSON file for easy access and reference.
It may be necassary that you have to change the permission of this pem file and set very minimal permission, Otherwise you will get error while you are trying to login to EC2 using this pem file.
chmod 400 KeyPair.pemThe preceding command would do that.
Step6: Create a Packer Image Template JSON file - Example
Now let us write a Packer Image Template file. For this post, we will install Tomcat8 and OpenJDK8 on Ubuntu 16 Xenial image
Now you have to use the Security Group ID and Key Pair Name we have Just created, Inside the template along with few other options.
Make Sure you replace them with yours before trying it out.
Here is Packer Template file with my configuration
You can see the KeyPair and Security Groups we have created are being referred along with the Base Image Info.
The Key file (pem) we have downloaded in the previous step and this JSON file are kept in the same directory.
Save this file as tomcat8_ojdk8.json in the same directory where you saved the Key file ( let's call it as a workspace) in my case, it is /apps/packer/tomcat8_ojdk8
{
    "variables": {
        "aws_access_key": "{{env `AWS_ACCESS_KEY_ID`}}",
        "aws_secret_key": "{{env `AWS_SECRET_ACCESS_KEY`}}"
    },
    "builders": [
        {
            "access_key": "{{user `aws_access_key`}}",
            "ami_name": "Tomcat8_OJDK8_AMI",
            "instance_type": "t3.micro",
            "region": "ap-south-1",
            "secret_key": "{{user `aws_secret_key`}}",
            "security_group_id":"sg-04cce0d3e58f065a0",
            "ssh_keypair_name":"SaravMacKeyPair",
            "ssh_private_key_file":"SaravMacKeyPair.pem",
            "associate_public_ip_address":"true",
            "source_ami_filter": {
              "filters": {
              "virtualization-type": "hvm",
              "name": "ubuntu/images/*ubuntu-xenial-16.04-amd64-server-*",
              "root-device-type": "ebs"
              },
              "owners": ["099720109477"],
              "most_recent": true
            },
            "ssh_username": "ubuntu",
            "type": "amazon-ebs"
        }
    ],
    "provisioners": [
        {
            "type": "shell",
            "inline":[
                "sudo add-apt-repository ppa:openjdk-r/ppa",
                "sudo apt-get update",
                "sudo apt-get install -y openjdk-8-jdk",
                "java -version",
                "sudo apt-get install -y tomcat8"
            ]
        }
    ]
}
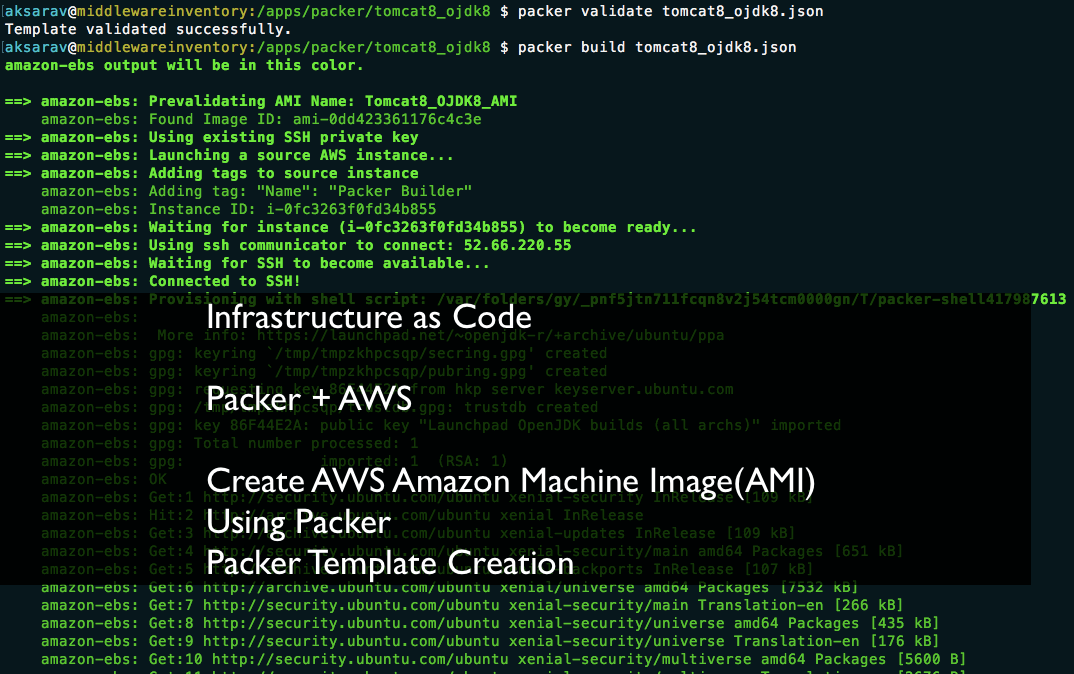
Step7: Validate the Packer Image Template JSON file
Go to the WorkSpace where you have saved the Packer Template file (JSON), Now you can execute packer validate followed by the JSON file name.
If No Syntax errors found, Packer would report "Template Validated Successfully"
Here are the Command Snippets as it was executed in my Local Machine
aksarav@middlewareinventory:/apps/packer/tomcat8_ojdk8 $ pwd
/apps/packer/tomcat8_ojdk8
aksarav@middlewareinventory:/apps/packer/tomcat8_ojdk8 $ ls -lrt
total 8
-rw-r--r –  1 aksarav  wheel  1458 Jun  3 06:35 tomcat8_ojdk8.json
aksarav@middlewareinventory:/apps/packer/tomcat8_ojdk8 $ packer validate tomcat8_ojdk8.json
Template validated successfully.
You can see the last line where I have used packer validate command and Packer reporting the Success Message.
Step8: Export AWS Key ID and Secret Key
Before you run the packer build. You must export the AWS_ACCESS_KEY_ID and AWS_SECRET_ACCESS_KEY into the environment variable.
If you scroll back and Look at the first line of our JSON file, we are trying to get these values from the env [Environment Variable]
$ export AWS_ACCESS_KEY_ID="anaccesskey"
$ export AWS_SECRET_ACCESS_KEY="asecretkey"
Step9: Packer Build - Run the Packer Image Template and Create AMI
Finally, It is a time to build our AMI
packer build tomcat8_ojdk8.json
Here is the Small ScreenCast of me executing this command and building the AMI
Whoohoo!.. we have Successfully Created the Packer AWS AMI Image using Packer Template.
Now this Image can be used to build an EC2 instance when ever there is a need.
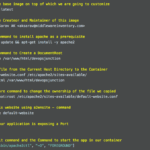
How to Create EC2 instance from this AMI image using Terraform
I already wrote an article with step by step instructions on how to create packer image and provision EC2 instance using that AMI image.
Refer this link to know how to create Packer Image and build EC2 instance with Terraform
Hope it helps.
Rate this article [ratings]
Cheers,
Sarav AK

Follow me on Linkedin My Profile Follow DevopsJunction onFacebook orTwitter For more practical videos and tutorials. Subscribe to our channel
Signup for Exclusive "Subscriber-only" Content