In this article, we are going to share the Ansible playbook for tomcat installation.
If you are new to Ansible, refer to our introductory article on the Ansible playbook and come back.
Now let us move on with our objective.
Tomcat, A web application server powered by J2EE and the most widely used Java Application server.
If you come from a Java background or used frameworks like Spring, there is a high chance you would have used Tomcat.
While fellow Industrial application servers such as WebLogic, WebSphere, JBoss etc are present, Tomcat still leads the market for its simplicity and zero cost.
with no further ado, let us move on to the source code of the ansible playbook that installs tomcat version 8 on a Linux system.
Ansible playbook to install Java and Tomcat
here is the source code of the Ansible playbook. We will decode this Ansible playbook and cover each task in detail shortly
---
- name: Download Tomcat8 from tomcat.apache.org
  hosts: testserver
  vars:
    download_url: https://dlcdn.apache.org/tomcat/tomcat-8/v8.5.83/bin/apache-tomcat-8.5.83.tar.gz
  tasks:
   - name: Download Open JDK
     become: yes
     apt:
      name: openjdk-8-jre-headless
      update_cache: yes
      state: present

   - name: validate if Java is availble
     shell:
      java -version

   - name: Create the group
     become: yes
     group:
      name: tomcat
      state: present

   - name: Create the user
     become: yes
     user:
        name: tomcat
        state: present

   - name: Create a Directory /opt/tomcat8
     become: yes
     file:
       path: /opt/tomcat8
       state: directory
       mode: 0755
       owner: tomcat
       group: tomcat

   - name: Download Tomcat using unarchive
     become: yes
     unarchive:
       src: "{{download_url}}"
       dest: /opt/tomcat8
       mode: 0755
       remote_src: yes
       group: tomcat
       owner: tomcat

   - name: Move files to the /opt/tomcat8 directory
     become: yes
     become_user: tomcat
     shell: "mv /opt/tomcat8/apache*/* /opt/tomcat8"

   - name: Creating a service file
     become: yes
     copy:
      content: |-
        [Unit]
        Description=Tomcat Service
        Requires=network.target
        After=network.target

        [Service]
        Type=forking
        User=tomcat
        Environment="CATALINA_PID=/opt/tomcat8/logs/tomcat.pid"
        Environment="CATALINA_BASE=/opt/tomcat8"
        Environment="CATALINA_HOME=/opt/tomcat8"
        Environment="CATALINA_OPTS=-Xms512M -Xmx1024M -server -XX:+UseParallelGC"

        ExecStart=/opt/tomcat8/bin/startup.sh
        ExecStop=/opt/tomcat8/bin/shutdown.sh
        Restart=on-abnormal

        [Install]
        WantedBy=multi-user.target
      dest: /etc/systemd/system/tomcat.service

   - name: Reload the SystemD to re-read configurations
     become: yes
     systemd:
        daemon-reload: yes

   - name: Enable the tomcat service and start
     become: yes
     systemd:
        name: tomcat
        enabled: yes
        state: started

   - name: Connect to Tomcat server on port 8080 and check status 200 - Try 5 times
     tags: test
     uri:
       url: http://localhost:8080
     register: result
     until: "result.status == 200"
     retries: 5
     delay: 10
Where can this playbook be used?
This ansible-playbook is designed specifically for ubuntu or debian architecture Linux Systems.
As we are using apt package manager command to install java. You can replace it with yum if you are using this playbook for other linux distributions.
Let me know if you need any help or face any issues.
Update the Download URL and Execute
I have taken the URL from the tomcat website but it changes often and per region of the world.
So make sure you update the Download URL by visiting the Apache tomcat download page
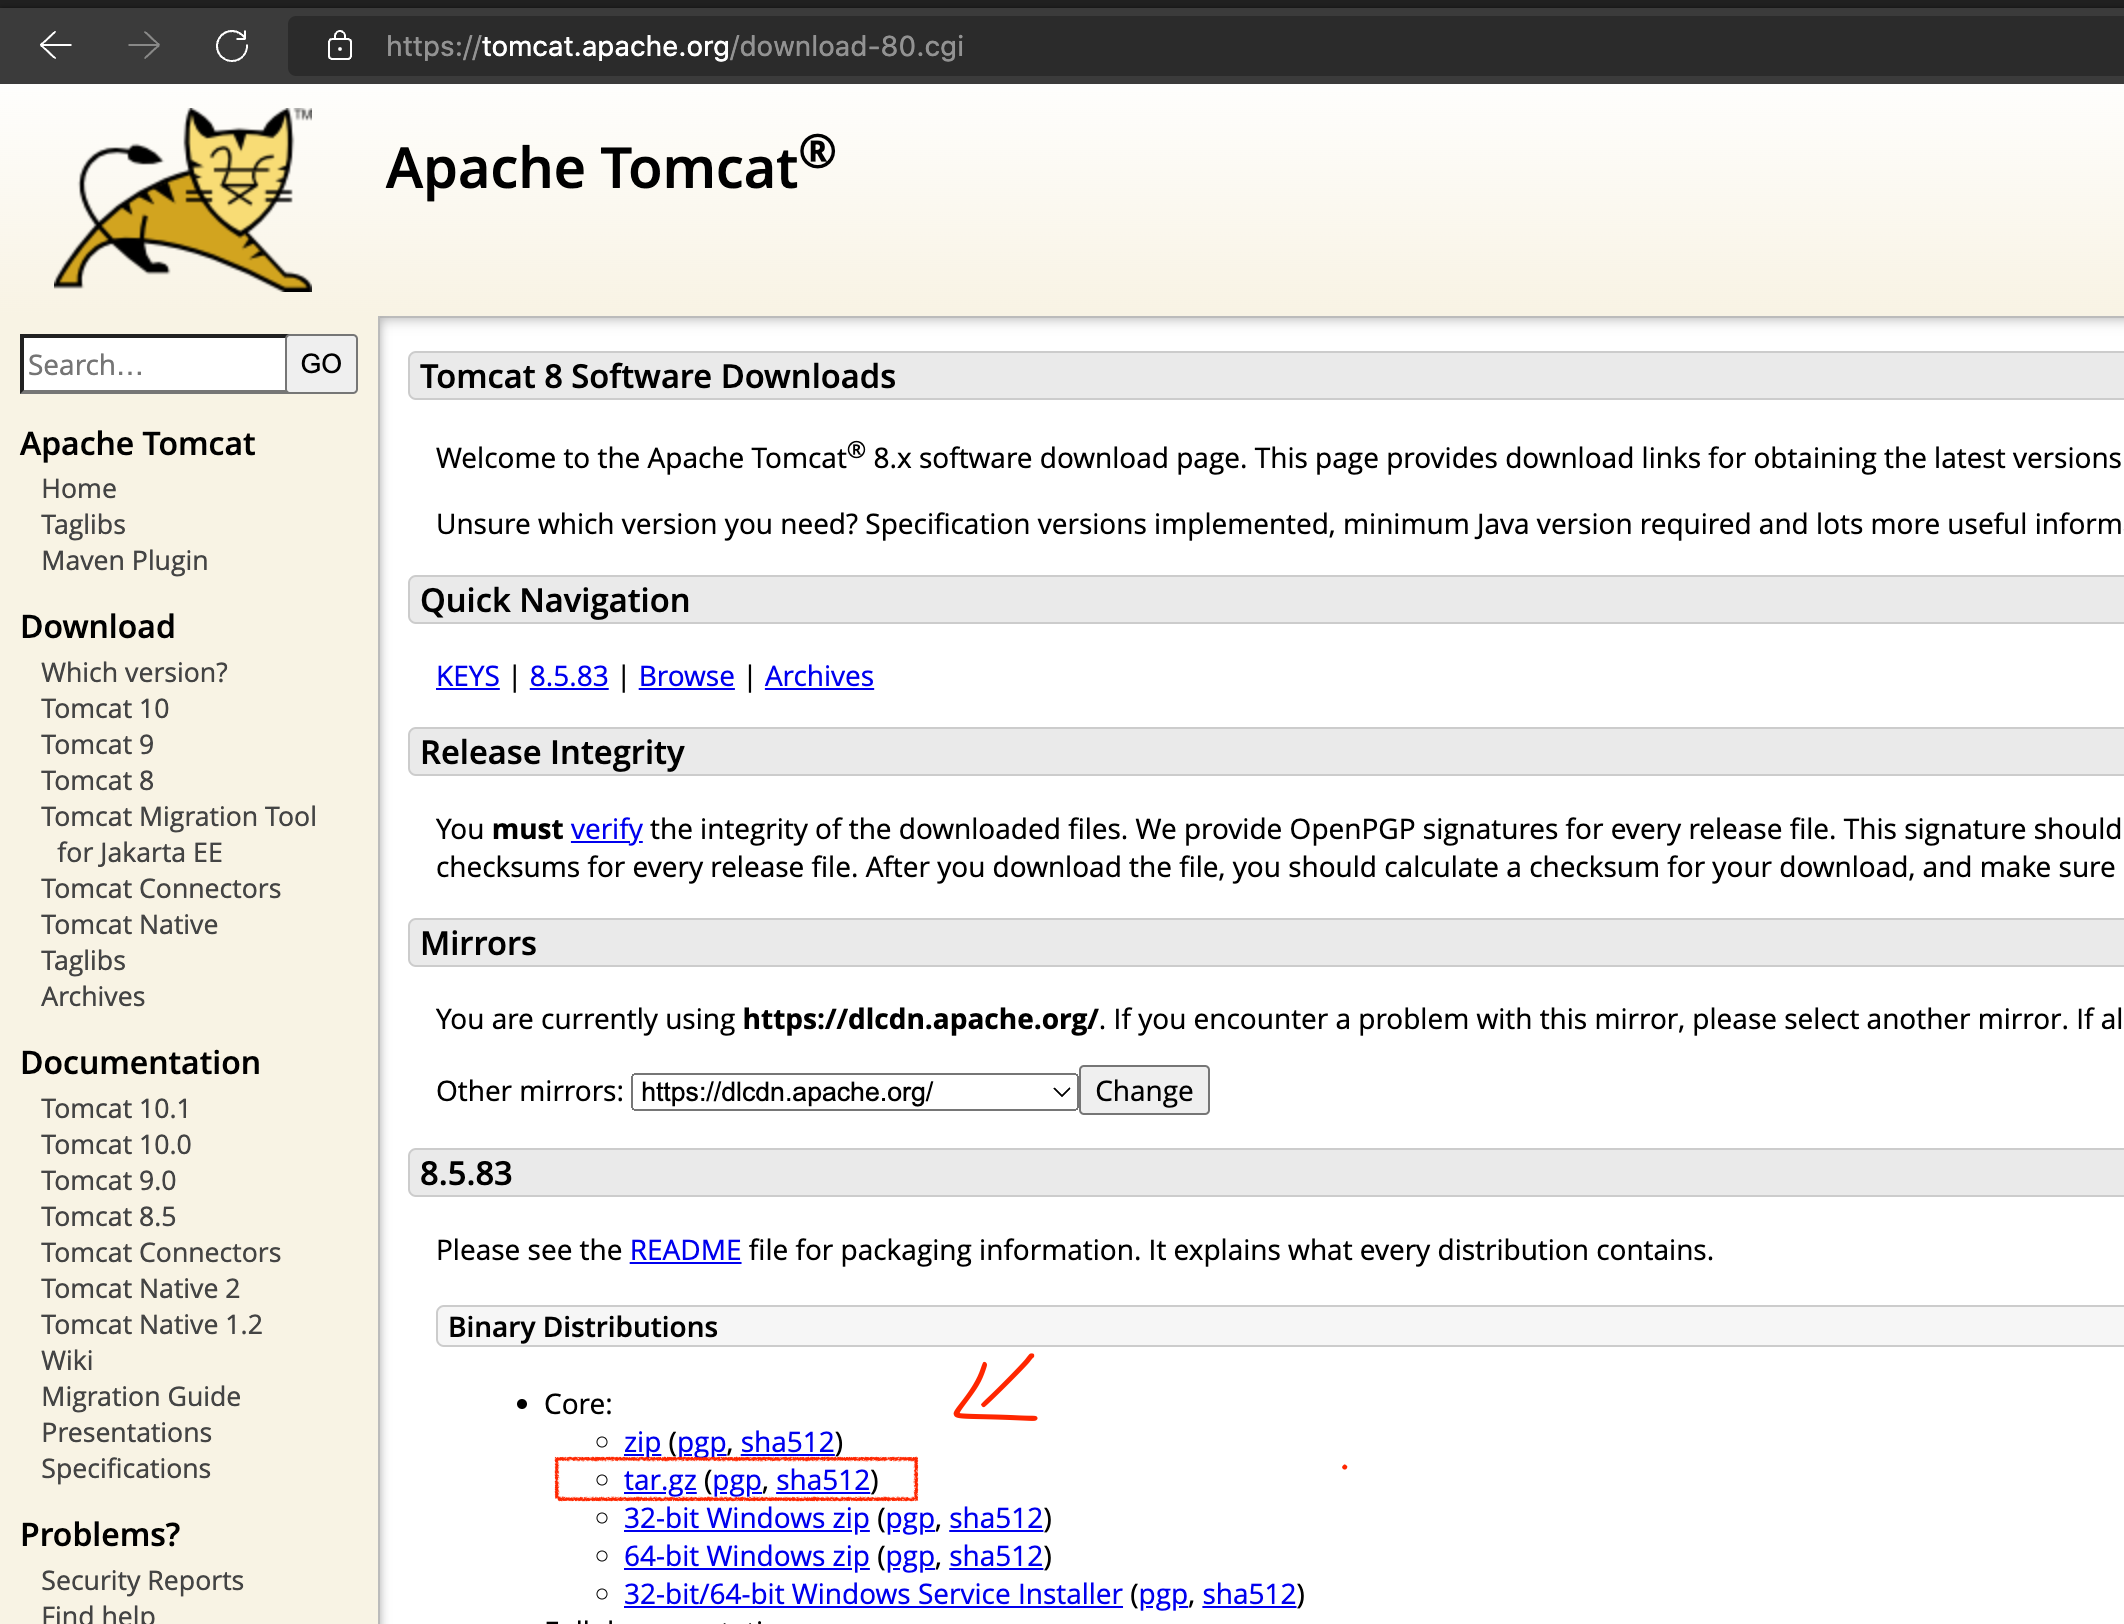
In the preceding snapshot, I have highlighted where I have taken the download URL from. Just right-click on that hyperlink and click on copy link that's all.
Once you have updated, you are good to go and execute the playbook with the following command
ansible-playbook install-tomcat.yaml
Now you can sit back and relax while Ansible does everything for you.
Decoding our Ansible Playbook
In this playbook, we have used a lot of Ansible modules to facilitate various tasks. this playbook consists of the following steps or tasks, In Ansible's dictionary, they are called as plays.
Let us see each play and its purpose along with what module is used.
- Download Open JDK - we are using the
aptmodule to install java as a system package - Validate if Java is available -
shellmodule is used to run ajava -versioncommand, the playbook would fail if the command fails (or) not found - Create a Group - we are using a
groupmodule is used to create linux user group named tomcat - Create a User - we are creating a new user named
tomcatusingusermodule, this user and the group would be used by the tomcat application server as its not recommended to run servers on Root - Directory creation - the
filemodule is used to create a directory where the tomcat server be installed and operated. CATALINA_BASE/opt/tomcat8in our case - Download Tomcat installable tar - the
unarchivemodule is used to download tomcat from the URL and to untar once the file is downloaded. we have combined the efforts ofget_urlandunarchivetogether as unarchive can have URL as a source - Moving files to the right directory - Once the untar is done. it would leave us with a big directory with a clumsy name containing the version etc. we are basically moving the content from
apache-tomcat-****to/opt/tomcat8for simplicity usingshellmodule, you can use copy module too - Creating a Service file for tomcat - we are using the
copymodule to create a file in remote and the content of the service file is hard coded inside the playbook itself. another way to do it is to usetemplatebut this is convenient. we are using|-to maintain the line break while assigning the multiline data to the content variable. - Reloading SystemD - Once the service file is created and placed on the appropriate
/etc/systemddirectory, we need to reload the system daemon to sync the changes. Ansible has a dedicated module namedsystemdfor to interact with SystemDaemon - Enabling the tomcat to Auto-Start - We are enabling the tomcat service we just created, for the boot time auto-start. this is done using
systemdmodule too - Connect to the tomcat web interface and validate - we are using the
urimodule to connect to thehttp://localhost:8080to ensure that the tomcat is started and running fine. we are also using until and retry to wait for the server to come up
Executing the Playbook in real-time
Here is a video record my screen executing this playbook

Where to go from here
Now you have installed the tomcat, you might want some test application to deploy and to validate.
Don't worry, I have a sample web application that you can use. refer to this article
You might also be interested to know how to install tomcat on Docker and Kubernetes. check out these articles.
Docker Tomcat Example – Dockerfile for Tomcat, Docker Tomcat Image
Check out our other articles on the Apache tomcat Application server here
If you have any queries please let me know in the comments section
Hope this helps and Happy Automation.
Cheers
Sarav AK

Follow me on Linkedin My Profile Follow DevopsJunction onFacebook orTwitter For more practical videos and tutorials. Subscribe to our channel
Signup for Exclusive "Subscriber-only" Content