Introduction
Log management in Infrastructure has changed tremendously in recent few years and we are a having wonderful products in the market to manage, parse, analyze log files
These tools are being used extensively for incident management, alerting, security analysis and application performance monitoring etc.
In the Opensource market, Elastic Search or ELK Stack is leading and makes it possible for small to medium companies to afford this wonderful log management solutions. while Splunk leads the enterprise market.
If you are not already aware, ELK stack is a combination of three open source projects, Elastic Search, Log Stash and Kibana and they come together to give you a combined log management experience and each one of them has a job to do.
- Elastic Search - Search and Data analytics Engine just like Apache Solr, Lucene
- Log Stash - Data processing and ingesting tool sends/stash to Elastic search
- Kibana - A Visualizing tool for the data stored in Elastic create graphs, alerts etc.
Hope this gives you a quick intro to ELK. but we are going to use EFK. what is EFK?
ELK vs EFK
You know what is ELK already and what is this EFK. It is an acronym of Elastic FluentD Kibana

If you have not heard/read about fluentD yet. This is your lucky day.
FluentD is a wonderful Log Collector tool just like Log Stash ( far better than) and it serves as unified logging platform yet Simple
Based on my personal experience. I found Log stash really hard to implement with GROK patterns and FluentD saved me. ( I mean it )
There is a lightweight log shipping product from Elastic named Beats as an alternate for LogStash. but it does not meet the efficiency and simplicity of fluentd
With no further ado, let us talk about our objective of implementing the Kubernetes FluentD Sidecar container.
Our Objective
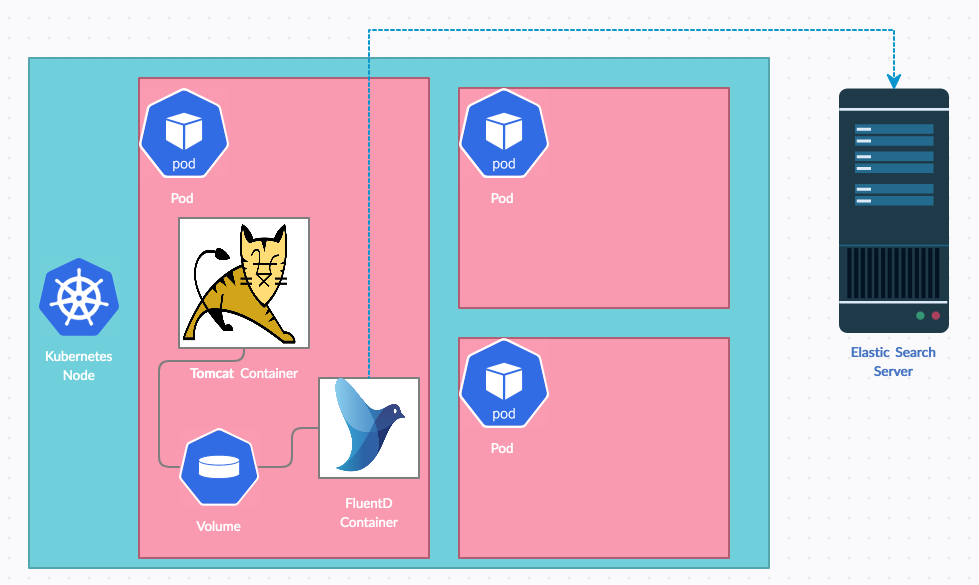
We have a tomcat based web application container to be deployed into Kubernetes.
I would like to collect and ship my tomcat logs and application logs from kubernetes to a remote elastic search server.
we are going to use the Elastic FluentD Kibana (EFK) stack using Kubernetes sidecar container strategy.
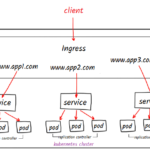
Why Sidecar logging and not K8s Cluster level logging
Not all the containers we deploy to K8s is writing logs to stdout, though it is recommended, It does not suit all requirements
Let's say I containerize my Java web app deployed on tomcat writes its own log files like Audit log, Application log etc.
I cannot obviously redirect all of them to the same stream.
Additionally, what if I want these log files to go to different Indexes in my Elastic Search for Monitoring and auditing.
Well, that's where Sidecar comes to help.
FluentD should have access to the log files written by tomcat and it is being achieved through Kubernetes Volume and volume mounts
FluentD would ship the logs to the remote Elastic search server using the IP and port along with credentials.
Steps to deploy fluentD as a Sidecar Container
To deploy fluentD as a sidecar container on Kubernetes POD. we need to create a few configuration elements like ConfigMap, Volumes, Deployment etc.
We will see all of them in detail one by one.
ConfigMap - to store fluentd config file
Our first task is to create a Kubernetes ConfigMap object to store the fluentd configuration file. You can store any non-confidential key-value data in ConfigMap object including files.
Here we are creating a ConfigMap named fluentdconf with the key name equivalent to the resulting filename fluent.conf
This ConfigMap with key:value data set would later be mounted into the POD. where the key would be the file name and the value would be stored into the file.
We have defined three major tags (or) root elements in the fluent.conf file
- Source - to define the file details to monitor/lookup and to set format to look out for
- filter - customizing the event collected and overwriting fields (or) adding fields
- Match - to define what to do with the matching data/log events and where to stash.
you can write your own format using RUBY Regular Expression (or) use built-in formats like apache2 to event filtering.
Under the match root element, we have to define our Elastic Search server details and credentials along with the index name to which we are sending the logs.
apiVersion: v1
kind: ConfigMap
metadata:
  name: fluentdconf
  namespace: development
data:
  fluent.conf: |
      <source>
        @type tail
        time_key time
        format multiline
        format_firstline /^\[[[A-Z]|\s]+\]/
        format1 /^\[(?<LogLevel>[[A-Z]|\s]+)\]\[(?<time>[0-9]{4}-[0-9]{2}-[0-9]{2}\s[0-9]{2}\:[0-9]{2}\:[0-9]{2}\,[0-9]{3})\]\s-\s(?<message>.*+)$/
        path /opt/tomcat/webapps/ROOT/WEB-INF/log/myapp.log
        pos_file /tmp/myapp.log.pos
        tag dev.myapp.applogs
      </source>

      <filter dev.myapp.applogs>
        @type record_transformer
        <record>
        hostname ${hostname}
        </record>
      </filter>

      <match dev.myapp.applogs>
        @type elasticsearch
        host 172.99.1.218
        port 59200
        user elasticusr
        password Pa$$w0rd
        index_name fluentd.${tag}
        logstash_format true
        logstash_prefix dev.myapp.applogs
        flush_interval 1s
      </match>

      <source>
        @type tail
        path /opt/tomcat/logs/localhost_access_log.%Y-%m-%d.txt
        pos_file /tmp/tomcataccesslog.pos
        tag dev.myapp.tomcatlogs
        format apache2
      </source>

      <filter dev.myapp.tomcatlogs>
        @type record_transformer
        <record>
        hostname ${hostname}
        </record>
      </filter>

      <match dev.myapp.tomcatlogs>
        @type elasticsearch
        host 172.99.1.218
        port 59200
        user elasticusr
        password Pa$$w0rd
        logstash_format true
        logstash_prefix dev.myapp.tomcatlogs
      </match>
Creating our Docker Container Images
As discussed earlier, we are going to have two containers in our POD. Tomcat as a primary container with our application pre-deployed and a sidecar container fluentd
Tomcat Docker file
this is the Dockerfile content for our tomcat image and it has been discussed in detail in our previous article here
FROM centos

RUN mkdir /opt/tomcat/

WORKDIR /opt/tomcat
RUN curl -O https://downloads.apache.org/tomcat/tomcat-8/v8.5.76/bin/apache-tomcat-8.5.76.tar.gz
RUN tar xvfz apache*.tar.gz
RUN mv apache-tomcat-8.5.76/* /opt/tomcat/.
RUN sed -i -e "s|mirrorlist=|#mirrorlist=|g" /etc/yum.repos.d/CentOS-*; sed -i -e "s|#baseurl=http://mirror.centos.org|baseurl=http://vault.centos.org|g" /etc/yum.repos.d/CentOS-*
RUN yum -y install java
RUN java -version

WORKDIR /opt/tomcat/webapps
RUN curl -O -L https://github.com/AKSarav/SampleWebApp/raw/master/dist/SampleWebApp.war

EXPOSE 8080

CMD ["/opt/tomcat/bin/catalina.sh", "run"]
You can make changes to the image and build it with your desired name like this
docker build -t tomcat8 .
If you do not want to make customizations you can pull it locally (or) just use my image name globally available from docker hub
docker pull saravak/tomcat8
Note*: The URL we have used in the Dockerfile to download tomcat often be updated by tomcat or there could be different download url available for different regions across the world.
If you are getting any issues with the link.
Please visit https://tomcat.apache.org/download-80.cgi to get the latest download URL and update it, in your dockerfile.
FluentD Docker file
Content for fluentD container's Dockerfile is given below.
FROM ubuntu:16.04
RUN apt-get update
RUN ulimit -n 65536
RUN apt-get install -y curl
RUN curl https://packages.treasuredata.com/GPG-KEY-td-agent | apt-key add -
RUN echo "deb http://packages.treasuredata.com/3/ubuntu/xenial/ xenial contrib" > /etc/apt/sources.list.d/treasure-data. list

RUN apt-get update && apt-get install -y -q curl make g++ && apt-get clean && apt-get install -y td-agent && rm -rf /var/lib/apt/lists/* /tmp/* /var/tmp/*

RUN sed -i -e "s/USER=td-agent/USER=root/" -e "s/GROUP=td-agent/GROUP=root/" /etc/init.d/td-agent

RUN /usr/sbin/td-agent-gem install fluent-plugin-aws-elasticsearch-service -v 1.0.0 CMD /usr/sbin/td-agent $FLUENTD_ARGS
As said earlier you can build your own docker image out of this file (or) simply use my globally available image saravak/fluentd
So before proceeding further, you need to have the docker images ready.
Either your custom-built docker image available in your local (or) you can choose to use my globally available docker images from docker hub
I am going with the global image for this article.
Creating a Kubernetes Deployment Manifest Yaml file
Our Container images are ready and we can use the images in our Kubernetes Deployment manifest.
Rather than using the POD manifest, Deployment kind has various advantages including the creation of replication controller, application roll-out, pod replacement etc
Deployment is the ideal way to deploy Microservices to Production Kubernetes
apiVersion: apps/v1
kind: Deployment
metadata:
  name: myapp-dpl
  namespace: development
  labels:
    app: myapp
spec:
  replicas: 1
  selector:
    matchLabels:
      app: myapp
  template:
    metadata:
      labels:
        environment: DEV
        managedby: K8s
        app: myapp
    spec:
      containers:

      # Primary Container
      - name: tomcat
        image:  saravak/tomcat8
        volumeMounts:
          - name: applog
            mountPath: /opt/tomcat/webapps/ROOT/WEB-INF/log/
          - name: tomcatlog
            mountPath: /opt/tomcat/logs
        ports:
        - containerPort: 8080
        resources:
          limits:
            memory: 1028Mi

      # This is for FluentD Logging Container
      - name: fluentd
        env:
        - name: FLUENT_UID
          value: root
        - name: FLUENT_CONF
          value: fluent.conf
        - name: FLUENTD_ARGS
          value: -c /fluentd/etc/fluent.conf
        image: saravak/fluentd:elastic
        volumeMounts:
        - name: applog
          mountPath: /opt/tomcat/webapps/ROOT/WEB-INF/log/
        - name:  fdconf
          mountPath:  /fluentd/etc/

      volumes:
      - name: applog
        emptyDir: {}
      - name: tomcatlog
        emptyDir: {}
      - name: fdconf
        configMap:
          name: fluentdconf
In the preceding manifest file, we are creating an application named myapp with two containers under the development namespace
The container names are tomcat and fluentd and the latter one is our primary objective here
For fluentd to function properly we need to pass a few values during the container startup such as
FLUENT_UID- to define what user the fluent should startFLUENT_CONF- represents the configuration file nameFLUENTD_ARGS- to define the fully qualified path of thefluent.conffile while starting the fluent with-cflag
Volumes and Volume Mounts
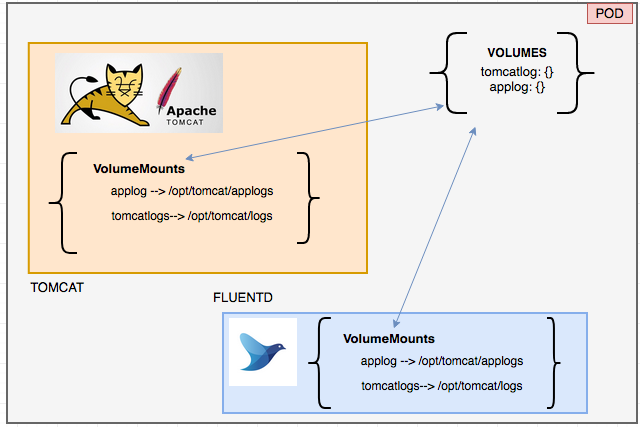
Another important item in our deployment manifest YAML file is volumes andVolume_mounts
you can notice that we are creating three volumes named applog, tomcatlog and fdconf
applog- an empty Directory volume to share the application logs directory between Tomcat and FluentDtomcatlog- an empty Directory volume to share the tomcat logs directory between Tomcat and fluentDconfigMap- ConfigMap type of volume to inject config data into the POD. in our case it is a file content stored in configMap
These volumes would be mounted with the help of volumeMounts within the containers Tomcat and FluentD.
When the volume is being mounted. It can be mounted to any physical location/path. This is similar to the Unix mounts.
Just to keep things clean I am using the same path on both containers. but it is not necessary.
the applog and tomcatlogs volumes should be mounted to the location specified in the fluent.conf file and it should match.
Deploying our YAML for Kubernetes FluentD Sidecar setup
So far we have seen how Kubernetes FluentD sidecar container is setup and the necessary elements like ConfigMap, Volume etc
Here I have collected all these codes and compiled as a single file with one addition.
Just to make my application available externally and to expose it, I have added a service to my final YAML file and I can deploy it right now to Kubernetes cluster
This is the complete file with ConfigMap + Service + Deployment
---
apiVersion: v1
kind: ConfigMap
metadata:
  name: fluentdconf
  namespace: development
data:
  fluent.conf: |
      <source>
        @type tail
        time_key time
        format multiline
        format_firstline /^\[[[A-Z]|\s]+\]/
        format1 /^\[(?<LogLevel>[[A-Z]|\s]+)\]\[(?<time>[0-9]{4}-[0-9]{2}-[0-9]{2}\s[0-9]{2}\:[0-9]{2}\:[0-9]{2}\,[0-9]{3})\]\s-\s(?<message>.*+)$/
        path /opt/tomcat/webapps/ROOT/WEB-INF/log/myapp.log
        pos_file /tmp/myapp.log.pos
        tag dev.myapp.applogs
      </source>

      <filter dev.myapp.applogs>
        @type record_transformer
        <record>
        hostname ${hostname}
        </record>
      </filter>

      <match dev.myapp.applogs>
        @type elasticsearch
        host 172.99.1.218
        port 59200
        user elasticusr
        password Pa$$w0rd
        index_name fluentd.${tag}
        logstash_format true
        logstash_prefix dev.myapp.applogs
        flush_interval 1s
      </match>

      <source>
        @type tail
        path /opt/tomcat/logs/localhost_access_log.%Y-%m-%d.txt
        pos_file /tmp/tomcataccesslog.pos
        tag dev.myapp.tomcatlogs
        format apache2
      </source>

      <filter dev.myapp.tomcatlogs>
        @type record_transformer
        <record>
        hostname ${hostname}
        </record>
      </filter>

      <match dev.myapp.tomcatlogs>
        @type elasticsearch
        host 172.99.1.218
        port 59200
        user elasticusr
        password Pa$$w0rd
        logstash_format true
        logstash_prefix dev.myapp.tomcatlogs
      </match>

---
kind: Service
apiVersion: v1
metadata:
  name:  myapp-svc
  namespace: development
  labels:
    app: myapp
spec:
  selector:
    app:  myapp
  type: NodePort
  ports:
  - port:  80
    targetPort:  8080

---
apiVersion: apps/v1
kind: Deployment
metadata:
  name: myapp-dpl
  namespace: development
  labels:
    app: myapp
spec:
  replicas: 1
  selector:
    matchLabels:
      app: myapp
  template:
    metadata:
      labels:
        environment: DEV
        managedby: K8s
        app: myapp
    spec:
      containers:

      # Primary Container
      - name: tomcat
        image:  saravak/tomcat8
        volumeMounts:
          - name: applog
            mountPath: /opt/tomcat/webapps/ROOT/WEB-INF/log/
          - name: tomcatlog
            mountPath: /opt/tomcat/logs
        ports:
        - containerPort: 8080
        resources:
          limits:
            memory: 1028Mi

      # This is for FluentD Logging Container
      - name: fluentd
        env:
        - name: FLUENT_UID
          value: root
        - name: FLUENT_CONF
          value: fluent.conf
        - name: FLUENTD_ARGS
          value: -c /fluentd/etc/fluent.conf
        image: saravak/fluentd:elastic
        volumeMounts:
        - name: applog
          mountPath: /opt/tomcat/webapps/ROOT/WEB-INF/log/
        - name: tomcatlog
          mountPath: /opt/tomcat/logs
        - name:  fdconf
          mountPath:  /fluentd/etc/

      # Logrotating containers:
      - name: LogRotate
        image: saravak/logrotatek8s
        volumeMounts:
        - name: tomcatlog
          mountPath: /logs/

      volumes:
      - name: applog
        emptyDir: {}
      - name: tomcatlog
        emptyDir: {}
      - name: fdconf
        configMap:
          name: fluentdconf
I save this entire configuration file as myapp-deployment.yml and creating a deployment using kubectl
kubectl create -f myapp-deployment.yml
You can also use
kubectl apply -f myapp-deployment.yml
Validating Kubernetes FluentD and Tomcat Containers in POD
After creating the deployment. Once you get the message "deployment created" in your terminal.
You can give it a few seconds for the POD to get created and check if the pod is ready
Check if the pod is created and running with 2 containers
# kubectl get podsNAME                       READY STATUS  RESTARTS AGE
myapp-dpl-5f5bf998c7-m4p79 2/2   Running 0        128d
you can see the status is Running and both fluentd and tomcat containers are ready
If you see anything other than 2/2 it means an issue with container startup. One of the containers might have failed.
Container wise status
If you have jq installed in your terminal. you can parse the kubectl output and display a container-wise status like this along with their name.
✗ kubectl get pods myapp-dpl-5f5bf998c7-m4p79 -o json|jq '.status.containerStatuses[] |{Name: .name, Status: .state} '
{
  "Name": "fluentd",
  "Status": {
    "running": {
      "startedAt": "2020-11-16T18:44:40Z"
    }
  }
}
{
  "Name": "tomcat",
  "Status": {
    "running": {
      "startedAt": "2020-11-16T18:44:40Z"
    }
  }
}
Describe pod to know more information
If you need to more information about your POD like the volume names and the volume mount names etc
you can use the following command
kubectl describe myapp-dpl-5f5bf998c7-m4p79
Check the logs of Kubernetes fluentD container for any Error
Just to make sure there are no connectivity issues and FluentD is able to connect to the Elastic Search server at the remote.
We need to check the logs of fluentd container running inside the pod
kubectl logs myapp-dpl-5f5bf998c7-m4p79 fluentdSince there are two containers in the POD, you have to explicitely mention the pod name after the POD name.
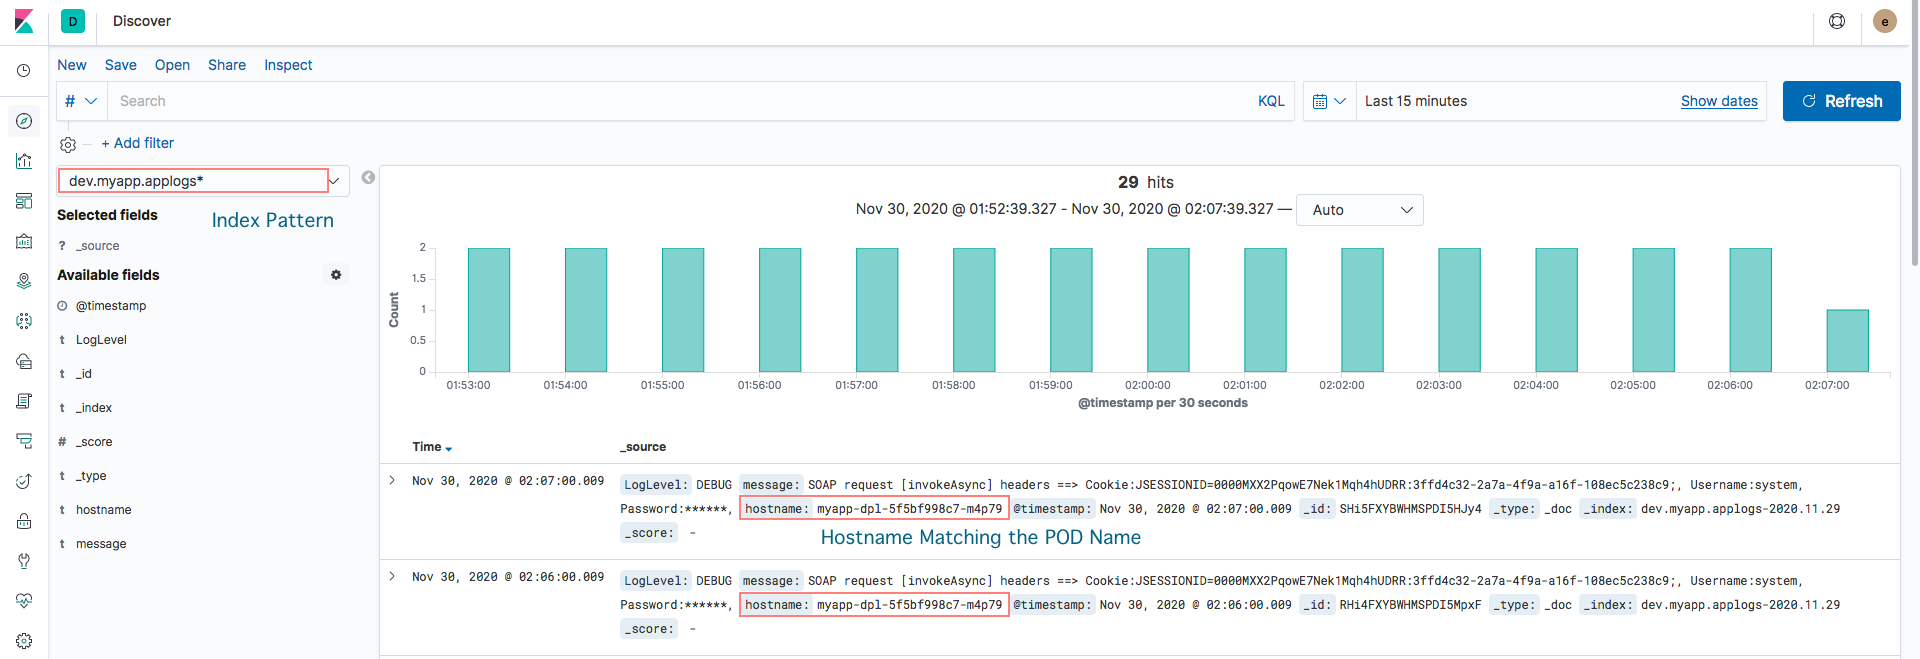
Validating the arrival of the logs at Elastic
Now you can log in to Kibana dashboard and validate if you are able to see the logs coming in
The hostname on each event would match your POD name
Conclusion
Hope this article helps you to understand a few concepts like Sidecar container and our primary objective of collecting and shipping the logs to Elastic Search has also been achieved.
Kubernetes FluentD - EFK logging is really efficient and microservices ready and this would be helpful in various other microservice setups as well.
If you have any questions or tips to make this article better. Please feel free to let me know in comments
Cheers
Sarav AK

Follow me on Linkedin My Profile Follow DevopsJunction onFacebook orTwitter For more practical videos and tutorials. Subscribe to our channel
Signup for Exclusive "Subscriber-only" Content