Kubernetes is a Container Orchestration tool given to the world by Google.
It changed the way applications are deployed managed and scaled.
In our blog, we have written various introductory articles on how to get started with Containers and Kubernetes
If you are new to Containers. read this article before moving on
You might have heard this phrase, With Great power comes great responsibility.
In K8s case, the great power it brings, it adds great responsibility to Engineers/Developers in designing/managing/administrating areas.
But it's worth it.!
So it's not really easy to have a Self Managed Kubernetes cluster due to the underlying complexity.
Most industry experts and organizations choose Managed Kubernetes for their Production and NonProd workloads like
- AKS - Azure Kubernetes Service
- EKS - Elastic Kubernetes Service
- GKE - Google Kubernetes Engine
We have written various articles on GKE and EKS. read them to get more understanding.
Objective
In this article, we are going to talk about AKS. - Azure Kubernetes Service. How to set up/get started with a new Azure Kubernetes Service cluster.
Azure Kubernetes Service (AKS) is an Azure-managed Kubernetes service that provides additional features like improved security and fast delivery.
However, creating AKS manually would involve some additional complexities of its own.
Let us learn how to create an AKS cluster using Terraform and then deploy a sample application into the cluster.
Now back to the objective.
Let us start with the necessary tools and access needed to get this going.
Configure the environment
Let's first set up the environment by installing Azure CLI and Terraform into our local machine. You can skip ahead to the next section if you already have it set up.
1. Install the Azure CLI using the documentation here.
2. Connect the Azure CLI to your Azure account by running the following code and then filling in the required details:
az login
3. Set up Terraform in your local machine using the documentation here.
4. Download kubectl on your local machine using the documentation here.
Granting permissions
Set up the privileges for accessing the Azure resources required for using Terraform by creating a service principal in your Azure account. The service principal in Azure helps to give required permissions to the users.
To set up a service principal, run the following code in your terminal after you have set up Azure CLI :
az ad sp create-for-rbac – name <service_principal_name> – role Contributor – scopes /subscriptions/<subscription_id>
Replace <service_principal_name> and <subscription_id> with appropriate values.
Note down the output of the above command as these details will come in handy later when we start making the Terraform script. I would recommend copying these values into your notepad.
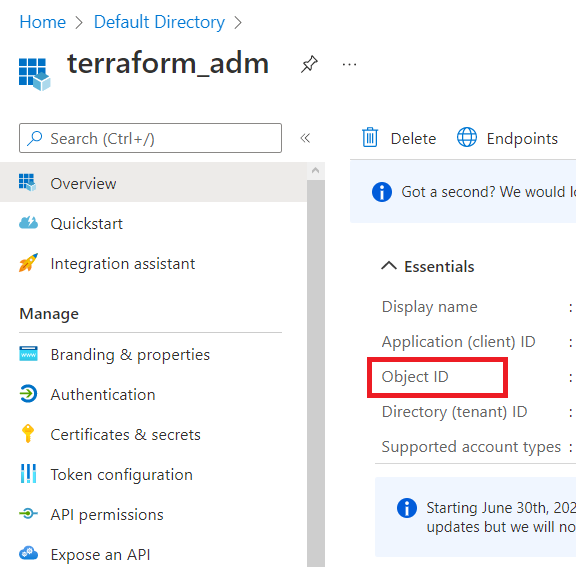
1. Once you have set up the service principal, go to Azure Active Directory and click on App registrations.
2. You will be able to see the service principal you just created. Click on it and note the Object ID as well from the service principal page for later use.
Create Azure resource group
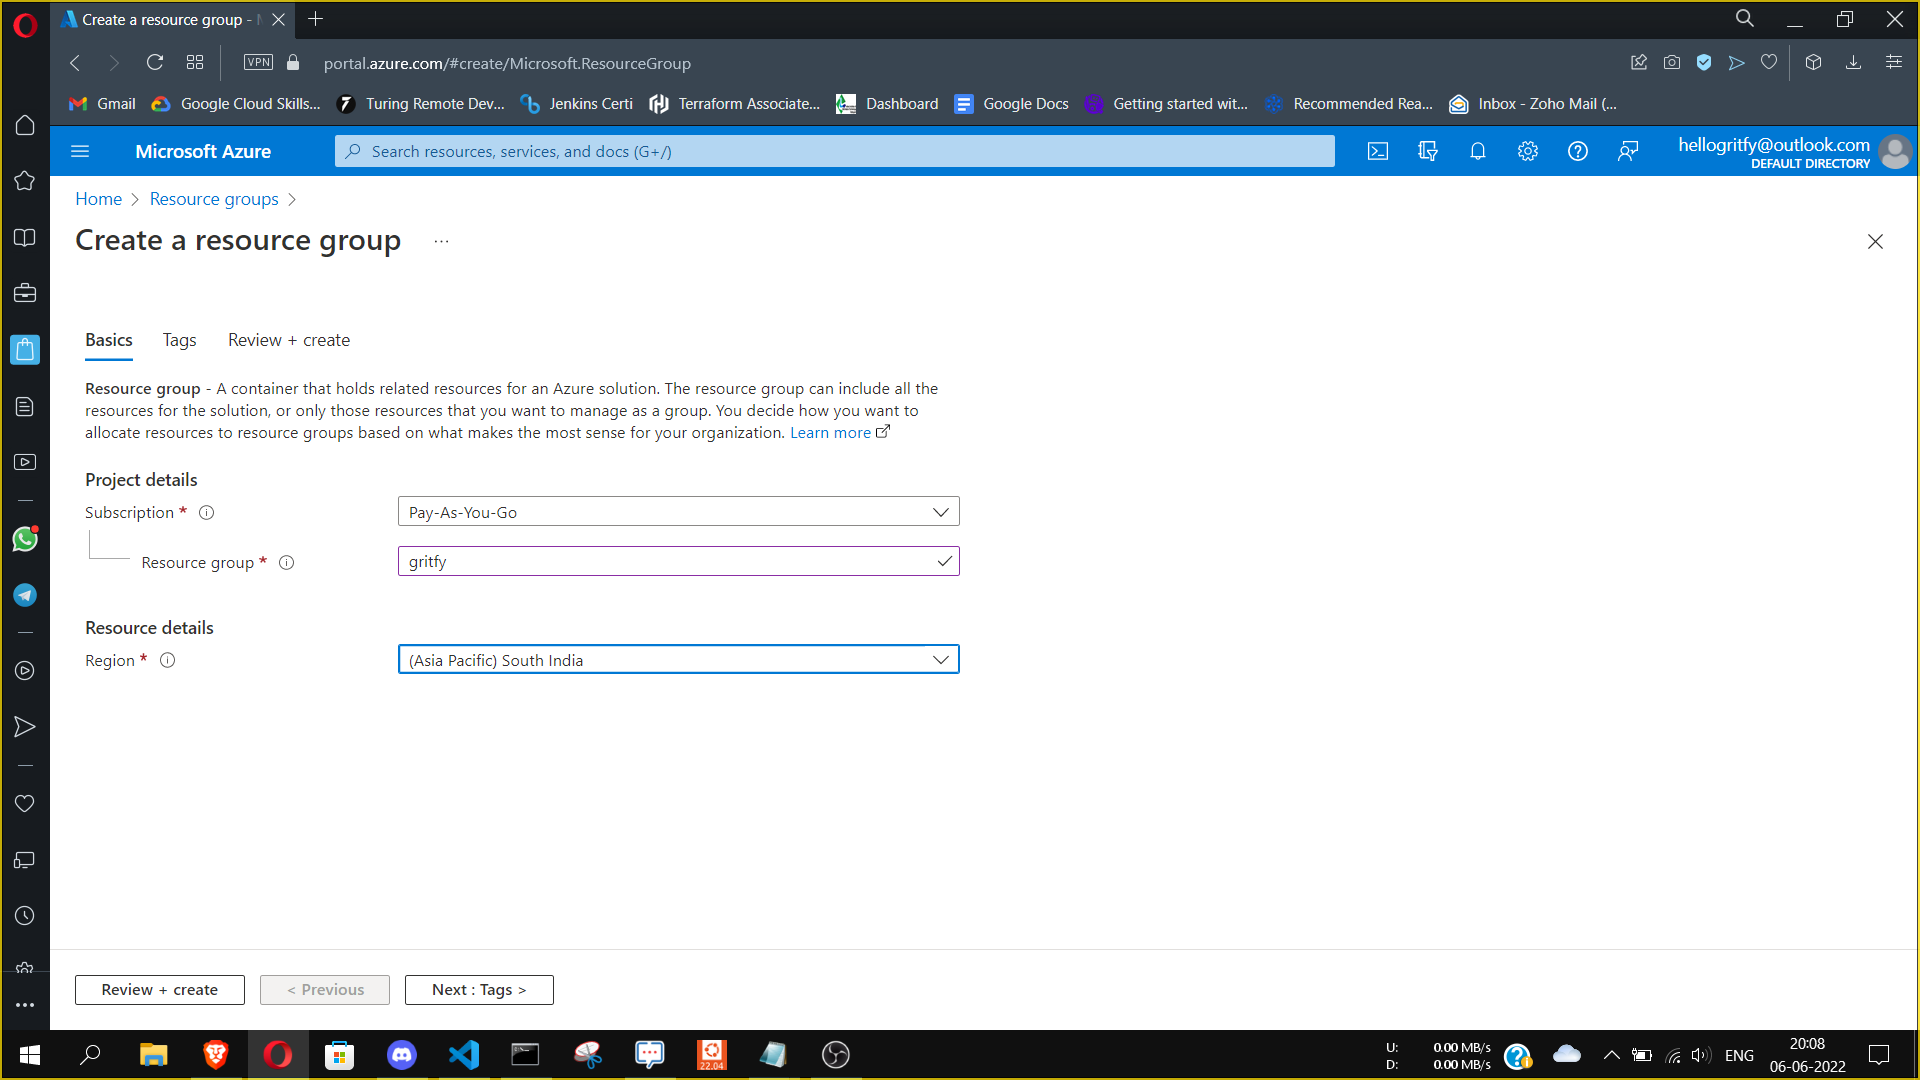
For creating an AKS cluster, we need to have a resource group in Azure into which we will provide our cluster.
Simply search resource group in the Azure portal and fill in the required details as given below and click Review+ create to create a resource group :
Create an Azure storage account (Optional)
If you are looking to just play around AKS and use it for small scale deployments, you can skip this part.
Terraform tracks the state of your Terraform code locally via the terraform.tfstate the file is usually in a development environment. But for a practical production environment, we have to configure an Azure storage account so that azure can store the Terraform state file.
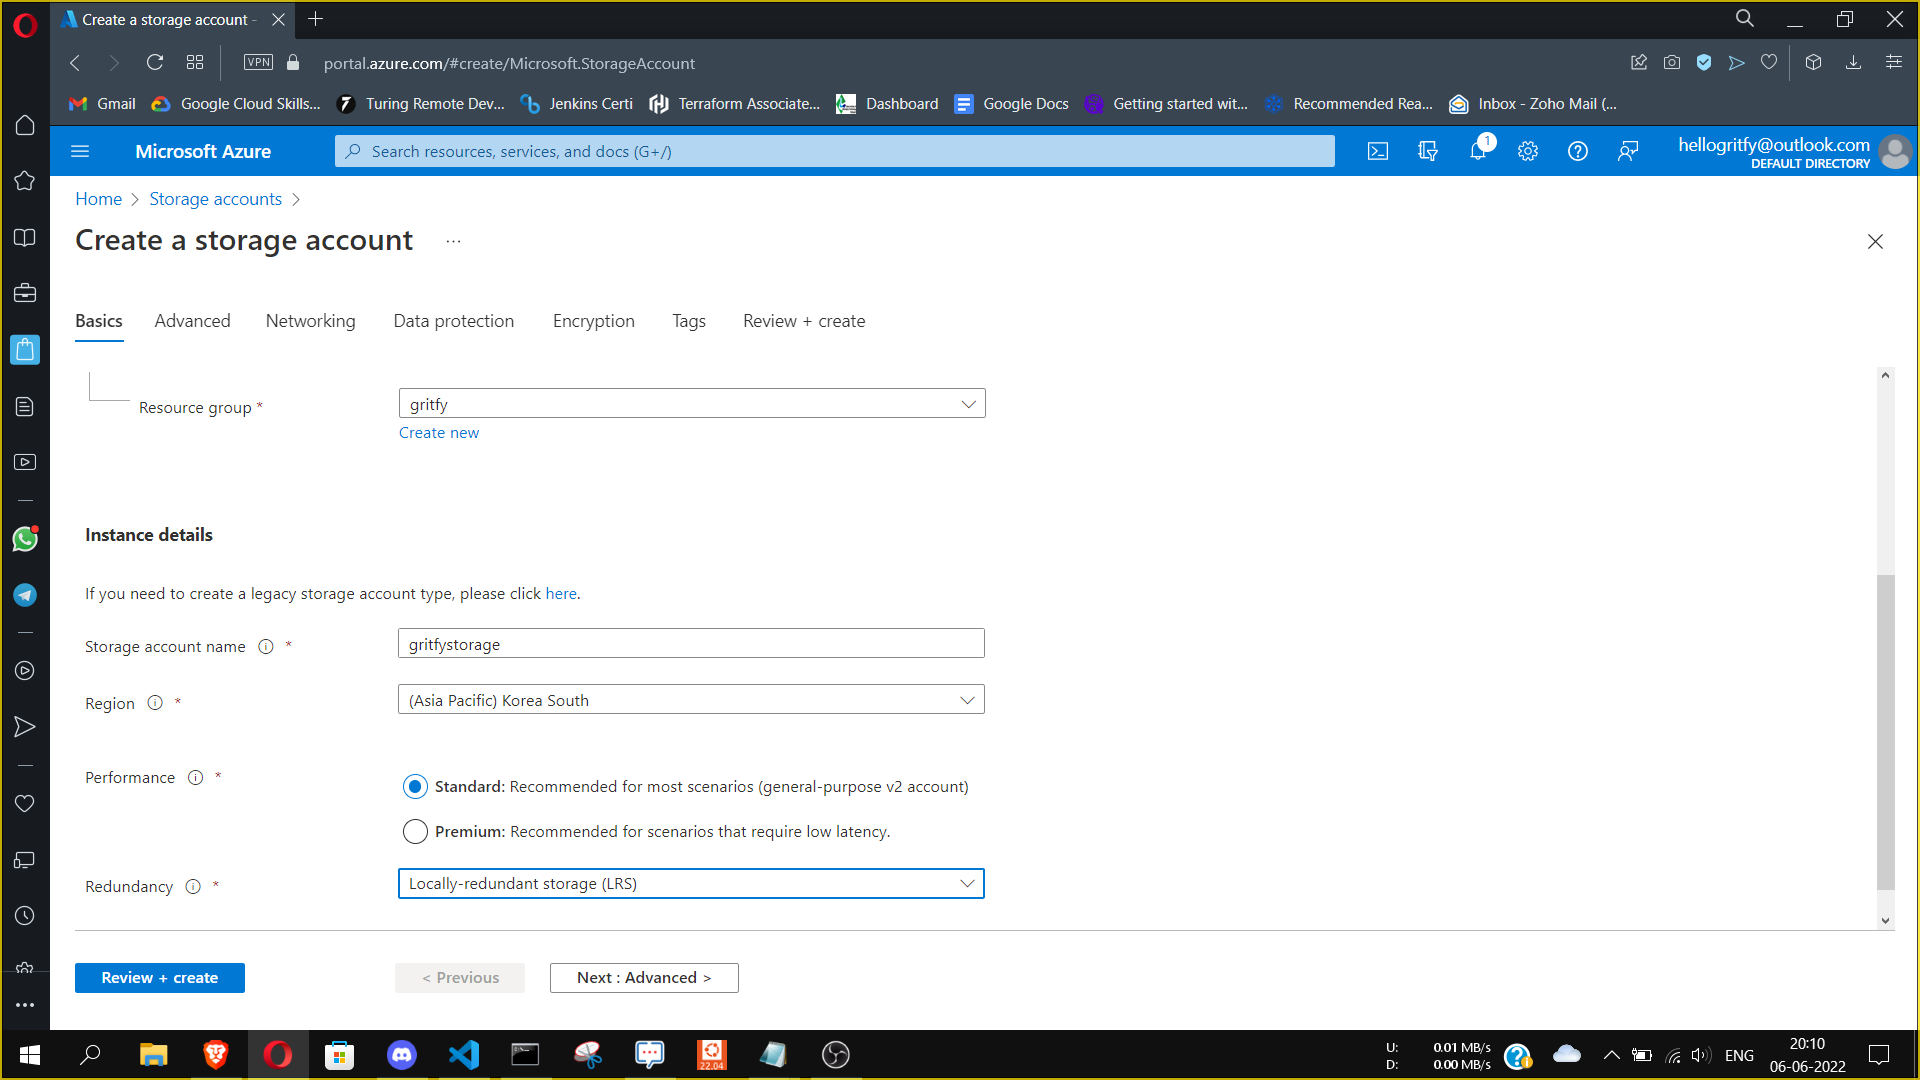
To create an Azure storage account, search for Storage account in the Azure portal.
1. Select the Resource group as the one you just created in the preceding part.
2. Enter the Storage account name and choose the region.
3. Select the Performance and Redundancy as per your requirement.
4. Click Review + create.
Configure Azure storage account
1. From the storage accounts, click on the storage account you just created.
2. In the left menu, go to the Security + networking section and select Access keys.
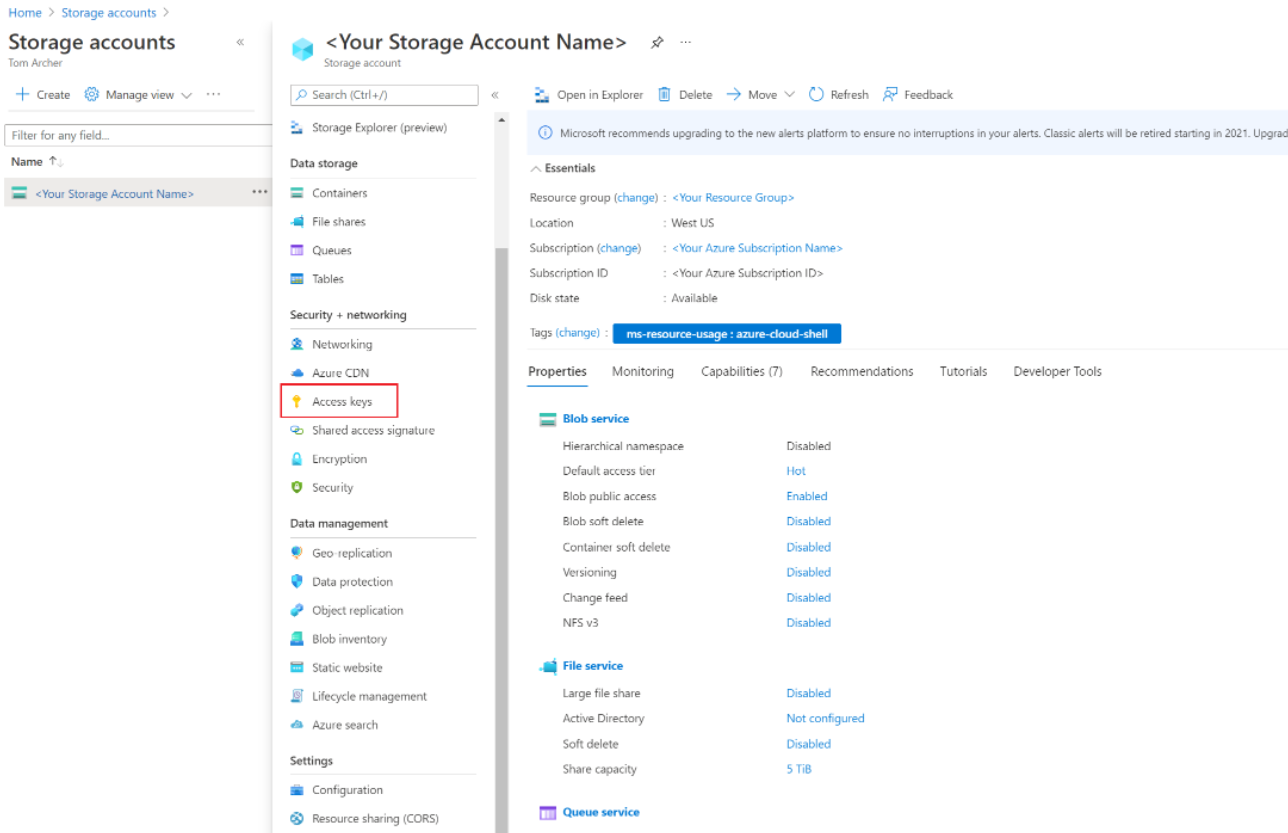
3. On the Access keys page, click Show keys to display the key values.
4. Copy the Key value of key1 from there. We will use this value in the next step.
Now we can authenticate the storage account to store the Terraform state file in a storage container using the following command:
az storage container create -n tfstate – account-name <storage_account_name> – account-key <storage_account_key>
Replace <storage_account_name> with the Azure storage account name and<storage_account_key> with the Key value you copied from Access keys page
Create SSH Keys
Create and store SSH keys in your Azure portal using the documentation given here. This is a public key that we will be using while creating the Terraform script so that we can have SSH access to the node machines. Save this SSH public key as well for later use.
Terraform Script
Great! Now you have met the requisites for setting up AKS with Terraform. It's time to get started with the Terraform script.
Terraform scripts are written in configuration blocks with an extension of *.tf. We will create a few .tf files in our workspace, each of which will serve a specific purpose. We will go into each of them one by one.
Link to GitHub
Get the full Terraform code from my GitHub repository here.
providers. tf
The provider block helps Terraform identify Azure as the provider.
We specify the backend "azurerm" so that azure can save our Terraform state file into the azure storage account.
You don't need to write the backend "azurerm" part if you are trying to set up a small-scale deployment ( nonproduction / development )
Create a file named providers.tf and add the following code :
terraform {
  required_version = ">=0.12"
  required_providers {
    azurerm = {
      source  = "hashicorp/azurerm"
      version = "~>2.0"
    }
  }
  backend "azurerm" {
    resource_group_name  = "gritfy"
    storage_account_name = "gritfystorage"
    container_name       = "tfstate"
    key                  = "codelab.microsoft.tfstate"
  }
}

provider "azurerm" {
  features {}
}
variables.tf
Now, we make variables.tf file to pass the required variables to Terraform.
variable "resource_group_location" {
  default       = "South India"
  description   = "Location of the resource group."
}

variable "agent_count" {
    default = 3
}

variable "ssh_public_key" {
    default = "Enter_ssh_public_key"
}

variable "dns_prefix" {
    default = "gritfyk8s"
}

variable cluster_name {
    default = "gritfyk8s"
}

variable resource_group_name {
    default = "gritfy"
}

variable locationk8s {
    default = "East Asia"
}

variable aks_service_principal_app_id {
    default= "Enter_aks_service_principal_app_id"
}

variable aks_service_principal_client_secret{
    default = "Enter_aks_service_principal_client_secret"
}

variable aks_service_principal_object_id {
    default= "Enter_aks_service_principal_object_id"
}
Replace the values Enter_ssh_public_key , Enter_aks_service_principal_app_id , Enter_aks_service_principal_client_secret and Enter_aks_service_principal_object_id with the appropriate values which you copied during the configuration section.
output.tf
Next, we create a file named output.tf which helps store the Terraform execution's output.
output "client_key" {
    value = azurerm_kubernetes_cluster.k8s.kube_config.0.client_key
}

output "client_certificate" {
    value = azurerm_kubernetes_cluster.k8s.kube_config.0.client_certificate
}

output "cluster_ca_certificate" {
    value = azurerm_kubernetes_cluster.k8s.kube_config.0.cluster_ca_certificate
}

output "cluster_username" {
    value = azurerm_kubernetes_cluster.k8s.kube_config.0.username
}

output "cluster_password" {
    value = azurerm_kubernetes_cluster.k8s.kube_config.0.password
}

output "kube_config" {
    value = azurerm_kubernetes_cluster.k8s.kube_config_raw
    sensitive = true
}

output "host" {
    value = azurerm_kubernetes_cluster.k8s.kube_config.0.host
}
main.tf
Finally, we create the main.tf file.
This is our primary file where we define our requirements and what we are going to do with Terraform.
Here, we are using the resource azurerm_kubernetes_cluster which is an azure managed Kubernetes service to create our cluster.
resource "azurerm_kubernetes_cluster" "k8s" {
    name                = var.cluster_name
    location            = var.locationk8s
    resource_group_name = var.resource_group_name
    dns_prefix          = var.dns_prefix

    linux_profile {
        admin_username = "ubuntu"

        ssh_key {
            key_data = var.ssh_public_key
        }
    }

    default_node_pool {
        name            = "default"
        node_count      = var.agent_count
        vm_size         = "Standard_B2s"
        os_disk_size_gb = 30
    }

    service_principal {
        client_id     = var.aks_service_principal_app_id
        client_secret = var.aks_service_principal_client_secret
    }

    tags = {
        Environment = "Development"
    }
}
Choose the vm_size according to the availability of the VMs using Quotas from Azure portal. You can use this link to check the Quotas. Sometimes the quota could be exhausted depending on the availability in the region.
Running the Terraform script
Good job! We have made the script ready. Let's initialize the terraform script by running the following command :
terraform init
Your Terraform would be successfully initiated now. Now, we run the following terraform command to plan it. Terraform plan is like a dry run and it shows the changes that would be made upon running the terraform script.
terraform plan -out tfplan.out
Here, we are saving the plan as an output file tfplan.out. This is recommended to make sure that no unintended changes are being made to the infrastructure.
Next, we will use the tfplan.out file to confirm and apply the changes in the plan. We can do this by running the following command :
terraform apply tfplan.out
Terraform will now start creating the resources. It will be completed after a few minutes and you will be able to see the AKS cluster you created in the Azure portal.
Deploying an application to AKS
Great! Now we have a running AKS cluster. Let's go ahead and deploy an application to our cluster.
I have an existing docker image which I will be using for this purpose. Refer to the article on how to create a docker image here.
We will be using this docker image to create a deployment to AKS.
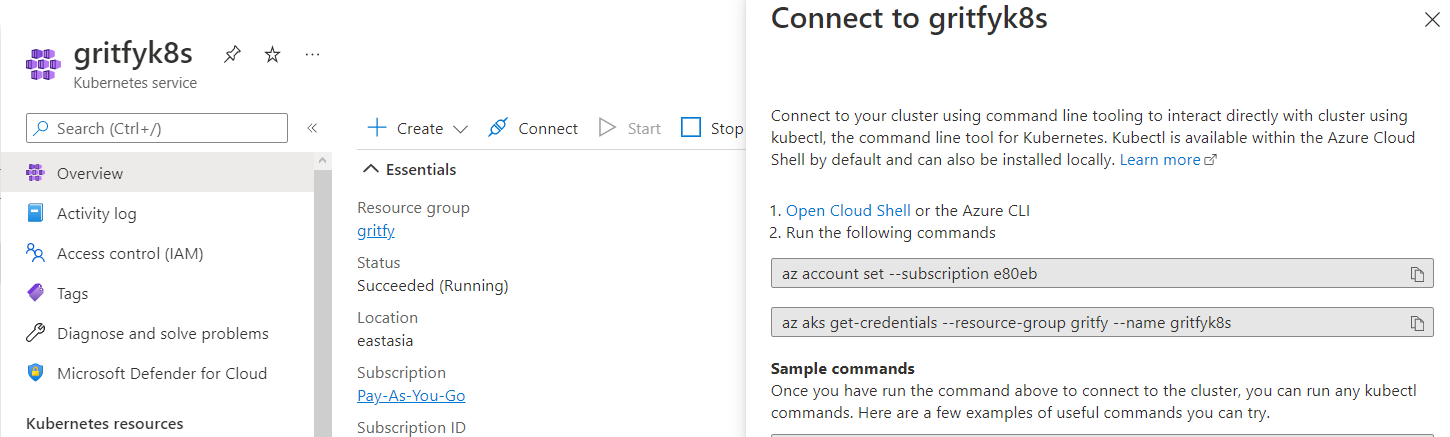
To start using your Kubernetes service, search for Kubernetes service in the Azure portal and click on the one you just created. Then, click on Connect.
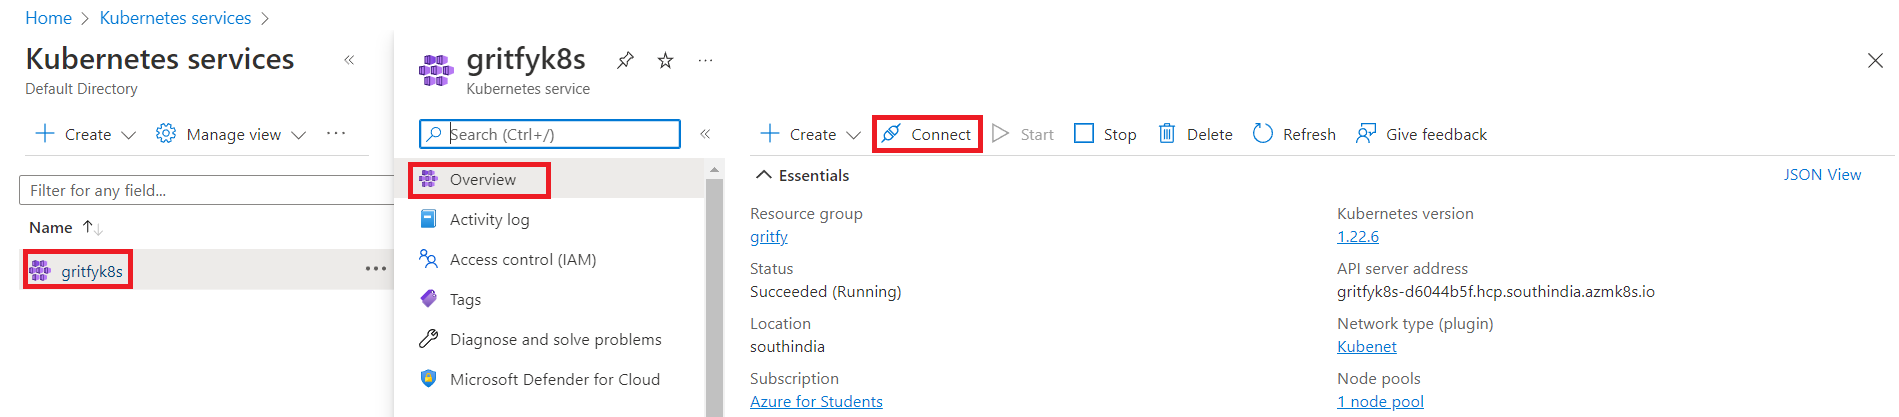
Now, run the two commands you see under Connect to gritfyk8s in your terminal. This allows kubectl to connect to AKS so that we can access the cluster.
Great! Now you have established a connection from kubectl on your local machine to AKS.
Refer to the article below on how to deploy an application to Kubernetes.
Though the article is created for GKE, You can follow the same Kubectl commands to deploy to the AKS cluster as well.
Conclusion
In this article, we configured the environment to make a Terraform AKS cluster, provisioned an AKS cluster using Terraform, and then deployed an application to it.
If you have any product and Cloud / DevOps requirements, Please do contact us for free consulting at [email protected]
Co Authored by
Vishnu & Sarav

Follow me on Linkedin My Profile Follow DevopsJunction onFacebook orTwitter For more practical videos and tutorials. Subscribe to our channel
Signup for Exclusive "Subscriber-only" Content